# Deploy an Aurora Global Database
!!! error "Backtrack is not compatible with Global Database"
Please note that backtrack feature is not compatible with Aurora Global Database. If you run through these labs, you will not be able to use this cluster for backtrack lab. You will have to either create a new cluster for the backtrack labs, or create a new stack using the instruction listed in the [Create a New DB Cluster](/provisioned/create/) section.
Amazon Aurora Global Database is designed for globally distributed applications, allowing a single Amazon Aurora database to span multiple AWS regions. It replicates your data with no impact on database performance, enables fast local reads with low latency in each region, and provides disaster recovery from region-wide outages.
This lab contains the following tasks:
1. Create an Aurora global cluster
This lab requires the following prerequisites:
* [Get Started](/prereqs/environment/) (choose the **Deploy Global DB** option)
* [Create a New DB Cluster](/provisioned/create/) (conditional, only if you plan to create a cluster manually)
!!! warning "Using Multiple Regions"
Due to the **multi-region** nature of a Global Database, you will often be switching between two regions to accomplish the tasks in this lab. **Please be mindful** that you are performing the actions in the proper region, as some of the resources created are very similar between the two regions.
We will refer to the region where your current DB cluster is deployed, and you have been working in so far, as your **primary region**.
We will refer to the region where you will deploy the secondary, read-only DB cluster as the **secondary region**.
To simplify the getting started experience with the labs, we have created the pre-requisite resources, like VPC, security groups, etc. in the secondary region. If you are running a facilitator led lab, then the secondary region is chosen for you as **N. Virginia** or **US-EAST-1**. If you are running these labs in your account by deploying the stack yourself, then you would have chose an secondary region during the initial launch.
Navigate to [Cloudformation console](https://console.aws.amazon.com/cloudformation/home?region=us-east-1). Make sure you have chosen the correct **secondary region**.
Click **Stacks** on the left navigation panel. Under the **Stacks** column, select the stack that starts with the name **stackset-auroralab**.
Once the status of the stack is `CREATE_COMPLETE`, click on the **Outputs** tab. The values here will be critical to the completion of the remainder of the lab. Please take a moment to save these values somewhere that you will have easy access to them during the remainder of the lab. The names that appear in the **Key** column are referenced directly in the instructions in subsequent steps, using the parameter format: ==[outputKey]==.

## 1. Create an Aurora global cluster
The lab environment that was provisioned automatically for you, already has an Aurora MySQL DB cluster. You will create a Global Database cluster using this existing DB cluster, as the **primary**.
???+ info "'Global cluster' vs. 'DB cluster': What is the difference?"
A **DB cluster** exists in one region only. It is a container for up to 16 **DB instances** that share the same storage volume. This is the traditional configuration of an Aurora cluster. Whether you are deploying a provisioned, Serverless or Multi-Master cluster, you are deploying a **DB cluster**, within a single region.
A **Global [database] cluster** is a container for several **DB clusters** each located in a different region, that act as a cohesive database. A **global cluster** is comprised of a **primary [DB] cluster** in one given region that is able to accept writes, and up to 5 **secondary [DB] clusters** that are read-only each in a different region. Each one of the **DB clusters** in a given **global cluster** have their own storage volume, however data is replicated from the **primary cluster** to each of the **secondary clusters** asynchronously, using a purpose-built low latency and high throughput replication system.
!!! warning "Region Check"
Ensure you are still working in the **primary region**, especially if you are following the links above to open the service console at the right screen.
First, you need to **disable** the **Backtrack** feature. At present database backtrack is not compatible with Aurora Global Databases, and a cluster with that feature active cannot be converted into a global database. Select the `auroralab-mysql-cluster` and click the **Modify** button.
!!! note
If you have not completed the [Backtrack a DB Cluster](/provisioned/backtrack/) lab already, and wish to do so, or have been instructed to do so part of the event, please complete that lab now before moving forward. Once disabled, you will not be able to re-enable the backtrack feature on an existing DB cluster.

Scroll down to the **Additional Configuration** section (expand it if needed) and uncheck the **Enable Backtrack** option, then click **Continue** at the bottom of the page.
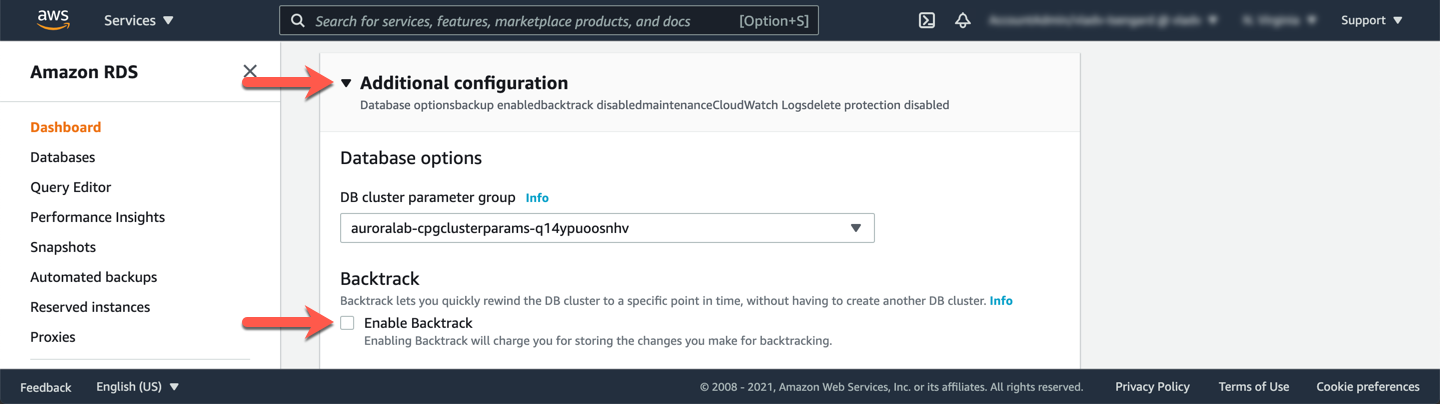
!!! note
If you don't see the Backtrack section as shown in the section above, your cluster did not have backtrack feature enabled, and you can safely skip this step without affecting rest of the lab.
In the **Scheduling of modifications** section, choose the **Apply immediately** option, then click **Modify cluster** to confirm the changes.

Once the modification is complete, and the DB cluster is in an `available` state again, from the **Actions** dropdown button, choose **Add AWS Region**.
!!! warning "Backtrack Error"
You may need to refresh the web browser page after disabling Backtrack, before you can add a region. If **Add AWS Region** appears greyed out, our you get an error message when choosing that option, please refresh the web browser page, or verify Backtrack was disabled correctly.

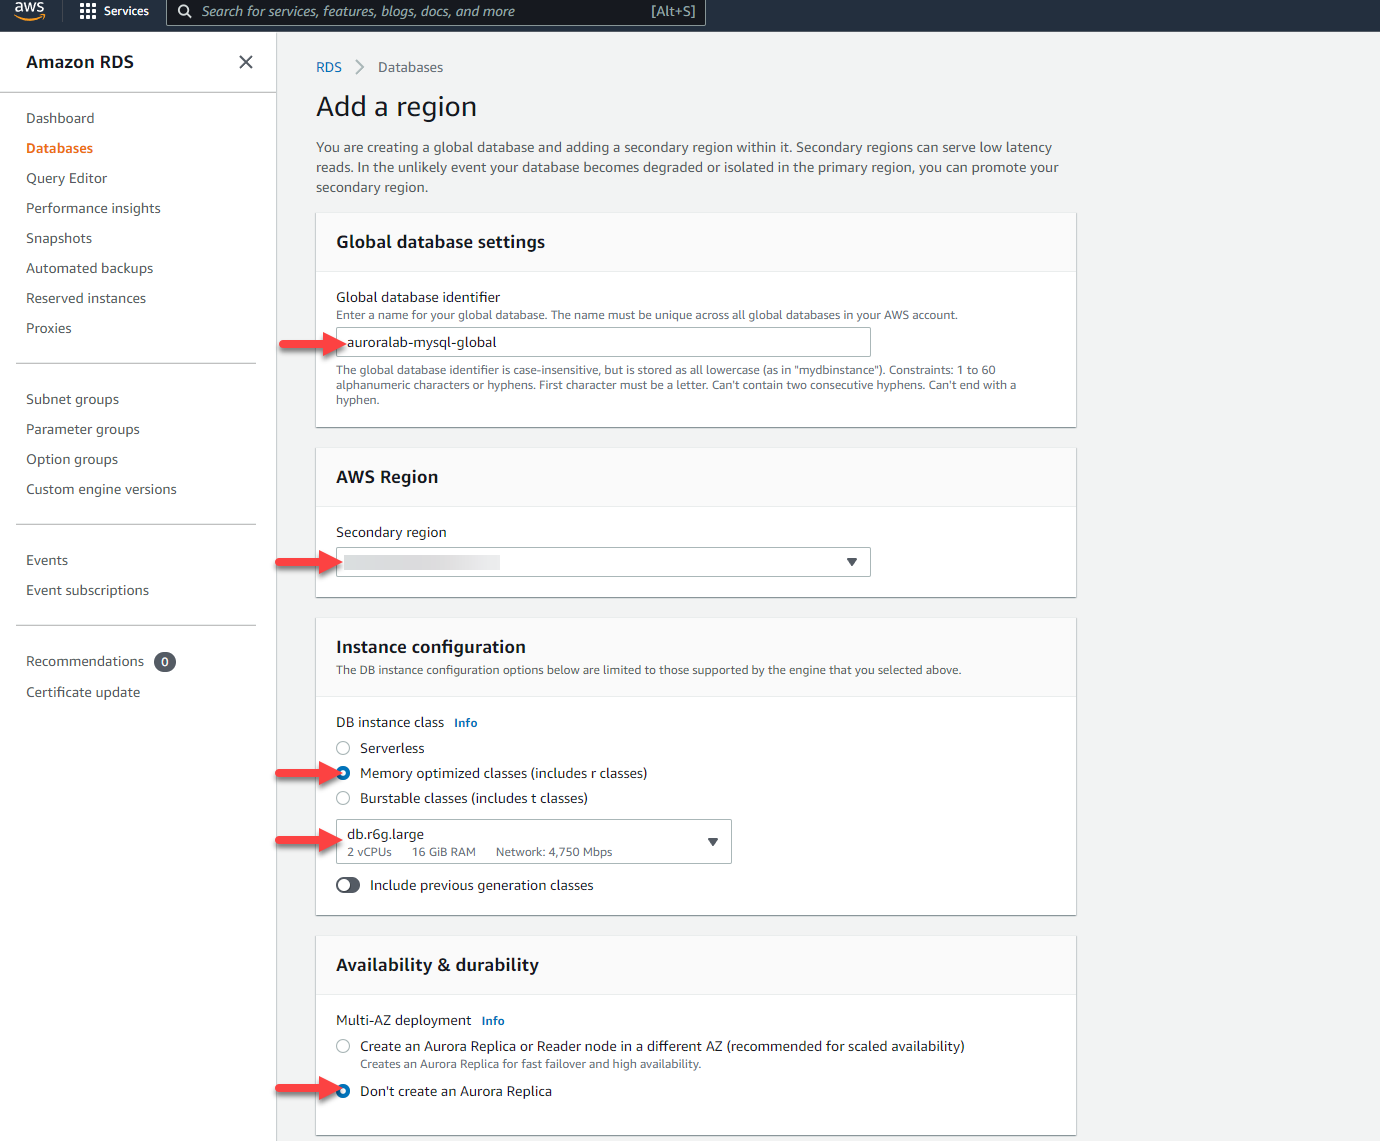
Set the following options on the configuration screen for the secondary DB cluster:
1. In the **Global database settings** section:
* [ ] Set **Global database identifier** to `auroralab-mysql-global`
2. In the **AWS Region** section:
* [ ] Choose the **Secondary region** of `US East (N. Virginia)`
3. In the **Instance configuration** section:
* [ ] Choose **Memory optimized classes** as `db.r6.large`
4. In the **Availability and durability** section:
* [ ] Choose `Don't create an Aurora Replica`
Scroll down and set the following parameters:
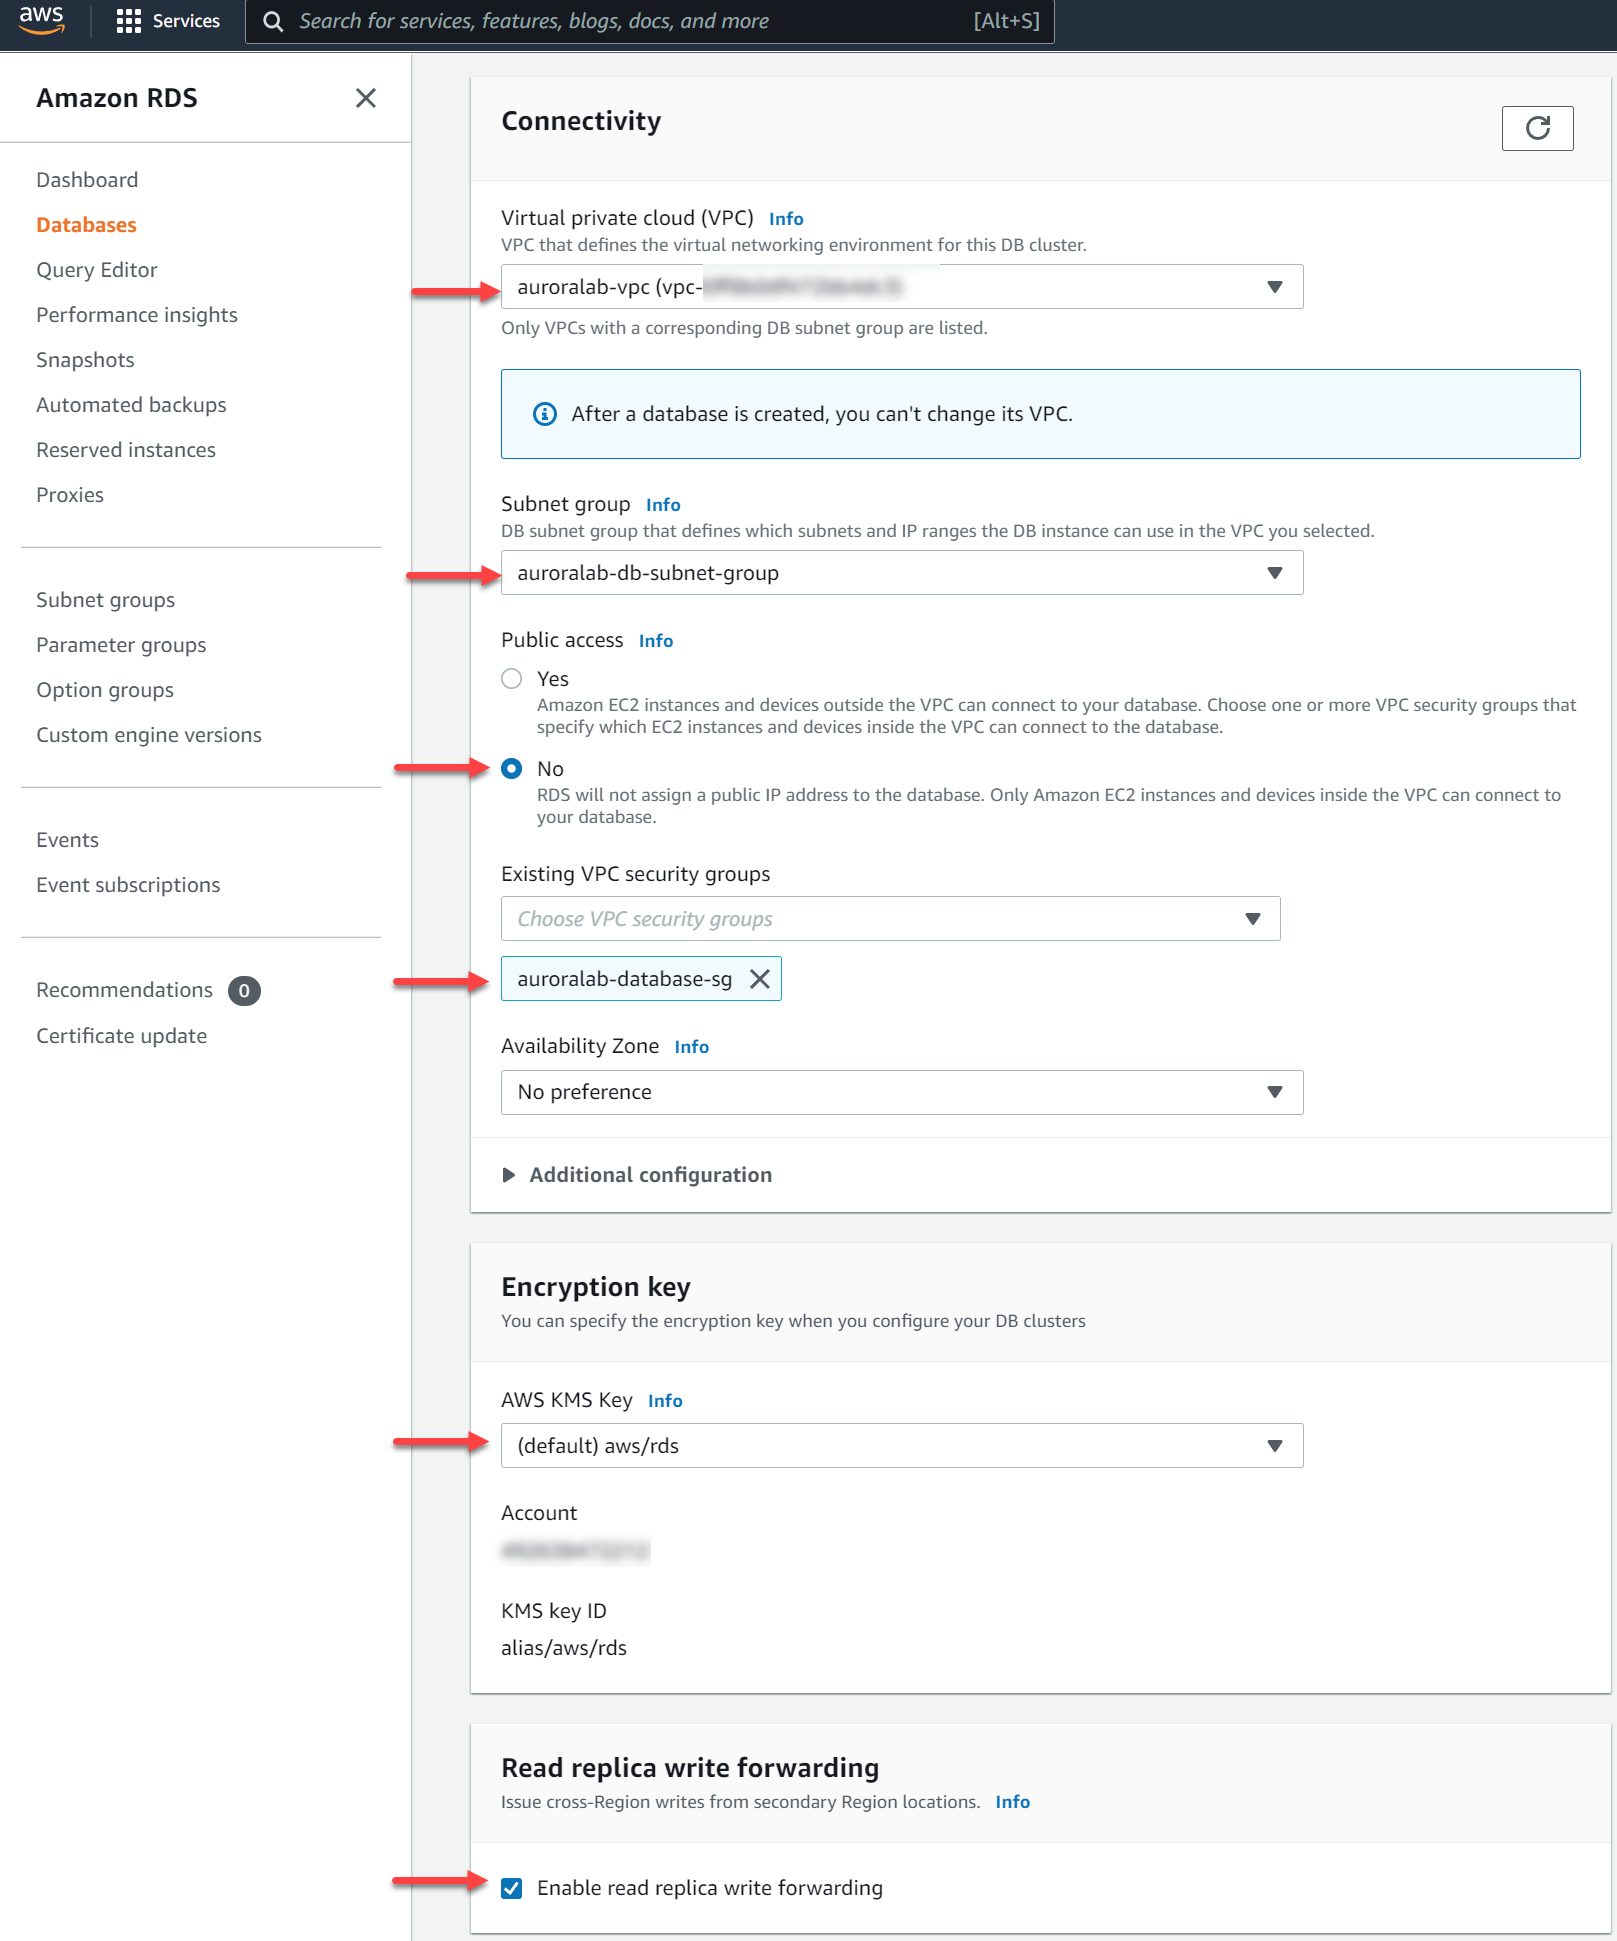
1. In the **Connectivity** section, specify where the database cluster will be deployed within your defined network configuration created above:
* [ ] Set **Virtual Private Cloud (VPC)** to `auroralab-vpc`.
* [ ] Ensure the correct **Subnet Group** was selected automatically, it should be named `auroralab-db-subnet-group`.
* [ ] Make sure the **Publicly accessible** option is set to `No`.
* [ ] For **VPC security group** select **Choose existing** and pick the security group named `auroralab-database-sg`, remove any other security groups, such as `default` from the selection.
* [ ] For **Encryption Key** use **AWS KMS Key** dropdown and select `(default) aws/rds` from the selection.
2. In the **Read replica write forwarding** section:
* [ ] **Check** the box for **Enable read replica write forwarding**
Scroll down and set the following parameters:
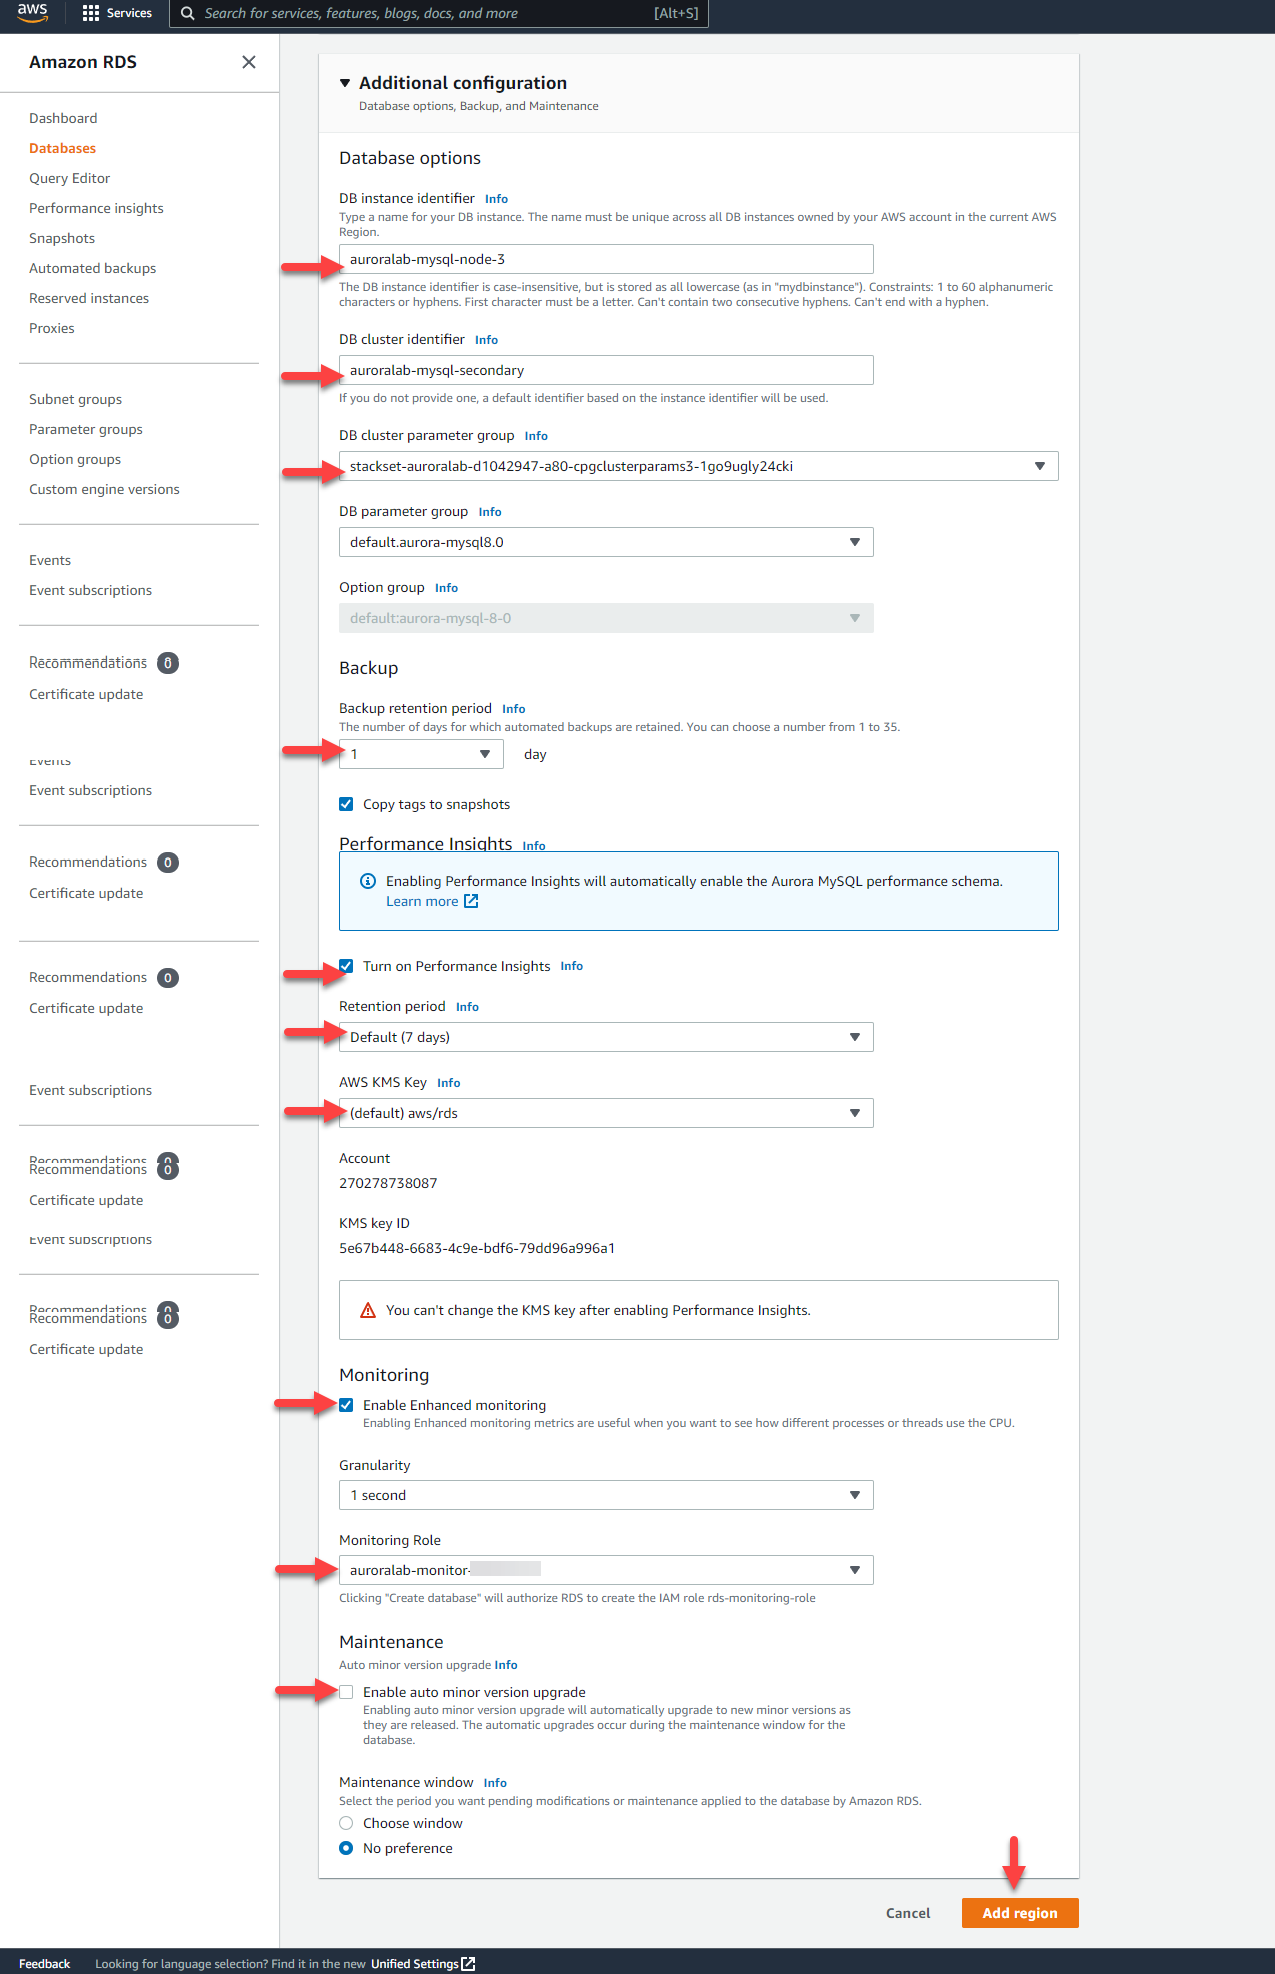
3. Expand the **Additional configuration** section, and configure the following options:
* [ ] Set **DB instance identifier** to `auroralab-mysql-node-3`
* [ ] Set **DB cluster identifier** to `auroralab-mysql-secondary`
* [ ] For **DB cluster parameter group** select the group with the stack name in the name (e.g. `stackset-auroralab-[...]`)
* [ ] Set **Backup retention period** to `1 day`
* [ ] **Check** the box for **Turn on Performance Insights**
* [ ] Set **Retention period** to `Default (7 days)`
* [ ] Set **Master key** to `(default) aws/rds`
* [ ] **Check** the box for **Enable Enhanced Monitoring**
* [ ] Set **Granularity** to `1 second`
* [ ] Set **Monitoring Role** to `auroralab-monitor-[secondary-region]`
!!! note
Please note there are **two** monitoring roles in the list, one for the primary region (the one in the top right corner of your web page), the other for the secondary region (typically `us-east-1`). At this step, you need the **secondary** region one.
??? tip "What do these selections mean?"
You will create a global cluster, a secondary DB cluster, and DB instance in that secondary cluster, with associated configurations in one step. Your existing DB cluster will become the primary DB cluster in the new global cluster. These are distinct API calls to the RDS service should you create a global cluster using the AWS CLI, SDKs or other tools. The RDS service console, simply combines these distinct steps into a single operation.
Click **Add region** to provision the global cluster.
!!! note
Creating a global cluster based on the existing DB cluster is a seamless operation, your workload will not experience any disruption. You can monitor the performance metrics of the load generator started above, throughout this operation to validate.
The global cluster, including the secondary DB cluster and instance may take up to 30 minutes to provision.
In order to connect to the DB cluster and start using it, you need to retrieve the DB cluster endpoints. Unlike a regular DB cluster, only the **Reader Endpoint** is provisioned. The **Cluster Endpoint** is not being provisioned, as secondary DB clusters only contain readers, and cannot accept writes. The **Reader Endpoint** will always resolve to one of the reader DB instances and should be used for low latency read operations within that region. In the RDS console, go to the DB cluster detail view by clicking on the cluster DB identifier for the secondary DB cluster, named `auroralab-mysql-secondary`.
The **Endpoints** section in the **Connectivity and security** tab of the details page displays the endpoints. Note these values down, as you will use them later.
