# Get Started Using the Lab Environment
Before you can use the resources in the lab environment, you need to complete a few steps.
If you are attending a formal event, such as a workshop or other training, your instructor will provide specific guidance on how to start. Typically you will be provided an AWS account through a platform called **Event Engine**, and the lab environment has already been deployed in that account for you. Choose the **I'm in a workshop using Event Engine** tab below (already preselected).
If you are trying these labs out yourself, in your own account, or you are attending a formal event and your instructor has specifically instructed you to deploy the lab environment manually, choose the **I need to deploy lab environment manually** tab below.
Please select the option that matches your circumstances best:
=== "I'm in a workshop using Event Engine"
Sign into Event Engine
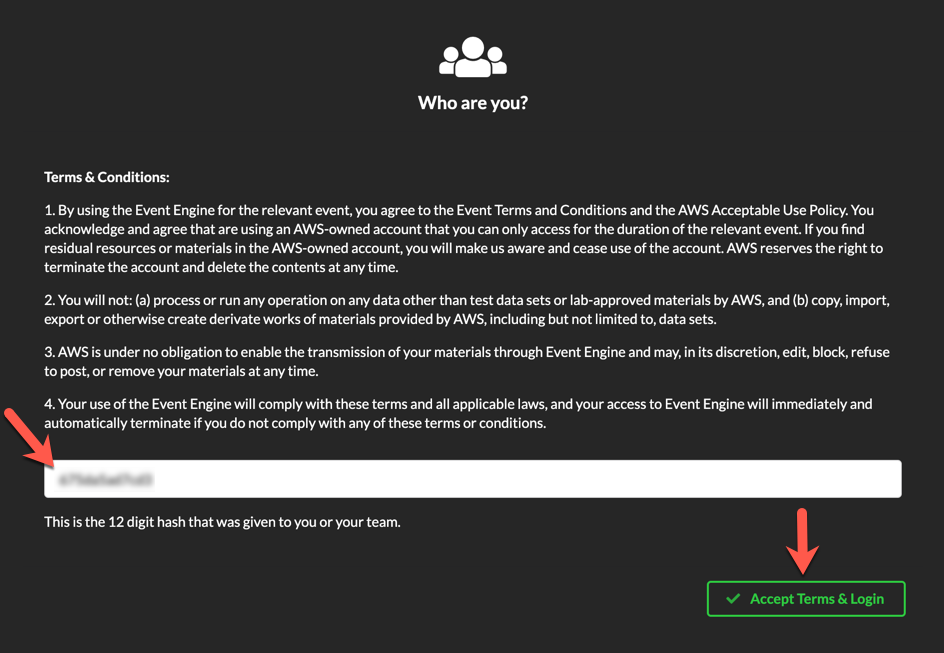
Go to **https://dashboard.eventengine.run/**.
Follow the instructions provided by the workshop organizers. You may be asked to enter a specific code, or perform additional authentication steps. The EventEngine platform supports multiple authentication and access mechanisms. Once authenticated, the EventEngine platform grants you permission to use a dedicated AWS account for the purposes of this workshop.
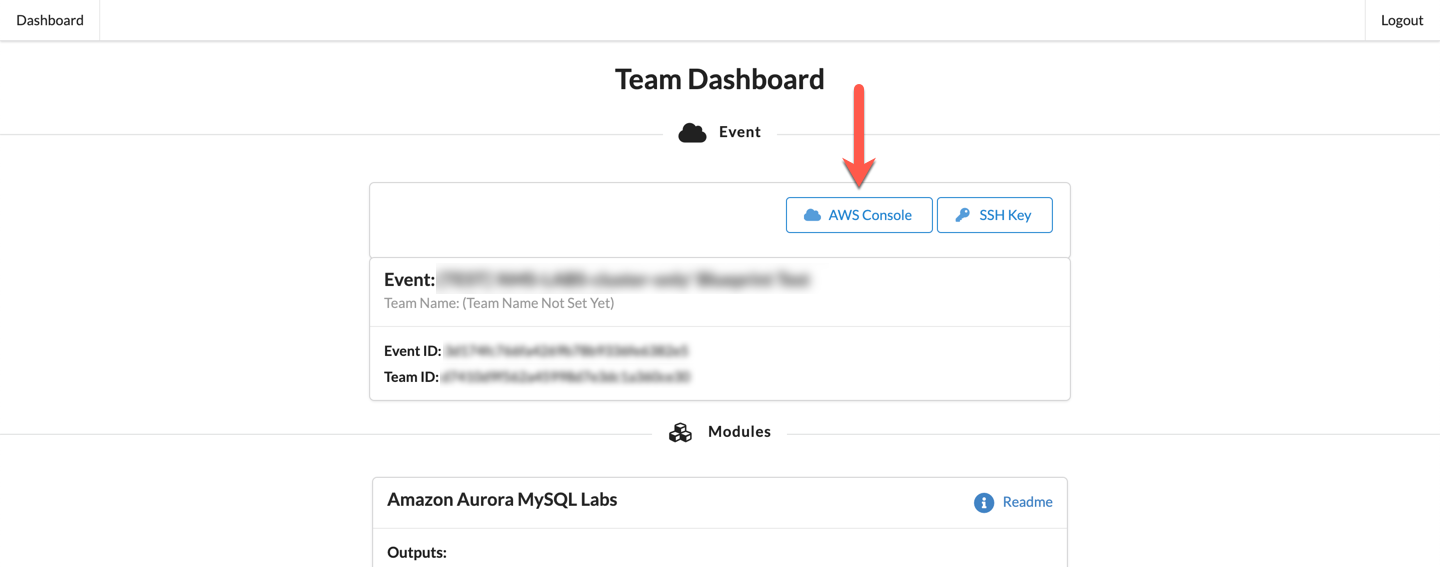
On the **Team Dashboard**, please click **AWS Console** to log into the AWS Management Console.
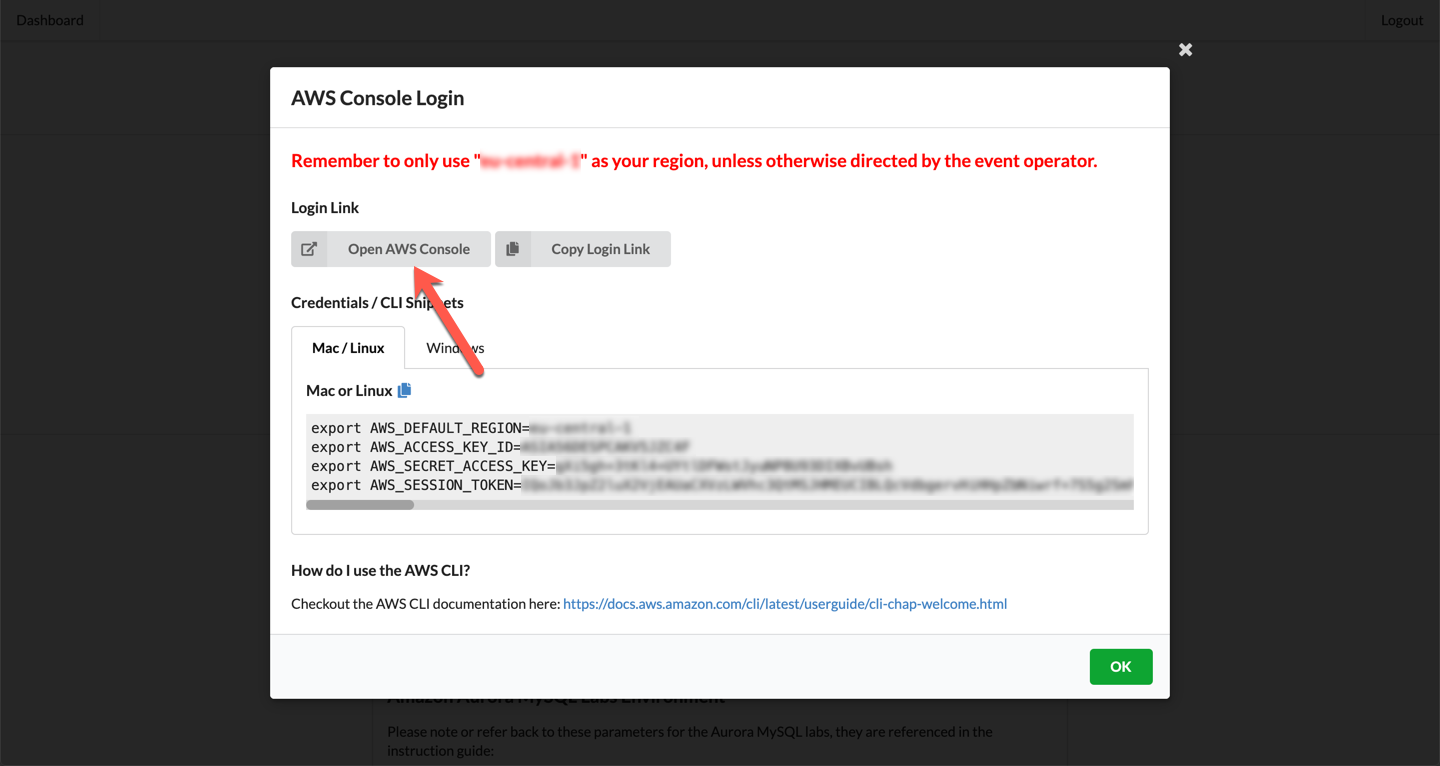
Click **Open Console**. For the purposes of this workshop, you will not need to use command line and API access credentials.
Get the environment parameters
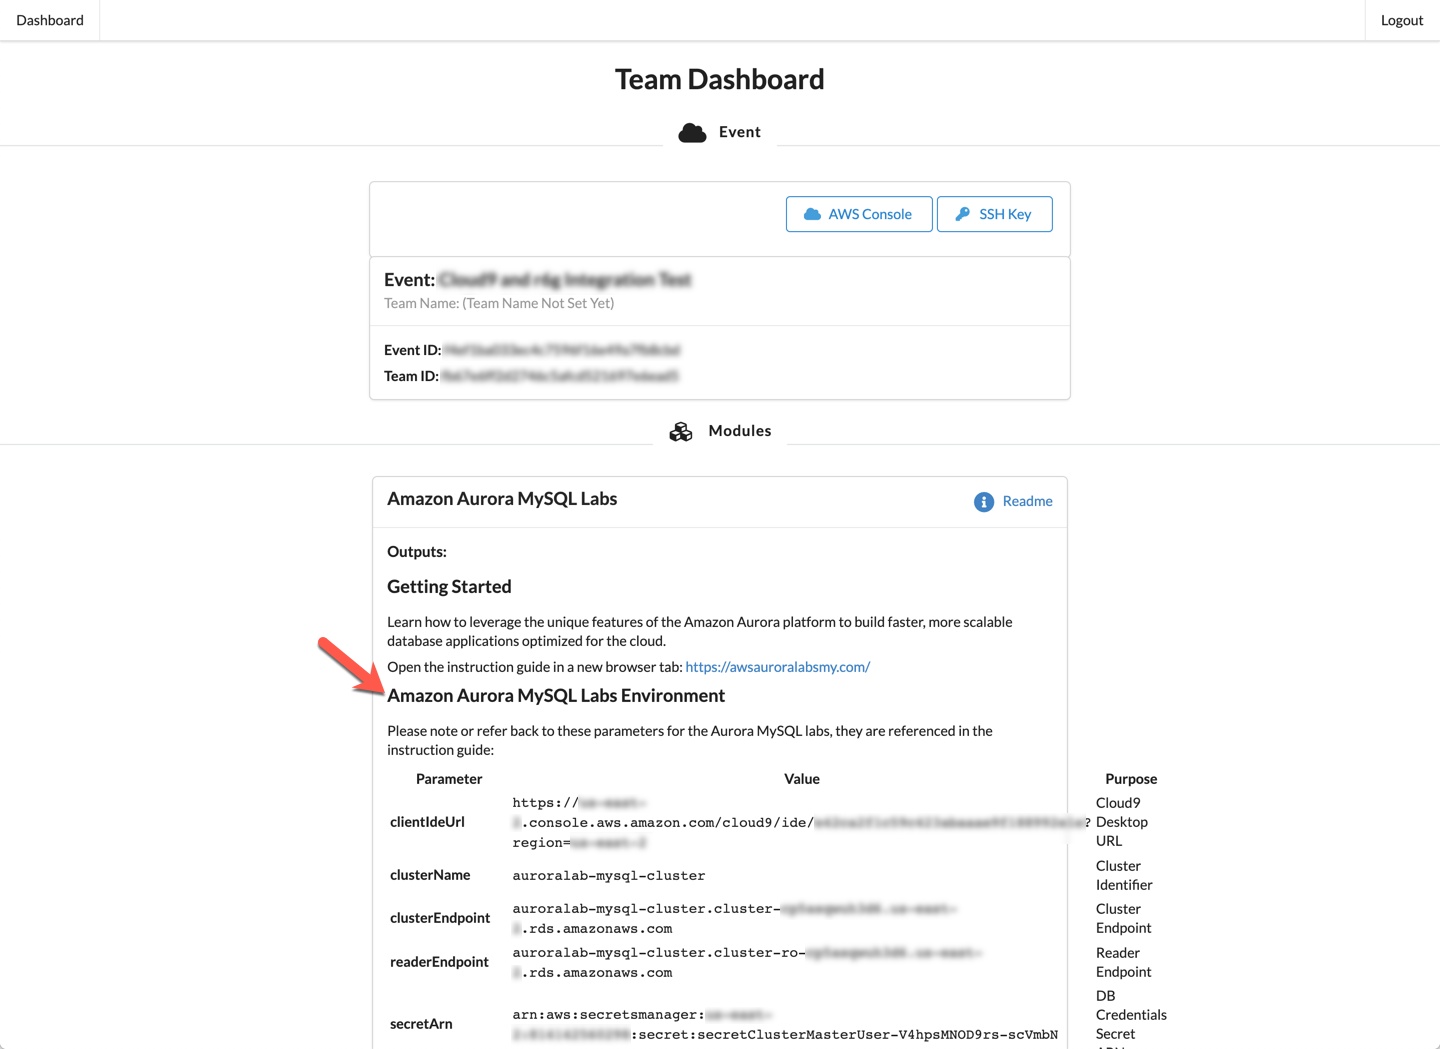
Back on the **Team Dashboard** web page (browser tab), close the **AWS Console Login** modal window (shown above) using the `x` in the top right corner, or the **OK** button, and scroll down.
You will see a set of parameters that you will need during the labs. The names that appear in the **Parameter** column here, are referenced directly in the instructions in subsequent labs, using the parameter format: ==[parameter]==. Replace the parameters with the corresponding values from here where indicated in subsequent labs.
Once you have completed these steps, you can continue with the next lab: [**Connect to the Cloud9 Desktop**](/prereqs/connect/)
=== "I need to deploy lab environment manually"
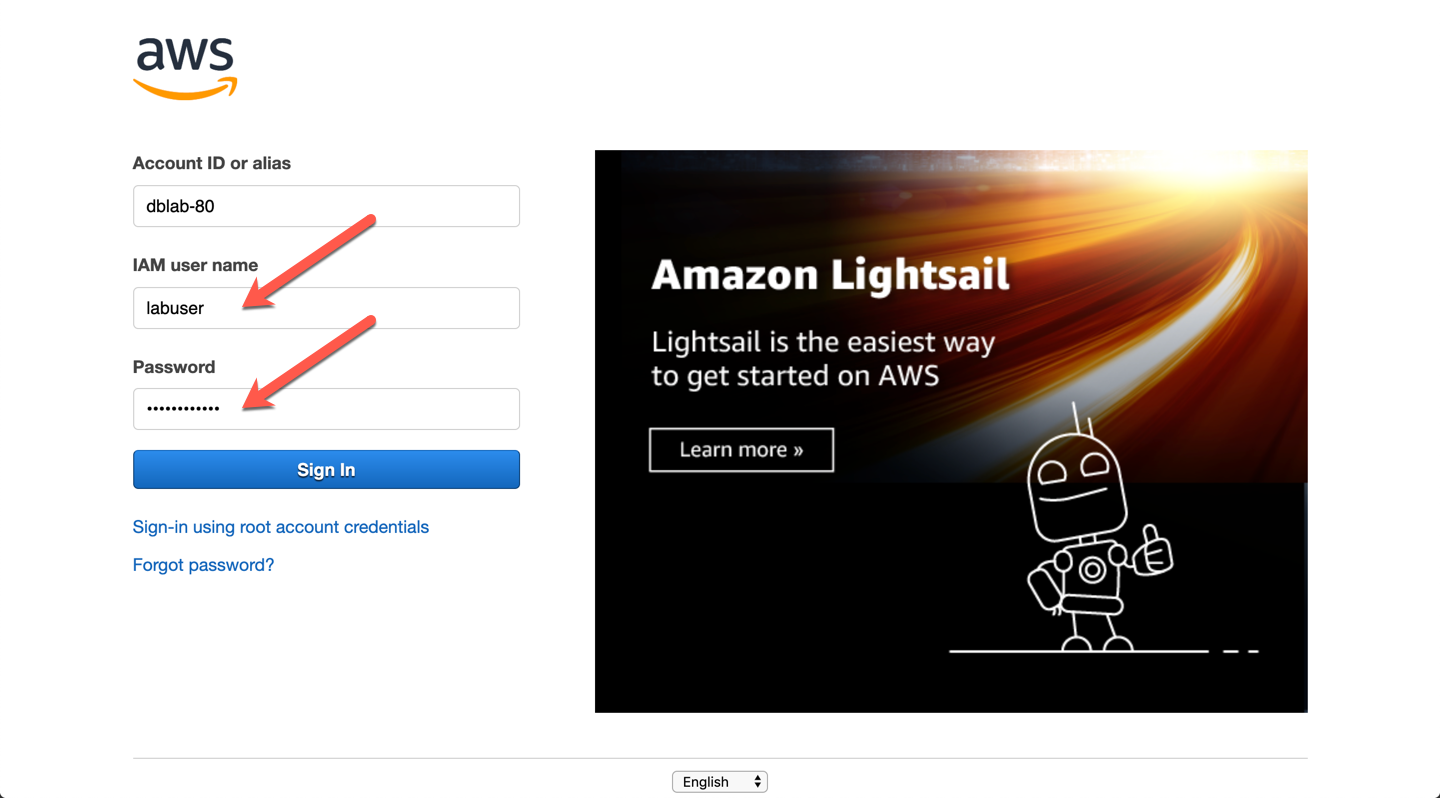
Access the AWS Management Console
If you are running these labs in a formal, instructional setting, please use the Console URL, and credentials provided to you to access and log into the AWS Management Console. Otherwise, please use your own credentials. You can access the console at: https://console.aws.amazon.com/ or through the Single Sign-On (SSO) mechanism provided by your organization.
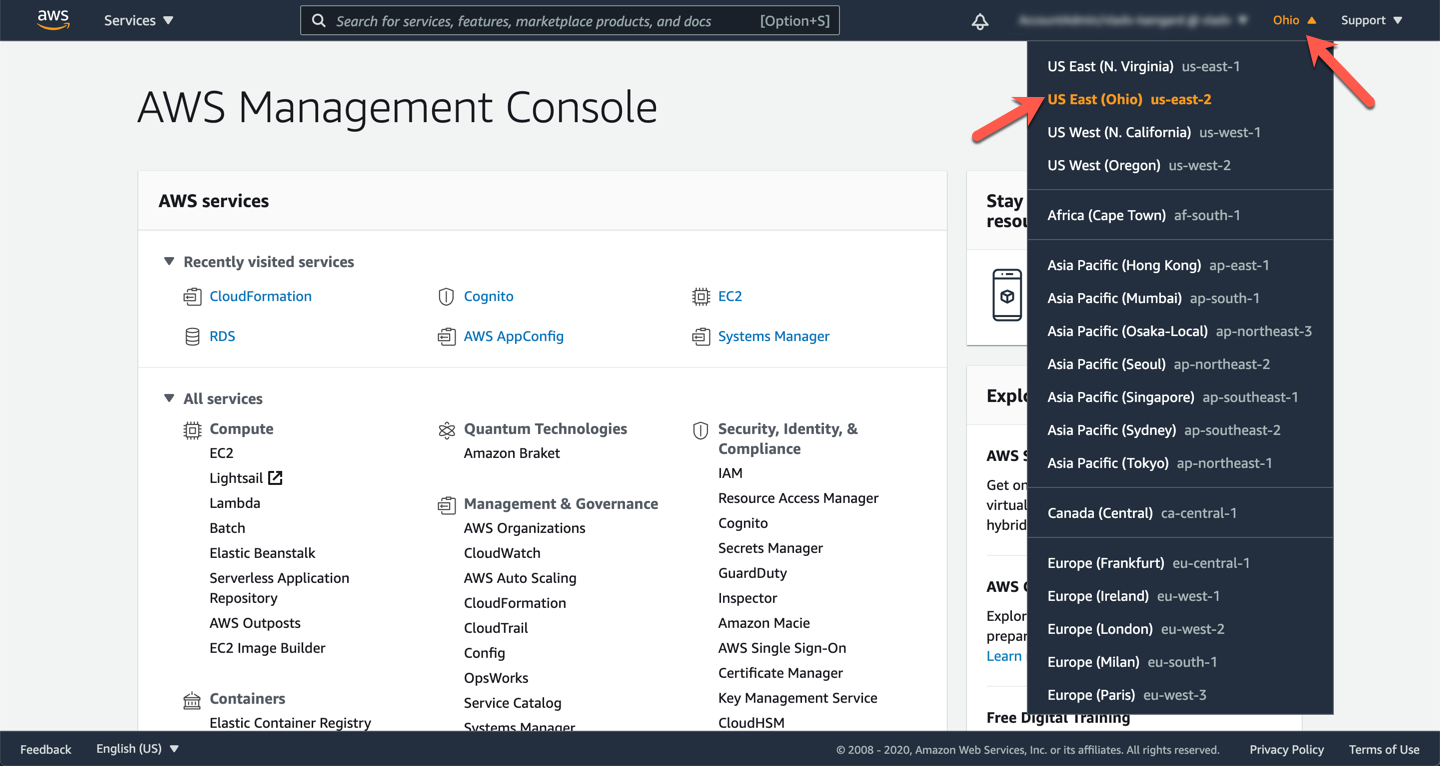
If you are running these labs in a formal, instructional setting, **please use the AWS region provided**. Ensure the correct AWS region is selected in the top right corner, if not use that dropdown to choose the correct region. The labs are designed to work in any of the regions where Amazon Aurora MySQL compatible is available. However, not all features and capabilities of Amazon Aurora may be available in all supported regions at this time.
!!! warning "Region for Global Database Labs"
If you plan to run the **Aurora Global Database** labs, please select a region that is **different from US East (N. Virginia) / us-east-1**. You will use this region for the secondary region for those labs, and the primary and secondary regions for Global Database need to be different.
Deploy the lab environment using AWS CloudFormation
To simplify the getting started experience with the labs, we have created foundational templates for AWS CloudFormation that provision the resources needed for the lab environment. These templates are designed to deploy a consistent networking infrastructure, and client-side experience of software packages and components used in the lab.
Please choose the most appropriate CloudFormation template based on the labs you want to run, and click **Launch Stack**:
Option | One-Click Launch
--- | ---
**I will create the DB cluster manually** |  **Create an Aurora Provisioned DB cluster for me automatically** |
??? tip "Can I see the CloudFormation template?"
Yes, we encourage you to download the CloudFormation template, review the resources that are being created and how they are configured.
[Download the CloudFormation template](https://[[website]]/templates/lab_template.yml)
!!! warning "Region Check"
Ensure you are still working in the correct region, especially if you are following the links above to open the service console at the right screen. Also note, the region should not be US East (N. Virginia) / us-east-1, if you are planning to run the Aurora Global Databsase labs.
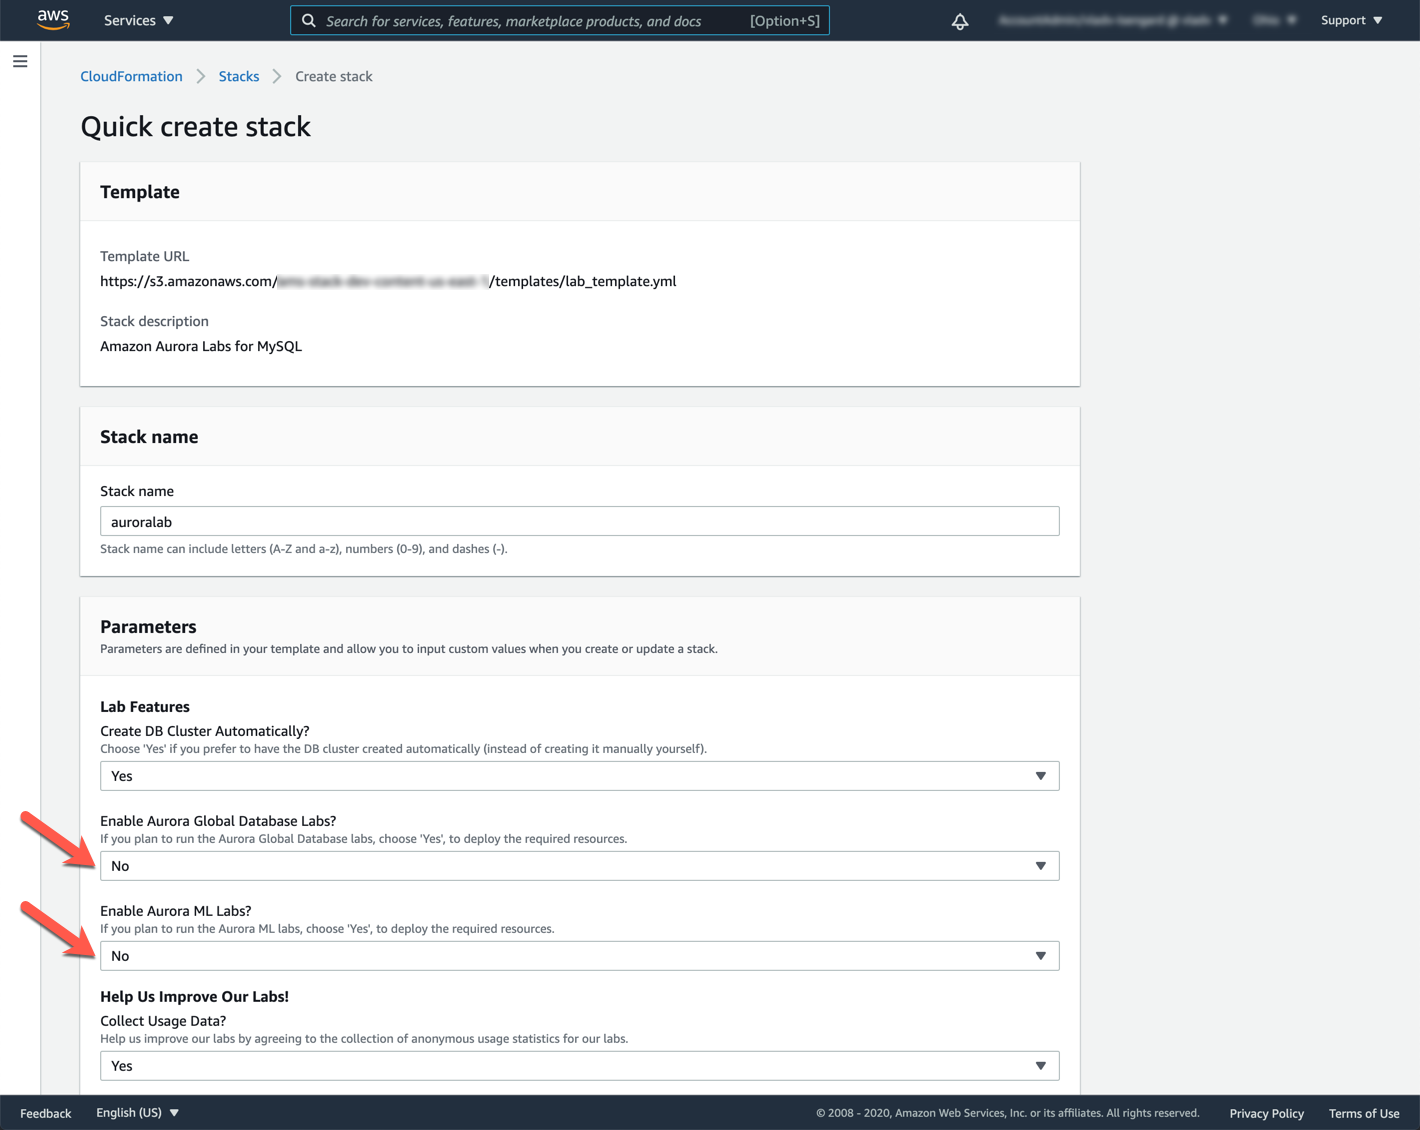
In the field named **Stack Name**, ensure the value `auroralab` is preset.
If you are planning to run the Aurora Global Database labs, please also select **Yes** for the **Enable Aurora Global Database Labs?** parameter (Lab Features section).
If you are planning to run the Aurora Machine Learning integration labs, please also select **Yes** for the **Enable Aurora ML Labs?** parameter (Lab Features section).
Scroll to the bottom of the page, check the box that reads: **I acknowledge that AWS CloudFormation might create IAM resources with custom names** and then click **Create stack**.

The stack will take approximatively 20 minutes to provision, you can monitor the status on the **Stack detail** page. You can monitor the progress of the stack creation process by refreshing the **Events** tab. The latest event in the list will indicate `CREATE_COMPLETE` for the stack resource.
!!! warning "Stack Creation Failure"
If you have never used AWS Cloud9 in this AWS account before, the creation of the CloudFormation stack will fail due to missing Cloud9 required IAM service role and instance profile. These resources are not created automatically for you on first use by the Cloud9 service, and must be created manually. The Cloud9 documentation on Managing Systems Manager permissions provides details and instructions to create these resources.
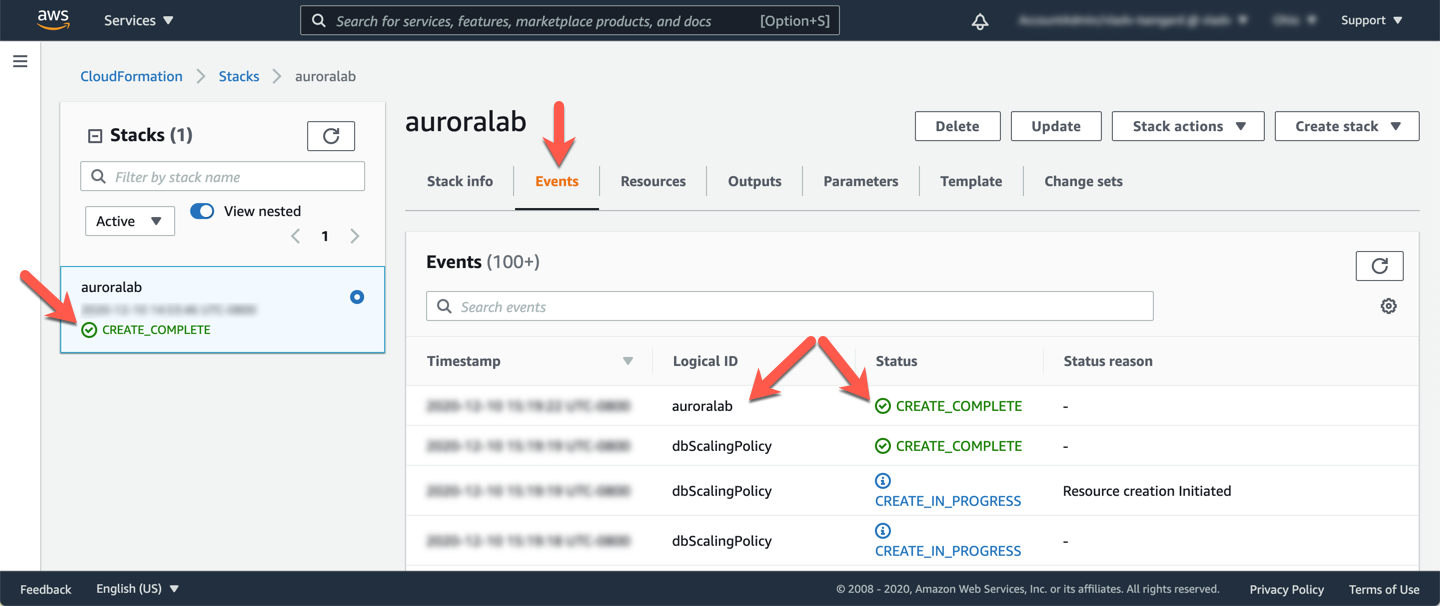
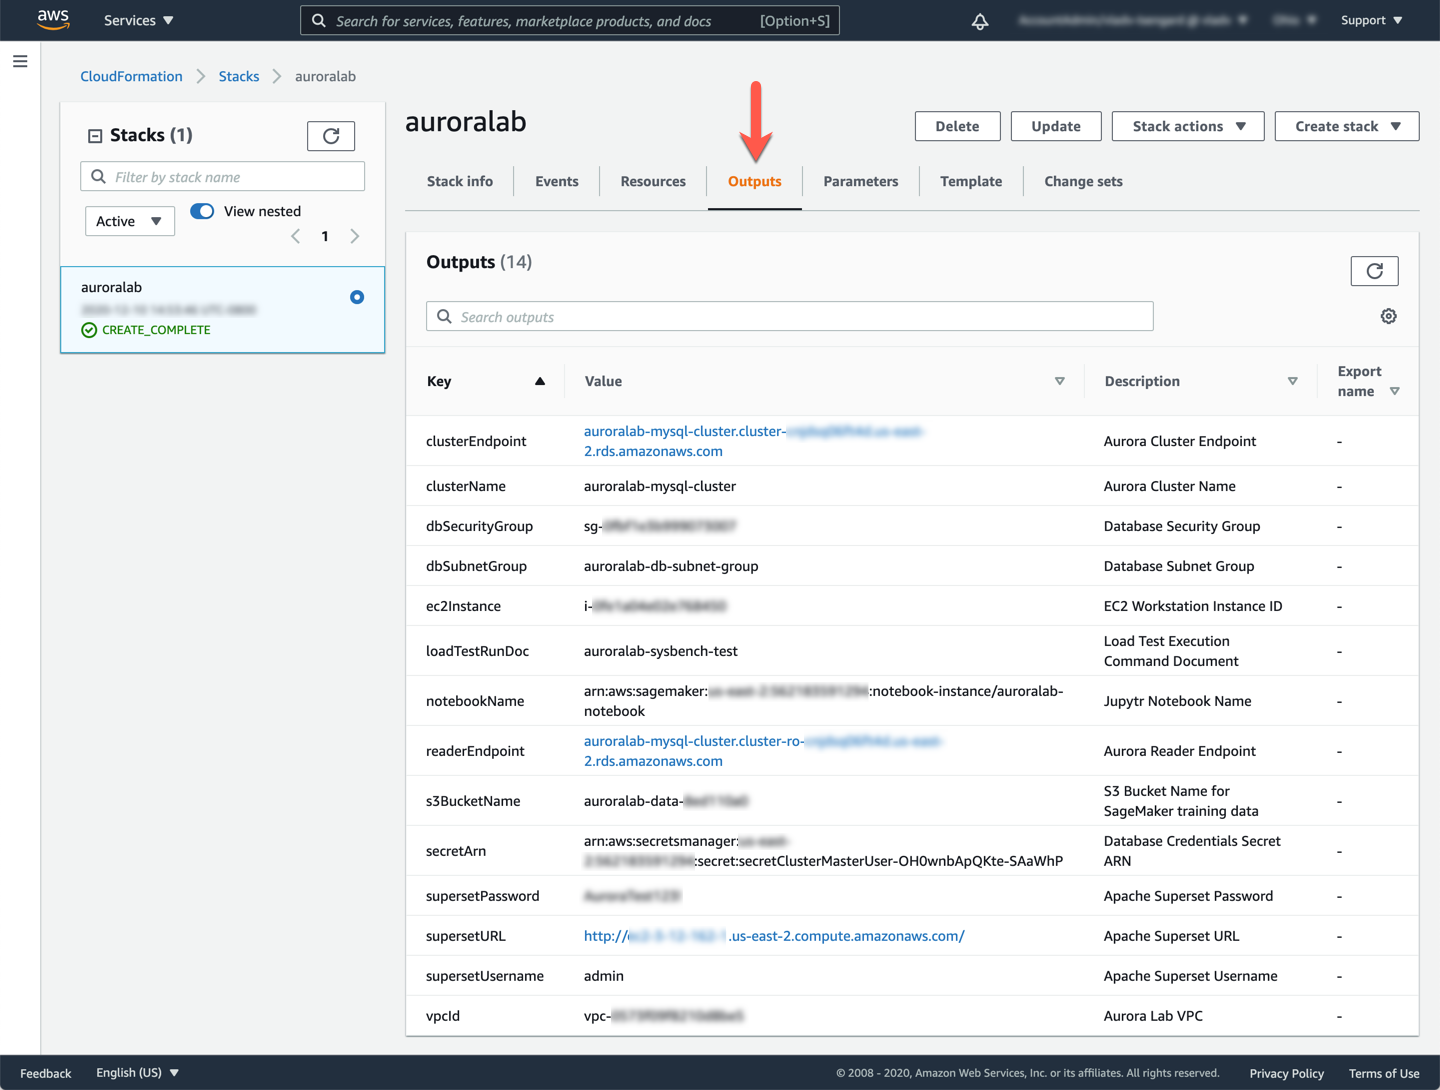
Once the status of the stack is `CREATE_COMPLETE`, click on the **Outputs** tab. The values here will be critical to the completion of the remainder of the lab. Please take a moment to save these values somewhere you will have easy access to them during the remainder of the lab. The names that appear in the **Key** column are referenced directly in the instructions in subsequent steps, using the parameter format: ==[outputKey]==
**Create an Aurora Provisioned DB cluster for me automatically** |
??? tip "Can I see the CloudFormation template?"
Yes, we encourage you to download the CloudFormation template, review the resources that are being created and how they are configured.
[Download the CloudFormation template](https://[[website]]/templates/lab_template.yml)
!!! warning "Region Check"
Ensure you are still working in the correct region, especially if you are following the links above to open the service console at the right screen. Also note, the region should not be US East (N. Virginia) / us-east-1, if you are planning to run the Aurora Global Databsase labs.
In the field named **Stack Name**, ensure the value `auroralab` is preset.
If you are planning to run the Aurora Global Database labs, please also select **Yes** for the **Enable Aurora Global Database Labs?** parameter (Lab Features section).
If you are planning to run the Aurora Machine Learning integration labs, please also select **Yes** for the **Enable Aurora ML Labs?** parameter (Lab Features section).

Scroll to the bottom of the page, check the box that reads: **I acknowledge that AWS CloudFormation might create IAM resources with custom names** and then click **Create stack**.

The stack will take approximatively 20 minutes to provision, you can monitor the status on the **Stack detail** page. You can monitor the progress of the stack creation process by refreshing the **Events** tab. The latest event in the list will indicate `CREATE_COMPLETE` for the stack resource.
!!! warning "Stack Creation Failure"
If you have never used AWS Cloud9 in this AWS account before, the creation of the CloudFormation stack will fail due to missing Cloud9 required IAM service role and instance profile. These resources are not created automatically for you on first use by the Cloud9 service, and must be created manually. The Cloud9 documentation on Managing Systems Manager permissions provides details and instructions to create these resources.

Once the status of the stack is `CREATE_COMPLETE`, click on the **Outputs** tab. The values here will be critical to the completion of the remainder of the lab. Please take a moment to save these values somewhere you will have easy access to them during the remainder of the lab. The names that appear in the **Key** column are referenced directly in the instructions in subsequent steps, using the parameter format: ==[outputKey]==

Verify lab environment
Let's make sure your workstation has been configured properly:
* Do you see a URL similar to `https://[region].console.aws.amazon.com/cloud9/ide/[hash]?region=[region])` (the values may vary) for the **clientIdeUrl** CloudFormation stack output key?
If so, you may proceed to the next lab: [**Connect to the Cloud9 Desktop**](/prereqs/connect/). Otherwise please revisit the instructions above, you might have missed a step.