# Clone a DB Cluster
This lab will walk you through the process of cloning a DB cluster. Cloning creates a separate, independent DB cluster, with a consistent copy of your data set as of the time you cloned it. Database cloning uses a copy-on-write protocol, in which data is copied at the time that data changes, either on the source databases or the clone databases. The two clusters are isolated, and there is no performance impact on the source DB cluster from database operations on the clone, or the other way around.
This lab contains the following tasks:
1. Create a clone DB cluster
2. Verify that the data set is identical
3. Change data on the clone
4. Verify that the data diverges
5. Cleanup lab resources
This lab requires the following prerequisites:
* [Get Started](/prereqs/environment/)
* [Connect to the Cloud9 Desktop](/prereqs/connect/)
* [Create a New DB Cluster](/provisioned/create/) (conditional, only if you plan to create a cluster manually)
* [Connect to the DB Cluster and Load Data](/provisioned/interact/)
## 1. Create a clone DB cluster
!!! warning "Workload State Check"
Before cloning the DB cluster ensure you have stopped any load generating tasks from previous labs, and exited out of the MySQL client command line using `quit;`.
If you have not already opened a terminal window in the Cloud9 desktop in a previous lab, please [following these instructions](/prereqs/connect/) to do so now. Run the command below, replacing the ==[dbSecurityGroup]== and ==[dbSubnetGroup]== placeholders with the appropriate outputs from your CloudFormation stack, or Event Engine Team Dashboard if you are participating in a formal workshop:
```
aws rds restore-db-cluster-to-point-in-time \
--restore-type copy-on-write \
--use-latest-restorable-time \
--source-db-cluster-identifier auroralab-mysql-cluster \
--db-cluster-identifier auroralab-mysql-clone \
--vpc-security-group-ids [dbSecurityGroup] \
--db-subnet-group-name [dbSubnetGroup]
```
Next, check the status of the creation of your clone, by using the following command. The cloning process can take several minutes to complete. See the example output below.
```
aws rds describe-db-clusters \
--db-cluster-identifier auroralab-mysql-clone \
| jq -r '.DBClusters[0].Status, .DBClusters[0].Endpoint'
```
Take note of both the ==status== and the ==endpoint== in the command output. Repeat the command several times, if needed. Once the **status** becomes **available**, you can add a DB instance to the cluster and once the DB instance is added, you will want to connect to the cluster via the **endpoint** value, which represents the cluster endpoint.

??? tip "Cost optimization with DB cluster clones"
Creating a DB cluster clone, even without adding DB instances, can be a useful and cost effective safety net measure, if you are about to make significant changes to your source cluster (such as an upgrade or risky DDL operation). The clone then becomes a quick rollback target, in case you encounter issues on the source as a result of the operation. You simply add a DB instance and point your application to the clone in such an event. We do not recommend using clones as long term point in time snapshot tools, as you are limited to 15 clones derived directly or indirectly from the same source.
Add a DB instance to the cluster once the status of the cluster becomes **available**, using the following command:
```
aws rds create-db-instance \
--db-instance-class db.r5.large \
--engine aurora-mysql \
--db-cluster-identifier auroralab-mysql-clone \
--db-instance-identifier auroralab-mysql-clone-instance
```
Check the creation of the DB instance within the cluster, by using the following command:
```
aws rds describe-db-instances \
--db-instance-identifier auroralab-mysql-clone-instance \
| jq -r '.DBInstances[0].DBInstanceStatus'
```

Repeat the command to monitor the creation status. Once the **status** changes from **creating** to **available**, you have a functioning clone. Creating a node in a cluster also takes several minutes.
## 2. Verify that the data set is identical
Verify that the data set is identical on both the source and cloned DB clusters, before we make any changes to the data. You can verify by performing a checksum operation on the **sbtest1** table.
Connect to the cloned database using the following command (use the endpoint you retrieved from the `describe-db-cluster` command above):
```
mysql -h[cluster endpoint of clone] -u$DBUSER -p"$DBPASS" mylab
```
!!! note
The database credentials you use to connect are the same as for the source DB cluster, as this is an exact clone of the source.
Next, issue the following command on the clone:
```
checksum table sbtest1;
```
The output of your commands should look similar to the example below. Please take note of the value for your specific clone cluster.

Now disconnect from the clone and connect to the source cluster with the following sequence:
```
quit;
mysql -h[clusterEndpoint] -u$DBUSER -p"$DBPASS" mylab
```
Execute the same checksum command that you ran on the clone:
```
checksum table sbtest1;
```
Please take note of the value for your specific source cluster. The checksum value should be the same as for the cloned cluster above.
## 3. Change data on the clone
Disconnect from the original cluster (if you are still connected to it) and connect to the clone cluster with the following sequence:
```
quit;
mysql -h[cluster endpoint of clone] -u$DBUSER -p"$DBPASS" mylab
```
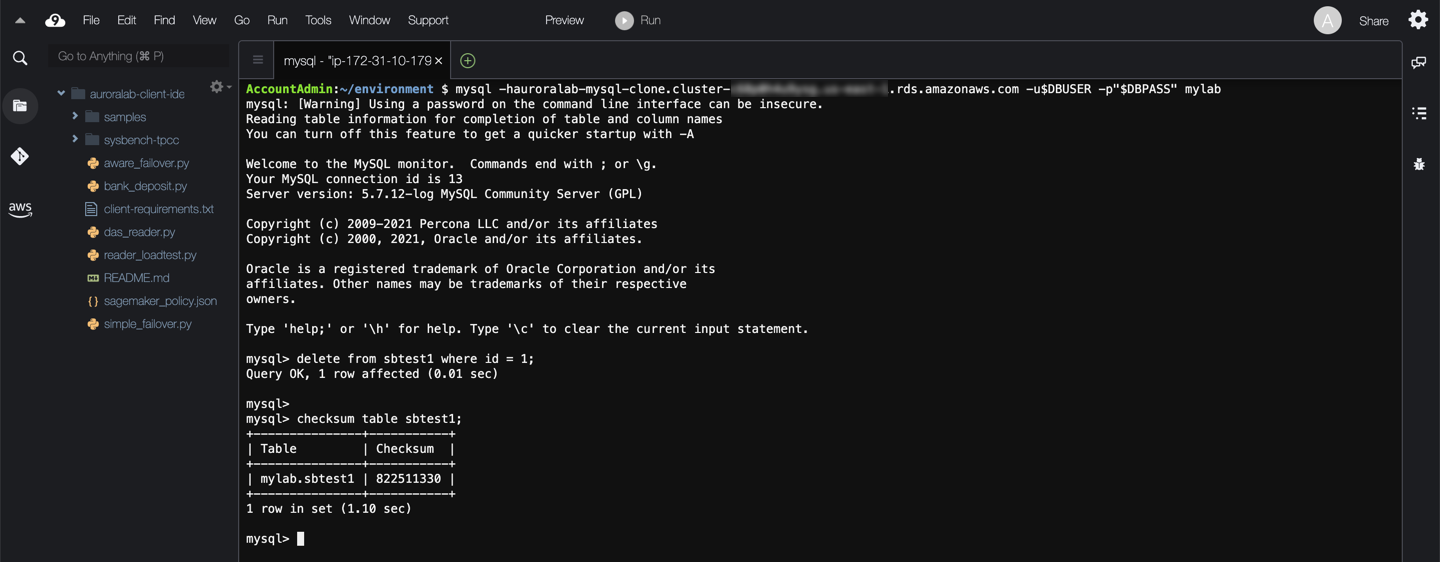
Delete a row of data and execute the checksum command again:
```
delete from sbtest1 where id = 1;
checksum table sbtest1;
```
The output of your commands should look similar to the example below. Notice that the checksum value changed, and is no longer the same as calculated in section 2 above.
## 4. Verify that the data diverges
Verify that the checksum value did not change on the source cluster as a result of the delete operation on the clone. Disconnect from the clone (if you are still connected) and connect to the source cluster with the following sequence:
```
quit;
mysql -h[clusterEndpoint] -u$DBUSER -p"$DBPASS" mylab
```
Execute the same checksum command that you ran on the clone:
```
checksum table sbtest1;
```
Please take note of the value for your specific source cluster. The checksum value should be the same as calculated for the source cluster above in section 2.
Disconnect from the DB cluster, using:
```
quit;
```
## 5. Cleanup lab resources
By running this lab, you have created additional AWS resources. We recommend you run the commands below to remove these resources once you have completed this lab, to ensure you do not incur any unwanted charges for using these services.
```
aws rds delete-db-instance --db-instance-identifier auroralab-mysql-clone-instance
aws rds delete-db-cluster --db-cluster-identifier auroralab-mysql-clone --skip-final-snapshot
```