# Create a New Aurora Cluster
This lab will walk you through the steps of creating an Amazon Aurora database cluster manually, and configuring app the parameters required for the cluster components. At the end of this lab you will have a database cluster ready to be used in subsequent labs.
!!! tip "Do you already know how to create a DB cluster?"
If you are familiar with the basic concepts of Amazon Aurora MySQL, and have created a cluster in the past, you may skip this module by provisioning the lab environment using the option to have the DB cluster deployed automatically. See the [Get Started](prereqs/environment/) prerequisites module for details on provisioning the lab environment. Skip to [Connect, Load Data and Auto Scale](/provisioned/interact/).
If you are running these labs in a formal, organized workshop event, please follow the recommendations of your instructors, and ask any lab assistant for help if you have questions about this lab.
This lab contains the following tasks:
1. Create the DB cluster
2. Retrieve the DB cluster endpoints
3. Assign an IAM role to the DB cluster
4. Create a replica auto scaling policy
5. Create an AWS Secrets Manager secret
6. Configure your Cloud9 desktop
7. Verify DB cluster
This lab requires the following lab modules to be completed first:
* [Get Started](/prereqs/environment/) (you do not need to provision a DB cluster automatically)
* [Connect to the Cloud9 Desktop](/prereqs/connect/) (needed for task \#6)
## 1. Create the DB cluster
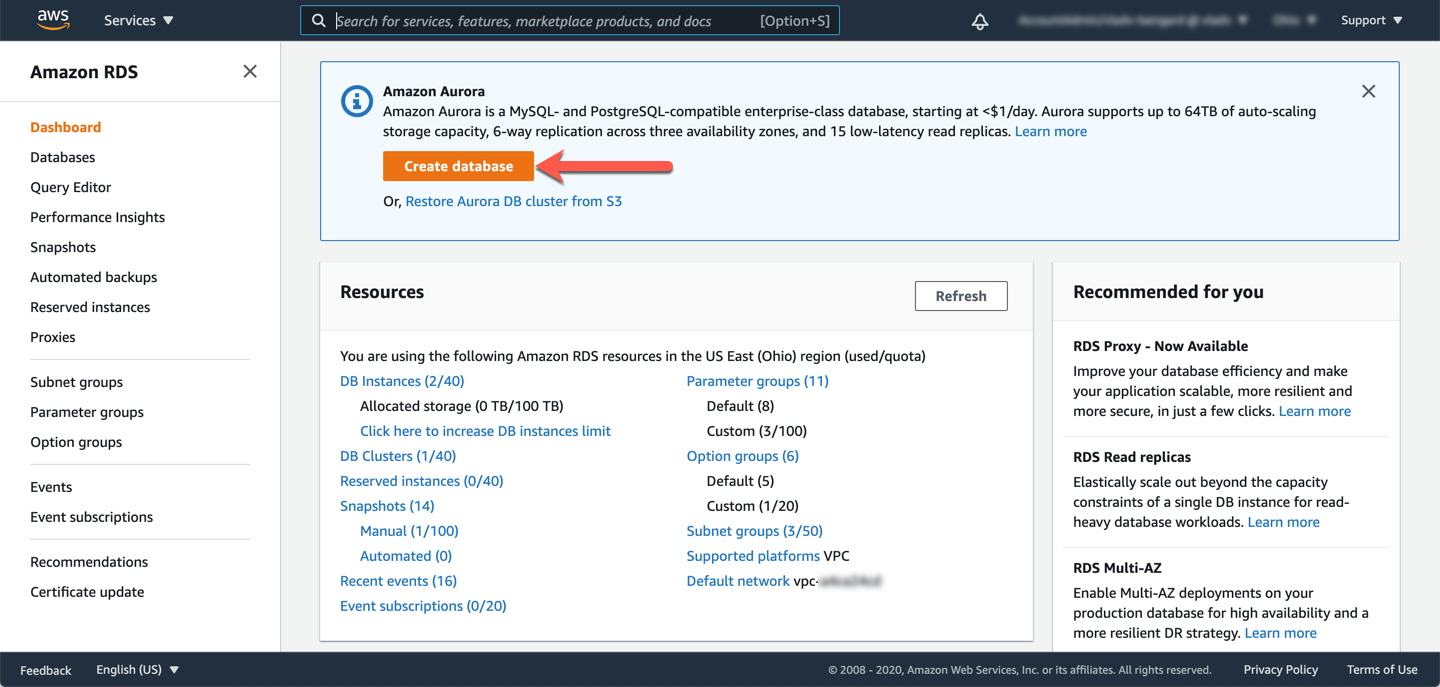
Open the Amazon RDS service console.
!!! warning "Region Check"
Ensure you are still working in the correct region, especially if you are following the links above to open the service console at the right screen.
Click **Create database** to start the configuration process
Set the following options on the configuration screen for the new DB cluster:
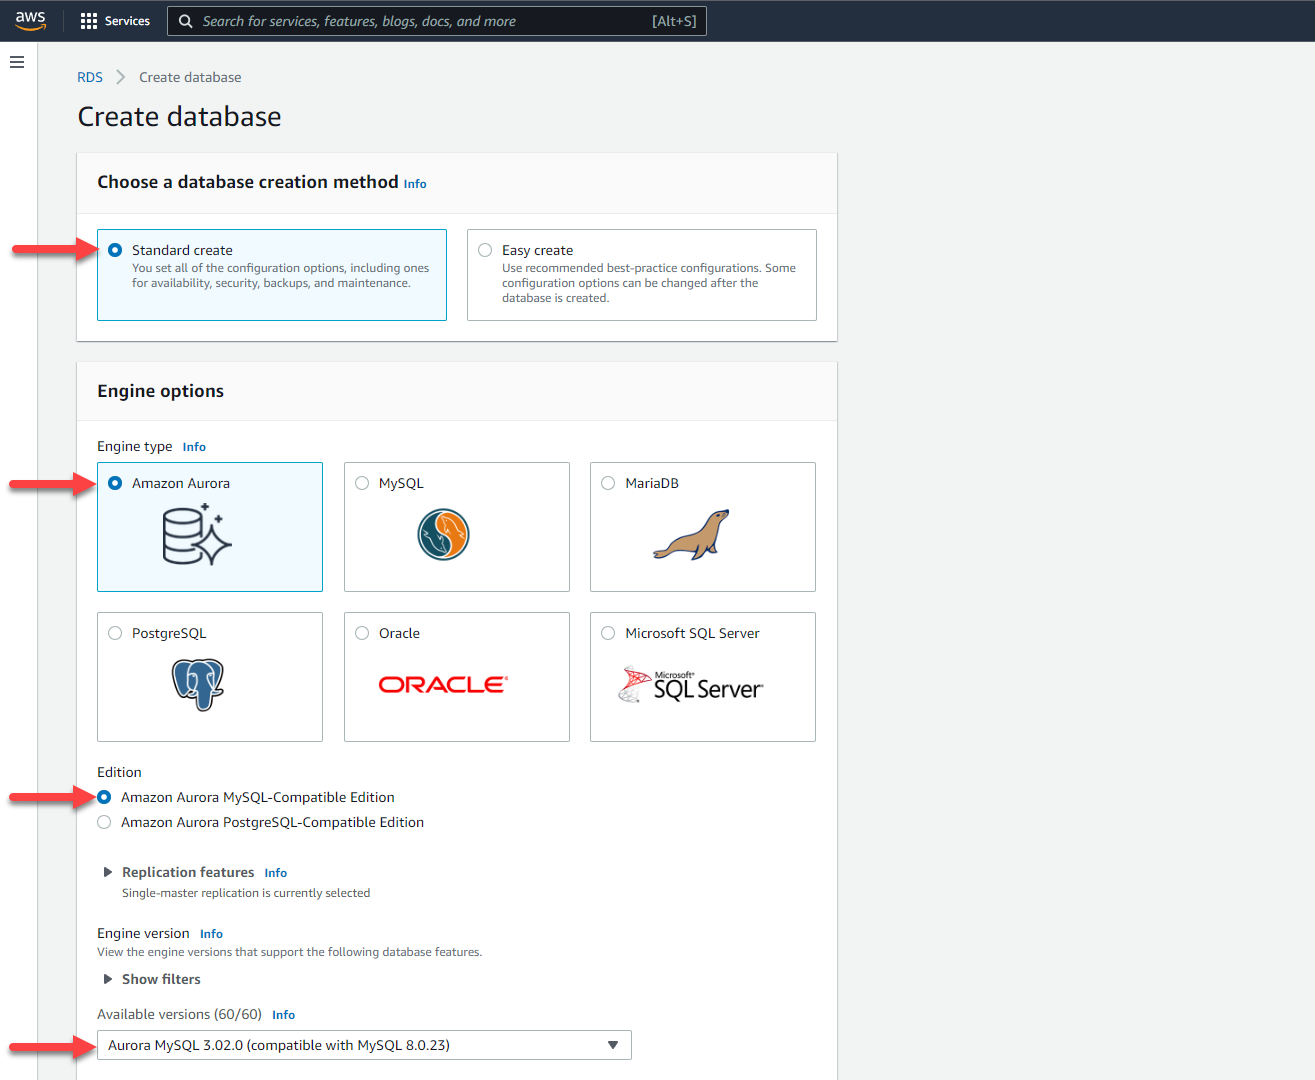
In the **Choose a database creation method** section:
* [ ] Ensure the **Standard Create** option is selected.
In the **Engine options** section:
* [ ] Choose the `Amazon Aurora` engine type.
* [ ] Choose the `Amazon Aurora with MySQL compatibility` edition.
* [ ] Choose the **Capacity type** of `Provisioned`.
* [ ] Select the `Aurora MySQL 3.02.0 (compatible with 8.0.23)` version.
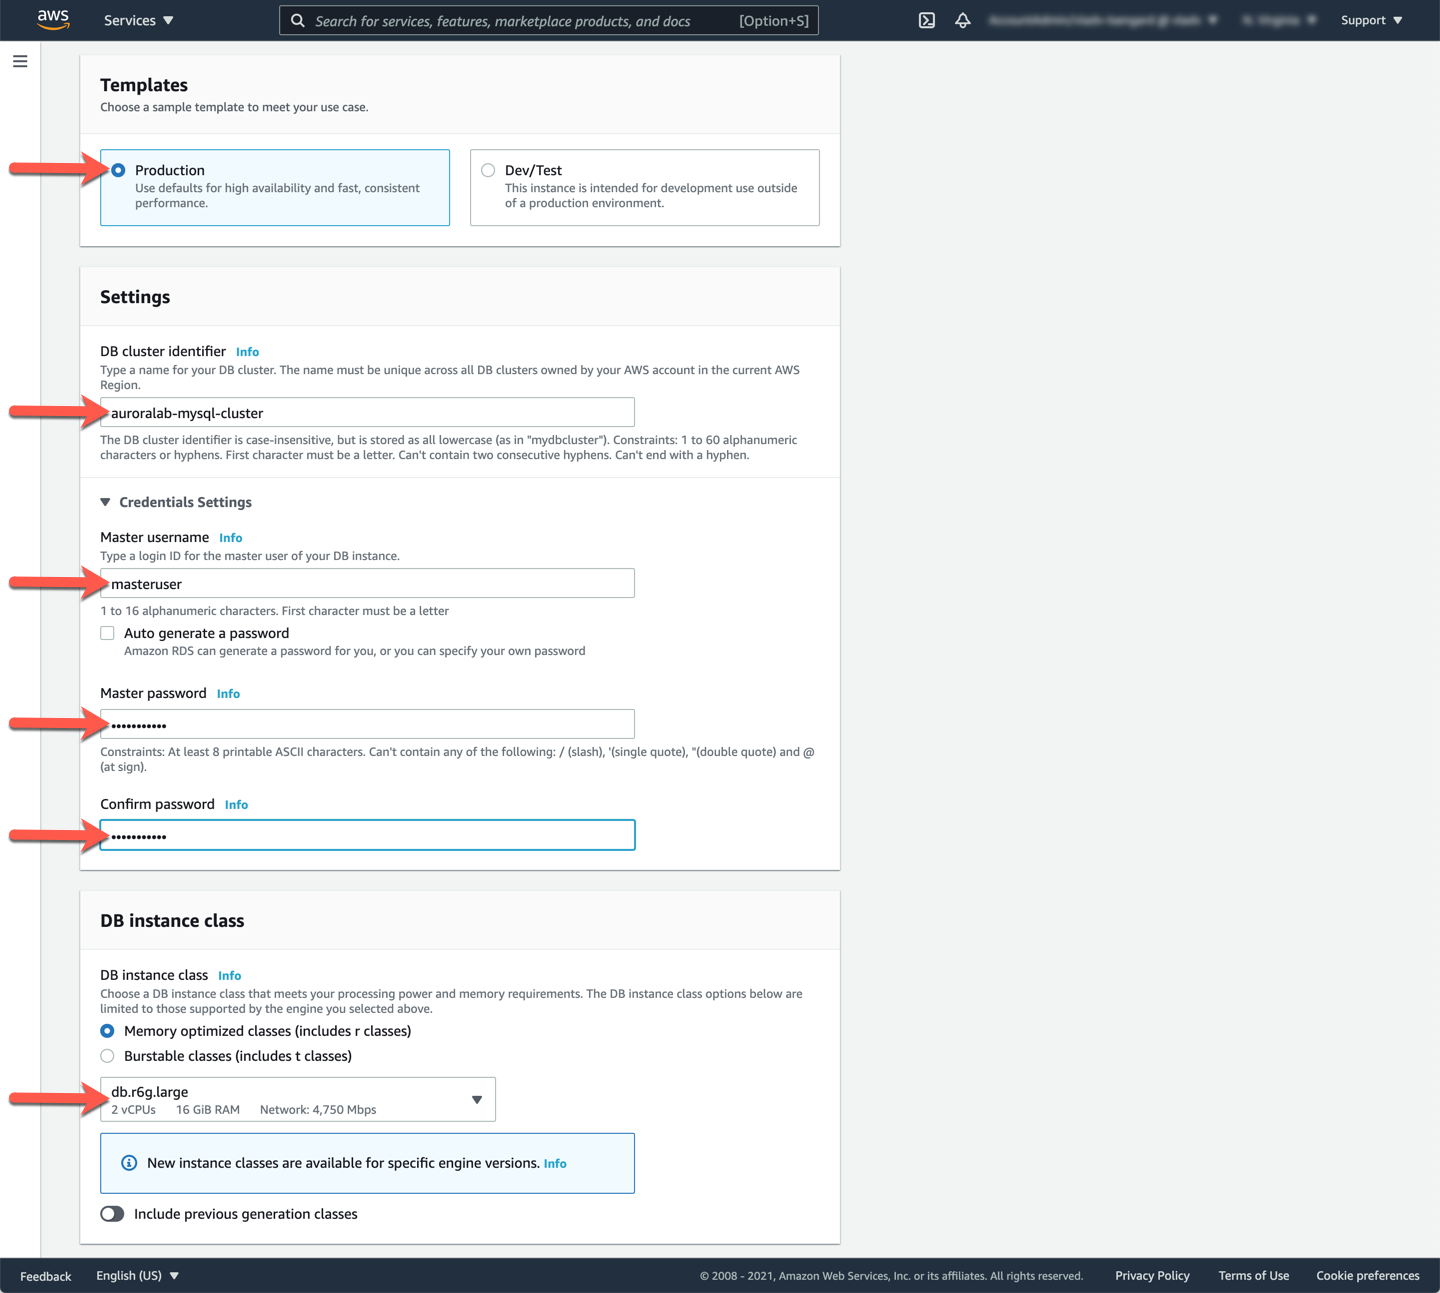
In the **Templates** section:
* [ ] Select the `Production` option.
In the **Settings** section:
* [ ] Set the **DB cluster identifier** to `auroralab-mysql-cluster`. Use this specific name so you don't have to edit commands in subsequent labs.
* [ ] Set the **Master username** to `administrator`. This is the user account with the most elevated permissions in the database, you can use a different name but may need to edit commands in subsequent labs.
* [ ] Set the **Master password** to a desired and memorable value, confirm the password.
* [ ] Ensure the check box **Auto generate a password** is **not checked**.
In the **DB instance size** section:
* [ ] Select **Memory Optimized classes**, and choose `r6g.large` in the size drop-down.
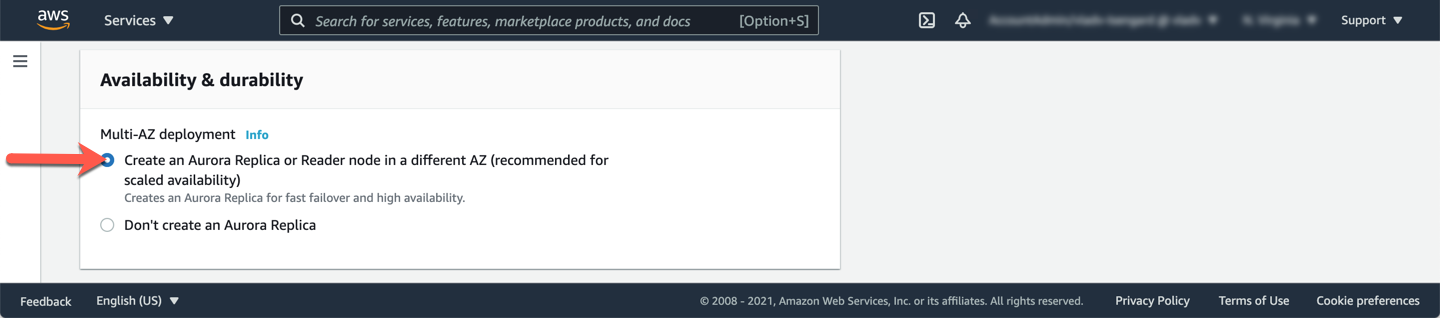
In the **Availability & durability** section:
* [ ] Choose `Create an Aurora Replica/Reader node in a different AZ`.
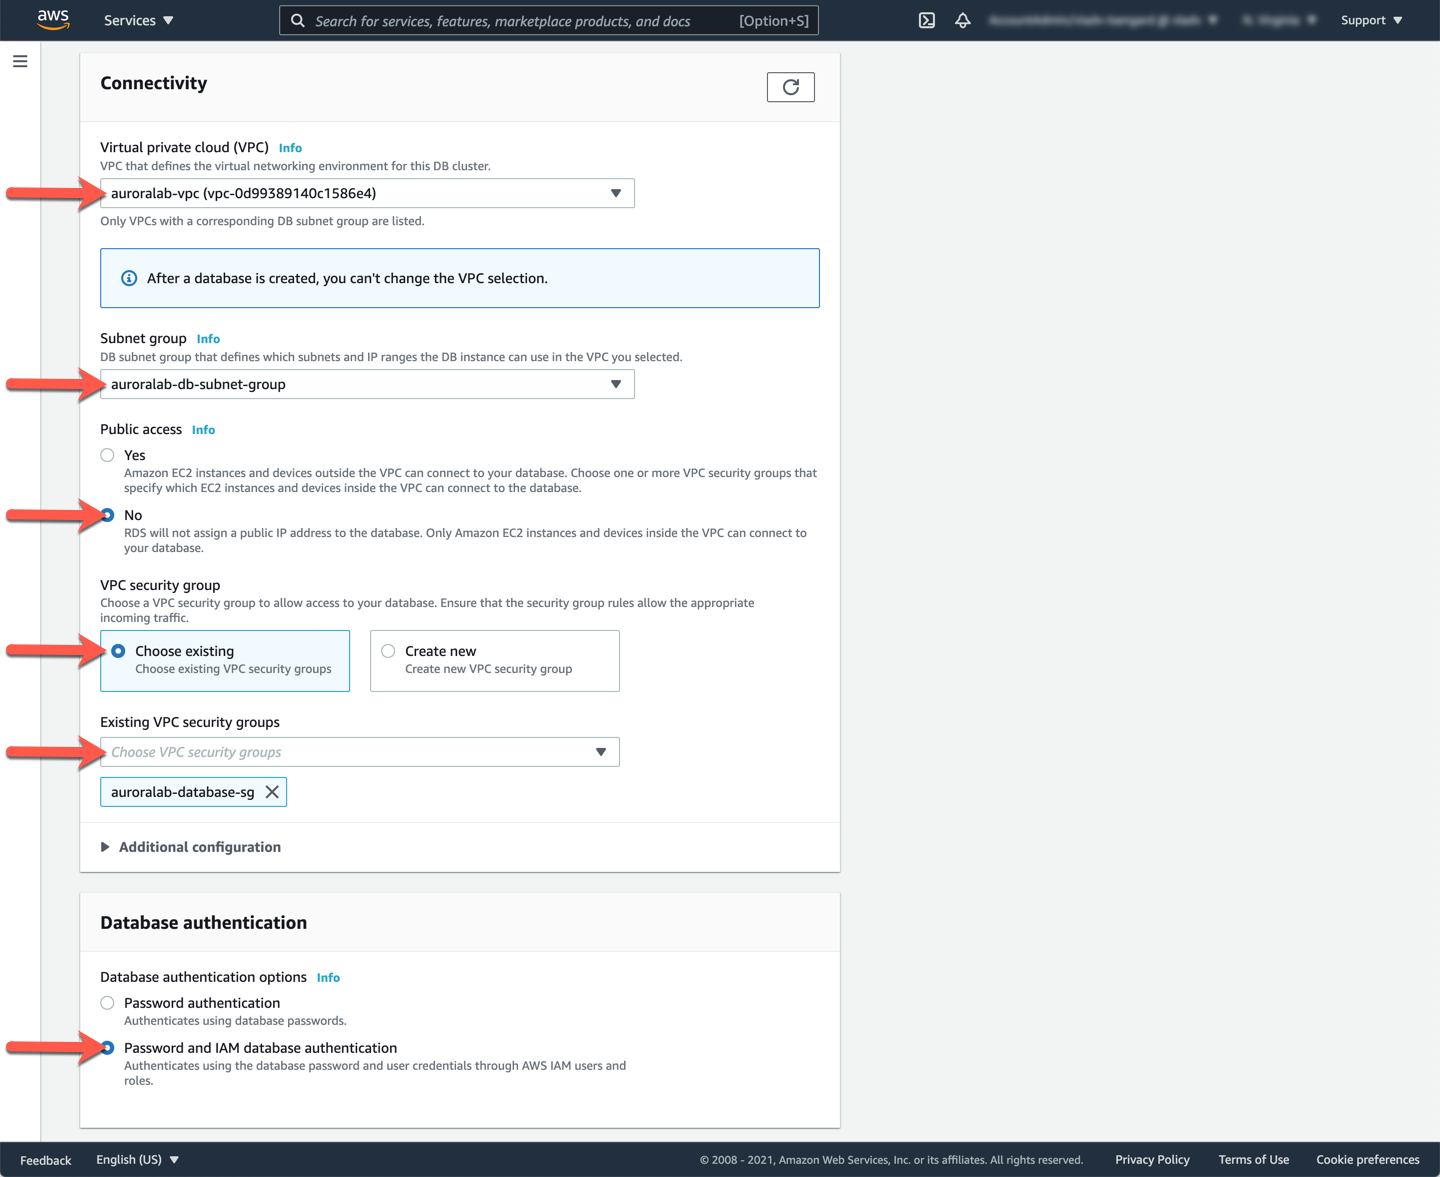
In the **Connectivity** section:
* [ ] Pick the **Virtual Private Cloud (VPC)** named `auroralab-vpc`.
* [ ] The DB subnet group will be selected automatically once you choose the right VPC, please verify the selection is correct. The name of the DB subnet group should be `auroralab-db-subnet-group`.
* [ ] Make sure the cluster **Publicly accessible** option is set to `No`.
* [ ] At **VPC security group**, make sure the **Choose existing** security group option is selected. The lab environment already provides a security group that allows your lab workspace EC2 instance to connect to the database.
* [ ] Select the security group named `auroralab-database-sg`.
* [ ] Please remove any other security groups, such as `default` from the selection.
In the **Database authentication** section:
* [ ] Choose `Password and IAM database authentication`. IAM authentication may be used in some of the subsequent labs.
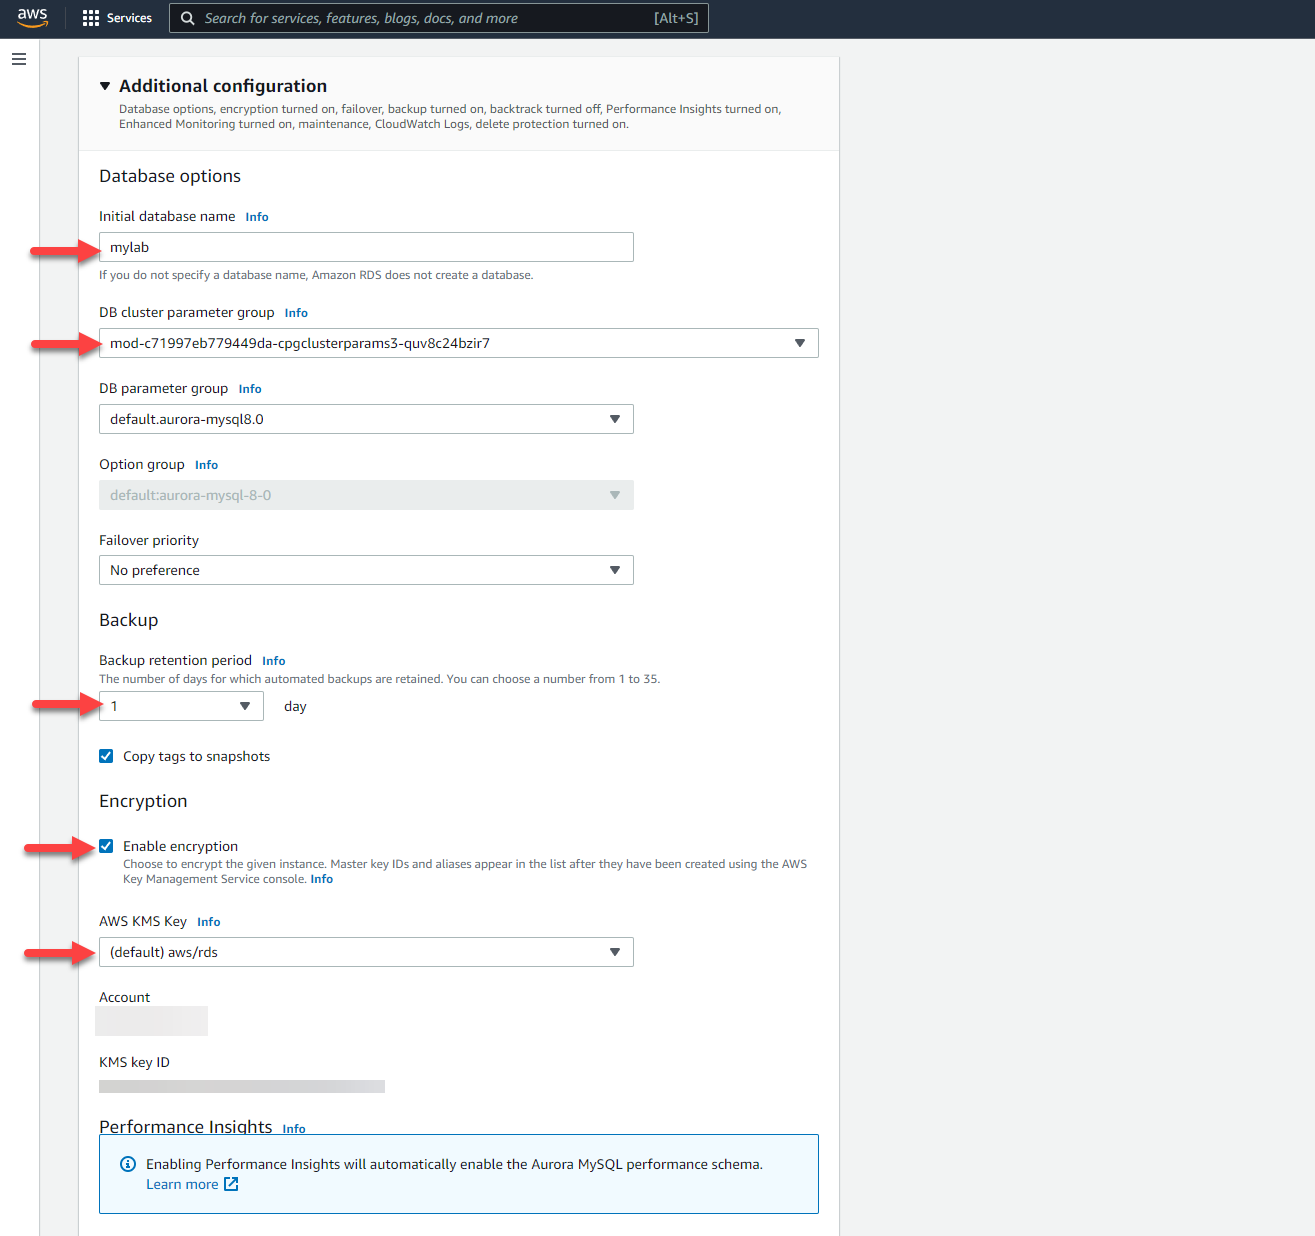
Expand the **Additional configuration** section, and configure options as follows:
* [ ] Set the **Initial database name** to `mylab`. You can use a custom name here, too, but you will need to edit commands and scripts in subsequent labs.
* [ ] For the **DB cluster parameter group** selector, choose the groups named starting with either `auroralab-[...]` or `mod-[...]`.
* [ ] Set **Backup retention period** to `1 day`.
* [ ] Check the box to **Enable encryption**.
* [ ] Set the **Master key** to `[default] aws/rds`.
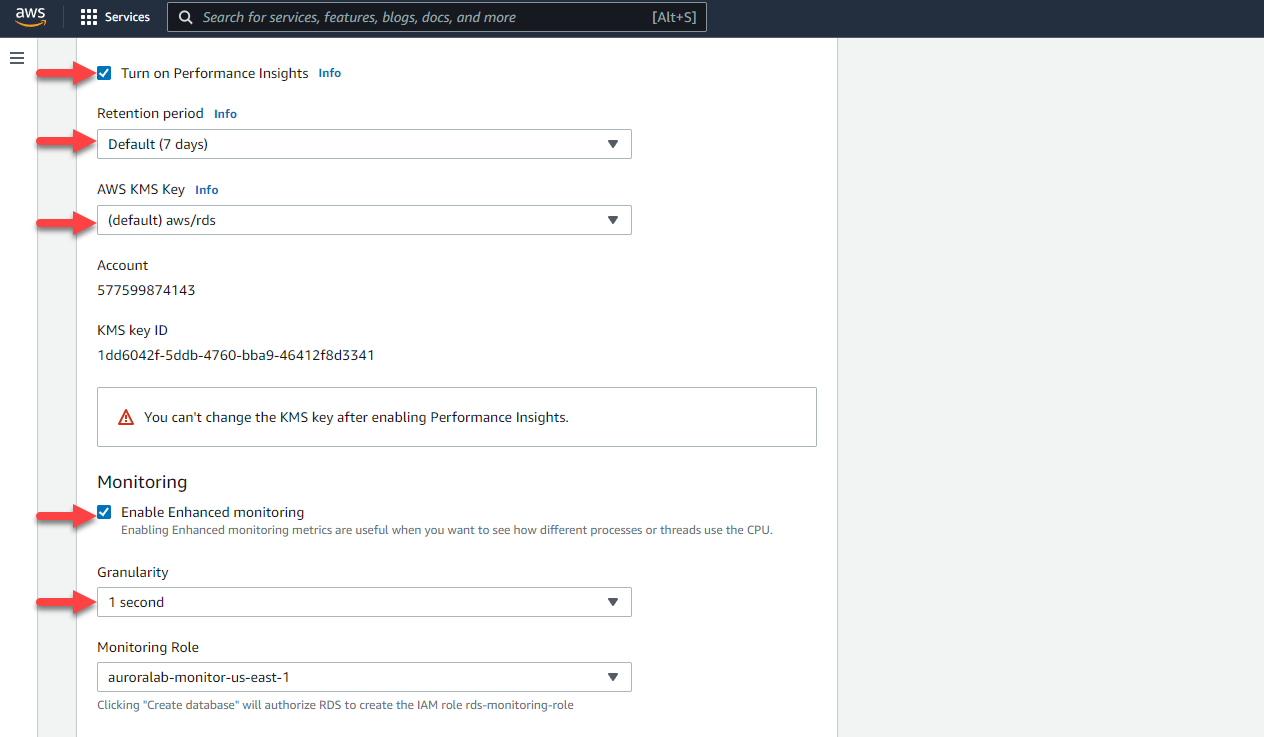
Continue in the **Additional configuration** section:
* [ ] Check the box to **Enable Performance Insights**.
* [ ] Set a **Retention period** of `Default (7 days)`.
* [ ] Set the **Master key** to `[default] aws/rds`.
* [ ] Check the **Enable Enhanced Monitoring** box.
* [ ] Select a **Granularity** of `1 second`.
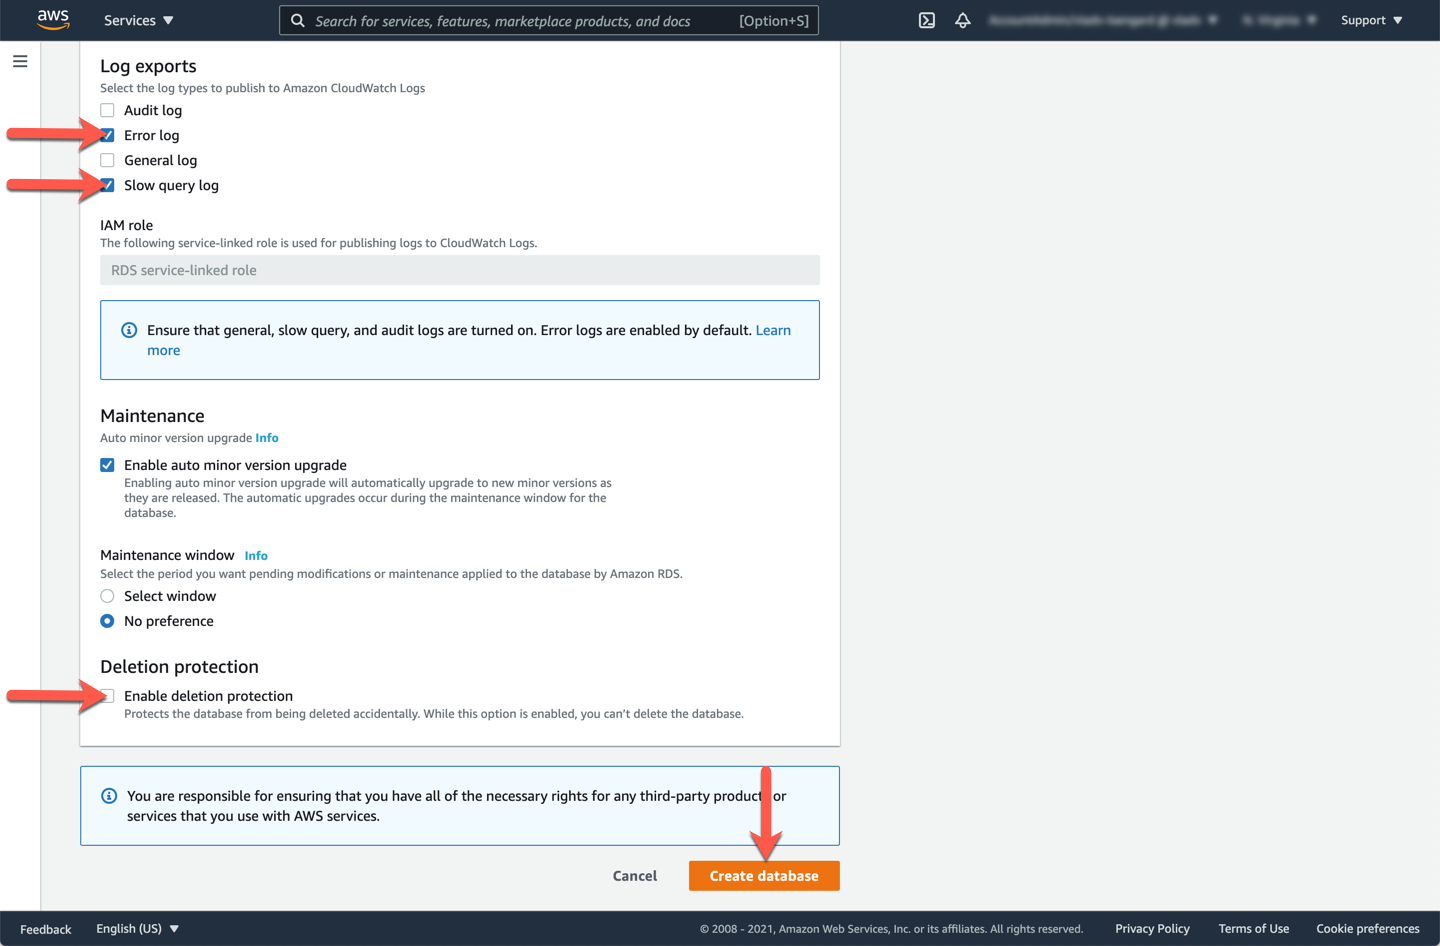
Also in the **Additional configuration** section:
* [ ] For **Log exports** check the `Error log` and `Slow query log` boxes.
* [ ] De-select/turn off the check box **Enable delete protection**. In a production use case, you will want to leave that option checked, but for testing purposes, un-checking this option will make it easier to clean up the resources once you have completed the labs.
??? info "What do these selections mean?"
You will create a database cluster with the following characteristics:
* Aurora MySQL 5.7 compatible
* Regional cluster composed of a writer and a reader DB instance in different availability zones (highly available)
* Deployed in the VPC and using the network configuration of the lab environment
* Using custom database engine parameters that enable the slow query log, S3 access and tune a few other configurations
* Automatically backed up continuously, retaining backups for 1 day
* Using data at rest encryption
* Retaining 24 hours worth of change data for backtrack purposes
* With Enhanced Monitoring and Performance Insights enabled
Click **Create database** to provision the DB cluster.
## 2. Retrieve the DB cluster endpoints
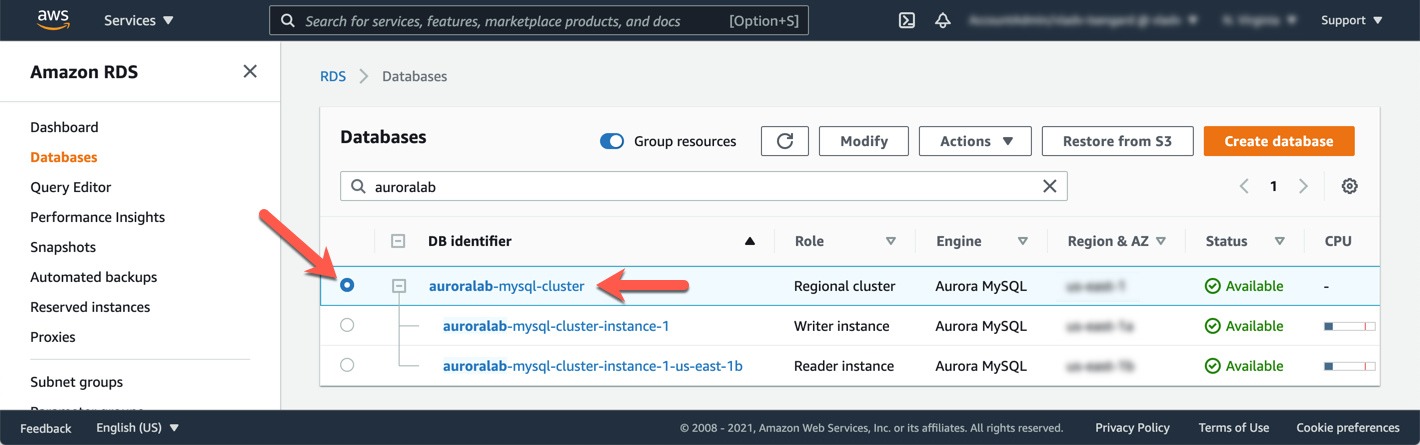
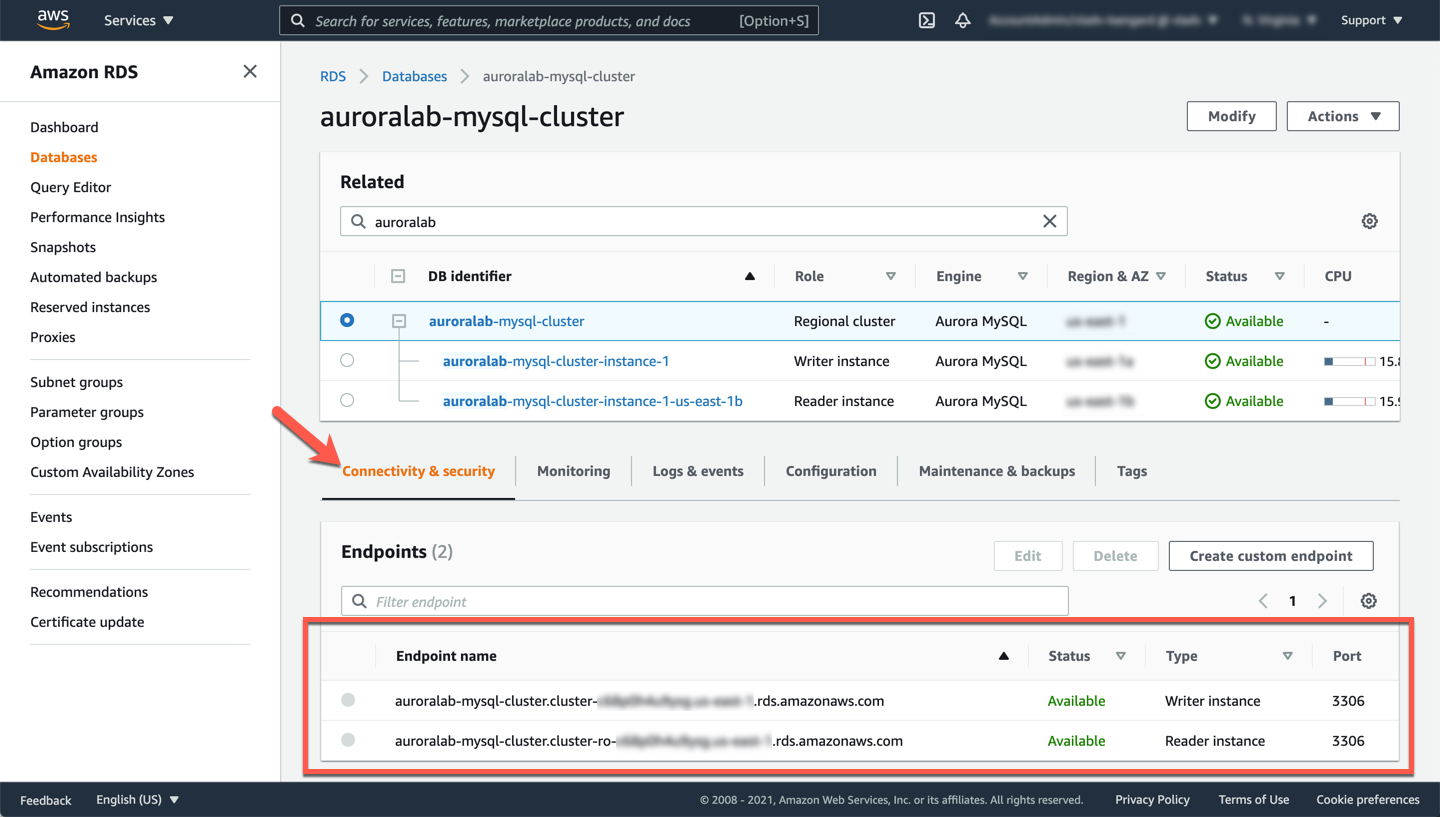
The database cluster may take several minutes to provision, including the DB instances making up the cluster. In order to connect to the DB cluster and start using it in subsequent labs, you need to retrieve the DB cluster endpoints. There are two endpoints created by default. The **Cluster Endpoint** will always point to the **writer** DB instance of the cluster, and should be used for both writes and reads. The **Reader Endpoint** will always resolve to one of the **reader** DB instances and should be used to offload read operations to read replicas. In the RDS console, go to the DB cluster detail view by clicking on the cluster DB identifier.
The **Endpoints** section in the **Connectivity and security** tab of the details page displays the endpoints. Note these values down, as you will use them later.
## 3. Assign an IAM role to the DB cluster
Once created, you should assign an IAM role to the DB cluster, in order to allow the cluster access to Amazon S3 for importing and exporting data. The IAM role has already been created foryou with the lab environment. On the same DB cluster detail page as before, in the **Manage IAM roles** section, choose **Select IAM roles to add to this cluster** and pick the IAM role named starting with `auroralab-integrate-[region]` from the dropdown. If more than one role with that prefix is available, choose the one for the current region you are operating in. Then click **Add role**.
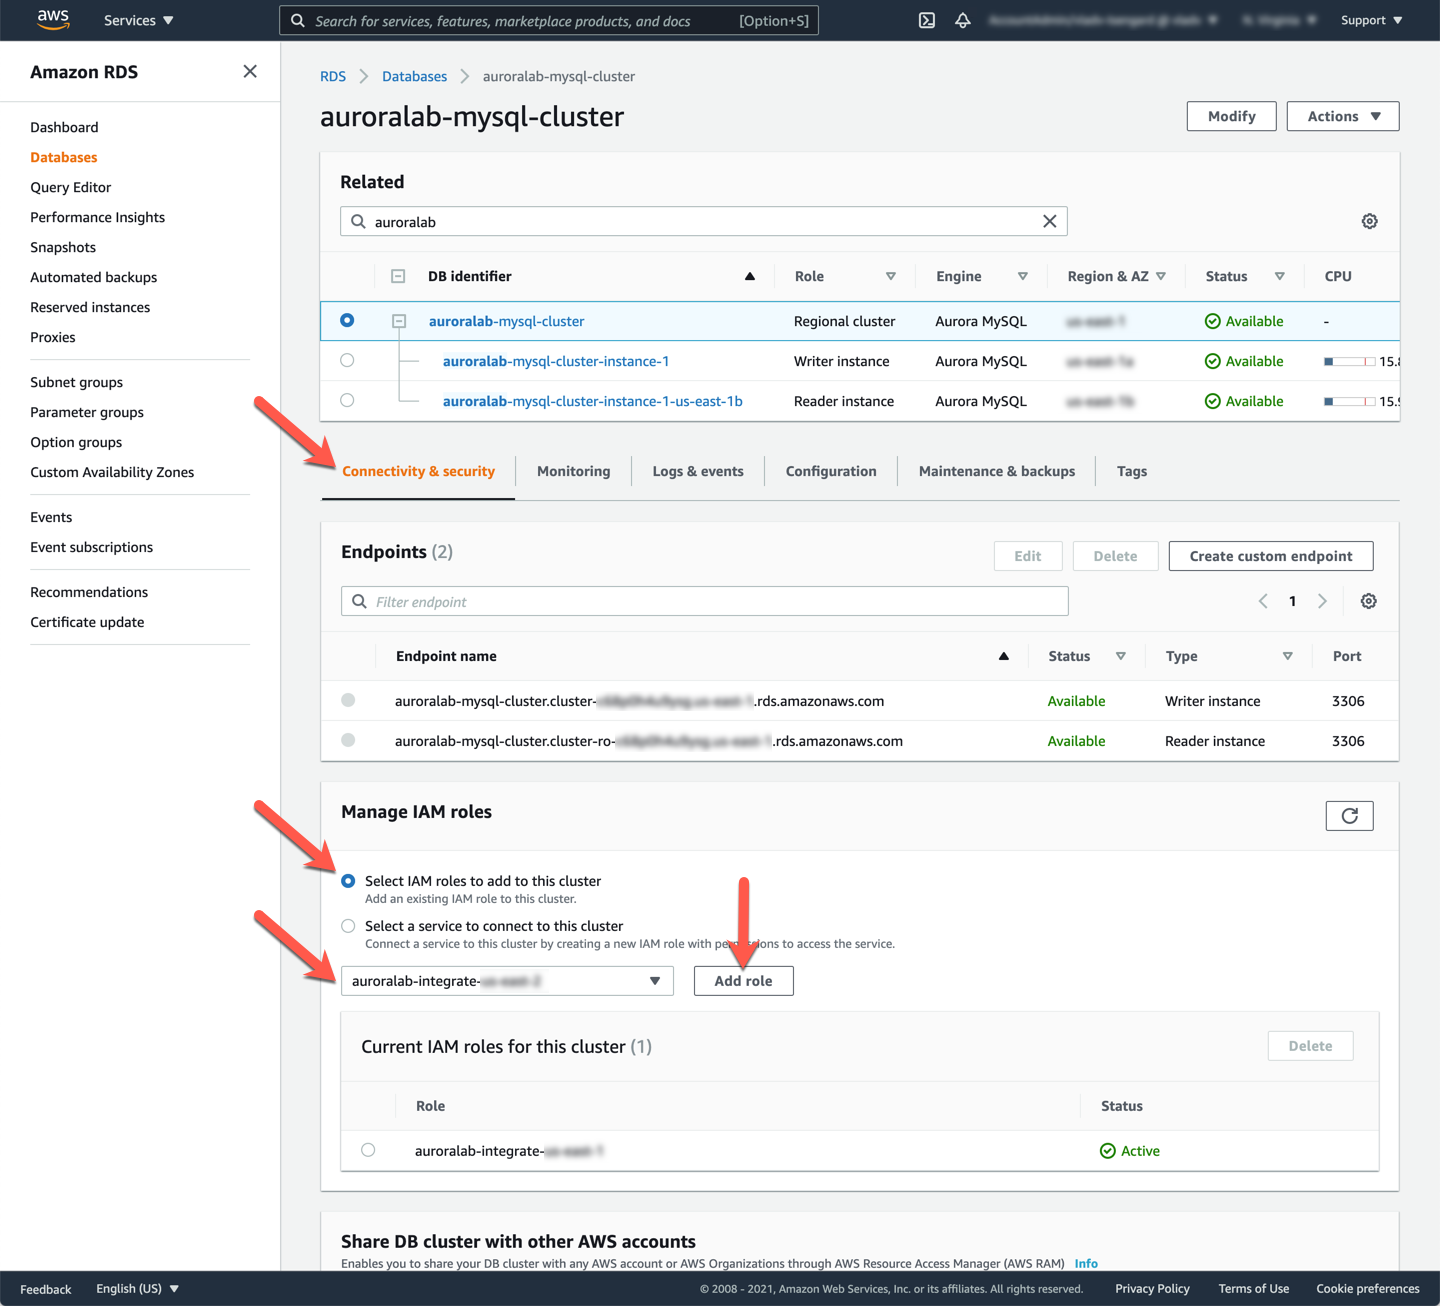
Once the operation completes the **Status** of the role will change from `Pending` to `Active`.
## 4. Create a replica auto scaling policy
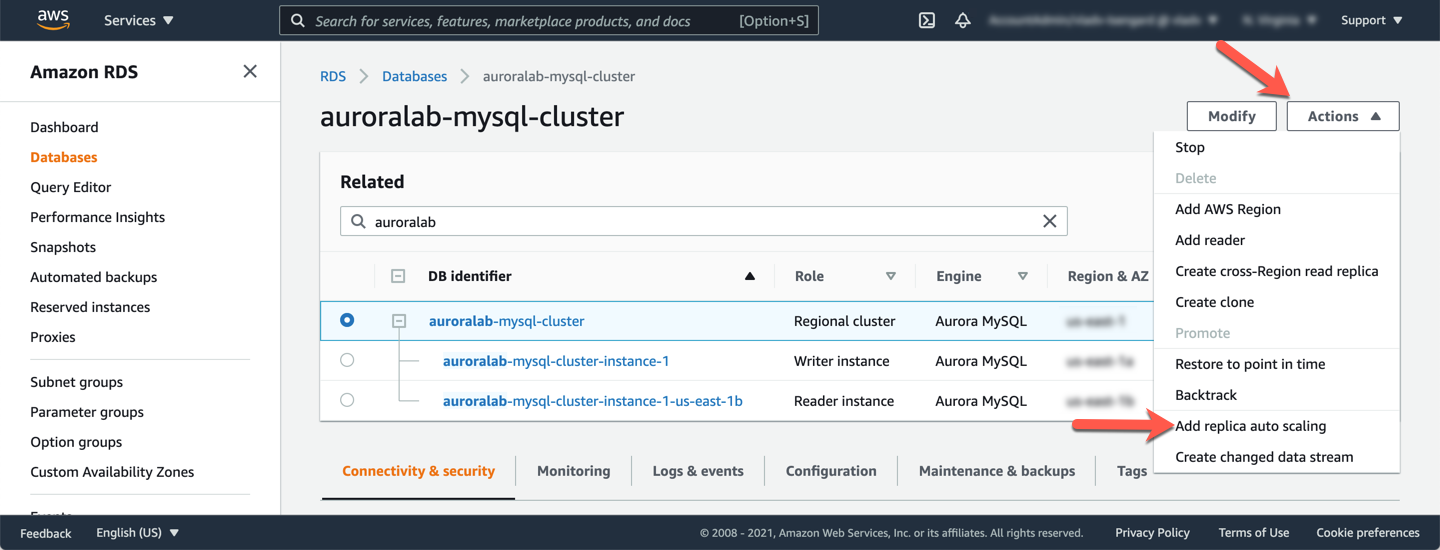
Finally, you will add a read replica auto scaling configuration to the DB cluster. This will allow the DB cluster to scale the number of reader DB instances that operate in the DB cluster at any given point in time based on the load.
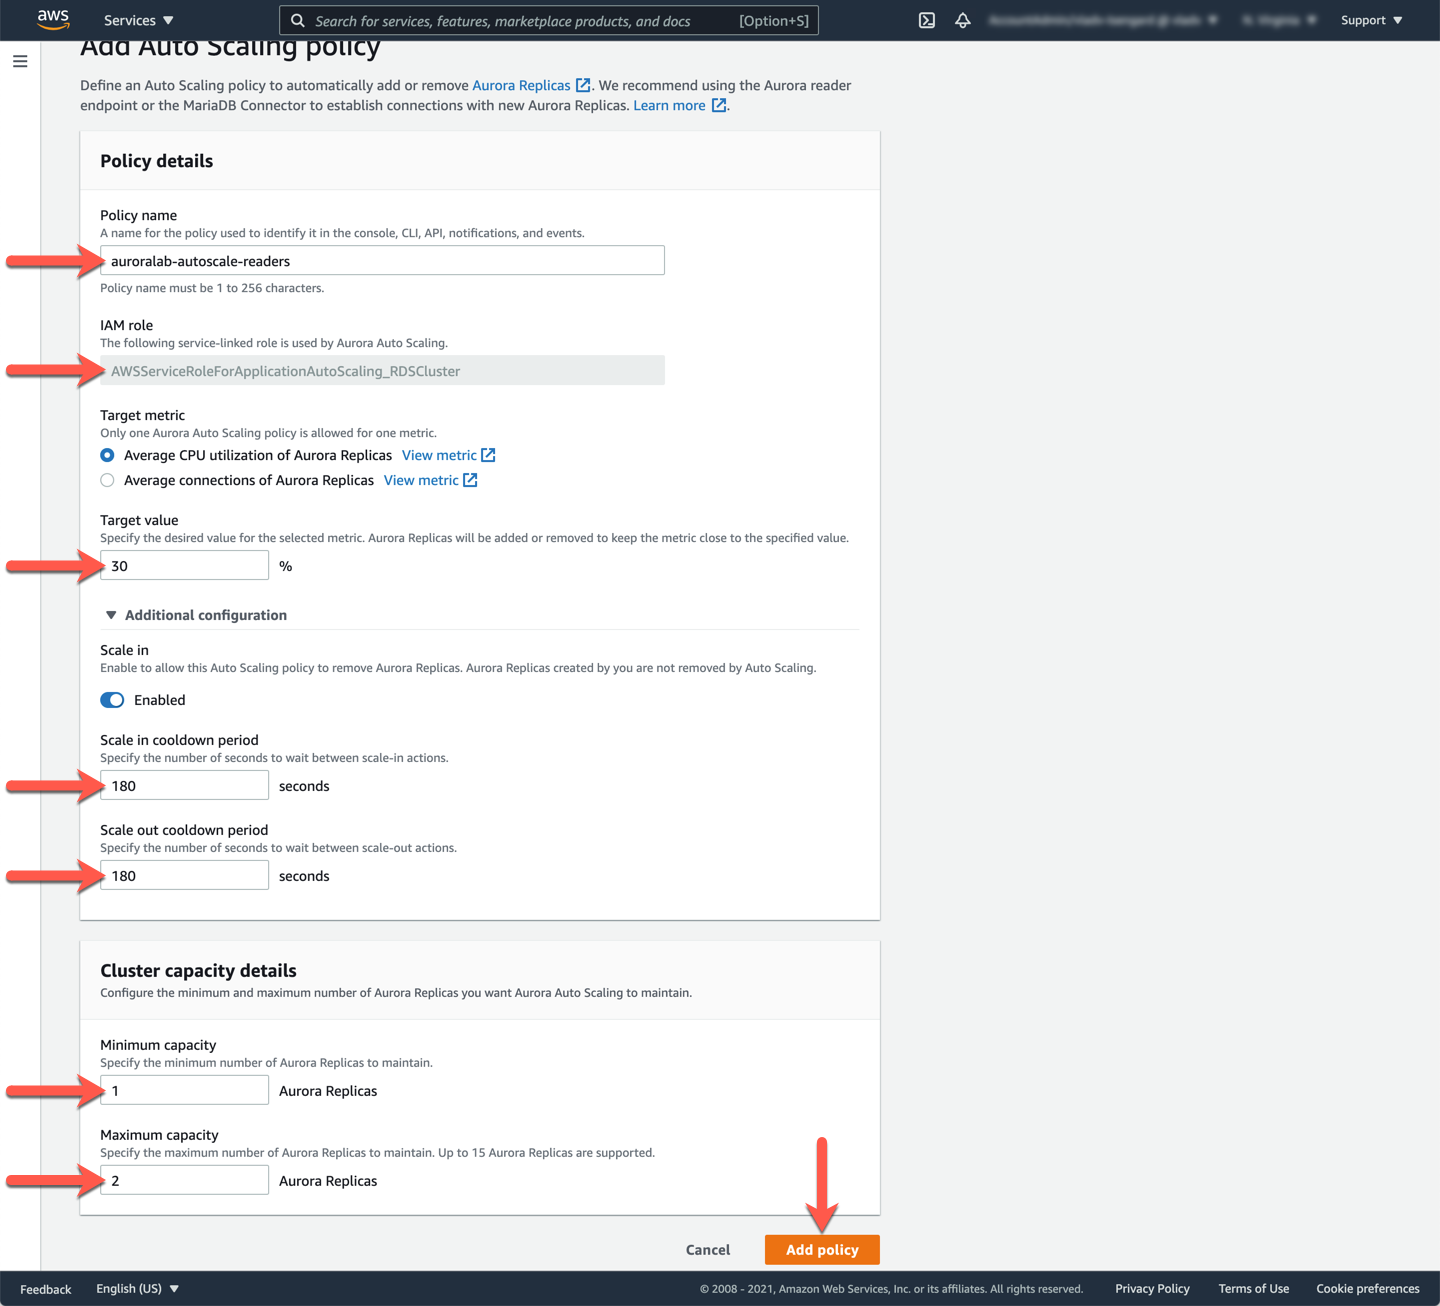
In the top right corner of the details page, click on **Actions** and then on **Add replica auto scaling**.
Set the **Policy name** based on the stack name: `auroralab-autoscale-readers`. For the **Target metric** choose **Average CPU utilization of Aurora Replicas**. Enter a **Target value** of `30` percent. In a production use case this value may need to be set much higher, but we are using a lower value for demonstration purposes. Next, expand the **Additional configuration** section, and change both the **Scale in cooldown period** and **Scale out cooldown period** to a value of `180` seconds. This will reduce the time you have to wait between scaling operations in subsequent labs.
In the **Cluster capacity details** section, set the **Minimum capacity** to `1` and **Maximum capacity** to `2`. In a production use case you may need to use different values, but for demonstration purposes, and to limit the cost associated with the labs we limit the number of readers to two. Next click **Add policy**.
## 5. Create an AWS Secrets Manager secret
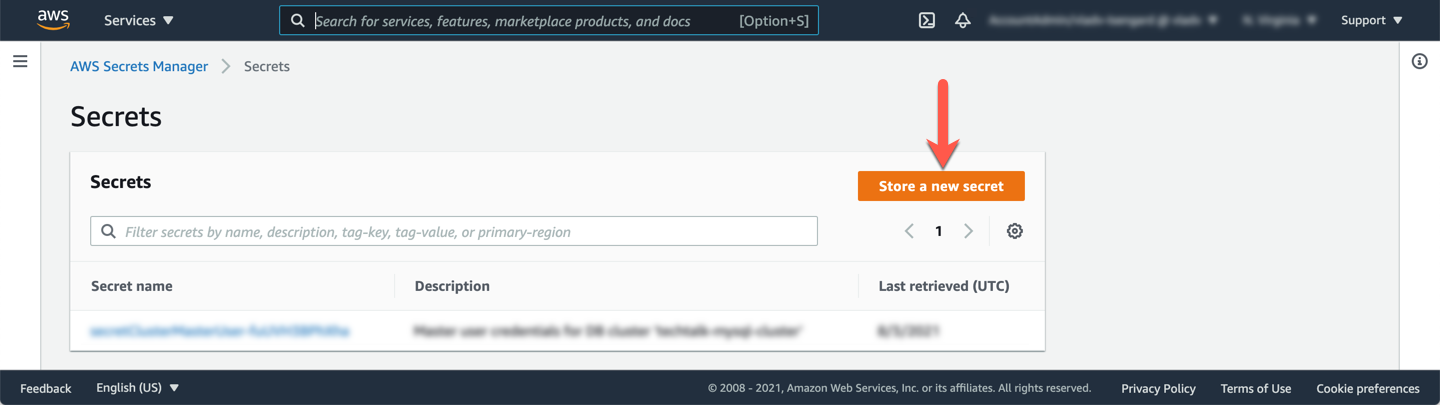
Open the AWS Secrets Manager service console.
!!! warning "Region Check"
Ensure you are still working in the correct region, especially if you are following the links above to open the service console at the right screen.
Click **Store a new secret** to start the configuration process.
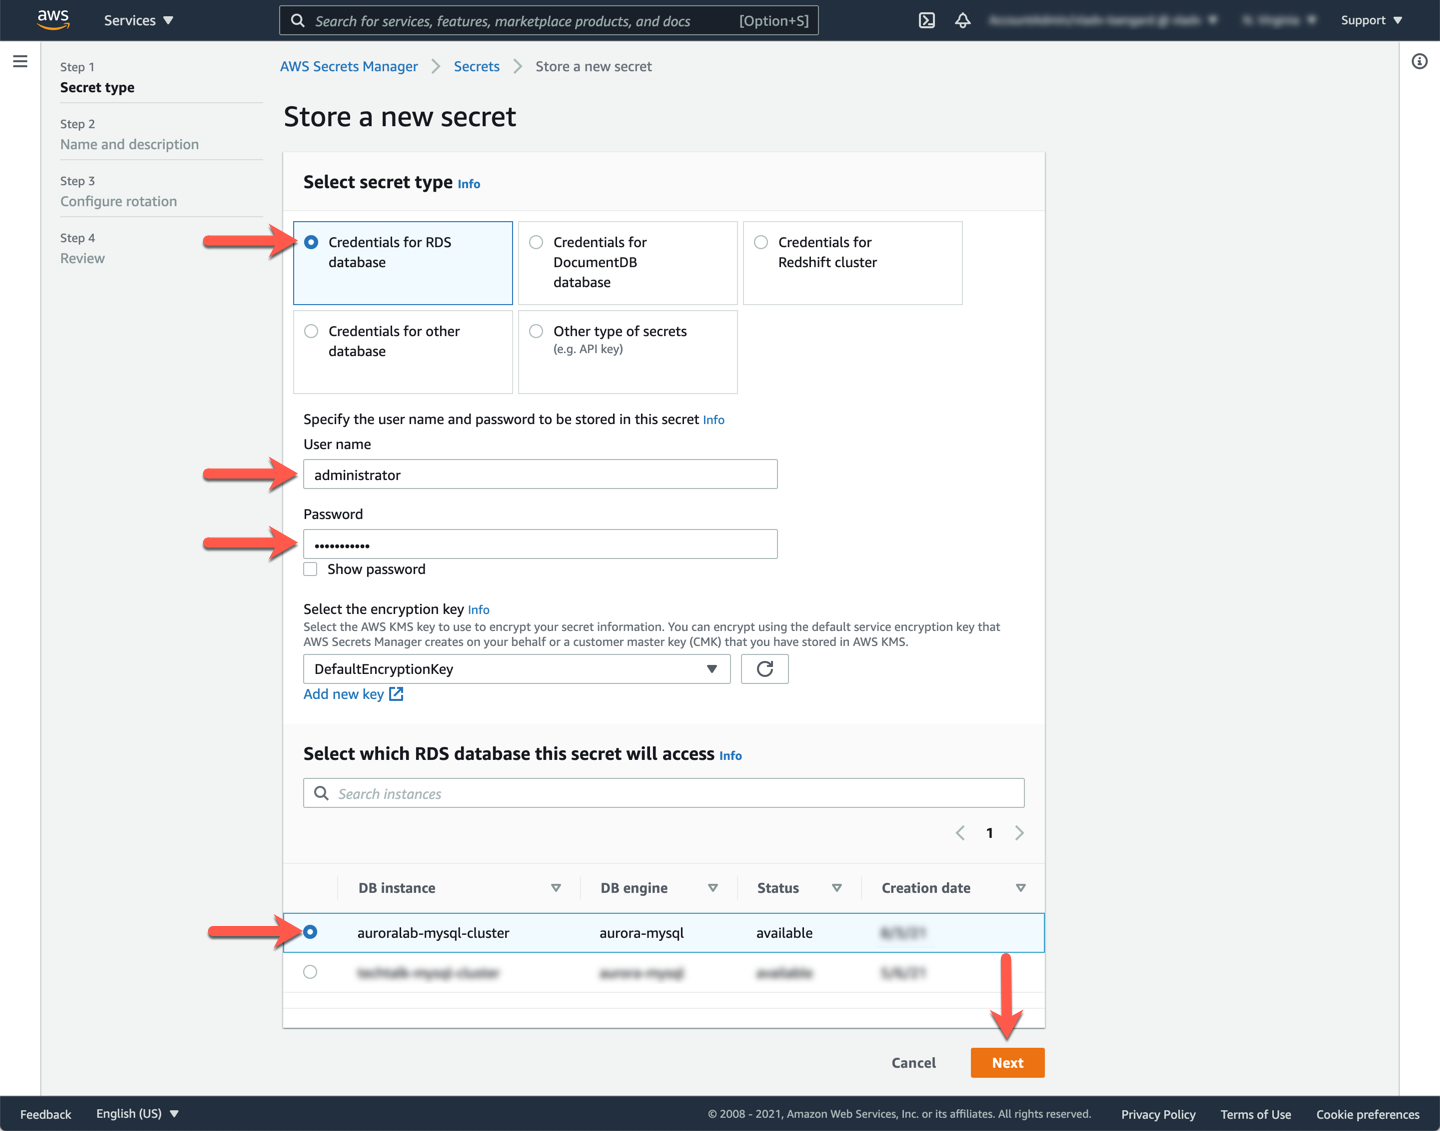
In the **Select secret type** section, choose **Credentials for RDS database**, then input the **User name** (should be `administrator`) and **Password** that you provided when you created the DB cluster previously.
Next, in the **Select which RDS database this secret will access** section, choose the DB cluster identifier you assigned to your cluster (e.g. `auroralab-mysql-cluster`). Click **Next**.
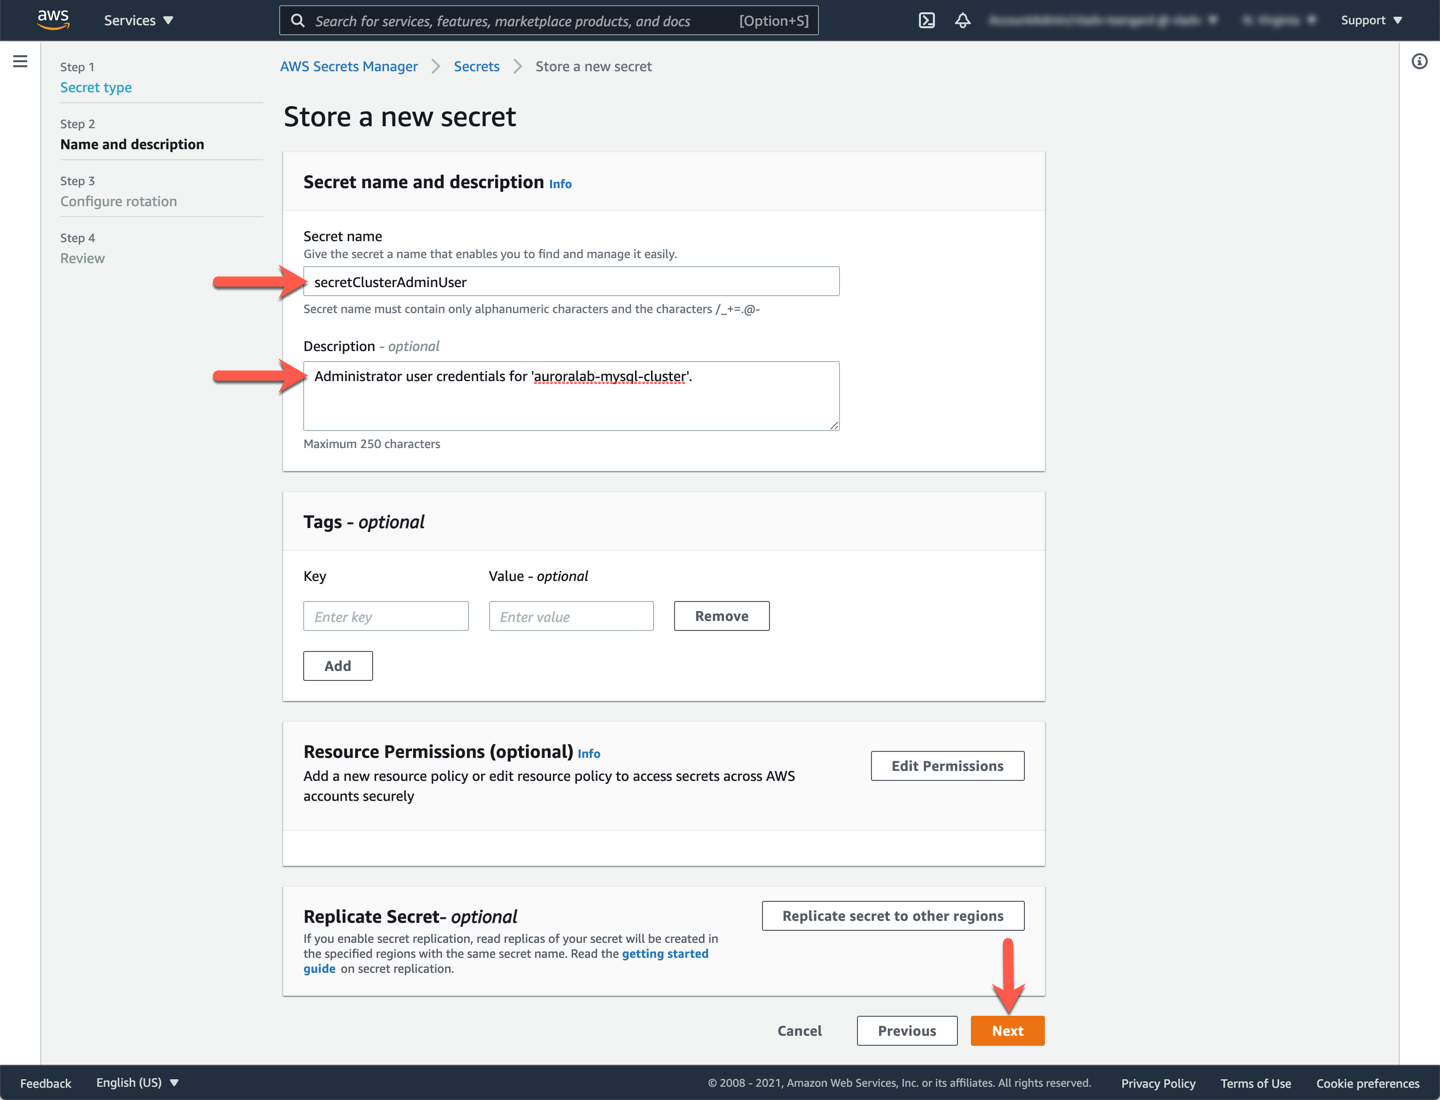
Name the secret `secretClusterAdminUser` and provide a relevant description for the secret, then click **Next**.
Finally, in the **Configure automatic rotation** section, leave the option of **Disable automatic rotation** selected. In a production environment you will want to use database credentials that rotate automatically for additional security. Click **Next**.

In the **Review** section you have the ability to check the configuration parameters for your secret, before it gets created. Additionally, you can retrieve sample code in popular programming languages, so you can easily retrieve secrets into your application. Click **Store** at the bottom of the screen.
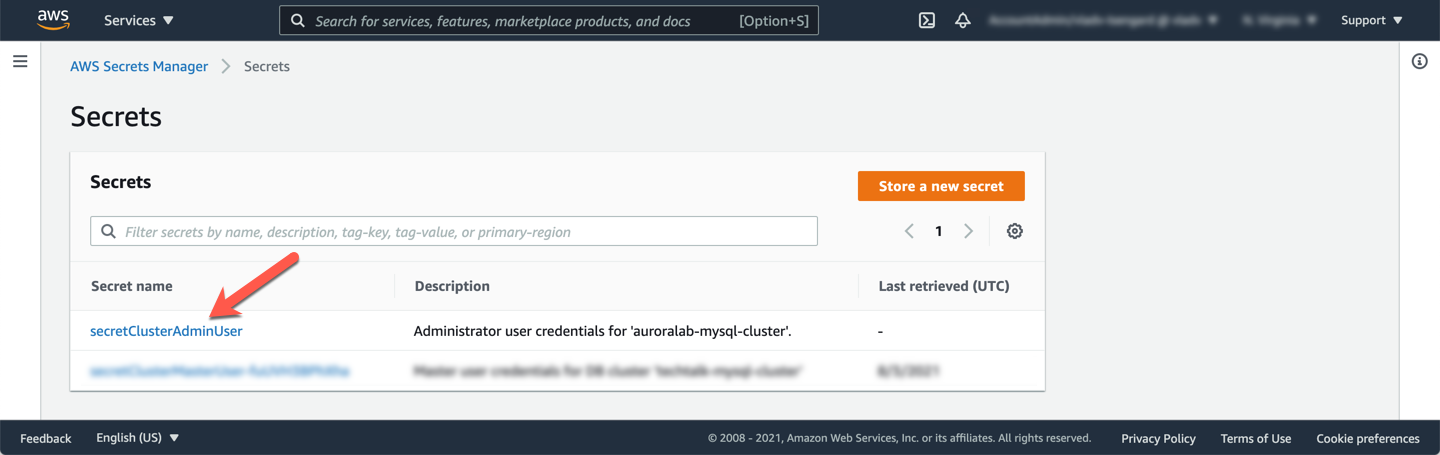
Once created, identify the **ARN** of the newly created secret. This value will be needed in subsequent labs. In the list of **Secrets** in the console, click on the name of the newly created secret.
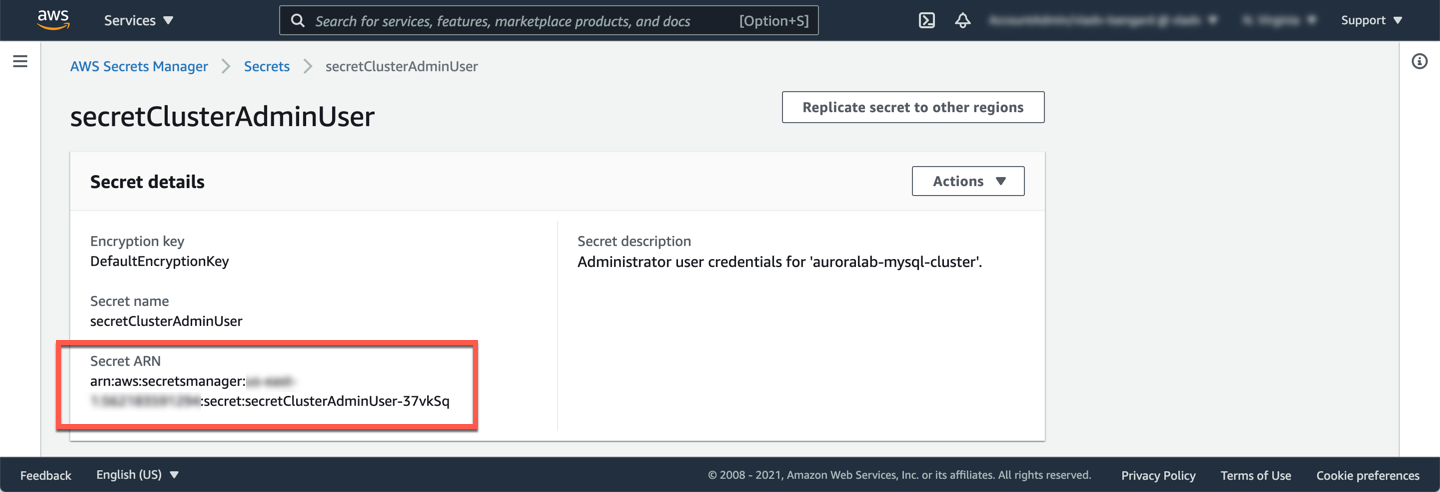
In the detail view of the secret, note the value for **Secret ARN**. Write this down, you will need it later.
## 6. Configure your Cloud9 desktop
Subsequent labs on this site use a consistent way to access DB credentials, regardless if the DB cluster was created manually or automatically. To simplify interactions, the lab credentials are saved in environment variables on the EC2 workstation you use to issue commands to the database. When the cluster is created automatically, the credentials are also set up for you. When you create the cluster manually, you need to run a few additional commands to reach parity.
If you have not already opened a terminal window in the Cloud9 desktop in a previous lab, please [following these instructions](/prereqs/connect/) to do so now. Once connected, run the command below, replacing the ==[secretArn]== placeholder with the ARN of the secret created above:
```
CREDS=`aws secretsmanager get-secret-value --secret-id [secretArn] | jq -r '.SecretString'`
export DBUSER="`echo $CREDS | jq -r '.username'`"
export DBPASS="`echo $CREDS | jq -r '.password'`"
echo "export DBPASS=\"$DBPASS\"" >> /home/ec2-user/.bashrc
echo "export DBUSER=$DBUSER" >> /home/ec2-user/.bashrc
```
## 7. Verify DB cluster
Let's make sure your DB cluster has been created properly. First let's ensure the credentials have been saved correctly in the environment variables, run:
```
echo $DBUSER
```
You should see `administrator` as the response string. Next, verify the version of the database engine created. Run the command below, replacing the ==[clusterEndpoint]== placeholder with the value of the cluster endpoint created in the preceding steps:
```
mysql -h[clusterEndpoint] -u$DBUSER -p"$DBPASS" -e"SELECT @@aurora_version;"
```
You should see a response containing version number `2.10.0`.