## Amazon Dynamodb Implementing Priority Queuing
Implementing Priority Queuing with Amazon DynamoDB
## License Summary
This sample code is made available under the MIT-0 license. See the LICENSE file.
## Quick start
1) Generate DynamoDB table using the CloudFromation script, as [shown below](#cdk)
Example:
aws cloudformation create-stack --stack-name q-ddb-stack --template-body file://aws-blog-queue-dynamodb-stack.template.json
2) Build your Java code
In the root of the project, type on the terminal: mvn clean install
Above command should build a JAR in the /target folder.
3) Start our own CLI using [Java JAR command](#cli)
Example:
java -cp awsblog-queueing-1.0.0.jar com.awsblog.queueing.cli.CLI --profile=default --region=us-east-1
4) Run Shipment & Queue simulation: follow the [test script](#how-to-test?)
## Build your infrastructure
There are several ways to build necessary infrastructure to showcase queuing concepts.
a) Using Cloud Formation script to build the dynamoDB table
There is a `aws-blog-queue-dynamodb-stack.template.json` at the root of the project. Run the following AWS CLI command:
```
aws cloudformation create-stack --stack-name q-ddb-stack --template-body file://aws-blog-queue-dynamodb-stack.template.json
```
Above script will generate required DynamoDB table.
b) Run CDK (we have used 1.11.DevPreview release of the Java CDK)
In order to run the sample code, we have created a CDK code to build your infrastructure in AWS. Running CDK
CLI you will create a DynamoDB example table.
To install the Command Line Interface (CLI) CDK, please follow CDK installation instructions, found at:
https://docs.aws.amazon.com/cdk/latest/guide/getting_started.html
Once you have install the prerequisites, start your terminal and navigate to the root
of our AWS Blog project. You should see the `pom.xml` and `cdk.json` in the root of the
project directory.
Run the following commands:
```
mvn clean compile
cdk --profile
--context instance-name=]
--context aws-region=
--context aws-credentials-profile=
deploy '*'
```
example:
```
cdk --profile default --verbose true --context aws-region=us-east-1 --context aws-credentials-profile=default deploy '*'
```
Current DynamoDB table name is: `AWSBlog-shipment-demo`. If you want to change it, make sure that this needs to be changed in the 2 places:
- `aws-blog-queue-dynamodb-stack.template.json`
- `configuration.json`
## SDK
Our project contains a SDK that supports all key queuing commands addressed in the Blog Post.
All of those commands are show cased within `com.awsblog.queueing.test` package.
Simple example:
``` \java
String ID = "A-101";
ShipmentData data = new ShipmentData(ID);
data.setData1("Data 1"); data.setData2("Data 2"); data.setData3("Data 3");
data.setItems(Arrays.asList(new ShipmentItem("Item-1", true), new ShipmentItem("Item-2", false)));
Shipment shipment = new Shipment();
shipment.setId(ID);
shipment.setData(data);
// create a SDK client
QueueSdkClient client = new QueueSdkClient.Builder()
.withCredentialsProfileName("default")
.withRegion("us-east-1").build();
// store shipment record in the DynamoDB table
client.put(shipment);
QueueStats queueStats = client.getQueueStats();
System.out.println(Utils.toJSON(queueStats));
// use SDK's get() method
Shipment retrievedShipment = client.get("A-101");
System.out.println(Utils.toJSON(retrievedShipment));
// send the record to the queue
EnqueueResult result = client.enqueue("A-101");
System.out.println(Utils.toJSON(result));
if (!result.isSuccessful()) {
// in case it failed, change the status and try it again
client.updateStatus("A-101", StatusEnum.READY_TO_SHIP);
client.enqueue("A-101");
}
Shipment enqueuedShipment = result.getShipment();
System.out.println(Utils.toJSON(enqueuedShipment));
queueStats = client.getQueueStats();
System.out.println(Utils.toJSON(queueStats));
// Retrieve the record from the queue
PeekResult peek = client.peek();
System.out.println(Utils.toJSON(peek.getPeekedShipmentId()));
```
## CLI
### Overview
CLI is a Java based utility that provides a Command Line Interface to number of methods
related to this AWS Blog Post project. The tool is a great educational system to better understand how queue implementation works on DynamoDB.
### Getting Started with CLI
In order to use CLI from the terminal, go to the folder: `.//target/`
In order to start your CLI session you'll have two different options to invoke your session.
- Option 1: Invoke the CLI with `--profile` and `--region` command line parameters
- Option 2: Start CLI without initially connected to AWS; at later time, user can use CLI 'aws' command to connect to AWS.
To start your interactive CLI, run the following command:
```
java -cp awsblog-queueing-1.0.0.jar com.awsblog.queueing.cli.CLI [--profile=] [--region=>]
```
Example:
```
java -cp awsblog-queueing-1.0.0.jar com.awsblog.queueing.cli.CLI --profile=default --region=us-east-1
```
### User guide
Once CLI is running, enter `h` or `?` to obtain the help:
```\java
===========================================================
>> Welcome to Queueing AWS Blog Post's CLI Tool!
===========================================================
for help, enter one of the following: ? or h or help
all commands in CLIs need to be typed in lowercase
current directory is: [/Users/xyz/Projects/AWSBlogPostQueueing/.]
... AWS session is properly established!
>> Enter command: ?
... this is CLI HELP!
> aws [] [Establish connection with AWS; Default profile name: `default` and region: `us-east-1`]
> qstat | qstats [Retrieves the Queue statistics (no need to be in App mode)]
> dlq [Retrieves the Dead Letter Queue (DLQ) statistics]
> create-test | ct [Create test Shipment records in DynamoDB: A-101, A-202, A-303 and A-404; if already exists, it will overwrite it]
> purge [It will remove all test data from DynamoDB]
> ls [List all shipment IDs ... max 10 elements]
> id [Get the application object from DynamoDB by app domain ID; CLI is in the app mode, from that point on]
> sys [Show system info data in a JSON format]
> data [Print the data as JSON for the current shipment record]
> info [Print all info regarding Shipment record: system_info and data as JSON]
> update [Update Shipment status .. e.g.: from UNDER_CONSTRUCTION to READY_TO_SHIP]
> reset [Reset the system info of the current shipment record]
> ready [Make the record ready for the shipment]
> enqueue | en [Enqueue current ID]
> peek [Peek the Shipment from the Queue .. it will replace the current ID with the peeked one]
> done [Simulate successful record processing completion ... remove from the queue]
> fail [Simulate failed record's processing ... put back to the queue; needs to be peeked again]
> invalid [Remove record from the regular queue to dead letter queue (DLQ) for manual fix]
> id [Reverting back to the standard CLI's system operational mode]
>> Enter command:
```
At the start, you are in the `standard` CLI mode. Here you can do check the queue or create the test data.
When entering `id ` you are in the CLI's App Shipment mode, wher you can do
various operation on the selected shipment record. ID information will be displayed
at the CLI's command prompt.
Example:
```
>> Enter command: aws default us-east-1
... AWS session is properly established!
>> Enter command: id A-101
Shipment's [A-101] record dump
{
"id" : "A-101",
"data" : {
"id" : "A-101",
"items" : [ {
"SKU" : "Item-1",
"is_packed" : true
}, {
"SKU" : "Item-2",
"is_packed" : false
} ],
"data_element_1" : "Data 1",
"data_element_2" : "Data 2",
"data_element_3" : "Data 3"
},
"system_info" : {
"id" : "A-101",
"creation_timestamp" : "2019-08-07T17:56:13.644Z",
"last_updated_timestamp" : "2019-08-07T20:46:01.160Z",
"status" : "PROCESSING_SHIPMENT",
"version" : 13,
"queued" : false,
"queue_selected" : false,
"queue_add_timestamp" : "2019-08-07T17:56:13.932Z",
"queue_peek_timestamp" : "2019-08-07T20:46:00.958Z",
"queue_remove_timestamp" : "2019-08-07T20:46:01.160Z"
}
}
ID >> Enter command:
```
## How to test?
To start, crate test records.
Run the following CLI command:
```
>> Enter command: ct
>> Creating shipment with ID : A-101
>> Creating shipment with ID : A-202
>> Creating shipment with ID : A-303
>> Creating shipment with ID : A-404
```
Above command has created 4 records, all with `UNDER_CONSTRUCTION` status.
List shipment records (10 records only), not in any specific order:
```
>> Enter command: ls
List of first 10 IDs:
>> ID : A-101 - status: UNDER_CONSTRUCTION
>> ID : A-202 - status: UNDER_CONSTRUCTION
>> ID : A-303 - status: UNDER_CONSTRUCTION
>> ID : A-404 - status: UNDER_CONSTRUCTION
```
Make the A-101 a current record:
```
>> Enter command: id A-101
Shipment's [A-101] record dump
{
"id" : "A-101",
"data" : {
"id" : "A-101",
"items" : [ {
"SKU" : "Item-1",
"is_packed" : true
}, {
"SKU" : "Item-2",
"is_packed" : true
}, {
"SKU" : "Item-3",
"is_packed" : true
} ],
"data_element_1" : "Data 1",
"data_element_2" : "Data 2",
"data_element_3" : "Data 3"
},
"system_info" : {
"id" : "A-101",
"creation_timestamp" : "2019-10-07T19:30:41.974Z",
"last_updated_timestamp" : "2019-10-07T19:30:41.974Z",
"status" : "UNDER_CONSTRUCTION",
"version" : 1,
"queued" : false,
"queue_selected" : false
}
}
```
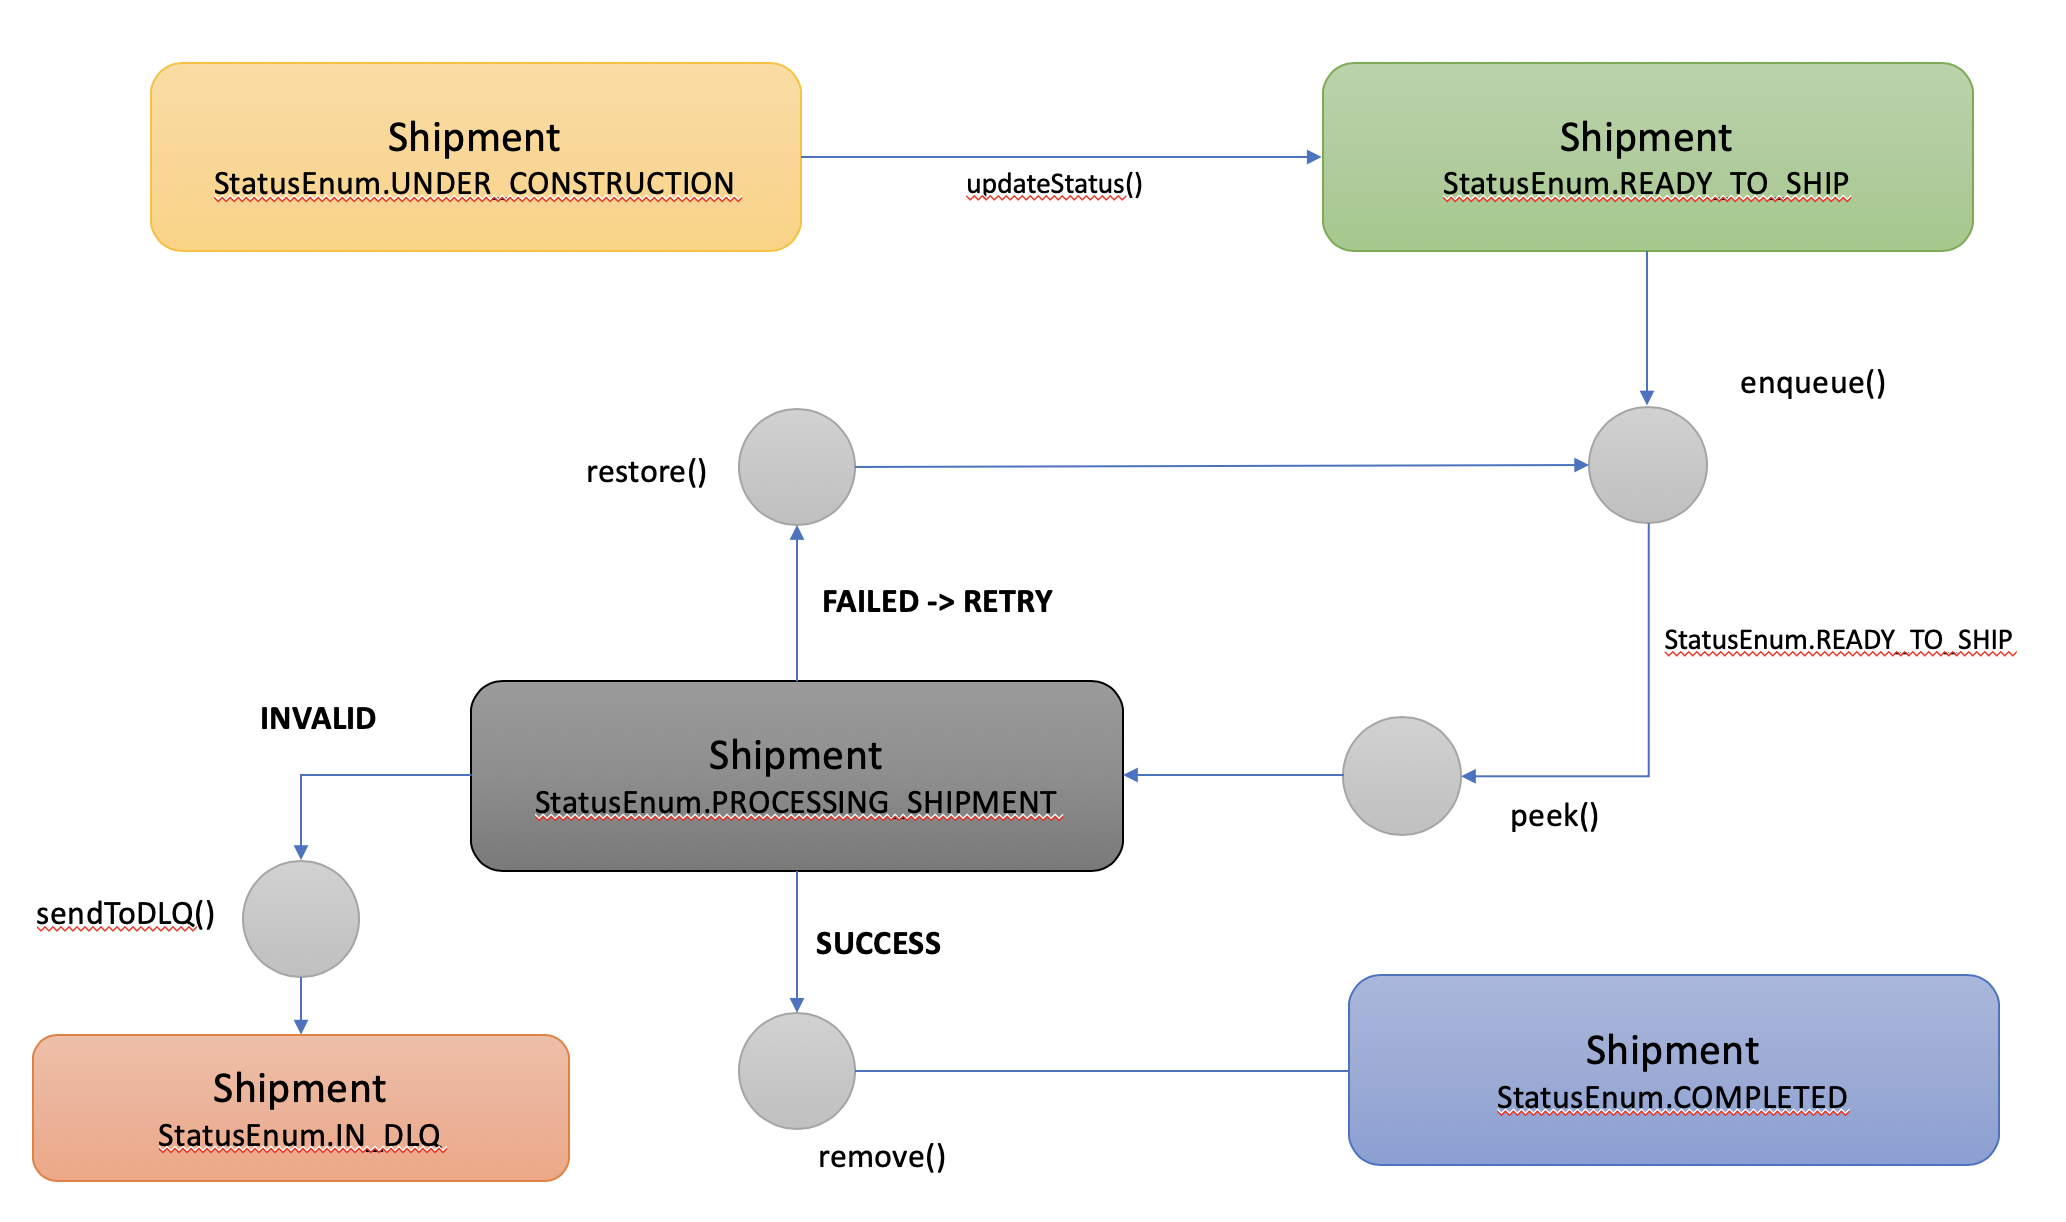
We'll follow the status transition chart:
Display system_info for the current ID:
```
ID >> Enter command: sys
ID's system info:
{
"id" : "A-101",
"creation_timestamp" : "2019-10-07T19:30:41.974Z",
"last_updated_timestamp" : "2019-10-07T19:30:41.974Z",
"status" : "UNDER_CONSTRUCTION",
"version" : 1,
"queued" : false,
"queue_selected" : false
}
```
Simulate the event when the record is finally ready for shipment. We'll use CLI's command `enqueue` or `en` to mark the record as ready to be shipped. The record will be placed in the queue.
Behind the scene, CLI is marking the record as `READY_TO_SHIP` and it is calling SDK's `enqueue(id)` method.
```
ID >> Enter command: en
Record's system info:
{
"id" : "A-101",
"creation_timestamp" : "2019-10-07T19:42:13.154Z",
"last_updated_timestamp" : "2019-10-07T19:42:13.311Z",
"status" : "READY_TO_SHIP",
"version" : 2,
"queued" : true,
"queue_selected" : false
} Queue stats
{
"first_100_IDs_in_queue" : [ "A-101" ],
"total_records_in_queue" : 1,
"total_records_in_queue_selected_for_processing" : 0,
"total_records_in_queue_pending_for_processing" : 1
}
```
In above example, we can see that the record with ID: A-101 is placed in the queue. Now the status is changed to `READY_TO_SHIP`.
In order to be going to processing stage, it will need to be retrieved from the queue, using SDK's `peek()` method.
We can obtain the queue statistics at any time using the `qstat` command:
```
ID >> Enter command: qstat
Queue status
{
"first_100_IDs_in_queue" : [ "A-101" ],
"total_records_in_queue" : 1,
"total_records_in_queue_selected_for_processing" : 0,
"total_records_in_queue_pending_for_processing" : 1
}
```
The `ls` list command now shows:
```
ID >> Enter command: ls
List of first 10 IDs:
>> ID : A-101 - status: READY_TO_SHIP
>> ID : A-202 - status: UNDER_CONSTRUCTION
>> ID : A-303 - status: UNDER_CONSTRUCTION
>> ID : A-404 - status: UNDER_CONSTRUCTION
```
We'll do the same with the record with ID: A-202.
Now `qstat` shows the two records in queue:
```
ID >> Enter command: qstat
Queue status
{
"first_100_IDs_in_queue" : [ "A-101", "A-202" ],
"total_records_in_queue" : 2,
"total_records_in_queue_selected_for_processing" : 0,
"total_records_in_queue_pending_for_processing" : 2
}
```
Notice that the first record is the oldest record (A-101).
If we want to retrieve the record from the queue, we can use `peek` command:
```
ID >> Enter command: peek
Peek was successful ... record peeked is: [A-101]
{
"id" : "A-101",
"creation_timestamp" : "2019-10-07T19:43:45.676Z",
"last_updated_timestamp" : "2019-10-07T19:43:45.822Z",
"status" : "PROCESSING_SHIPMENT",
"version" : 3,
"queued" : true,
"queue_selected" : true,
"queue_peek_timestamp" : "2019-10-07T19:46:11.011Z"
}
Queue stats
{
"first_100_IDs_in_queue" : [ "A-101", "A-202" ],
"first_100_selected_IDs_in_queue" : [ "A-101" ],
"total_records_in_queue" : 2,
"total_records_in_queue_selected_for_processing" : 1,
"total_records_in_queue_pending_for_processing" : 1
}
```
Above, we can see that A-101 is peeked from the queue. The status of the record is changed to `PROCESSING_SHIPMENT`. From this point, we can have successful processing -
it removes Shipment record from the queue, failed - puts it back in the queue or marks it as invalid - it sends the record to another queue,
called Dead Letter Queue (DLQ) for further processing.
At this stage, we'll simulate successful processing of the record, using `done' command.
```
ID >> Enter command: done
Processing for ID [A-101] is completed successfully! Remove from the queue!
Queue status
{
"first_100_IDs_in_queue" : [ "A-202" ],
"total_records_in_queue" : 1,
"total_records_in_queue_selected_for_processing" : 0,
"total_records_in_queue_pending_for_processing" : 1
}
```
The status of A-101 is changed to `COMPLETED`:
```
{
"id" : "A-101",
"creation_timestamp" : "2019-10-07T19:43:45.676Z",
"last_updated_timestamp" : "2019-10-07T19:47:23.824Z",
"status" : "COMPLETED",
"version" : 5,
"queued" : false,
"queue_selected" : false,
"queue_peek_timestamp" : "2019-10-07T19:46:11.011Z",
"queue_remove_timestamp" : "2019-10-07T19:47:23.824Z"
}
```
This record cannot be used anymore. Call to any command, such as `enqueue` or `done` would fail.
```
ID >> Enter command: en
Enqueue has failed!
Error message:
{
"errorMessage" : "Illegal state, cannot proceed!",
"successful" : false,
"id" : "A-101",
"return_value" : "FAILED_ILLEGAL_STATE",
"status" : "PROCESSING_SHIPMENT",
"last_updated_timestamp" : "2019-10-07T19:59:21.526Z",
"version" : 2
}
```
In another example, we'll re-create all test records and will enqueue A-303.
```
>> Enter command: id A-303
Shipment's [A-303] record dump
{
"id" : "A-303",
"data" : {
"id" : "A-303",
"items" : [ {
"SKU" : "Item-1",
"is_packed" : true
}, {
"SKU" : "Item-2",
"is_packed" : true
}, {
"SKU" : "Item-3",
"is_packed" : true
} ],
"data_element_1" : "Data 1",
"data_element_2" : "Data 2",
"data_element_3" : "Data 3"
},
"system_info" : {
"id" : "A-303",
"creation_timestamp" : "2019-10-08T14:28:26.582Z",
"last_updated_timestamp" : "2019-10-08T14:28:26.582Z",
"status" : "UNDER_CONSTRUCTION",
"version" : 1,
"queued" : false,
"queue_selected" : false
}
}
ID >> Enter command: en
Record's system info:
{
"id" : "A-303",
"creation_timestamp" : "2019-10-08T15:03:18.332Z",
"last_updated_timestamp" : "2019-10-08T15:03:18.480Z",
"status" : "READY_TO_SHIP",
"version" : 2,
"queued" : true,
"queue_selected" : false
} Queue stats
{
"first_100_IDs_in_queue" : [ "A-303" ],
"total_records_in_queue" : 1,
"total_records_in_queue_selected_for_processing" : 0,
"total_records_in_queue_pending_for_processing" : 1
}
D >> Enter command: peek
Peek was successful ... record peeked is: [A-303]
{
"id" : "A-303",
"creation_timestamp" : "2019-10-08T15:03:18.332Z",
"last_updated_timestamp" : "2019-10-08T15:04:00.543Z",
"status" : "PROCESSING_SHIPMENT",
"version" : 3,
"queued" : true,
"queue_selected" : true,
"queue_peek_timestamp" : "2019-10-08T15:04:00.543Z"
}
Queue stats
{
"first_100_IDs_in_queue" : [ "A-303" ],
"first_100_selected_IDs_in_queue" : [ "A-303" ],
"total_records_in_queue" : 1,
"total_records_in_queue_selected_for_processing" : 1,
"total_records_in_queue_pending_for_processing" : 0
}
```
If we try to `peek` for another record, no shipment record will be returned as there are no more eligible records in the queue.
```
ID >> Enter command: peek
peek() has failed!
Error message:
{
"errorMessage" : "Cannot proceed, queue is empty!",
"successful" : false,
"return_value" : "FAILED_EMPTY_QUEUE",
"status" : "NONE",
"version" : 0,
"timestamp_milliseconds_utc" : 0,
"peeked_id" : "NOT FOUND"
}
```
Now, let's simulate failed processing. We would return the record into the queue; that record's status will change to `READY_TO_SHIP`. Eventually, `peek` will retrieve it for processing. This is using SDK's `restore()` method call.
```
ID >> Enter command: fail
Processing for ID [A-303] has failed! Put the record back to the queue!
Queue status
{
"first_100_IDs_in_queue" : [ "A-303" ],
"total_records_in_queue" : 1,
"total_records_in_queue_selected_for_processing" : 0,
"total_records_in_queue_pending_for_processing" : 1
}
ID >> Enter command: sys
ID's system info:
{
"id" : "A-303",
"creation_timestamp" : "2019-10-08T15:03:18.332Z",
"last_updated_timestamp" : "2019-10-08T15:05:46.928Z",
"status" : "READY_TO_SHIP",
"version" : 4,
"queued" : true,
"queue_selected" : false,
"queue_add_timestamp" : "2019-10-08T15:05:46.928Z",
"queue_peek_timestamp" : "2019-10-08T15:04:00.543Z"
}
```
Let's peek again and let's mark it as an invalid record - goes to Dead Letter Queue (DLQ) for additional processing.
```
ID >> Enter command: peek
Peek was successful ... record peeked is: [A-303]
{
"id" : "A-303",
"creation_timestamp" : "2019-10-08T15:03:18.332Z",
"last_updated_timestamp" : "2019-10-08T15:06:37.644Z",
"status" : "PROCESSING_SHIPMENT",
"version" : 5,
"queued" : true,
"queue_selected" : true,
"queue_add_timestamp" : "2019-10-08T15:05:46.928Z",
"queue_peek_timestamp" : "2019-10-08T15:06:37.644Z"
}
Queue stats
{
"first_100_IDs_in_queue" : [ "A-303" ],
"first_100_selected_IDs_in_queue" : [ "A-303" ],
"total_records_in_queue" : 1,
"total_records_in_queue_selected_for_processing" : 1,
"total_records_in_queue_pending_for_processing" : 0
}
ID >> Enter command: invalid
Processing for ID [A-303] has failed .. invalid data! Send record to DLQ!
Queue status
{
"total_records_in_queue" : 0,
"total_records_in_queue_selected_for_processing" : 0,
"total_records_in_queue_pending_for_processing" : 0
}
```
To check the records in DLQ, use CLI's `dlq` command:
```
ID >> Enter command: dlq
DLQ status
{
"first_100_IDs_in_queue" : [ "A-303" ],
"total_records_in_DLQ" : 1
}
```