# Apache Solr on Amazon Elastic Kubernetes Service
[](https://github.com/aws-samples/amazon-eks-arch-apache-solr/releases)
[](https://github.com/aws-samples/amazon-eks-arch-apache-solr/blob/main/LICENSE)
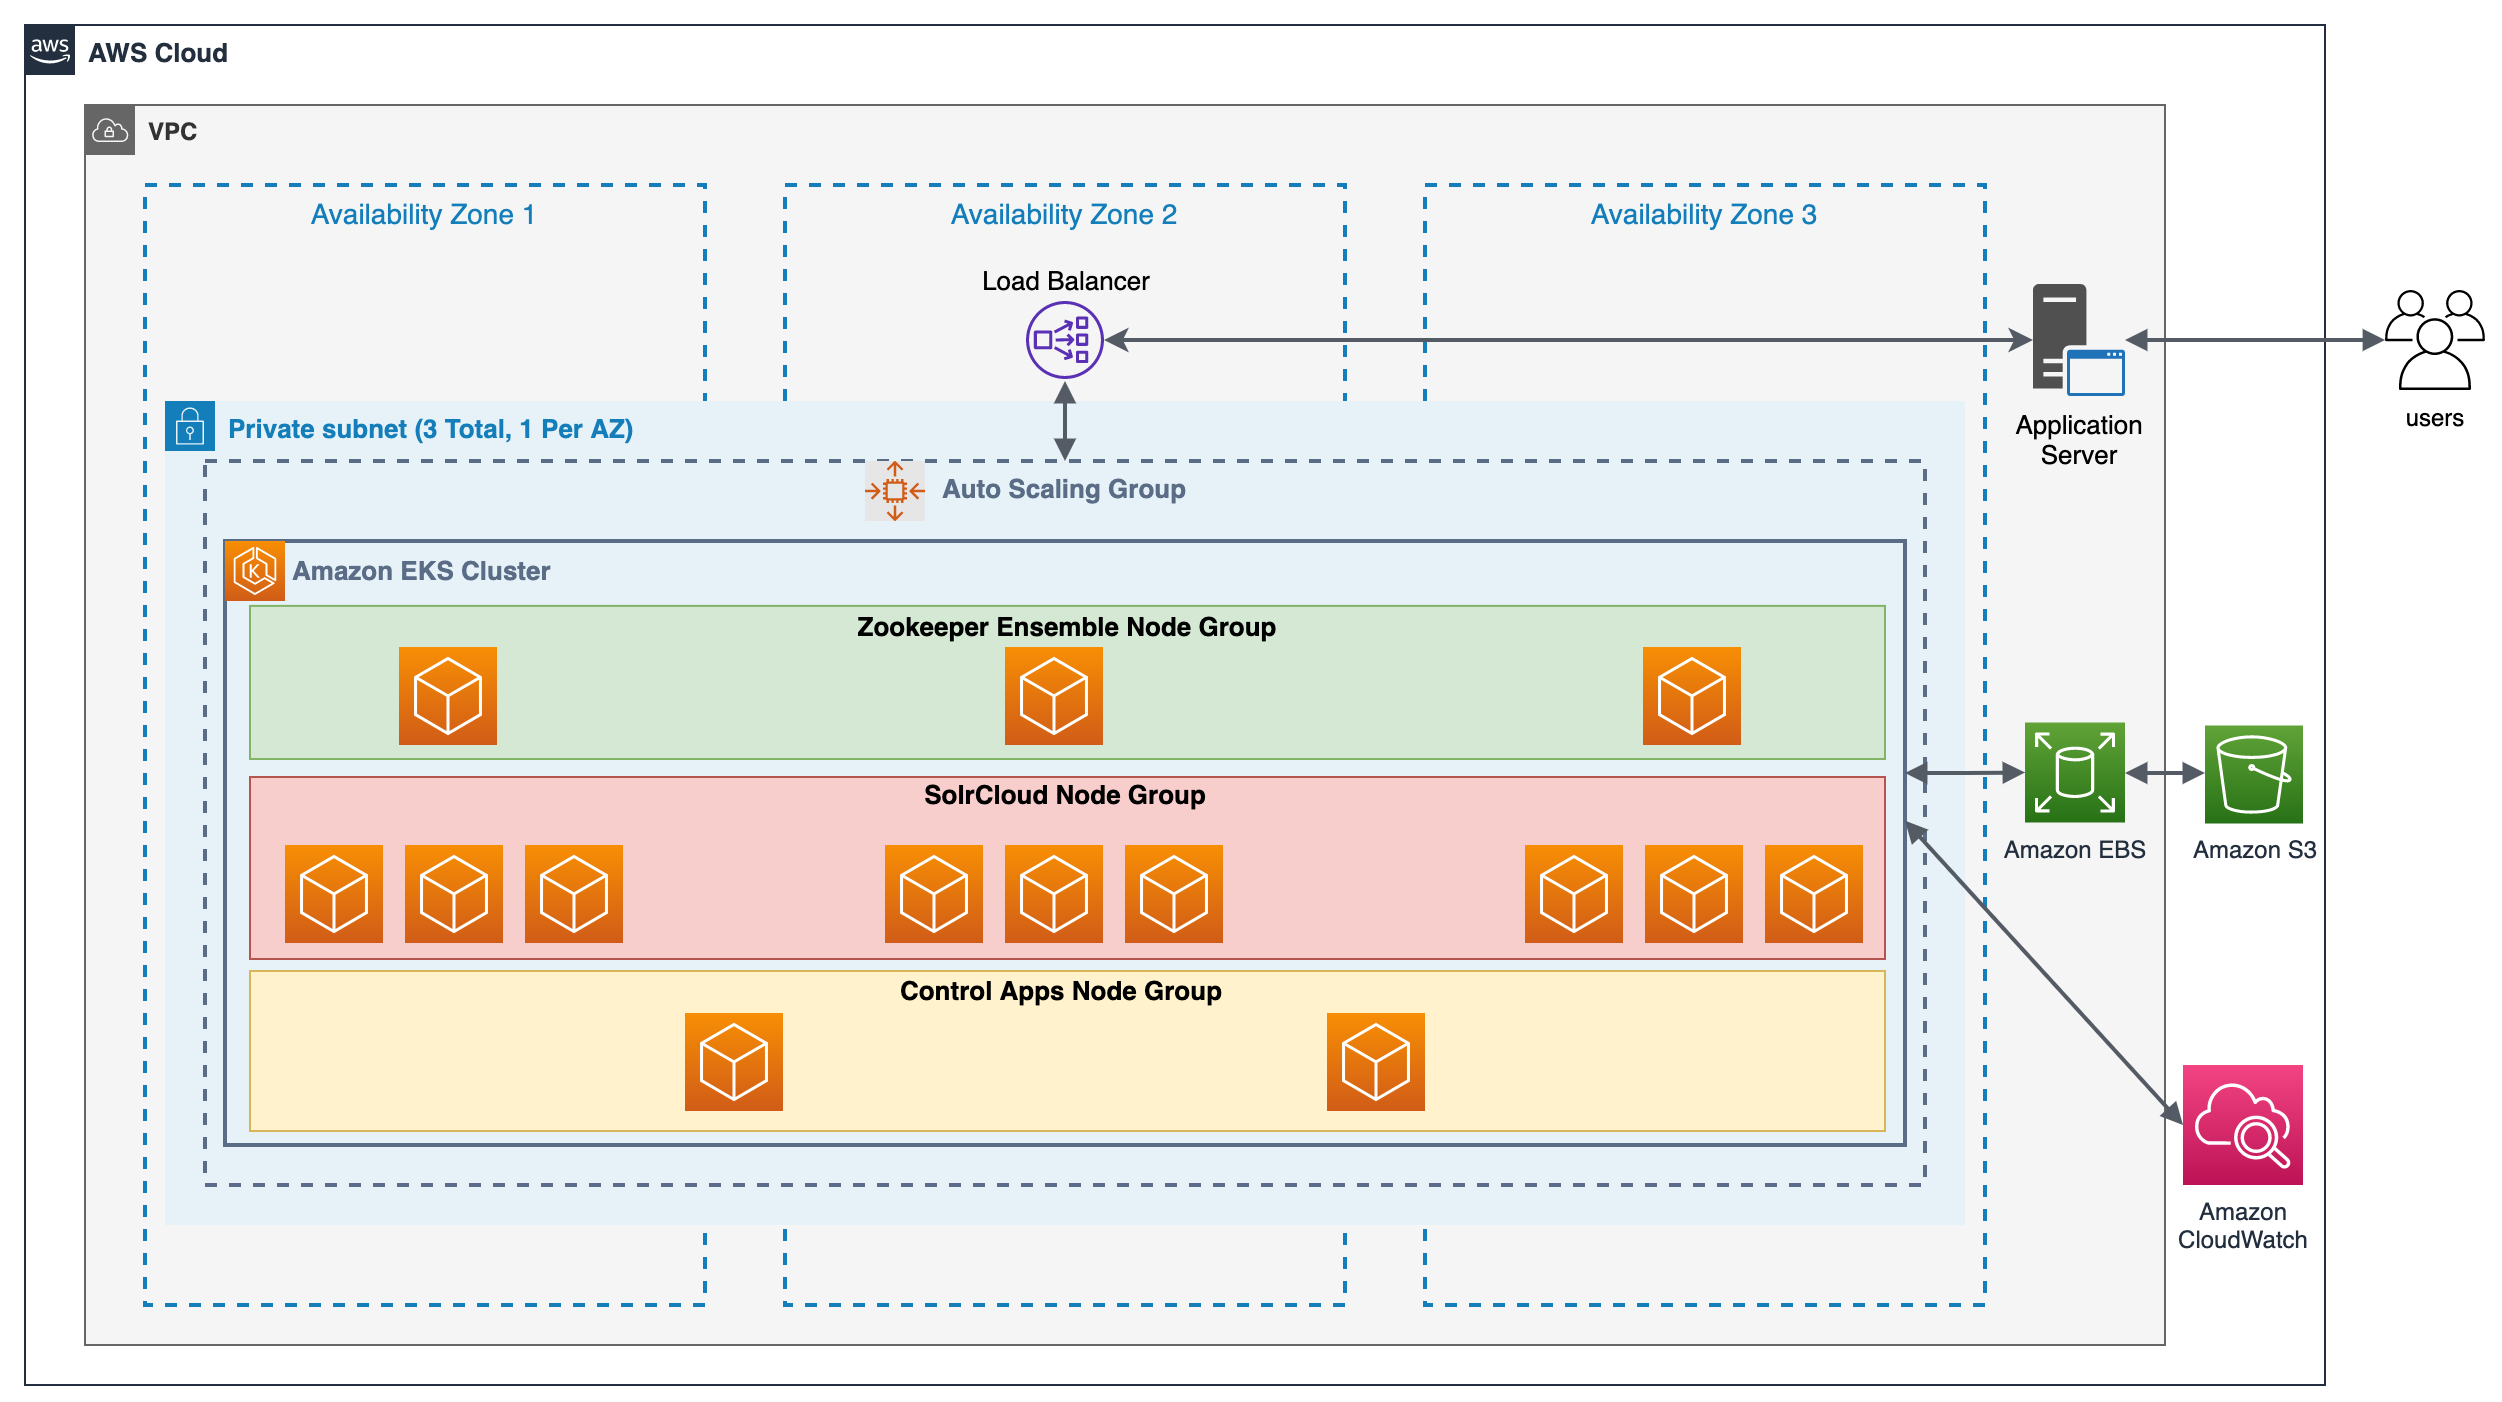
This repo contains sample configuration files to install [Apache Solr](https://solr.apache.org/) on [Amazon Elastic Kubernetes Service (EKS)](https://docs.aws.amazon.com/eks/latest/userguide/what-is-eks.html). It also contains some files required to run the demo. This repository walks through the installation and configuration of the following components-
- An Amazon EKS Cluster with three [managed node groups](https://docs.aws.amazon.com/eks/latest/userguide/managed-node-groups.html)
- An Apacle Solr cluster, also known as [SolrCloud](https://solr.apache.org/guide/8_10/solrcloud.html)
- A [Zookeeper ensemble](https://solr.apache.org/guide/8_10/setting-up-an-external-zookeeper-ensemble.html), required by SolrCloud
- [Apache Solr auto-scaler](https://solr.apache.org/guide/8_10/solrcloud-autoscaling-auto-add-replicas.html) to scale Solr replicas
- [Prometheus](https://prometheus.io/) to extract custom metrics from SolrCloud cluster, to be used by Horizontal Pod Autoscaler.
- [Horizontal Pod Autoscaler (HPA)](https://docs.aws.amazon.com/eks/latest/userguide/horizontal-pod-autoscaler.html) and [Cluster Autoscaler (CA)](https://docs.aws.amazon.com/eks/latest/userguide/cluster-autoscaler.html) for the EKS cluster to scale the Pods within the managed node groups and to scale the compute for the EKS Cluster respectively.
## Getting Started
### Pre-requisites
- An [AWS Account](https://console.aws.amazon.com/console/home).
- An [AWS Cloud9](https://aws.amazon.com/cloud9/) workspace. Setup a Cloud9 workspace following the instructions found [here](https://www.eksworkshop.com/020_prerequisites/workspace/)
- [Install Kubernetes tool eksctl, kubectl and AWS CLI](https://www.eksworkshop.com/020_prerequisites/k8stools/)
- [Create an IAM role](https://www.eksworkshop.com/020_prerequisites/iamrole/) for your Cloud9 workspace.
- [Attach the IAM role](https://www.eksworkshop.com/020_prerequisites/ec2instance/) to the Cloud9 workspace.
- [Update the IAM settings](https://www.eksworkshop.com/020_prerequisites/workspaceiam/) for your Cloud9 workspace.
### Use the following steps to create the Solr environment
1. From a terminal in your Cloud9 workspace, clone this git repository and set the directory:
```bash
git clone apache-solr-k8s-main
cd apache-solr-k8s-main/config
```
2. Create an Amazon EKS cluster using. Note: replace `` with the AWS region you wish to deploy your EKS Cluster, for example `--region=us-west-2`.
```bash
eksctl create cluster --version=1.21 \
--name= solr8demo \
--region= \
--node-private-networking \
--alb-ingress-access \
--asg-access \
--without-nodegroup
```
3. Create the Managed Node Groups in private subnets within the cluster using:
> :warning: The managed node groups config file uses EC2 instance type `m5.xlarge` which is not free tier eligible.
> Thus, your AWS account may also incur charges for EC2. For pricing details of Amazon Elastic Kubernetes Service refer the [Amazon EKS pricing page](https://aws.amazon.com/eks/pricing/).
```bash
eksctl create nodegroup -f managedNodegroups.yml
```
4. Setup the Helm charts, and install [Prometheus](https://github.com/prometheus-community/helm-charts):
```bash
curl -sSL https://raw.githubusercontent.com/helm/helm/master/scripts/get-helm-3 | bash
helm repo add stable https://charts.helm.sh/stable/
helm repo add prometheus-community https://prometheus-community.github.io/helm-charts
helm repo update
```
5. Install Kubernetes Metrics Server
```bash
kubectl apply -f https://github.com/kubernetes-sigs/metrics-server/releases/latest/download/components.yaml
```
Verify that the metrics-server deployment is running the desired number of pods with the following command.
```bash
kubectl get deployment metrics-server -n kube-system
```
6. Install ZooKeeper for SolrCloud Zookeeper ensemble:
```
kubectl create configmap zookeeper-ensemble-config --from-env-file=zk-config.properties
kubectl apply -f zookeeper.yml
```
Check status of the pods in the StatefulSet for Zookeeper by running the following command
```bash
kubectl get pods -l app=zk
```
Expected output should look like
```
NAME READY STATUS RESTARTS AGE
zk-0 1/1 Running 0 4h4m
zk-1 1/1 Running 0 4h3m
zk-2 1/1 Running 0 4h3m
```
7. Install Solr and Solr-metrics exporter:
```bash
kubectl create configmap solr-cluster-config --from-env-file=solr-config.properties
kubectl apply -f solr-cluster.yml
kubectl apply -f solr-exporter.yml
```
Check status of the Solr pods
```bash
kubectl get pods -l app=solr-app
```
Expected output
```
NAME READY STATUS RESTARTS AGE
solr-0 1/1 Running 0 3h59m
solr-1 1/1 Running 0 3h59m
solr-2 1/1 Running 0 3h58m
```
Verify that the Solr Exporter service is running on port 9983. This is important since our HPA depends on Solr metrics to be exported to Kubernetes metrics server via Prometheus.
```bash
kubectl get service/solr-exporter-service
```
Expected output (_Note: CLUSTER-IP will likely be different_)
```
NAME TYPE CLUSTER-IP EXTERNAL-IP PORT(S) AGE
solr-exporter-service ClusterIP 10.100.205.122 9983/TCP 4h1m
```
8. Update the `prom.yml` Prometheus configuration file with the `solr-exporter-service` IP and host port.
Find the `solr-exporter-service` cluster IP address using the command below
```bash
kubectl get service/solr-exporter-service -o jsonpath='{.spec.clusterIP}'
```
Update the `prometheus.yml` property in the `prom.yml` file as shown below and replace `` with the cluster IP from above command. Save the file.
```yaml
scrape_configs:
- job_name: prometheus
static_configs:
- targets:
- localhost:9090
- job_name: solr
scheme: http
static_configs:
- targets: [':9983']
```
9. Install Prometheus adapter:
```bash
helm install prometheus-adapter prometheus-community/prometheus-adapter \
--set prometheus.url=http://prometheus-server.default.svc.cluster.local \
--set prometheus.port=80 \
--values=adapterConfig.yml
helm install prometheus prometheus-community/prometheus \
--values prom.yml
```
9. Configure [Horizontal Pod Autoscaler (HPA)](https://docs.aws.amazon.com/eks/latest/userguide/horizontal-pod-autoscaler.html) and [Cluster Autoscaler (CA)](https://docs.aws.amazon.com/eks/latest/userguide/cluster-autoscaler.html) using `kubectl`:
```bash
kubectl apply -f hpa.yml
kubectl apply -f cluster-autoscaler-autodiscover.yaml
```
Verify HPA has been setup correctly-
```bash
kubectl describe hpa
```
Expected output
```
Name: solr-hpa
Namespace: default
Labels:
Annotations:
CreationTimestamp: Wed, 22 Dec 2021 19:25:18 +0000
Reference: StatefulSet/solr
Metrics: ( current / target )
"solr_metrics" (target value): 4021 / 50k
Min replicas: 3
Max replicas: 20
StatefulSet pods: 20 current / 20 desired
Conditions:
Type Status Reason Message
---- ------ ------ -------
AbleToScale True ReadyForNewScale recommended size matches current size
ScalingActive True ValidMetricFound the HPA was able to successfully calculate a replica count from external metric solr_metrics(nil)
ScalingLimited True TooManyReplicas the desired replica count is more than the maximum replica count
Events:
```
> :warning: The "solr_metrics" value may be 0 or a lower number when setting up the Solr deployment. However, this number is expected to change when Solr receives client requests. Also note that the `maxReplicas` used in the `hpa.yml` config file is set to 10. You may consider changing this to meet the needs of your Solr deployment. `maxReplicas` defines the maximum number of pods the HPA can scale up to.
1. Obtain SolrCloud Administration UI URL using `kubectl get services solr-service` from a terminal in your Cloud9 workspace. The URL will be of the form `http://..elb.amazonaws.com:8983`.

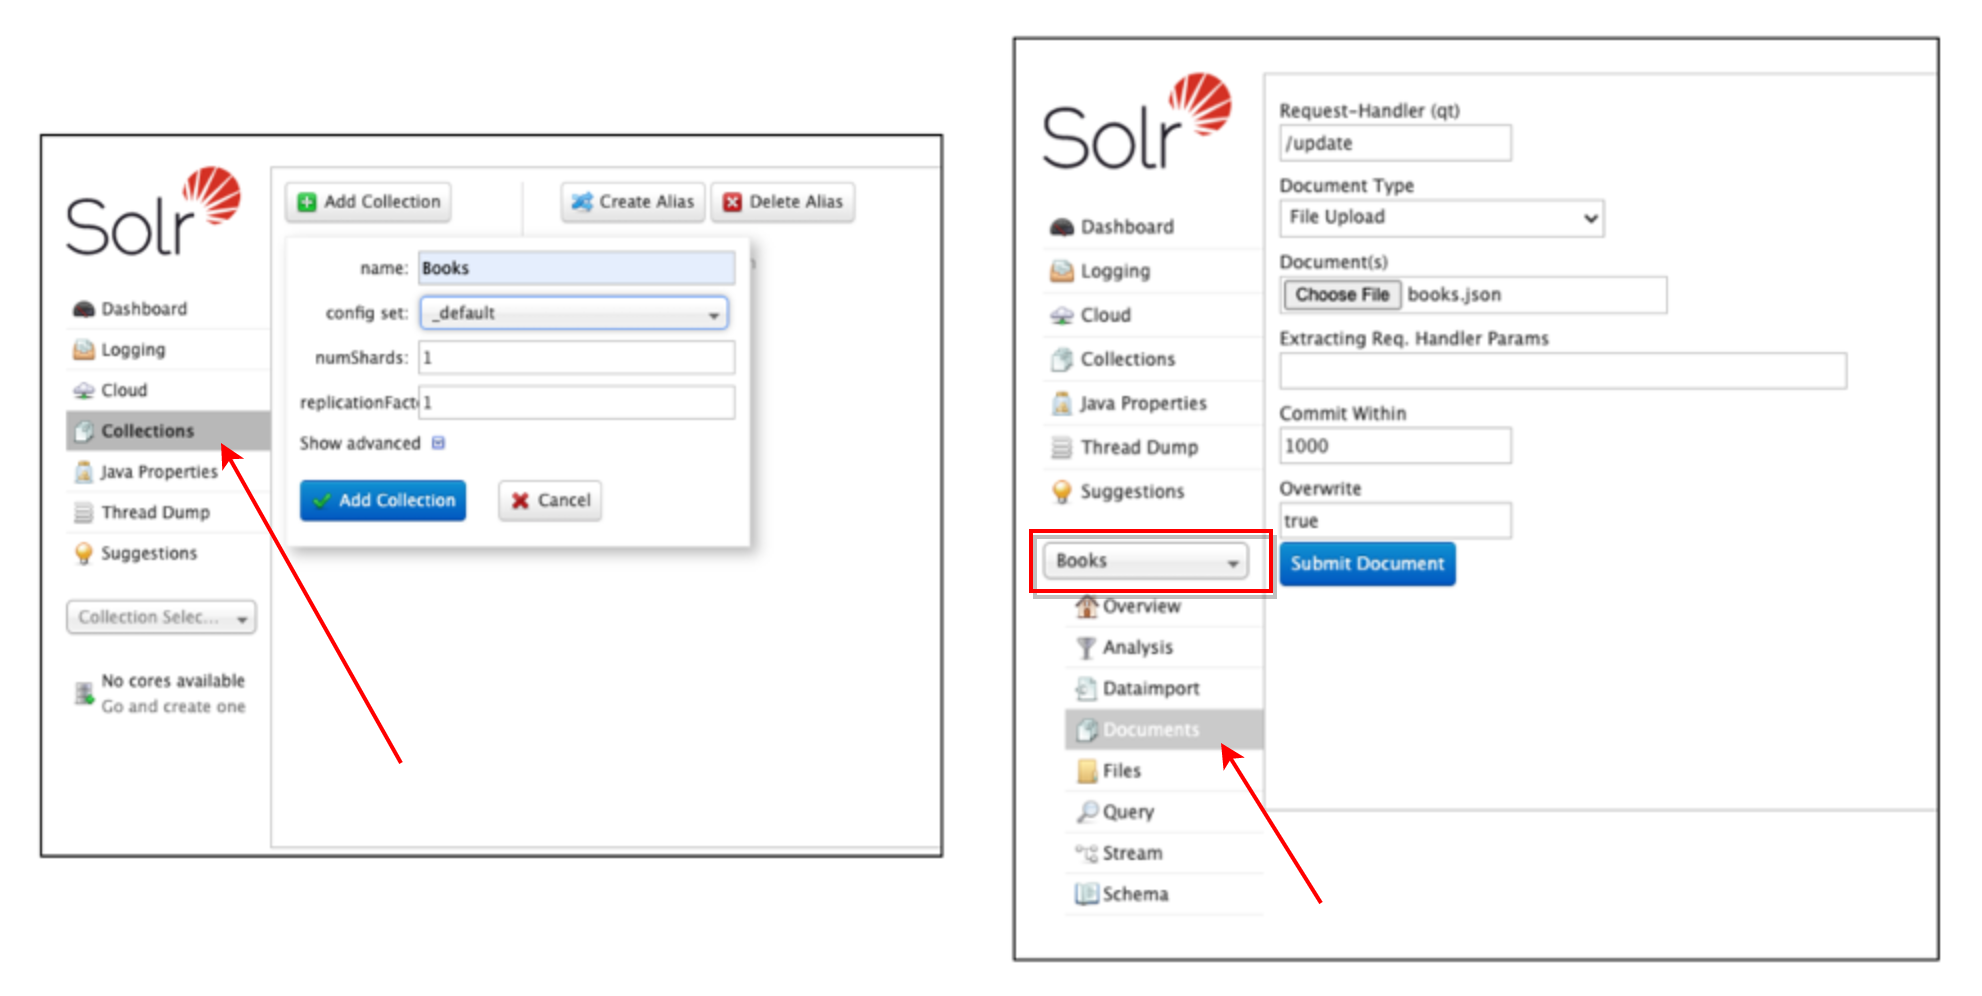
11. Create a [Solr Collection](https://solr.apache.org/guide/6_6/collections-api.html#CollectionsAPI-create) named `Books` using the Solr Administration UI and upload the sample data file `data/books.json`.
12. Cnfigure SolrCloud autoscaler by setting a [Search Rate Trigger](https://solr.apache.org/guide/7_4/solrcloud-autoscaling-triggers.html). The autoscaler config can be set using the endpoint `http://..elb.amazonaws.com:8983/api/cluster/autoscaling/`:
```bash
curl -X POST -H 'Content-type:application/json' -d '{
"set-trigger": {
"name" : "search_rate_trigger",
"event" : "searchRate",
"collections" : "Books",
"metric" : "QUERY./select.requestTimes:1minRate",
"aboveRate" : 10.0,
"belowRate" : 0.01,
"waitFor" : "30s",
"enabled" : true,
"actions" : [
{
"name" : "compute_plan",
"class": "solr.ComputePlanAction"
},
{
"name" : "execute_plan",
"class": "solr.ExecutePlanAction"
}
]
}
}' http://..elb.amazonaws.com:8983/api/cluster/autoscaling/
```
---
### Testing the deployment
A Python script is included in the `scripts` directory which can be used to test the deployment.
1. Change directory
```bash
cd scripts
chmod 744 ./submit_mc_pi_k8s_requests_books.py
```
2. Install the required dependencies
```bash
sudo python3 -m pip install -r ./requirements.txt
```
3. Run the script
```bash
python ./submit_mc_pi_k8s_requests_books.py -p 1 -r 1 -i 1
```
To run a short load test the value of flags `-p`, `-r`, and `-i` can be increased
```bash
python ./submit_mc_pi_k8s_requests_books.py -p 100 -r 30 -i 30000000 > result.txt
```
Review the `result.txt` file to ensure you are getting search query responses from Solr.
---
### Cleaning up
Use the following steps to clean up the Solr environment.
1. Uninstall Horizontal Pod Autoscaler (HPA) and Cluster Autoscaler (CA):
```bash
kubectl delete -f hpa.yml
kubectl delete -f cluster-autoscaler-autodiscover.yaml
```
2. Uninstall Solr:
```bash
kubectl delete -f solr-cluster.yml
kubectl delete configmap solr-cluster-config
kubectl delete -f solr-exporter.yml
```
3. Uninstall Zookeeper:
```bash
kubectl delete -f zookeeper.yml
kubectl delete configmap zookeeper-ensemble-config
```
4. Delete the Managed Node Groups:
```bash
eksctl delete nodegroup -f managedNodegroups.yml
```
5. Delete the Amazon EKS cluster:
```bash
eksctl delete cluster --name=solr8demo
```
## Security
See [CONTRIBUTING](CONTRIBUTING.md#security-issue-notifications) for more information.
## License
This library is licensed under the MIT-0 License. See the LICENSE file.