# Instructions how to install the Amazon Forecast solution
The Amazon Forecast Pre-POC workshop uses a solution that is implemented using AWS service components bundled together and deployed using an AWS CloudFormation template. AWS CF templates are JSON or YAML that programmatically declare the AWS resources to be used and specific configurations. The architecture components will make experimentation and iteration of Forecast models easier.
By default, the installed components of this solution do not incur any cost when not in use.
> ⚠️ **Warning:** SageMaker is the only AWS service in this solution you need to take extra precautions about when not in use. As installed, it will not incur cost. However, if you do open a SageMaker Notebook, make sure to shut down all Notebook instances when not in use, otherwise SageMaker will keep charging, even when not in use.
## Details
The CloudFormation template used in this workshop will:
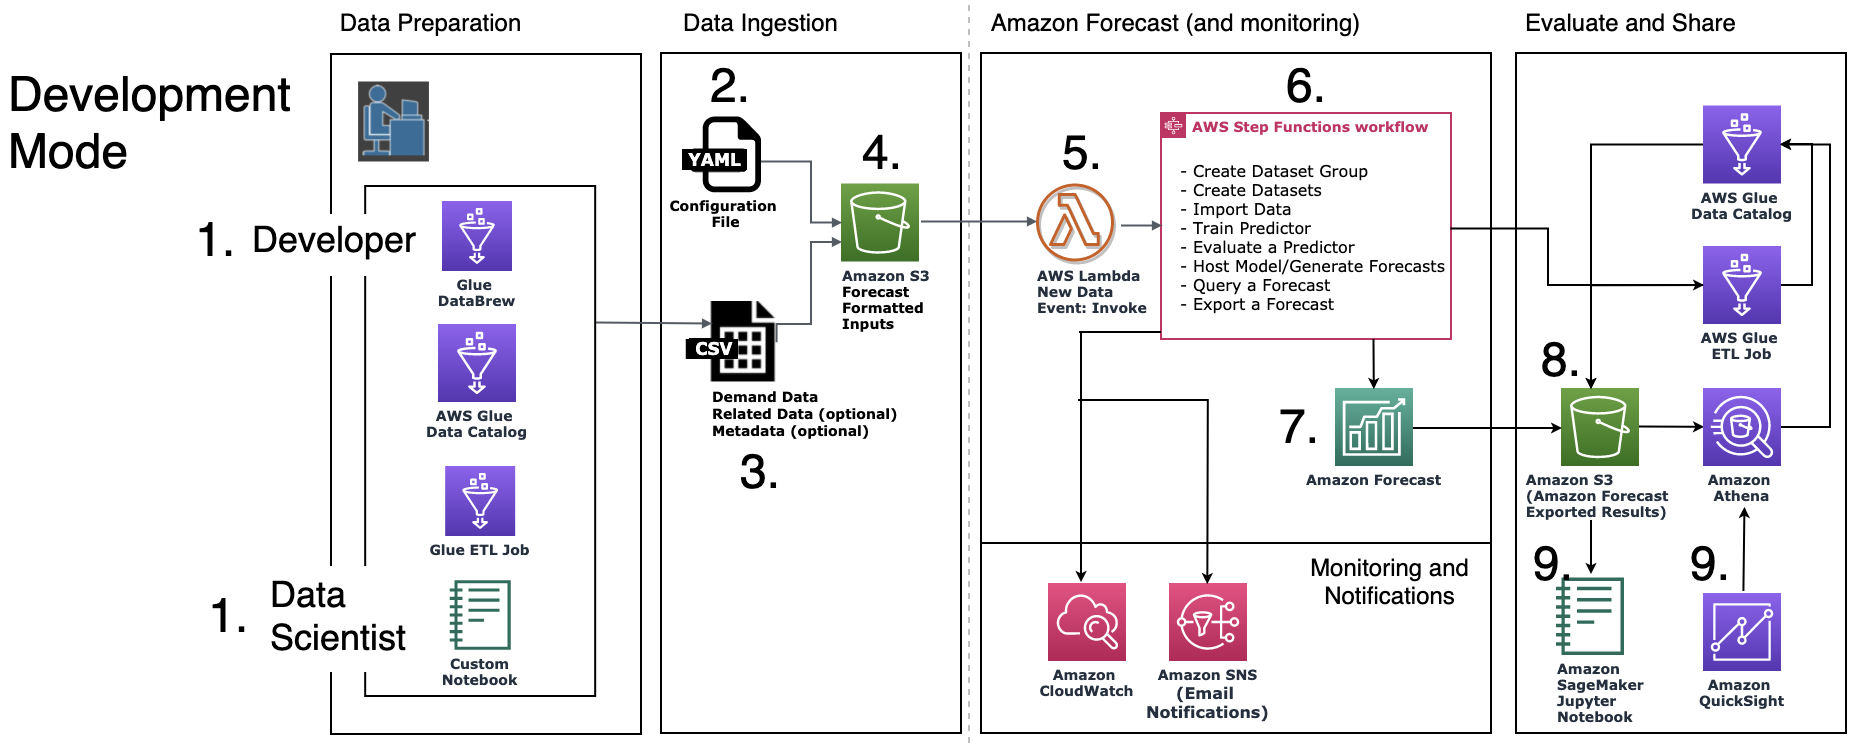
* Deploy the Improving Improving Forecast Accuracy with Machine Learning Solution, components shown in architecture diagram below. The main stack called "forecast-stack-ForecastStack-xxxx" will be a nested stack.
* Deploy a demonstration stack called "forecast-stack" using data from the NYC Taxi Dataset, will automatically run by itself, so you can see a demo of Amazon Forecast completely through.
* In order to visualize using Amazon QuickSight, follow the additional steps after the CloudFormation instructions.
Below is an architecture diagram of components used in this solution, showing how it is used in Development and Production Modes.

## Instructions
A few days before starting the workshop, log into your AWS account and install our CloudFormation template:
1. **Log in to AWS using an Admin account**. If you do not already have one, create an AWS account.
2. **Install the AWS CloudFormation template.** Right-click-open in new tab, the Region closest to you:
| Region | Launcher |
|:-------|:---------|
| `ap-northeast-1` Tokyo | [](https://console.aws.amazon.com/cloudformation/home?region=ap-northeast-1#/stacks/new?stackName=forecast-stack&templateURL=https:%2F%2Fs3.amazonaws.com%2Fsolutions-reference%2Fimproving-forecast-accuracy-with-machine-learning%2Flatest%2Fimproving-forecast-accuracy-with-machine-learning-demo.template "Launch Stack") |
| `ap-northeast-2` Seoul | [](https://console.aws.amazon.com/cloudformation/home?region=ap-northeast-2#/stacks/new?stackName=forecast-stack&templateURL=https:%2F%2Fs3.amazonaws.com%2Fsolutions-reference%2Fimproving-forecast-accuracy-with-machine-learning%2Flatest%2Fimproving-forecast-accuracy-with-machine-learning-demo.template "Launch Stack") |
| `ap-south-1` Mumbai | [](https://console.aws.amazon.com/cloudformation/home?region=ap-south-1#/stacks/new?stackName=forecast-stack&templateURL=https:%2F%2Fs3.amazonaws.com%2Fsolutions-reference%2Fimproving-forecast-accuracy-with-machine-learning%2Flatest%2Fimproving-forecast-accuracy-with-machine-learning-demo.template "Launch Stack") |
| `ap-southeast-1` Singapore | [](https://console.aws.amazon.com/cloudformation/home?region=ap-southeast-1#/stacks/new?stackName=forecast-stack&templateURL=https:%2F%2Fs3.amazonaws.com%2Fsolutions-reference%2Fimproving-forecast-accuracy-with-machine-learning%2Flatest%2Fimproving-forecast-accuracy-with-machine-learning-demo.template "Launch Stack") |
| `ap-southeast-2` Sydney | [](https://console.aws.amazon.com/cloudformation/home?region=ap-southeast-2#/stacks/new?stackName=forecast-stack&templateURL=https:%2F%2Fs3.amazonaws.com%2Fsolutions-reference%2Fimproving-forecast-accuracy-with-machine-learning%2Flatest%2Fimproving-forecast-accuracy-with-machine-learning-demo.template "Launch Stack") |
| `eu-central-1` Frankfurt | [](https://console.aws.amazon.com/cloudformation/home?region=eu-central-1#/stacks/new?stackName=forecast-stack&templateURL=https:%2F%2Fs3.amazonaws.com%2Fsolutions-reference%2Fimproving-forecast-accuracy-with-machine-learning%2Flatest%2Fimproving-forecast-accuracy-with-machine-learning-demo.template "Launch Stack") |
| `eu-west-1` Ireland | [](https://console.aws.amazon.com/cloudformation/home?region=eu-west-1#/stacks/new?stackName=forecast-stack&templateURL=https:%2F%2Fs3.amazonaws.com%2Fsolutions-reference%2Fimproving-forecast-accuracy-with-machine-learning%2Flatest%2Fimproving-forecast-accuracy-with-machine-learning-demo.template "Launch Stack") |
| `us-east-1` N. Virginia | [](https://console.aws.amazon.com/cloudformation/home?region=us-east-1#/stacks/new?stackName=forecast-stack&templateURL=https:%2F%2Fs3.amazonaws.com%2Fsolutions-reference%2Fimproving-forecast-accuracy-with-machine-learning%2Flatest%2Fimproving-forecast-accuracy-with-machine-learning-demo.template "Launch Stack") |
| `us-east-2` Ohio | [](https://console.aws.amazon.com/cloudformation/home?region=us-east-2#/stacks/new?stackName=forecast-stack&templateURL=https:%2F%2Fs3.amazonaws.com%2Fsolutions-reference%2Fimproving-forecast-accuracy-with-machine-learning%2Flatest%2Fimproving-forecast-accuracy-with-machine-learning-demo.template "Launch Stack") |
| `us-west-2` Oregon | [](https://console.aws.amazon.com/cloudformation/home?region=us-west-2#/stacks/new?stackName=forecast-stack&templateURL=https:%2F%2Fs3.amazonaws.com%2Fsolutions-reference%2Fimproving-forecast-accuracy-with-machine-learning%2Flatest%2Fimproving-forecast-accuracy-with-machine-learning-demo.template "Launch Stack") |
## Next, follow these directions for the screens that will pop up:
**Step 1**: Accept defaults, click "Next"
 **Step 2:** Provide an email address for notifications. Click "Next".
 **Step 3**: Accept defaults, click "Next"
**Step 4:** Click both checkboxes to allow IAM resources to be created and to allow possibly nested stacks. Click “Create Stack”
**Step 3**: Accept defaults, click "Next"
**Step 4:** Click both checkboxes to allow IAM resources to be created and to allow possibly nested stacks. Click “Create Stack”
 **Step 5:** Open your email and confirm subscription to notifications.
 **That’s it! Congratulations**! You have deployed a CloudFormation template in Amazon Forecast.
## **Optional steps for QuickSight visualization:**
**Step 1**: Sign up for [QuickSight Enterprise](https://aws.amazon.com/quicksight/pricing/). QuickSight is a BI visualization tool, comparable to Tableau. QuickSight Enterprise is $29/month (at time of writing this) which should be enough if everyone is logging in using "Admin" account.
**Step 2**: Login to AWS using Admin account. [console.aws.amazon.com](https://amazon-forecast-samples.s3-us-west-2.amazonaws.com/common/images/workshops/QuickSightConfig.png)
After you login, copy your Account ID and save somewhere convenient.

**Step 3**: In the AWS console, top menu bar, click terminal icon to open AWS CloudShell.
**Step 4**: Next we need to get your QuickSight ARN. In the CloudShell, type:
aws quicksight list-users --region us-east-1 --aws-account-id **accountID** --namespace default
* where **accountID** is number you copied in Step 2.
**Step 5**: Copy your QuickSight ARN (Note "ARN" means "Amazon Resource Number", think of it as an AWS-specialized URL) following this pattern:
**That’s it! Congratulations**! You have deployed a CloudFormation template in Amazon Forecast.
## **Optional steps for QuickSight visualization:**
**Step 1**: Sign up for [QuickSight Enterprise](https://aws.amazon.com/quicksight/pricing/). QuickSight is a BI visualization tool, comparable to Tableau. QuickSight Enterprise is $29/month (at time of writing this) which should be enough if everyone is logging in using "Admin" account.
**Step 2**: Login to AWS using Admin account. [console.aws.amazon.com](https://amazon-forecast-samples.s3-us-west-2.amazonaws.com/common/images/workshops/QuickSightConfig.png)
After you login, copy your Account ID and save somewhere convenient.

**Step 3**: In the AWS console, top menu bar, click terminal icon to open AWS CloudShell.
**Step 4**: Next we need to get your QuickSight ARN. In the CloudShell, type:
aws quicksight list-users --region us-east-1 --aws-account-id **accountID** --namespace default
* where **accountID** is number you copied in Step 2.
**Step 5**: Copy your QuickSight ARN (Note "ARN" means "Amazon Resource Number", think of it as an AWS-specialized URL) following this pattern:
"**arn:aws:quicksight:us-east-1:accountID:user/default/quickSight_username**" , where
- region = `us-east-1` *regardless of where you spun up the stack* (as QuickSight configuration is always performed via `us-east-1`)
- account ID = number from Step 2
Example:
* arn:aws:quicksight:us-east-1:12345678901:user/default/Admin/myusername
* arn:aws:quicksight:us-east-1:12345678901:user/default/myusername
Copy and save your QuickSight ARN somewhere convenient and to your clipboard.
**Step 6**: Go back to your AWS console, top menu bar, in the Search box, type "quicksight". See image Step 3.
Open QuickSight
#### Configure from where QuickSight is allowed to read data.
**Step 1**: From QuickSight, click top right drop-down next to your username. Click change region. Choose us-east-1 N.Virginia. (QuickSight configuration tasks only work in us-east-1).
**Step 2**: From QuickSight, click drop-down menu on top-right, next to your username. Click "Manage Quicksight".

**Step 3**: From QuickSight, click left-side-menu. On the main screen, under "Security & permissions", under "QuickSight access to AWS Services", click “Add or Remove”.

Next, you will configure which S3 buckets QuickSight can read from.
**Step 4**: Click S3 "Details". Click "Select S3 buckets".

**Step 5**: Verify which S3 buckets you need to allow by going back to CloudFormation template.
Open AWS console again. [console.aws.amazon.com](https://amazon-forecast-samples.s3-us-west-2.amazonaws.com/common/images/workshops/QuickSightConfig.png)
In search box type "cloud formation" to **navigate to CloudFormation templates**.
**Click on the nested stack called "forecast-stack-ForecastStack-xxxx"** (do not click on the nested DemoDownloader ). 
On the nested ForecastStack, **click "Outputs" tab.**
Make note of the names of your 1) AthenaBucket, 2) ForecastBucket

**Step 6**: Go back to your QuickSight console window, where you were in the middle of setting S3 permissions. Choose forecast-stack-athenabucket and forecast-stack-data-bucket names that match what you saw in previous step. Click "Finish". 
Next, allow QuickSight to read from both S3 and Athena.
**Step 7**: Click "Amazon S3" and "Amazon Athena" checkboxes. Click “Update”.

#### Update the CloudFormation nested stack called "forecast-stack-ForecastStack-xxxx" and add your QuickSight ARN.
**Step 8**: Open AWS console again. [console.aws.amazon.com](https://amazon-forecast-samples.s3-us-west-2.amazonaws.com/common/images/workshops/QuickSightConfig.png)
In search box type "cloud formation" to navigate to CloudFormation templates.
Click on the button next to nested stack called "forecast-stack-ForecastStack-xxxx" and click menu action “Update”

**Step 9**: Click "Update nested stack" and click "Update stack".

**Step 10**: Click "Use current template" and click "Next".

**Step 11**: Edit "Email" if it's not already set. Paste your QuickSight ARN in the "Visualization Options" field. Click "Next".

**Step 12**: Accept existing role. Click "Next".
**Step 13**: On final Review page, scroll down to the bottom of page. Click the 2 checkboxes to allow IAM resources to be created and auto_expand to make the requested changes. Click "Update stack".

**Congratulations!!** You have installed a CloudFormation template in Amazon Forecast and configured Forecast visualization output into QuickSight.
## Deleting the stack
1) Deleting the "forecast-stack" demo stack will retain the nested main "forecast-stack-ForecastStack-xxxx" "Improving Forecast Accuracy with Machine Learning Stack".
2) Deleting the nested main "forecast-stack-ForecastStack-xxxx" "Improving Forecast Accuracy with Machine Learning" stack will leave all S3, Athena, QuickSight, and Forecast data in the account.
**Other deployment options**: For more deployment options, see Automated Deployment.