# Amazon IVS manifest clipping: Standalone API
This steps deploys the standalone clipmanifest API **only**. This guide deploys the standalone clipmanifest API **only**. If you already have your application and would like to deploy the API, these are the correct steps you should follow.
## Solution Architecture
 ## 1. Cloning the Git repository
Clone the git repository of the Clip Manifest API for Amazon IVS:
```
git clone https://github.com/aws-samples/amazon-ivs-clip-manifest.git
cd amazon-ivs-clip-manifest/standalone-api/
```
## 2. Create a deployment bucket or use an existing bucket
If you already have a deployment bucket, jump this step.
```sh
aws s3api create-bucket --bucket --region
```
## 3. Create the SAM package
```sh
sam package \
--template-file template.yaml \
--s3-bucket \
--output-template-file packaged.yaml
```
## 4. Deploy the package
```sh
sam deploy \
--template-file packaged.yaml \
--stack-name sample-clip-manifest \
--capabilities CAPABILITY_IAM
```
It will take approximately 5 minutes to complete the stack deployment. Take notes of the following outputs because you will use them later.
```sh
ApiURLCreateClip
API endpoint post create clips
https://.execute-api.us-east-1.amazonaws.com/Prod/clipmanifest/
RecordConfiguration
RecordingBucketName
my-new-ivs-recording-bucket-standalone-api
CloudfrontDistribution
Amazon CloudFront Domain Name
https://.cloudfront.net
```
## 5. Amazon IVS Channel configuration
If you already have an Amazon IVS channel created that you want to use, you can skip this step.
Copy from the AWS SAM deploy output the recording bucket name and replace the "Your Recording Bucket Name" below.
```
aws ivs create-recording-configuration \
--name "my-recording-config" \
--recording-reconnect-window-seconds 60 \
--destination-configuration s3={bucketName=} \
--thumbnail-configuration recordingMode="INTERVAL",targetIntervalSeconds=30
```
Take note of the RecordingConfiguration ARN, as it will be used to link your recording configuration.
```
"recordingConfiguration": {
"arn": "arn:aws:ivs:us-east-1:my_account_id:recording-configuration/unique_id",
"destinationConfiguration": {
"s3": {
"bucketName": "my-new-ivs-recording-bucket-standalone-api-my_account_id"
}
}
```
## 6. Create the Amazon IVS Channel and link to your recording configuration*
```
aws ivs create-channel --name my-ivs-channel --recording-configuration-arn ""
```
## 7. Testing the clipmanifest API
After completing a live transmission to your Amazon IVS RTMPS endpoint, navigate to the Amazon S3 Recording Bucket, and look for the .m3u8 manifest. The Amazon S3 path should look like the below:
````
/ivs/v1/////////media/hls/720p30/playlist.m3u8
````
## 1. Cloning the Git repository
Clone the git repository of the Clip Manifest API for Amazon IVS:
```
git clone https://github.com/aws-samples/amazon-ivs-clip-manifest.git
cd amazon-ivs-clip-manifest/standalone-api/
```
## 2. Create a deployment bucket or use an existing bucket
If you already have a deployment bucket, jump this step.
```sh
aws s3api create-bucket --bucket --region
```
## 3. Create the SAM package
```sh
sam package \
--template-file template.yaml \
--s3-bucket \
--output-template-file packaged.yaml
```
## 4. Deploy the package
```sh
sam deploy \
--template-file packaged.yaml \
--stack-name sample-clip-manifest \
--capabilities CAPABILITY_IAM
```
It will take approximately 5 minutes to complete the stack deployment. Take notes of the following outputs because you will use them later.
```sh
ApiURLCreateClip
API endpoint post create clips
https://.execute-api.us-east-1.amazonaws.com/Prod/clipmanifest/
RecordConfiguration
RecordingBucketName
my-new-ivs-recording-bucket-standalone-api
CloudfrontDistribution
Amazon CloudFront Domain Name
https://.cloudfront.net
```
## 5. Amazon IVS Channel configuration
If you already have an Amazon IVS channel created that you want to use, you can skip this step.
Copy from the AWS SAM deploy output the recording bucket name and replace the "Your Recording Bucket Name" below.
```
aws ivs create-recording-configuration \
--name "my-recording-config" \
--recording-reconnect-window-seconds 60 \
--destination-configuration s3={bucketName=} \
--thumbnail-configuration recordingMode="INTERVAL",targetIntervalSeconds=30
```
Take note of the RecordingConfiguration ARN, as it will be used to link your recording configuration.
```
"recordingConfiguration": {
"arn": "arn:aws:ivs:us-east-1:my_account_id:recording-configuration/unique_id",
"destinationConfiguration": {
"s3": {
"bucketName": "my-new-ivs-recording-bucket-standalone-api-my_account_id"
}
}
```
## 6. Create the Amazon IVS Channel and link to your recording configuration*
```
aws ivs create-channel --name my-ivs-channel --recording-configuration-arn ""
```
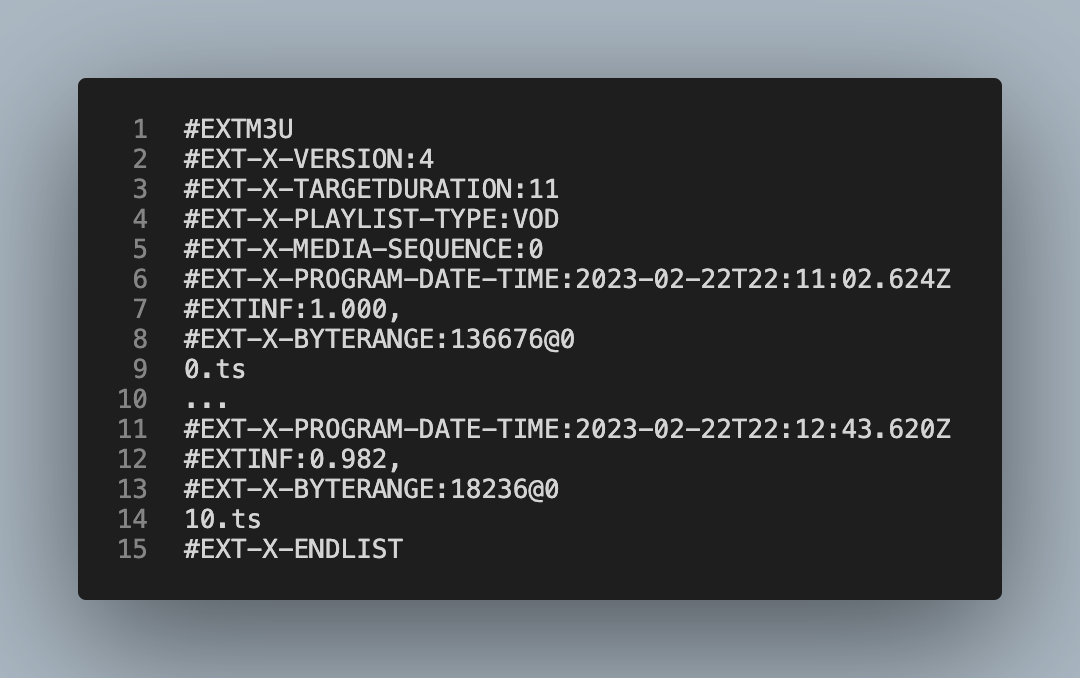
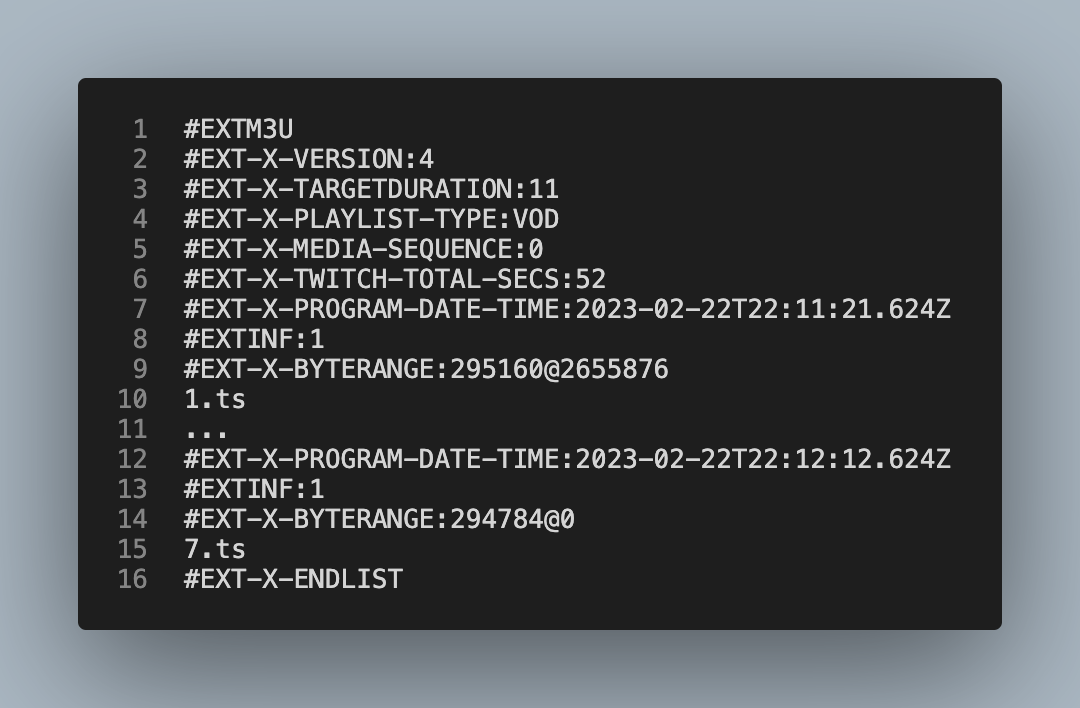
## 7. Testing the clipmanifest API
After completing a live transmission to your Amazon IVS RTMPS endpoint, navigate to the Amazon S3 Recording Bucket, and look for the .m3u8 manifest. The Amazon S3 path should look like the below:
````
/ivs/v1/////////media/hls/720p30/playlist.m3u8
````
 ## 8. Using the create clips API
Make an HTTP Post call to the Amazon API Gateway endpoint.
```sh
curl -X POST /clipmanifest -H "Content-Type: application/json" -d "{\"start_time\": 20,\"end_time\": 70,\"master_url\": \"https://\", \"byte_range\": true}"
```
Example:
```sh
curl -X POST https://.execute-api.us-east-1.amazonaws.com/Prod/clipmanifest/ -H "Content-Type: application/json" -d "{\"start_time\": 20,\"end_time\": 70,\"master_url\": \"https://.cloudfront.net/ivs/v1//2rrcA103rn67/2022/10/15/2/11/X5JJ9FegmZiq/media/hls/master.m3u8\", \"byte_range\": true}"
```
## 9. Test the clip
The new manifest follows the path URL of the recording with the object called clip_master.m3u8
## 8. Using the create clips API
Make an HTTP Post call to the Amazon API Gateway endpoint.
```sh
curl -X POST /clipmanifest -H "Content-Type: application/json" -d "{\"start_time\": 20,\"end_time\": 70,\"master_url\": \"https://\", \"byte_range\": true}"
```
Example:
```sh
curl -X POST https://.execute-api.us-east-1.amazonaws.com/Prod/clipmanifest/ -H "Content-Type: application/json" -d "{\"start_time\": 20,\"end_time\": 70,\"master_url\": \"https://.cloudfront.net/ivs/v1//2rrcA103rn67/2022/10/15/2/11/X5JJ9FegmZiq/media/hls/master.m3u8\", \"byte_range\": true}"
```
## 9. Test the clip
The new manifest follows the path URL of the recording with the object called clip_master.m3u8
 [Return to home page of the solution](../README.md)