# Welcome to the Amazon Neptune and AWS CDK for Amundsen project!
## Overview
This project has an [associated blog](https://aws.amazon.com/blogs/database/category/database/amazon-neptune/) which provides extensive detail on Amundsen, as well as greater detail regarding this solution.
### What is Amundsen?
[Amundsen](https://github.com/amundsen-io/amundsen) is a data discovery and metadata engine for improving the productivity of data analysts, data scientists and engineers when interacting with data. It does that today by indexing data resources (tables, dashboards, streams, etc.) and powering a page-rank style search based on usage patterns (e.g. highly queried tables show up earlier than less queried tables). Think of it as Google search for data. The project is named after Norwegian explorer Roald Amundsen, the first person to discover the South Pole.
### Why this Project?
The goal of this project is to simplify the provisioning and configuration of an environment for you to take advantage of Amundsen. This project leverages [Amazon Neptune](https://aws.amazon.com/neptune/) and [Amazon Elasticsearch Service](https://aws.amazon.com/elasticsearch-service/) for the Amundsen Metadata and Search Services, and uses [AWS Cloud Development Kit (AWS CDK)](https://aws.amazon.com/cdk/) to synthesize CloudFormation templates necessary to provision the infrastructure as code. In addition, this project provisions [Amazon RDS for PostgreSQL](https://aws.amazon.com/rds/postgresql/), [Amazon RedShift](https://aws.amazon.com/redshift/), and other resources to streamline the loading and indexing of sample data dump from an existing Amazon Neptune sample project - [Knowledge Graph Chatbot Full Stack Application](https://github.com/aws-samples/amazon-neptune-samples/blob/master/gremlin/chatbot-full-stack-application).
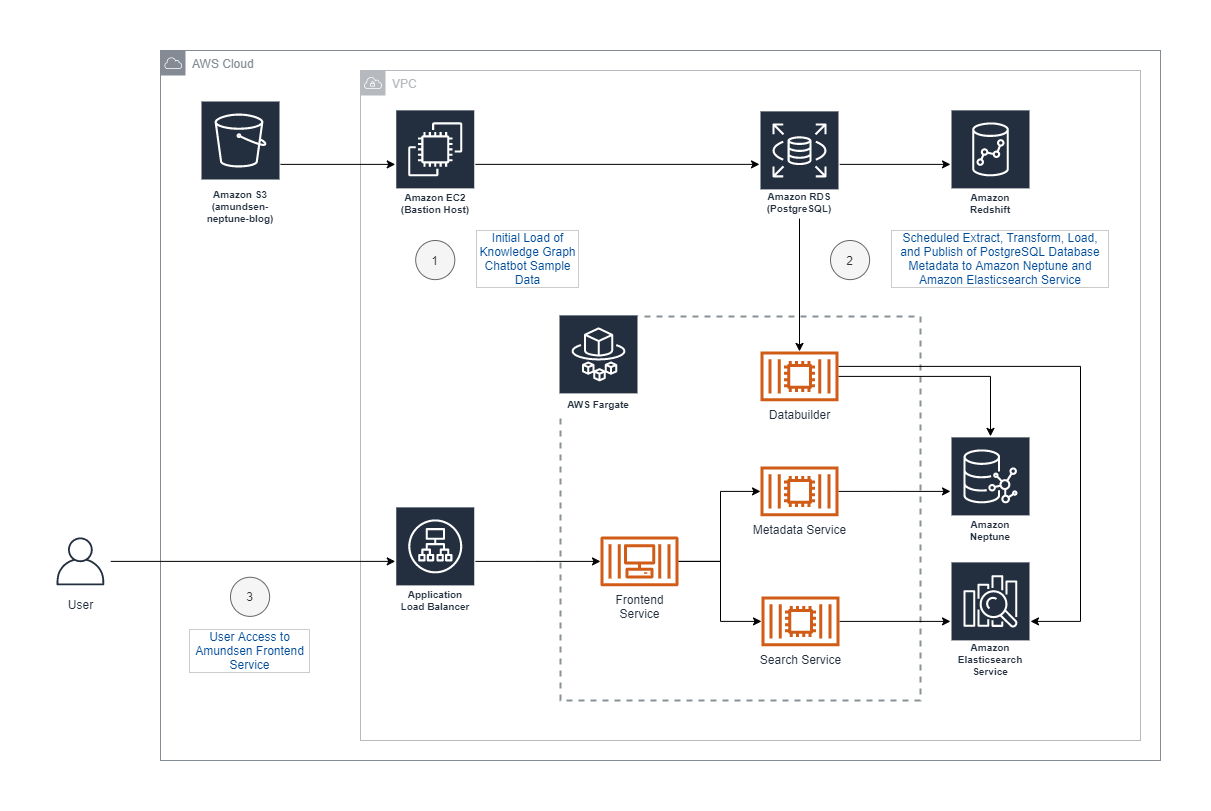
## Solution Overview
### Architecture
 ### Customization
The `cdk.json` file stores variables used by the AWS CDK Toolkit. The default variable values should be acceptable for most environments, but if not, you can change any of these values followed by [Build and Deploy](#Build-and-Deploy) per the instructions below.
Customiz the AWS CDK toolkit with the following custom variables in `cdk.json`:
### Customization
The `cdk.json` file stores variables used by the AWS CDK Toolkit. The default variable values should be acceptable for most environments, but if not, you can change any of these values followed by [Build and Deploy](#Build-and-Deploy) per the instructions below.
Customiz the AWS CDK toolkit with the following custom variables in `cdk.json`:
vpc-cidrrds-enginerds-portrds-databasesample-data-s3-bucketsample-data-rds-dump-filenamesample-data-redshift-query-s3-bucketsample-data-redshift-query-filenameapplicationenvironment
## Getting Started
### Pre-Requisites
In order to get started, you will need an AWS account, preferably free from any production workloads. Also, either an IAM role to deploy with from Cloud9 or an IAM user with admin permissions as the stacks we will be deploying require significant access.
Once we have that in place, it’s time to get ready to deploy.
### Cloud9
[AWS Cloud9](https://aws.amazon.com/cloud9/) is a cloud-based integrated development environment (IDE) that lets you write, run, and debug your code with just a browser. Cloud9 comes pre-configured with many of the dependencies we require for this blog post, such as git, npm, and AWS CDK.
Create a Cloud9 environment from the AWS console. Provide the required Name, and leave the remaining default values. Once your Cloud9 environment has been created, you should have access to a terminal window.
### Service-Linked Role
Amazon Elasticsearch Service (Amazon ES) uses AWS Identity and Access Management (IAM) service-linked roles. A service-linked role is a unique type of IAM role that is linked directly to Amazon ES. Service-linked roles are predefined by Amazon ES and include all the permissions that the service requires to call other AWS services on your behalf. You must create a Service Linked Role for Amazon ES- if it does not already exist. To create a service-linked role for Amazon ES, issue the following command:
aws iam create-service-linked-role --aws-service-name es.amazonaws.com
### Build and Deploy
From a terminal window, you will need to clone the GitHub repo, install packages, build, and synthesize the CloudFormation templates. Issue the following commands in a terminal window in Cloud9. By default, the AWS CDK will prompt you to deploy changes. If you want to skip confirmations, add the following command line option to the AWS CDK commands below. --require-approval never. In addition, you can deploy all stacks at once by issuing cdk deploy --all rather than issuing separate cdk deploy `` commands.
git clone https://github.com/aws-samples/amazon-neptune-samples
cd amazon-neptune-samples/amazon-neptune-and-aws-cdk-for-amundsen
# Update to latest npm
npm install -g npm@latest
# Install packages
npm install
# Build
npm run build
# Bootstrap AWS Cloud Development Kit (AWS CDK)
cdk bootstrap
# Synthesize CloudFormation
cdk synth
# Deploy each stack
cdk deploy Amundsen-Blog-VPC-Stack
cdk deploy Amundsen-Blog-RDS-Stack
cdk deploy Amundsen-Blog-Redshift-Stack
cdk deploy Amundsen-Blog-Bastion-Stack
cdk deploy Amundsen-Blog-Amundsen-Stack
cdk deploy Amundsen-Blog-Databuilder-Stack
The Amundsen Frontend hostname will be output to multiple places. First, the AWS CDK console output will include the following:
`Amundsen-Blog-Amundsen-Stack.amundsenfrontendhostname = `
As well, the associated CloudFormation stack `Amundsen-Blog-Amundsen-Stack` will have a key-value pair output with the key `amundsenfrontendhostname`. The Amundsen Frontend Hostname should be accessible over HTTP.
## License Summary
This library is licensed under the MIT-0 License. See the [LICENSE](./LICENSE) file.