# Amazon QuickSight Asset Migration CI/ CD
This is a prescriptive guidance to implement code integration and code deployment (CI/ CD) pipeline for migrating Amazon QuickSight assets from less restrictive environment such as Beta to a more restrictive environment such as Production.
## Architecture
 The architecture uses the below AWS services.
1. AWS Code Commit
2. AWS Lambda
3. Amazon QuickSight
4. Amazon Identity and Access Management (IAM)
5. Amazon S3
6. AWS Code Pipeline
## Pre-requisite
* The AWS Code Commit code repository must have 2 branches- **_master_** and **_beta_**.
* Amazon QuickSight asset definition file from the Beta environment should be available. For example to deploy an Amazon QuickSight analysis asset, you should know how to use the [**describe-analysis-definition**](https://docs.aws.amazon.com/cli/latest/reference/quicksight/describe-analysis-definition.html) CLI command and how to modify the output of the describe-analysis-definition command to use as input to [**create-analysis**](https://docs.aws.amazon.com/cli/latest/reference/quicksight/create-analysis.html) CLI command.
* You should consider maintaining IAM user groups to allow/ limit Git push and merg the above branches using AWS Code Commit IAM policies as described in [Limit pushes and merges to branches in AWS CodeCommit](https://docs.aws.amazon.com/codecommit/latest/userguide/how-to-conditional-branch.html).
## Deployment guide
### AWS Code Commit
#### _Setup IAM user who will access the AWS Code Commit repository_
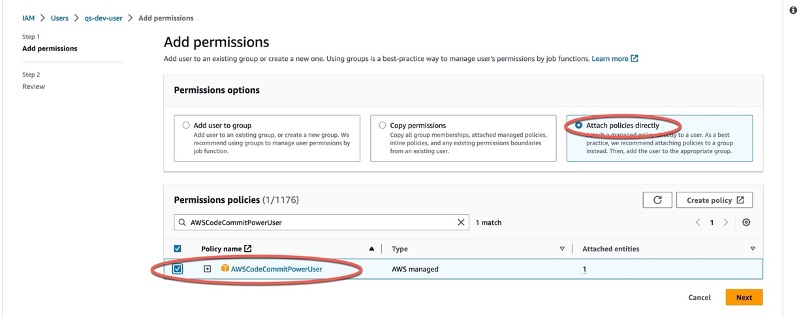
Step 1: **AWS IAM > Users > Search or Add users > Permissions > Add permissions > Attach policies directly > AWSCodeCommitPowerUser**
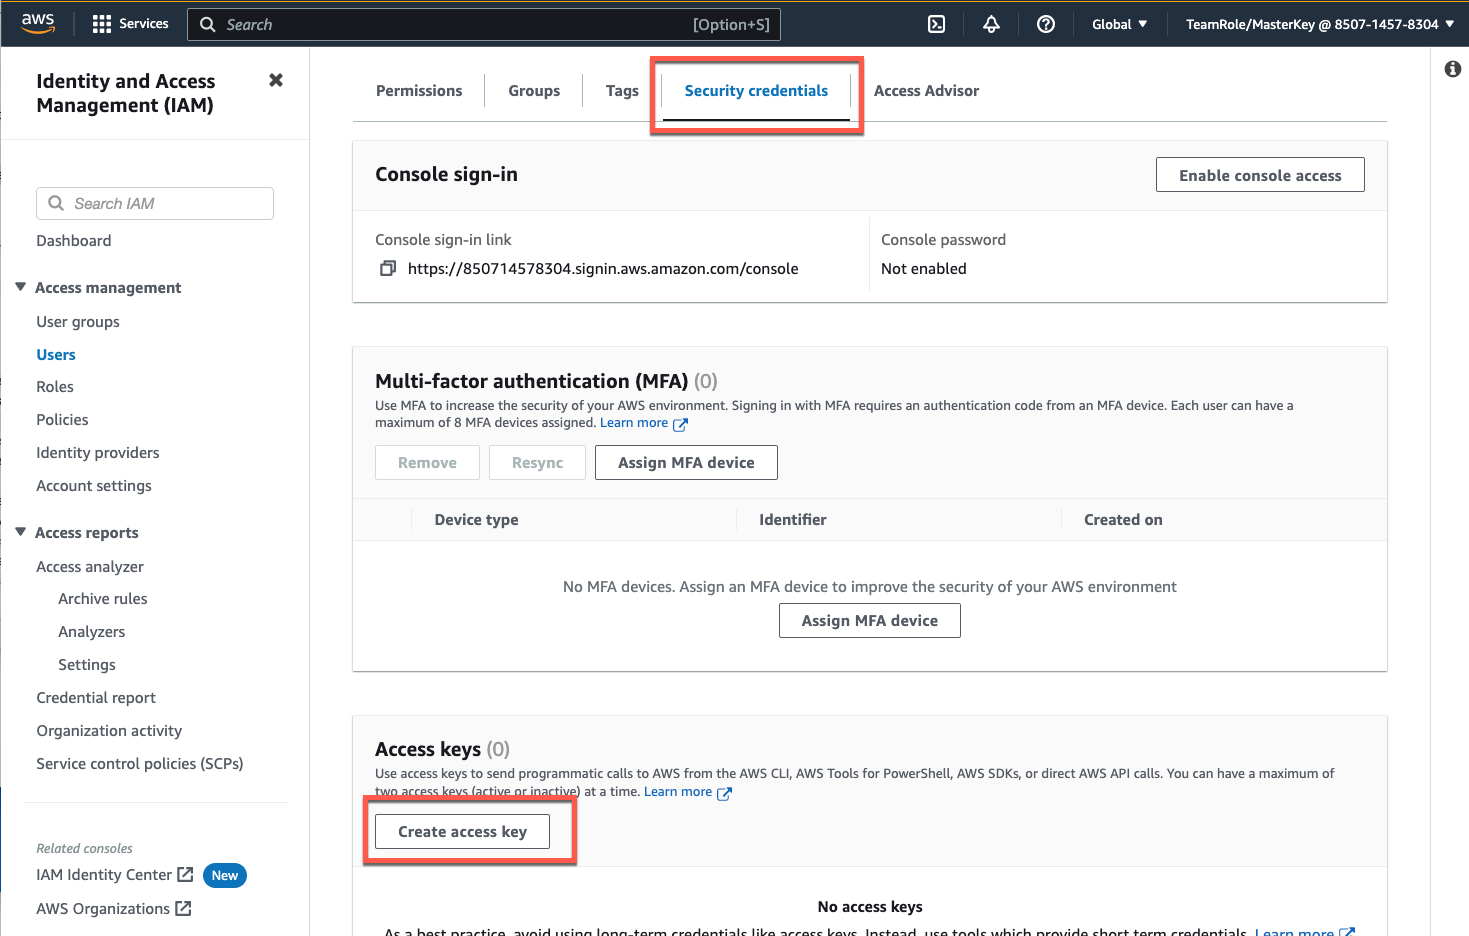
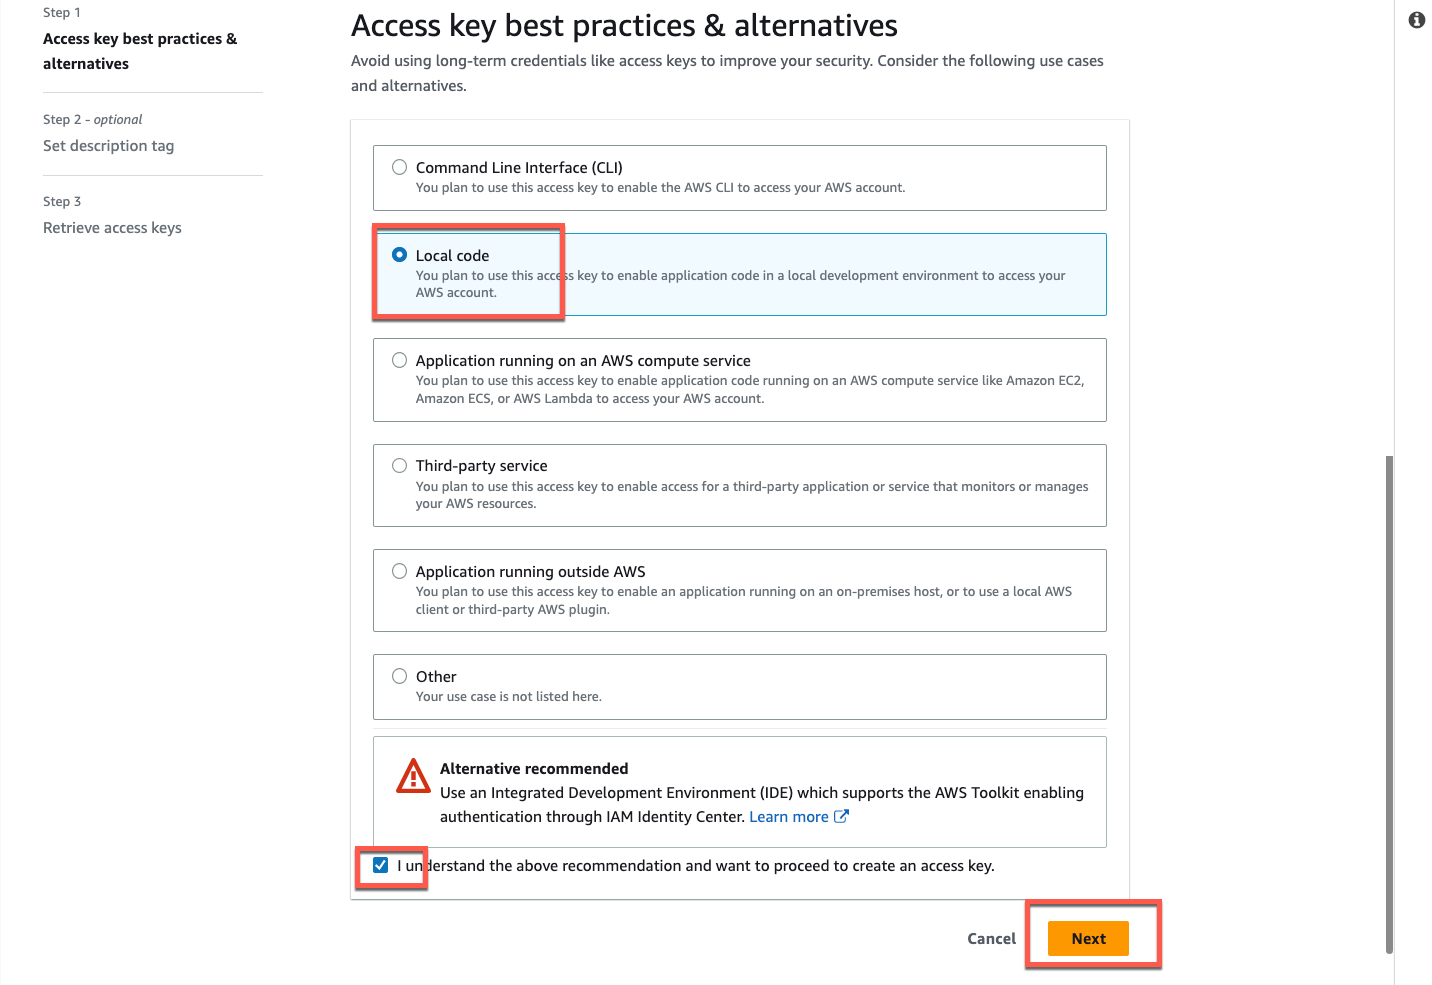
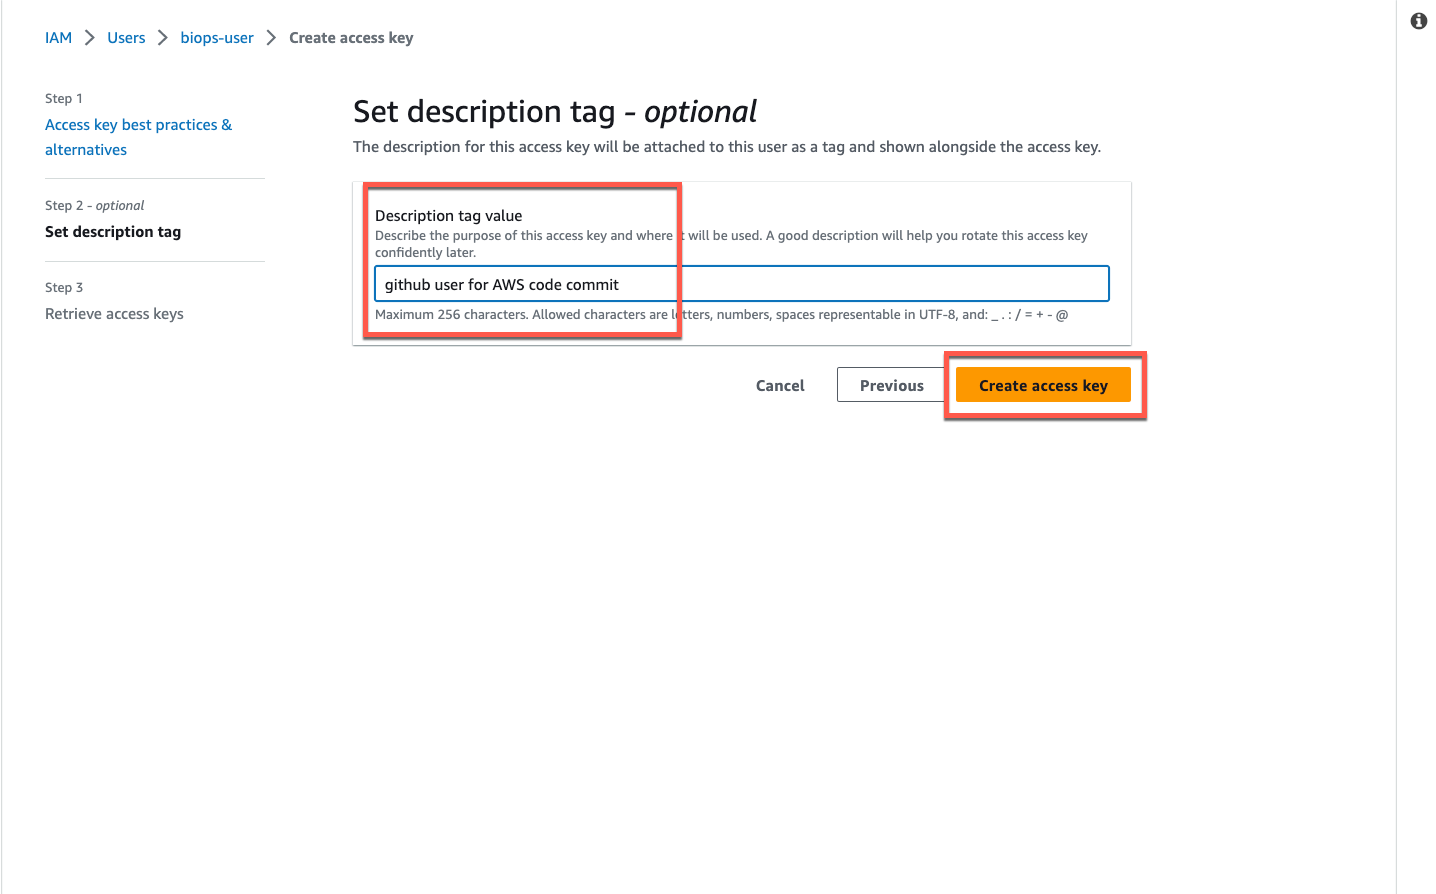
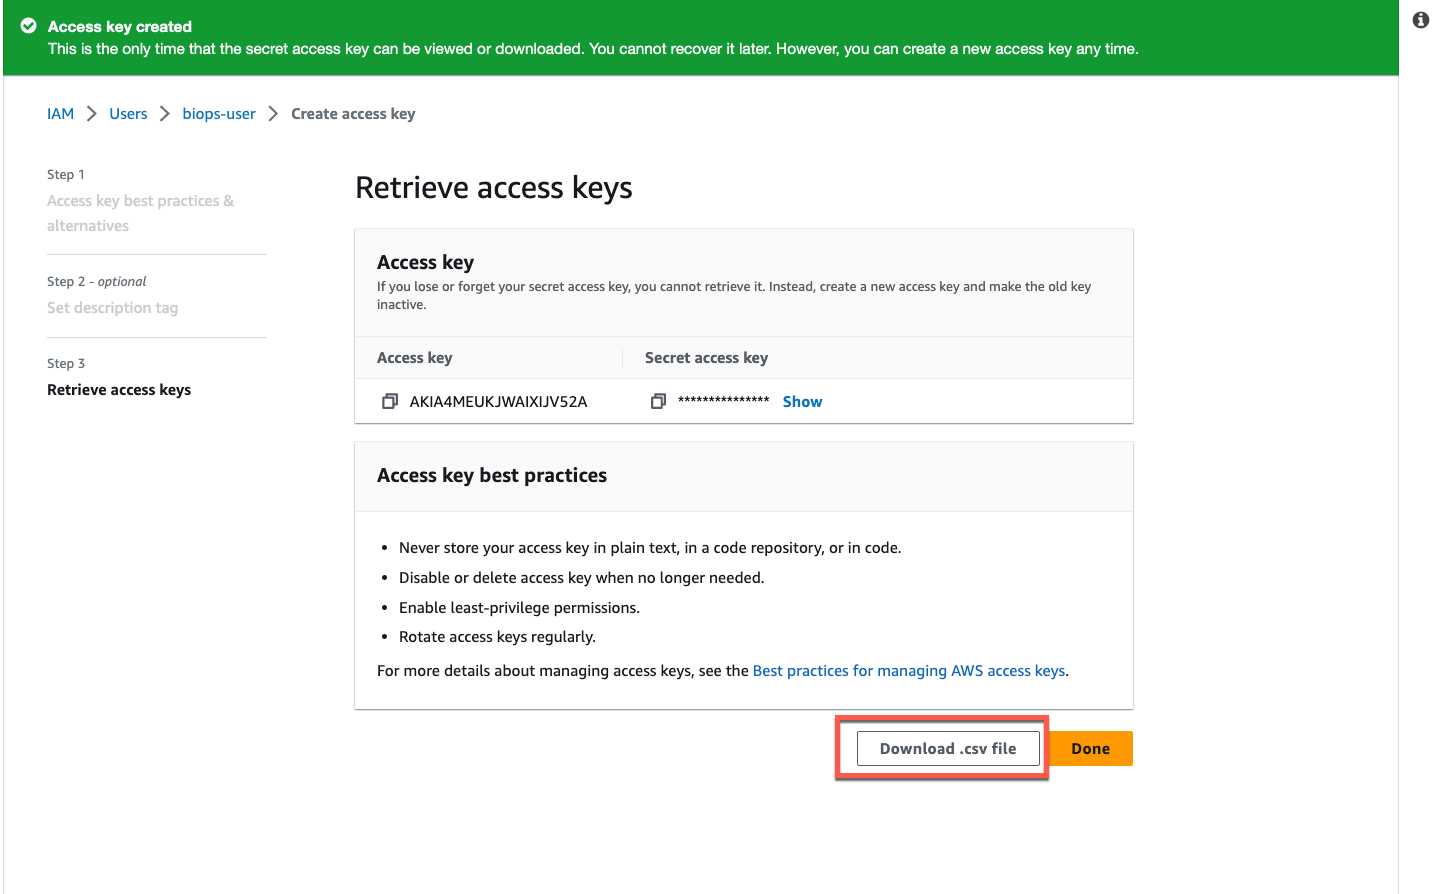
**Optional step**: If you are creating a new IAM user navigate to the _Security credentials_ tab and click _Create access key_, select _Local code_ , click _Next_. On the _Set description tag_ page click _Create access key_. Click _Download .csv file_ and click _Done_.
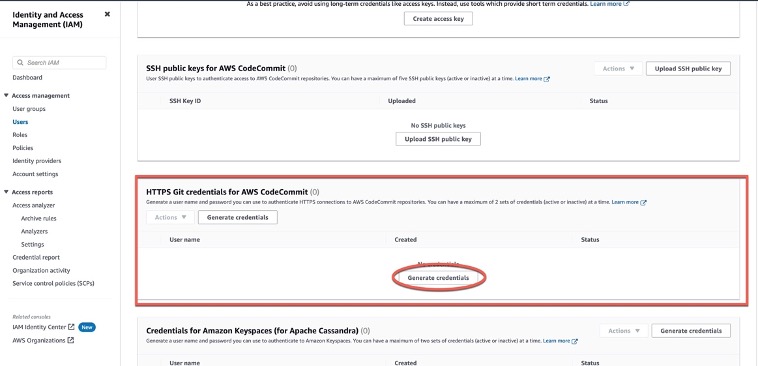
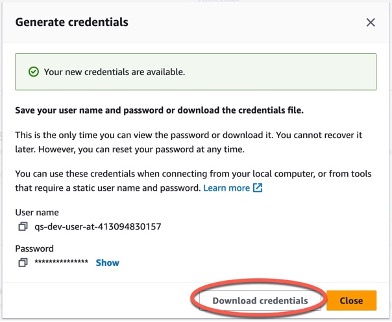
Step 2: **AWS IAM > Users > Search or Add users > Security credentials > HTTPS Git credentials for AWS CodeCommit > Generate credentials**
#### _Setup the AWS CodeCommit repository_
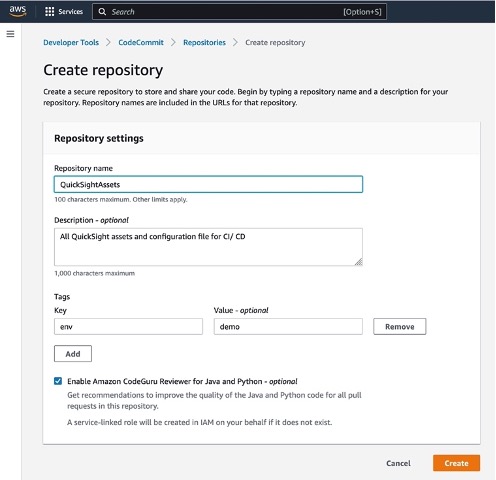
Step 1: **AWS > CodeCommit > Source > Repositories > Create repository**
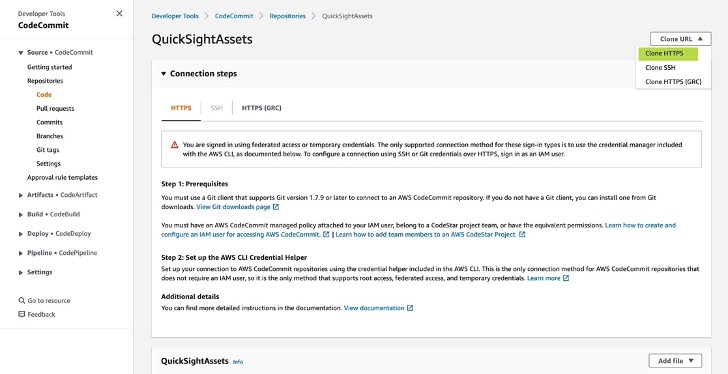

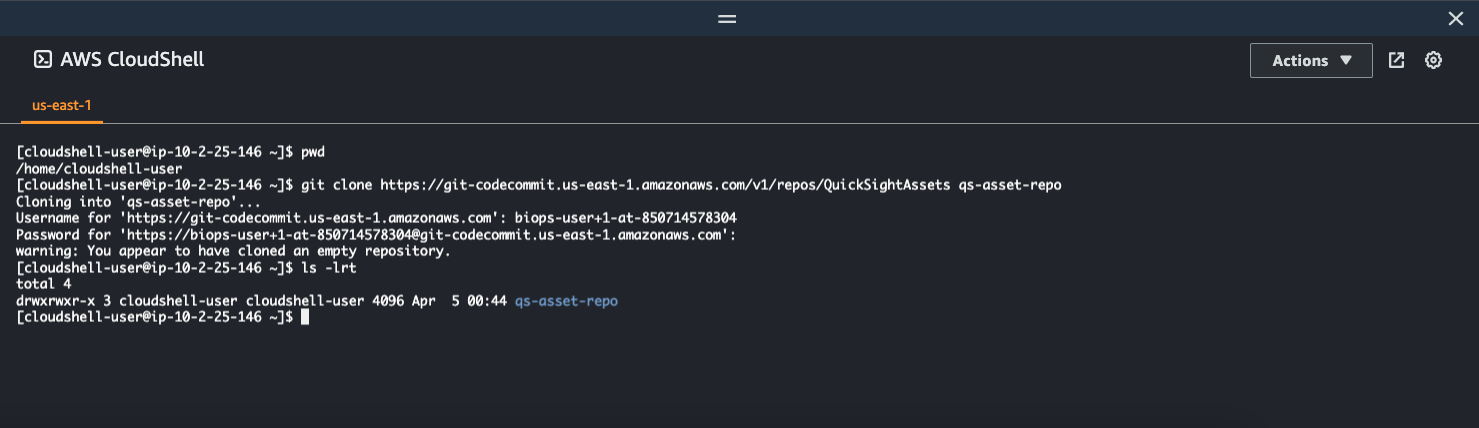
Step 2: Open CloudShell from the AWS Console.
Run below commands to clone the repo.
Note: When you are prompted for repository Username and Password, enter the downloaded credential retrieved during setting up HTTPS Git credentials for _AWS CodeCommit > Generate credentials_ step described in the previous step.
`git branch master
`
`
git clone https://git-codecommit.us-east-1.amazonaws.com/v1/repos/QuickSightAssets qs-asset-repo
`
Step 3: Create repository folder structure in CloudShell.
Run below commands from the terminal inside the local repository directory created above.
```
$ cd qs-asset-repo
$ mkdir datasource dataset analysis dashboard theme scripts
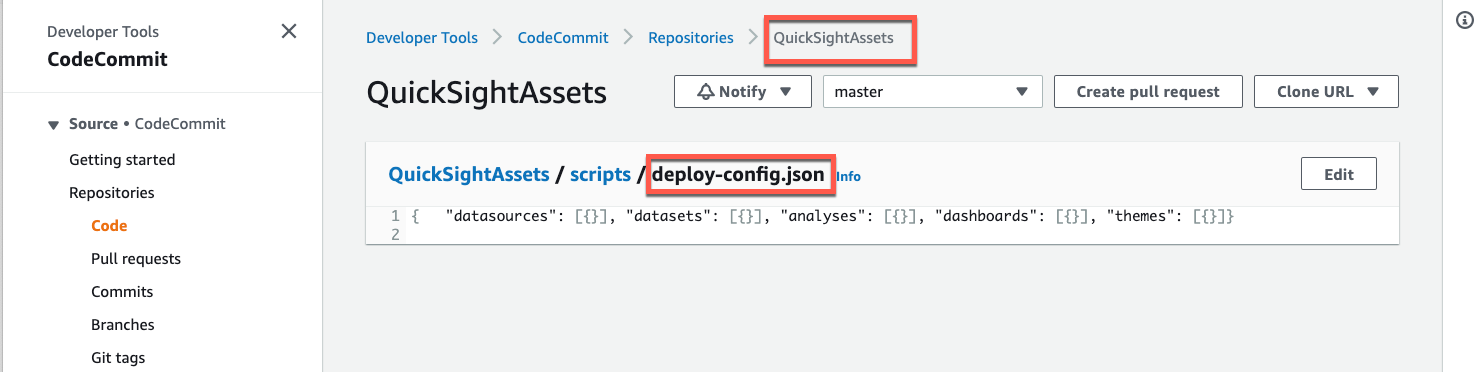
$ echo "{ \"datasources\": [{}], \"datasets\": [{}], \"analyses\": [{}], \"dashboards\": [{}], \"themes\": [{}]}" >> scripts/deploy-config.json
$ git add scripts/
$ git commit -m "Initial scripts file"
$ git push
```
After the final step above, come back to AWS console and navigate to your AWS CodeCommit repository. You will see the _deploy-config.json_ file got created.
### AWS IAM
#### _Configurations in the source AWS account_
In the Beta account i.e where the CI/ CD Code Pipeline is being setup, create below IAM roles
1. _**Current-Account-QuickSight-Asset-CRUD**_
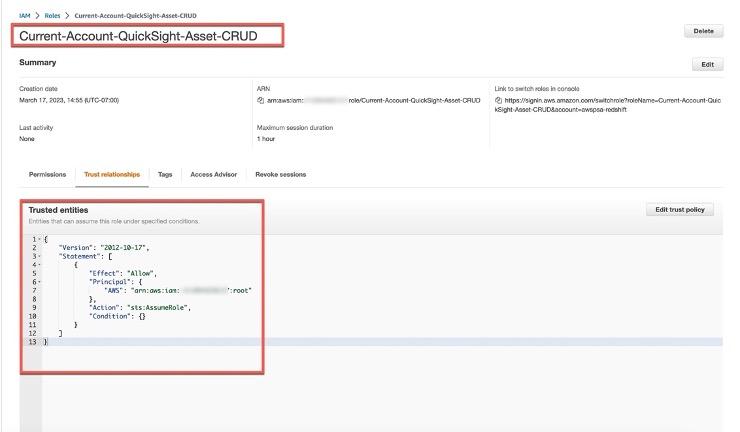
_Trust relationship_
```
{
"Version": "2012-10-17",
"Statement": [
{
"Effect": "Allow",
"Principal": {
"AWS": "arn:aws:iam:::root"
},
"Action": "sts:AssumeRole",
"Condition": {}
}
]
}
```
_Inline Policy (**Quicksight-assets-create-update**)_
```
{
"Version": "2012-10-17",
"Statement": [
{
"Sid": "VisualEditor0",
"Effect": "Allow",
"Action": [
"quicksight:CreateDashboard",
"quicksight:PassDataSet",
"quicksight:CreateDataSet",
"quicksight:UpdateDataSet",
"quicksight:UpdateThemePermissions",
"quicksight:CreateDataSource",
"quicksight:UpdateDataSource",
"quicksight:CreateTheme",
"quicksight:UpdateDataSetPermissions",
"quicksight:CreateAnalysis",
"quicksight:UpdateDataSourcePermissions",
"quicksight:UpdateAnalysisPermissions",
"quicksight:UpdateDashboardPermissions",
"quicksight:UpdateDashboard",
"quicksight:UpdateAnalysis",
"quicksight:UpdateTheme"
],
"Resource": "*"
}
]
}
```
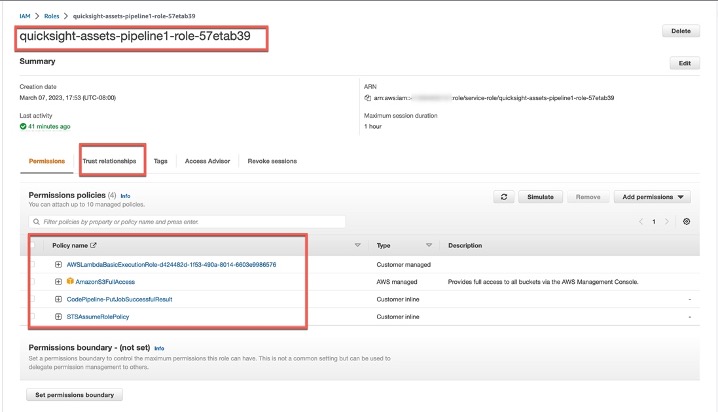
2. _**quicksight-assets-pipeline1-role**_
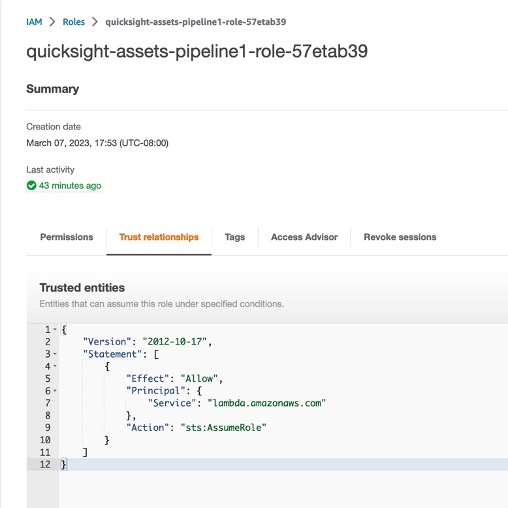
_Trust relationship_
```
{
"Version": "2012-10-17",
"Statement": [
{
"Effect": "Allow",
"Principal": {
"Service": "lambda.amazonaws.com"
},
"Action": "sts:AssumeRole"
}
]
}
```
_Inline Policies_
1. _CodePipeline-PutJobSuccessfulResult_
```
{
"Version": "2012-10-17",
"Statement": [
{
"Sid": "VisualEditor0",
"Effect": "Allow",
"Action": "codepipeline:PutJobSuccessResult",
"Resource": "*"
}
]
}
```
2. _STSAssumeRolePolicy_
```
{
"Version": "2012-10-17",
"Statement": [
{
"Sid": "AssumeRole",
"Effect": "Allow",
"Action": "sts:AssumeRole",
"Resource": [
"arn:aws:iam:::role/Cross-Account-QuickSight-Asset-CRUD",
"arn:aws:iam:::role/Current-Account-QuickSight-Asset-CRUD"
]
}
]
}
```
#### _Configurations in the target AWS account_
In the target AWS account i.e where the CI/ CD Code Pipeline will deploy the Amazon QuickSight assets, create the below IAM role
_**Cross-Account-QuickSight-Asset-CRUD**_
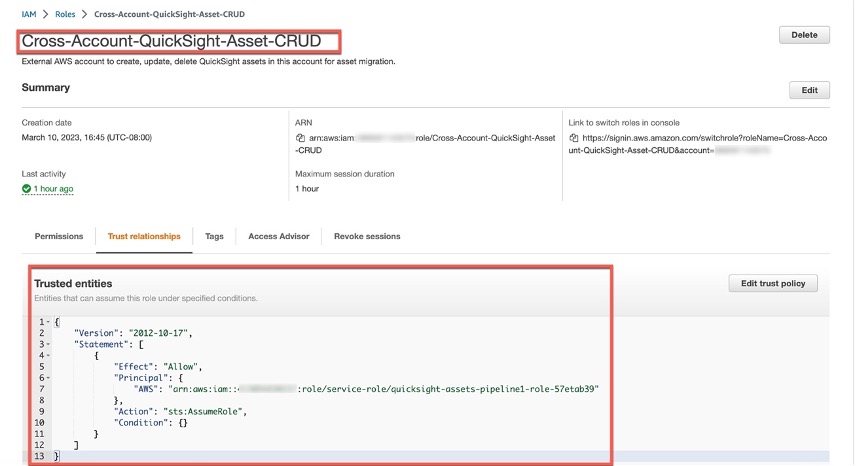
_Trust relationship_
```
{
"Version": "2012-10-17",
"Statement": [
{
"Effect": "Allow",
"Principal": {
"AWS": "arn:aws:iam:::role/service-role/quicksight-assets-pipeline1-role "
},
"Action": "sts:AssumeRole",
"Condition": {}
}
]
}
```
_Inline Policy (**_Quicksight-assets-create-update_**)_
```
{
"Version": "2012-10-17",
"Statement": [
{
"Sid": "VisualEditor0",
"Effect": "Allow",
"Action": [
"quicksight:CreateDashboard",
"quicksight:PassDataSet",
"quicksight:CreateDataSet",
"quicksight:UpdateDataSet",
"quicksight:UpdateThemePermissions",
"quicksight:CreateDataSource",
"quicksight:UpdateDataSource",
"quicksight:CreateTheme",
"quicksight:UpdateDataSetPermissions",
"quicksight:CreateAnalysis",
"quicksight:UpdateDataSourcePermissions",
"quicksight:UpdateAnalysisPermissions",
"quicksight:UpdateDashboardPermissions",
"quicksight:UpdateDashboard",
"quicksight:UpdateAnalysis",
"quicksight:UpdateTheme"
],
"Resource": "*"
}
]
}
```
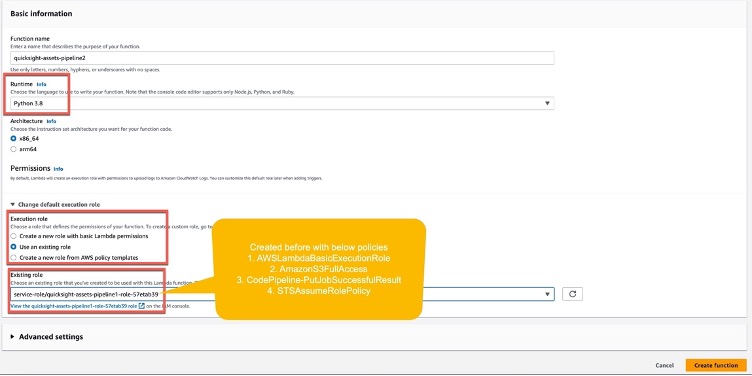
### AWS Lambda
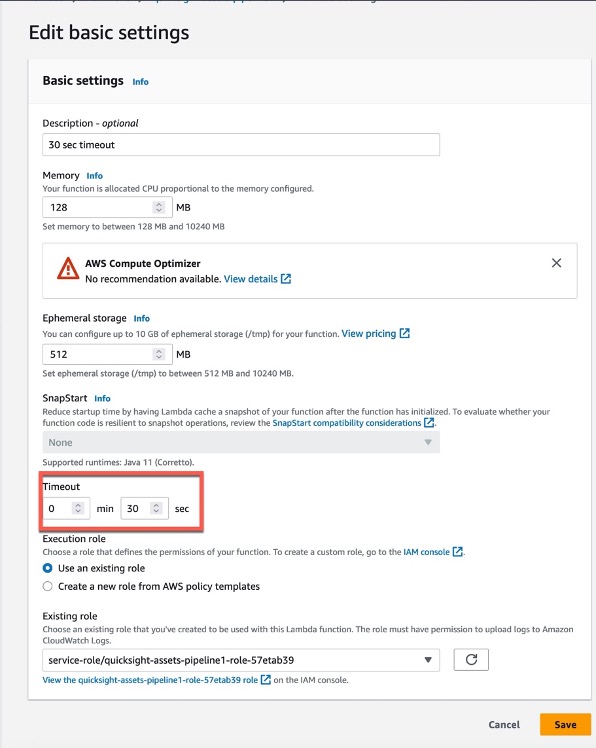
Step 1: Create a Lambda function _quicksight-assets-pipeline_ from scratch with Runtime **Python 3.8**, select Execution role as **Use an existing role**
Step 2: Update Lambda configuration
1. Change the timeout to 30 seconds
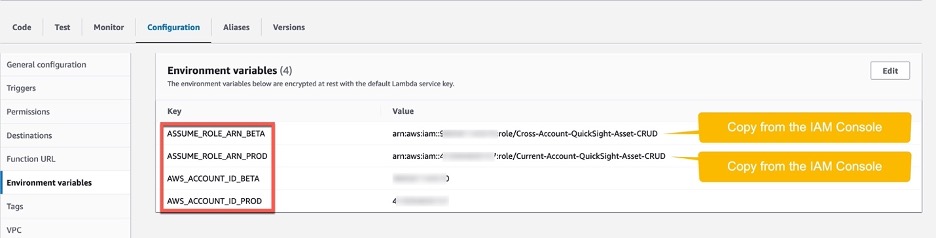
2. Add the below 4 environment variables
* ASSUME_ROLE_ARN_BETA -- arn:aws:iam::source-aws-account-id:role/Cross-Account-QuickSight-Asset-CRUD
* ASSUME_ROLE_ARN_PROD -- arn:aws:iam::target-aws-account-id:role/Current-Account-QuickSight-Asset-CRUD
* AWS_ACCOUNT_ID_BETA -- source-aws-account-id
* AWS_ACCOUNT_ID_PROD -- target-aws-account-id
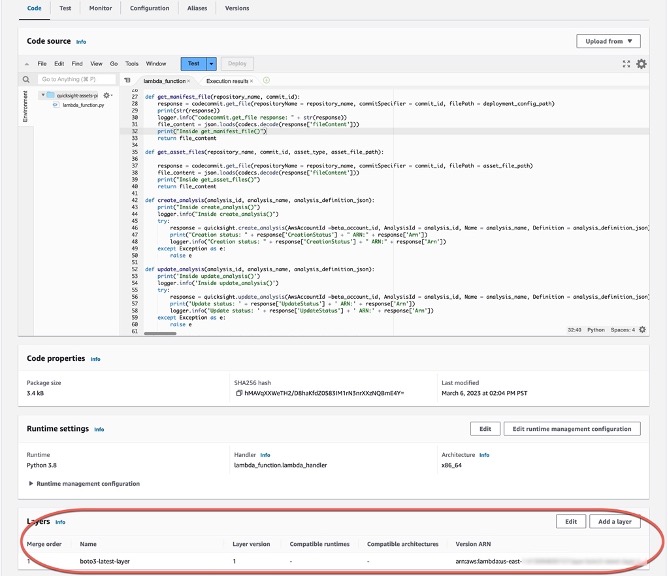
Step 3: Add the below code to the Lambda function.
Download the code from [deploy-qs-assets-x-account.py](https://github.com/aws-samples/amazon-quicksight-asset-migration-cicd/blob/main/deploy-qs-assets-x-account.py) and paste into the AWS Lambda function _lambda_function.py_ editor.
Step 4: Navigate to **Configuration** tab. Under Execution role you will see a role name prefixed as _quicksight-assets-pipeline-role_ got created. Click on this role to open the IAM console. We will attach appropriate policies to this role here for the lambda function to perform actions on Amazon QuickSight and AWS Code Pipeline.
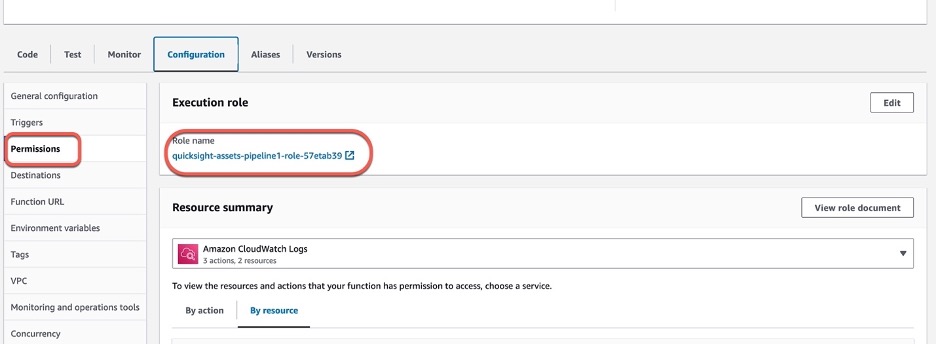
Step 5: Check for below policies are attached to the _quicksight-assets-pipeline-role-_ IAM role.
* AWSLambdaBasicExecutionRole
* AmazonS3FullAccess
* CodePipeline-PutJobSuccessfulResult
* STSAssumeRolePolicy
Step 6: Attach latest boto3 lambda layer
Follow the steps described [here](https://aws.amazon.com/premiumsupport/knowledge-center/lambda-python-runtime-errors/) to attach the latest boto3 lambda layer.
### AWS Code Pipeline
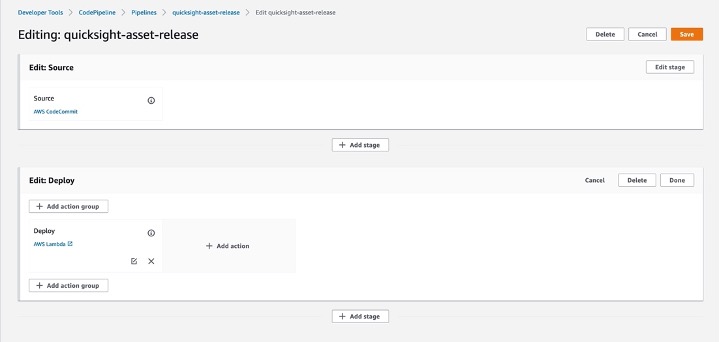
Step 1: Create Pipeline

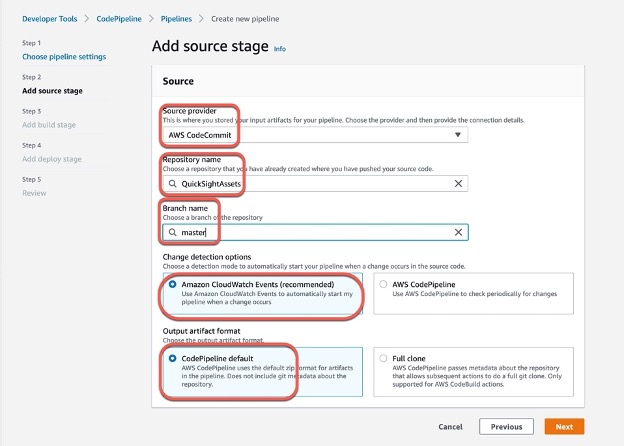

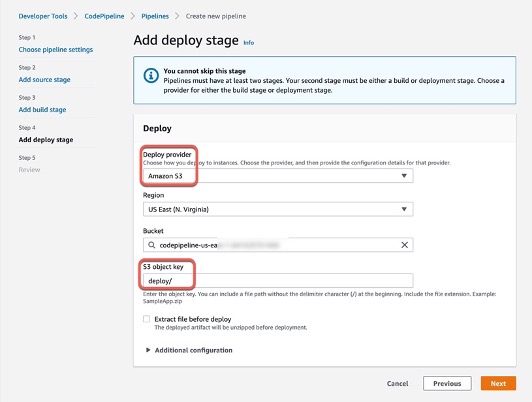
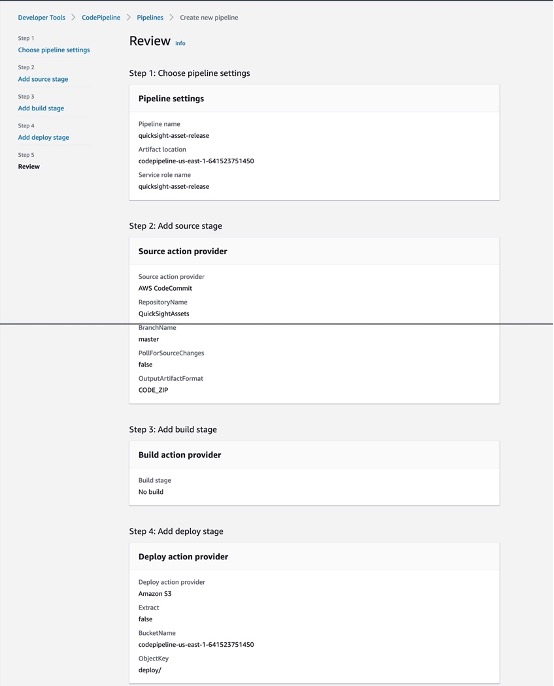
Step 2: Edit Pipeline “Deploy” stage

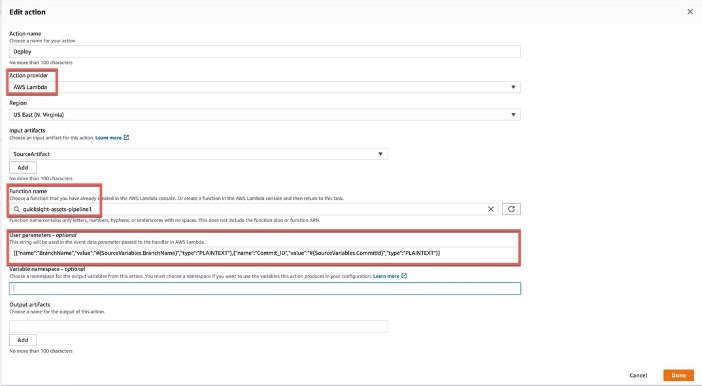
_User parameters_
```
[{"name":"BranchName","value":"#{SourceVariables.BranchName}","type":"PLAINTEXT"},{"name":"Commit_ID","value":"#{SourceVariables.CommitId}","type":"PLAINTEXT"}]
```
### Testing guide
Step 1: Download one of the analysis definition from the source AWS account by running [describe-analysis-definition](https://docs.aws.amazon.com/cli/latest/reference/quicksight/describe-analysis-definition.html#describe-analysis-definition) API.
Step 2: Update the downloaded JSON file to be used as input to QuickSight [create-analysis](https://docs.aws.amazon.com/cli/latest/reference/quicksight/create-analysis.html) API. If you save this file as **analysis-definition-to-migrate.json**
Step 3: Move the modified JSON file under the analysis folder of your local repository
Step 4: Modify the scripts/deploy-config.json file as below
```
{
"datasources": [{}],
"datasets": [{}],
"analyses": [{"id":"some-alphanumeric-id-you-want", "name": "Some Name You Want to Call", "filename": "analysis-definition-to-migrate.json"}],
"dashboards": [{}],
"themes": [{}]
}
```
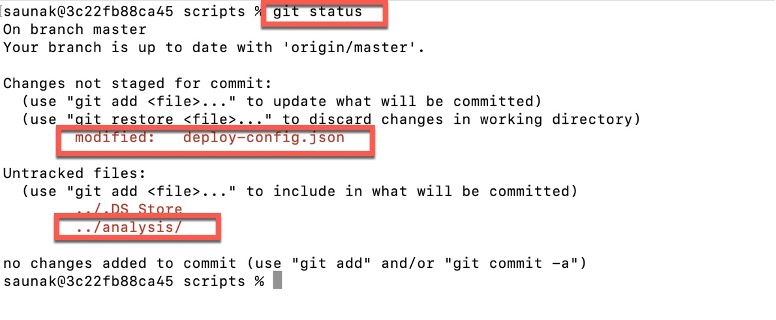
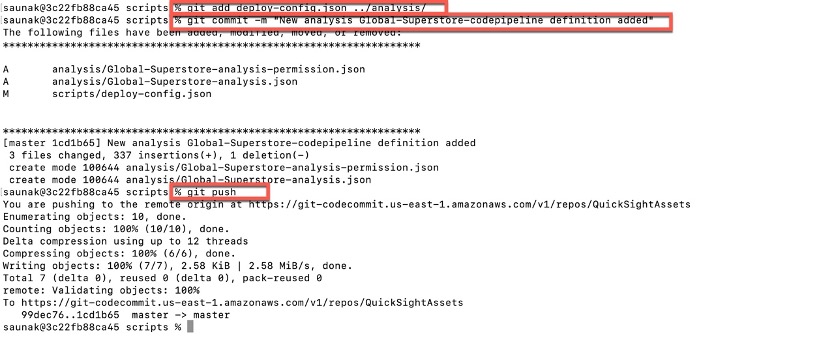
Step 5: Execute the below commands from terminal
```
$ git status
$ git add deploy-config.json ../analysis/
$ git commit -m "New analysi ssome-alphanumeric-id-you-want definition added"
$ git push
```
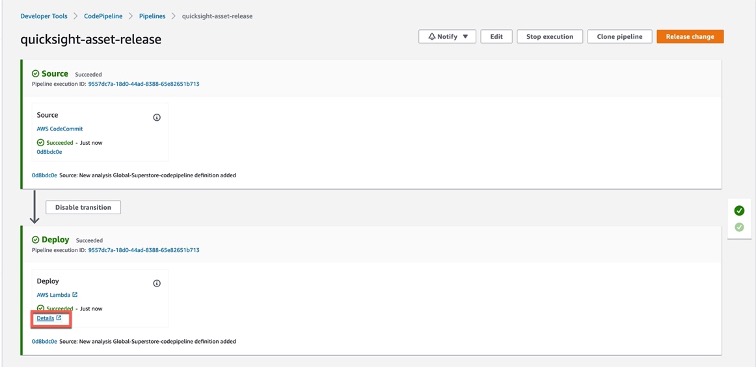
Step 6: Navigate to AWS Code Pipeline console

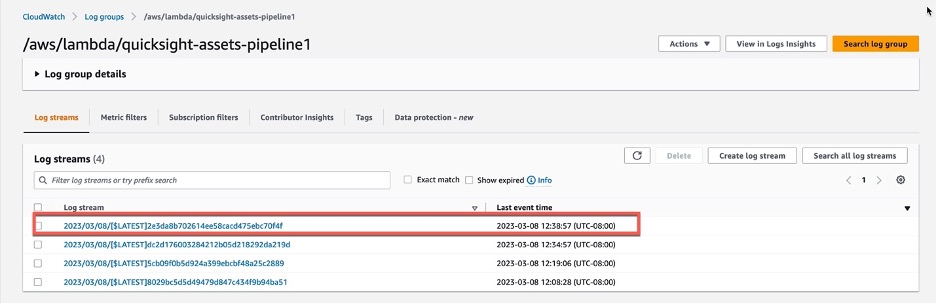
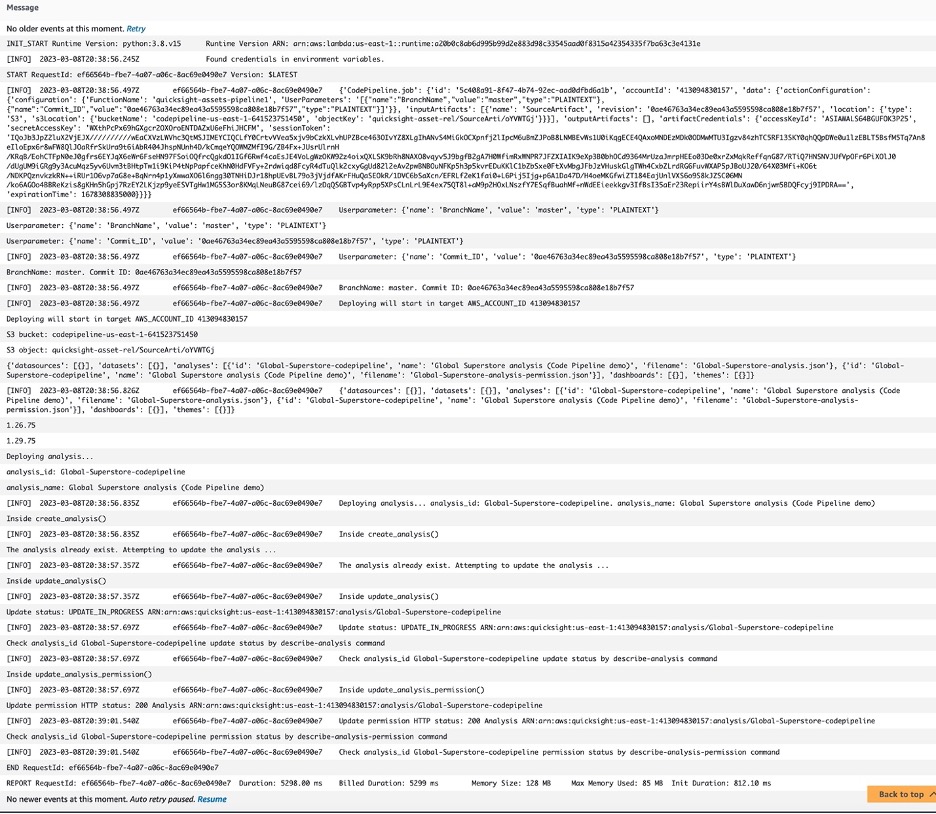
Step 7: Check the AWS CloudWatch log
## Security
See [CONTRIBUTING](CONTRIBUTING.md#security-issue-notifications) for more information.
## License
This library is licensed under the MIT-0 License. See the LICENSE file.
The architecture uses the below AWS services.
1. AWS Code Commit
2. AWS Lambda
3. Amazon QuickSight
4. Amazon Identity and Access Management (IAM)
5. Amazon S3
6. AWS Code Pipeline
## Pre-requisite
* The AWS Code Commit code repository must have 2 branches- **_master_** and **_beta_**.
* Amazon QuickSight asset definition file from the Beta environment should be available. For example to deploy an Amazon QuickSight analysis asset, you should know how to use the [**describe-analysis-definition**](https://docs.aws.amazon.com/cli/latest/reference/quicksight/describe-analysis-definition.html) CLI command and how to modify the output of the describe-analysis-definition command to use as input to [**create-analysis**](https://docs.aws.amazon.com/cli/latest/reference/quicksight/create-analysis.html) CLI command.
* You should consider maintaining IAM user groups to allow/ limit Git push and merg the above branches using AWS Code Commit IAM policies as described in [Limit pushes and merges to branches in AWS CodeCommit](https://docs.aws.amazon.com/codecommit/latest/userguide/how-to-conditional-branch.html).
## Deployment guide
### AWS Code Commit
#### _Setup IAM user who will access the AWS Code Commit repository_
Step 1: **AWS IAM > Users > Search or Add users > Permissions > Add permissions > Attach policies directly > AWSCodeCommitPowerUser**

**Optional step**: If you are creating a new IAM user navigate to the _Security credentials_ tab and click _Create access key_, select _Local code_ , click _Next_. On the _Set description tag_ page click _Create access key_. Click _Download .csv file_ and click _Done_.


Step 2: **AWS IAM > Users > Search or Add users > Security credentials > HTTPS Git credentials for AWS CodeCommit > Generate credentials**


#### _Setup the AWS CodeCommit repository_
Step 1: **AWS > CodeCommit > Source > Repositories > Create repository**


Step 2: Open CloudShell from the AWS Console.
Run below commands to clone the repo.
Note: When you are prompted for repository Username and Password, enter the downloaded credential retrieved during setting up HTTPS Git credentials for _AWS CodeCommit > Generate credentials_ step described in the previous step.
`git branch master
`
`
git clone https://git-codecommit.us-east-1.amazonaws.com/v1/repos/QuickSightAssets qs-asset-repo
`

Step 3: Create repository folder structure in CloudShell.
Run below commands from the terminal inside the local repository directory created above.
```
$ cd qs-asset-repo
$ mkdir datasource dataset analysis dashboard theme scripts
$ echo "{ \"datasources\": [{}], \"datasets\": [{}], \"analyses\": [{}], \"dashboards\": [{}], \"themes\": [{}]}" >> scripts/deploy-config.json
$ git add scripts/
$ git commit -m "Initial scripts file"
$ git push
```
After the final step above, come back to AWS console and navigate to your AWS CodeCommit repository. You will see the _deploy-config.json_ file got created.

### AWS IAM
#### _Configurations in the source AWS account_
In the Beta account i.e where the CI/ CD Code Pipeline is being setup, create below IAM roles
1. _**Current-Account-QuickSight-Asset-CRUD**_

_Trust relationship_
```
{
"Version": "2012-10-17",
"Statement": [
{
"Effect": "Allow",
"Principal": {
"AWS": "arn:aws:iam:::root"
},
"Action": "sts:AssumeRole",
"Condition": {}
}
]
}
```
_Inline Policy (**Quicksight-assets-create-update**)_
```
{
"Version": "2012-10-17",
"Statement": [
{
"Sid": "VisualEditor0",
"Effect": "Allow",
"Action": [
"quicksight:CreateDashboard",
"quicksight:PassDataSet",
"quicksight:CreateDataSet",
"quicksight:UpdateDataSet",
"quicksight:UpdateThemePermissions",
"quicksight:CreateDataSource",
"quicksight:UpdateDataSource",
"quicksight:CreateTheme",
"quicksight:UpdateDataSetPermissions",
"quicksight:CreateAnalysis",
"quicksight:UpdateDataSourcePermissions",
"quicksight:UpdateAnalysisPermissions",
"quicksight:UpdateDashboardPermissions",
"quicksight:UpdateDashboard",
"quicksight:UpdateAnalysis",
"quicksight:UpdateTheme"
],
"Resource": "*"
}
]
}
```
2. _**quicksight-assets-pipeline1-role**_


_Trust relationship_
```
{
"Version": "2012-10-17",
"Statement": [
{
"Effect": "Allow",
"Principal": {
"Service": "lambda.amazonaws.com"
},
"Action": "sts:AssumeRole"
}
]
}
```
_Inline Policies_
1. _CodePipeline-PutJobSuccessfulResult_
```
{
"Version": "2012-10-17",
"Statement": [
{
"Sid": "VisualEditor0",
"Effect": "Allow",
"Action": "codepipeline:PutJobSuccessResult",
"Resource": "*"
}
]
}
```
2. _STSAssumeRolePolicy_
```
{
"Version": "2012-10-17",
"Statement": [
{
"Sid": "AssumeRole",
"Effect": "Allow",
"Action": "sts:AssumeRole",
"Resource": [
"arn:aws:iam:::role/Cross-Account-QuickSight-Asset-CRUD",
"arn:aws:iam:::role/Current-Account-QuickSight-Asset-CRUD"
]
}
]
}
```
#### _Configurations in the target AWS account_
In the target AWS account i.e where the CI/ CD Code Pipeline will deploy the Amazon QuickSight assets, create the below IAM role
_**Cross-Account-QuickSight-Asset-CRUD**_

_Trust relationship_
```
{
"Version": "2012-10-17",
"Statement": [
{
"Effect": "Allow",
"Principal": {
"AWS": "arn:aws:iam:::role/service-role/quicksight-assets-pipeline1-role "
},
"Action": "sts:AssumeRole",
"Condition": {}
}
]
}
```
_Inline Policy (**_Quicksight-assets-create-update_**)_
```
{
"Version": "2012-10-17",
"Statement": [
{
"Sid": "VisualEditor0",
"Effect": "Allow",
"Action": [
"quicksight:CreateDashboard",
"quicksight:PassDataSet",
"quicksight:CreateDataSet",
"quicksight:UpdateDataSet",
"quicksight:UpdateThemePermissions",
"quicksight:CreateDataSource",
"quicksight:UpdateDataSource",
"quicksight:CreateTheme",
"quicksight:UpdateDataSetPermissions",
"quicksight:CreateAnalysis",
"quicksight:UpdateDataSourcePermissions",
"quicksight:UpdateAnalysisPermissions",
"quicksight:UpdateDashboardPermissions",
"quicksight:UpdateDashboard",
"quicksight:UpdateAnalysis",
"quicksight:UpdateTheme"
],
"Resource": "*"
}
]
}
```
### AWS Lambda
Step 1: Create a Lambda function _quicksight-assets-pipeline_ from scratch with Runtime **Python 3.8**, select Execution role as **Use an existing role**

Step 2: Update Lambda configuration
1. Change the timeout to 30 seconds

2. Add the below 4 environment variables
* ASSUME_ROLE_ARN_BETA -- arn:aws:iam::source-aws-account-id:role/Cross-Account-QuickSight-Asset-CRUD
* ASSUME_ROLE_ARN_PROD -- arn:aws:iam::target-aws-account-id:role/Current-Account-QuickSight-Asset-CRUD
* AWS_ACCOUNT_ID_BETA -- source-aws-account-id
* AWS_ACCOUNT_ID_PROD -- target-aws-account-id

Step 3: Add the below code to the Lambda function.
Download the code from [deploy-qs-assets-x-account.py](https://github.com/aws-samples/amazon-quicksight-asset-migration-cicd/blob/main/deploy-qs-assets-x-account.py) and paste into the AWS Lambda function _lambda_function.py_ editor.
Step 4: Navigate to **Configuration** tab. Under Execution role you will see a role name prefixed as _quicksight-assets-pipeline-role_ got created. Click on this role to open the IAM console. We will attach appropriate policies to this role here for the lambda function to perform actions on Amazon QuickSight and AWS Code Pipeline.

Step 5: Check for below policies are attached to the _quicksight-assets-pipeline-role-_ IAM role.
* AWSLambdaBasicExecutionRole
* AmazonS3FullAccess
* CodePipeline-PutJobSuccessfulResult
* STSAssumeRolePolicy
Step 6: Attach latest boto3 lambda layer
Follow the steps described [here](https://aws.amazon.com/premiumsupport/knowledge-center/lambda-python-runtime-errors/) to attach the latest boto3 lambda layer.

### AWS Code Pipeline
Step 1: Create Pipeline


Step 2: Edit Pipeline “Deploy” stage


_User parameters_
```
[{"name":"BranchName","value":"#{SourceVariables.BranchName}","type":"PLAINTEXT"},{"name":"Commit_ID","value":"#{SourceVariables.CommitId}","type":"PLAINTEXT"}]
```

### Testing guide
Step 1: Download one of the analysis definition from the source AWS account by running [describe-analysis-definition](https://docs.aws.amazon.com/cli/latest/reference/quicksight/describe-analysis-definition.html#describe-analysis-definition) API.
Step 2: Update the downloaded JSON file to be used as input to QuickSight [create-analysis](https://docs.aws.amazon.com/cli/latest/reference/quicksight/create-analysis.html) API. If you save this file as **analysis-definition-to-migrate.json**
Step 3: Move the modified JSON file under the analysis folder of your local repository
Step 4: Modify the scripts/deploy-config.json file as below
```
{
"datasources": [{}],
"datasets": [{}],
"analyses": [{"id":"some-alphanumeric-id-you-want", "name": "Some Name You Want to Call", "filename": "analysis-definition-to-migrate.json"}],
"dashboards": [{}],
"themes": [{}]
}
```
Step 5: Execute the below commands from terminal
```
$ git status
$ git add deploy-config.json ../analysis/
$ git commit -m "New analysi ssome-alphanumeric-id-you-want definition added"
$ git push
```


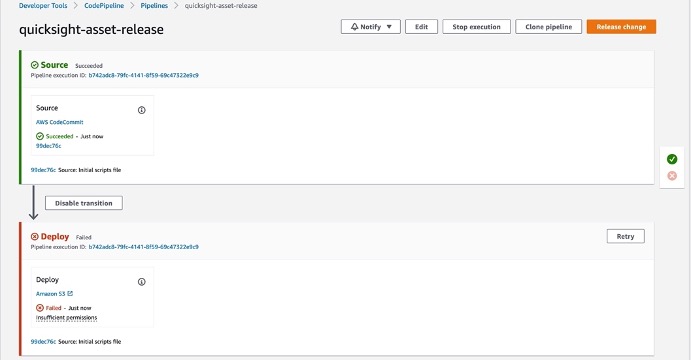
Step 6: Navigate to AWS Code Pipeline console


Step 7: Check the AWS CloudWatch log


## Security
See [CONTRIBUTING](CONTRIBUTING.md#security-issue-notifications) for more information.
## License
This library is licensed under the MIT-0 License. See the LICENSE file.