# Deployment guide
---
## Prerequisites
To deploy the solution, you must have **Administrator** (or **Power User**) permissions to package the CloudFormation templates, upload templates in your Amazon S3 bucket, and run the deployment commands.
You must also have [AWS CLI](https://aws.amazon.com/cli/). If you do not have it, see [Installing, updating, and uninstalling the AWS CLI](https://docs.aws.amazon.com/cli/latest/userguide/cli-chap-install.html). If you would like to use the multi-account model deployment option, you need access to minimum two AWS accounts, recommended three accounts for development, staging and production environments.
### Check if a SageMaker domain exists in the deployment region
❗ At the time of writing there is a limit of **one SageMaker domain per region per account**. You cannot deploy this solution if you have already a domain in the deployment region in your AWS account. Chose a different region or delete the existing domain in the deployment region.
To check if you have a domain in the deployment region, run the following CLI command:
```sh
aws sagemaker list-domains
```
If any of domains in the returned list is in the status `InService`, you cannot deploy a new domain in this region.
### Check how many VPCs you have in the deployment region
❗ By default you have a limit of five [Amazon Virtual Private Cloud (Amazon VPC)](https://docs.aws.amazon.com/vpc/?id=docs_gateway) VPCs per region per account. Check how many VPCs you have in the deployment region of your AWS account. You must have not more than four VPCs to be able to deploy the solution.
You can run the following CLI command to see all VPCs in your account in the deployment region:
```sh
aws ec2 describe-vpcs
```
The solution deploys a VPC in your AWS account. This VPC is not deleted if you remove solution's CloudFormation stack or if the deployment fails. Subsequent failures of the deployment or re-deployments might reach the limit of five VPCs in the deployment region and **any new deployment of the solution will fail**. Always check how many VPCs you have in the deployment region in the main and target accounts before launching the solution.
### Check if SageMaker Service Catalog Products roles exists
SageMaker uses two execution **global** roles [`AmazonSageMakerServiceCatalogProductsLaunchRole`](https://console.aws.amazon.com/iam/home?#/roles/AmazonSageMakerServiceCatalogProductsLaunchRole) and [`AmazonSageMakerServiceCatalogProductsUseRole`](https://console.aws.amazon.com/iam/home?#/roles/AmazonSageMakerServiceCatalogProductsUseRole) to launch SageMaker portfolio of products and operate a CI/CD model deployment pipeline. Refer to SageMaker [documentation](https://docs.aws.amazon.com/sagemaker/latest/dg/security-iam-awsmanpol-sc.html) to understand these roles.
❗ If you have already deployed a SageMaker domain in your AWS account in any region, you might already have these roles. In this case you **must delete these two roles before you start solution deployment**. The solution will create two IAM roles with the same names but different IAM policies attached.
Please check if these roles exist in your account before deployment.
To check if `AmazonSageMakerServiceCatalogProductsLaunchRole` role exist, run the following CLI command in the deployment account:
```sh
aws iam get-role --role-name AmazonSageMakerServiceCatalogProductsLaunchRole
```
If role doesn't exist, you get a `NoSuchEntity` error, otherwise you get information about the role.
To check if `AmazonSageMakerServiceCatalogProductsUseRole` role exist, run the following CLI command:
```sh
aws iam get-role --role-name AmazonSageMakerServiceCatalogProductsUseRole
```
If any of the roles exists in your AWS account, delete the existing role or roles, otherwise the deployment of the solution might fail or MLOps projects will not operate properly.
### Package CloudFormation templates
Please go through these [step-by-step instructions](../package-cfn.md) to package and upload the solution templates into a S3 bucket for the deployment.
#### Optional - run security scan on the CloudFormation templates
If you would like to run a security scan on the CloudFormation templates using [`cfn_nag`](https://github.com/stelligent/cfn_nag) (recommended), you have to install `cfn_nag`:
```sh
brew install ruby brew-gem
brew gem install cfn-nag
```
To initiate the security scan, run the following command:
```sh
make cfn_nag_scan
```
## Deployment options
You have a choice of different independent deployment options using the delivered CloudFormation templates:
+ _Easiest option_
[**Data science environment quickstart**](#data-science-environment-quickstart): deploy an end-to-end data science environment with the majority of options set to default values. This deployment type supports **single-account model deployment workflow** only. _You can change only a few deployment options_
+ _Most common and flexible option_
[**Two-step deployment via CloudFormation**](#two-step-deployment-via-cloudformation): deploy the core infrastructure in the first step and then deploy a data science environment, both as CloudFormation templates. CLI `aws cloudformation create-stack` is used for deployment. _You can change any deployment option_
+ _Most advanced option_
[**Two-step deployment via CloudFormation and AWS Service Catalog**](#two-step-deployment-via-cloudformation-and-aws-service-catalog): deploy the core infrastructure in the first step via `aws cloudformation create-stack` and then provision a data science environment via [AWS Service Catalog](https://aws.amazon.com/servicecatalog/). _You can change any deployment option_
The following sections give step-by-step deployment instructions for each of the options.
You can also find all CLI commands in the delivered shell scripts in the project folder `test`.
The following diagram visualizes the deployment options:

### Special deployment options
This special type of deployment is designed for an environment, where all `iam:` API calls, such as role and policy creation, are separated from the main deployment. All IAM roles for users and services and related IAM permission policies should be created as part of a separate process following the **separation of duties** principle.
The IAM part can be deployed using the delivered CloudFormation templates or completely separated out-of-stack in your own process.
You provide the ARNs for the IAM roles as CloudFormation template parameters to deploy the data science environment.
If you use this deployment option, at no point you need any of `iam:*` permissions in your IAM permission policy to deploy a data science environment.
See [Appendix B](appendix.md#appendix-b)
## Multi-account model deployment prerequisites
❗ Skip this section if you don't use multi-account setup and jump to [Deployment types](#deployment-types).
### Concepts
In the following instructions we use the these concepts:
- **Main account**: AWS account where you deploy the data science environment with SageMaker domain and studio
- **Target accounts**: Staging and production AWS accounts used for model deployment
### Infrastructure
Multi-account model deployment requires VPC infrastructure and specific execution roles in the target accounts. The provisioning of the infrastructure and the roles is done automatically during the deployment of the data science environment as a part of the overall deployment process. **To enable multi-account setup you must provide the staging and production organizational unit (OUs) IDs OR staging and production account lists as CloudFormation parameters for the deployment.**
This diagram shows how CloudFormation stack sets are used to deploy the needed infrastructure to the target accounts.

Two stack sets - one for the VPC infrastructure and another for the roles - are deployed for each environment type, staging and production.
**One-off** setup is needed to enable **multi-account** model deployment workflow with SageMaker MLOps projects.
❗ You **don't need** to perform this setup if you are going to use single-account deployment only.
### Step 1
The provisioning of a data science environment uses CloudFormation stack set to deploy the required IAM roles and VPC infrastructure into the target accounts.
The solution uses `SELF_MANAGED` stack set permission model and needs to bootstrap two IAM roles:
- `AdministratorRole` in the development account where you are going to deploy the SageMaker domain
- `SetupStackSetExecutionRole` in each of the target accounts
These roles must exist **before** you launch the solution deployment. The `AdministratorRole` is automatically created during the solution deployment. For the `SetupStackSetExecutionRole` you can use the delivered CloudFormation template [`env-iam-setup-stacksest-role.yaml`](../cfn_templates/env-iam-setup-stackset-role.yaml) or your own process of provisioning of an IAM role.
To provision `SetupStackSetExecutionRole` launch the following CloudFormation template in **each of the target accounts**, but not in the main account:
```bash
# STEP 1:
# SELF_MANAGED stack set permission model:
# Deploy a stack set execution role to _EACH_ of the target accounts in both staging and prod OUs
# This stack set execution role is used to deploy the target accounts stack sets in env-main.yaml
# ENV_NAME needs to be unique to be able to create s3 buckets for the environment and consistent with service catalog
# !!!!!!!!!!!! RUN THIS COMMAND IN EACH OF THE TARGET ACCOUNTS !!!!!!!!!!!!
ENV_NAME="sm-mlops" # Or use your own unique environment names like "sm-mlops-$DEPARTMENT_NAME"
ENV_TYPE=# use your own consistent environment stage names like "staging" and "prod"
ADMIN_ACCOUNT_ID=
# Change or leave on default
SETUP_STACKSET_ROLE_NAME=$ENV_NAME-setup-stackset-execution-role
STACK_NAME=$ENV_NAME-setup-stackset-role
# Delete stack if it exists
aws cloudformation delete-stack --stack-name $STACK_NAME
aws cloudformation deploy \
--template-file cfn_templates/env-iam-setup-stackset-role.yaml \
--stack-name $STACK_NAME \
--capabilities CAPABILITY_NAMED_IAM \
--parameter-overrides \
EnvName=$ENV_NAME \
EnvType=$ENV_TYPE \
StackSetExecutionRoleName=$SETUP_STACKSET_ROLE_NAME \
AdministratorAccountId=$ADMIN_ACCOUNT_ID
aws cloudformation describe-stacks \
--stack-name $STACK_NAME \
--output table \
--query "Stacks[0].Outputs[*].[OutputKey, OutputValue]"
```
Take a note of `StackSetExecutionRoleName` in the stack output. The **name**, not ARN, of the provisioned IAM role must be passed to the `env-main.yaml` template or used in Service Catalog-based deployment as `SetupStackSetExecutionRoleName` parameter.
### Step 2
**This step is only needed if you use AWS Organizations setup.**
#### Enable AWS CloudFormation StackSets service for your AWS Organizations
You must enable [AWS CloudFormation StackSets](https://docs.aws.amazon.com/AWSCloudFormation/latest/UserGuide/what-is-cfnstacksets.html) service integration with your AWS Organizations.
When you enable integration, you allow the specified service to create a [service-linked role](https://docs.aws.amazon.com/IAM/latest/UserGuide/using-service-linked-roles.html) in all the accounts in your organization. This allows the service to perform operations on your behalf in your organization and its accounts.
You can check the integration status and enable it in the [AWS Organizations Services](https://console.aws.amazon.com/organizations/v2/home/services) console or run the following CLI commands in **the management account** of your AWS Organizations.
1. Check if AWS CloudFormation StackSet service is enabled:
```sh
aws organizations list-aws-service-access-for-organization \
--query 'EnabledServicePrincipals[?ServicePrincipal==`member.org.stacksets.cloudformation.amazonaws.com`]'
```
If the command returns an empty array `[]`, you must enable StackSets. If you get `AccessDeniedException`, make sure you run the command in the management account of the AWS Organizations and you have the corresponding permissions.
2. If stack sets are not enabled, run the following command:
```sh
aws organizations enable-aws-service-access \
--service-principal=member.org.stacksets.cloudformation.amazonaws.com
```
#### Register a delegated administrator account
A delegated administrator account must be registered in order to enable `ListAccountsForParent` AWS Organization API call. If the data science account is already **the management account** in the AWS Organizations, this step must be skipped.
Run the following CLI command under **administrator credentials in the AWS Organization management account**:
```sh
# STEP 2:
# Register a delegated administrator to enable AWS Organizations API permission for non-management account
# Must be run under administrator in the AWS Organizations _management account_
ADMIN_ACCOUNT_ID=
aws organizations register-delegated-administrator \
--service-principal=member.org.stacksets.cloudformation.amazonaws.com \
--account-id=$ADMIN_ACCOUNT_ID
```
Check that the development account is listed as a delegated administrator account:
```sh
aws organizations list-delegated-administrators \
--service-principal=member.org.stacksets.cloudformation.amazonaws.com
```
## Multi-region deployment considerations
The solution is designed for multi-region deployment. You can deploy end-to-end stack in any region of the same AWS account. The following limitations and considerations apply:
+ The **shared IAM roles** (`DSAdministratorRole`, `SageMakerDetectiveControlExecutionRole`, `SCLaunchRole`) are created each time you deploy a new core infrastructure (`core-main`) or "quickstart" (`data-science-environment-quickstart`) stack. They created with `-` prefix and designed to be unique within your end-to-end data science environment. For example, if you deploy one stack set (including core infrastructure and team data science environment) in one region and another stack in another region, these two stacks do not share any IAM roles and any users assuming any persona roles have an independent set of permissions per stack set and per region.
+ The **environment IAM roles** (`DSTeamAdministratorRole`, `DataScientistRole`, `SageMakerExecutionRole`, `SageMakerPipelineExecutionRole`, `SCProjectLaunchRole`, `SageMakerModelExecutionRole`) are created with unique names. Each deployment of a new data science environment (via CloudFormation or via AWS Service Catalog) creates a set of unique roles.
+ SageMaker Studio uses two pre-defined roles `AmazonSageMakerServiceCatalogProductsLaunchRole` and `AmazonSageMakerServiceCatalogProductsUseRole`. These roles are **global** for the AWS account and created by the first deployment of core infrastructure. These two roles have `Retain` deletion policy and _are not deleted_ when you delete the stack which has created these roles. These roles are **global** for the AWS account.
## Deployment instructions
The following three sections describes each deployment type and deployment use case in detail.
### Data science environment quickstart
This option deploys the end-to-end infrastructure and a data science Environment in one go.
You can change only few deployment options. The majority of the options are set to their default values.
**This is the recommended options for majority of deployments. Use other options only if you need to test or model a specific use case, for example multi-account model deployment.**
📜 Use this option if you want to provision a _completely new set_ of the infrastructure and do not want to parametrize the deployment.
❗ With Quickstart deployment type you can uses single-account model deployment only. Do not select `YES` for `MultiAccountDeployment` parameter for model deploy SageMaker project template:
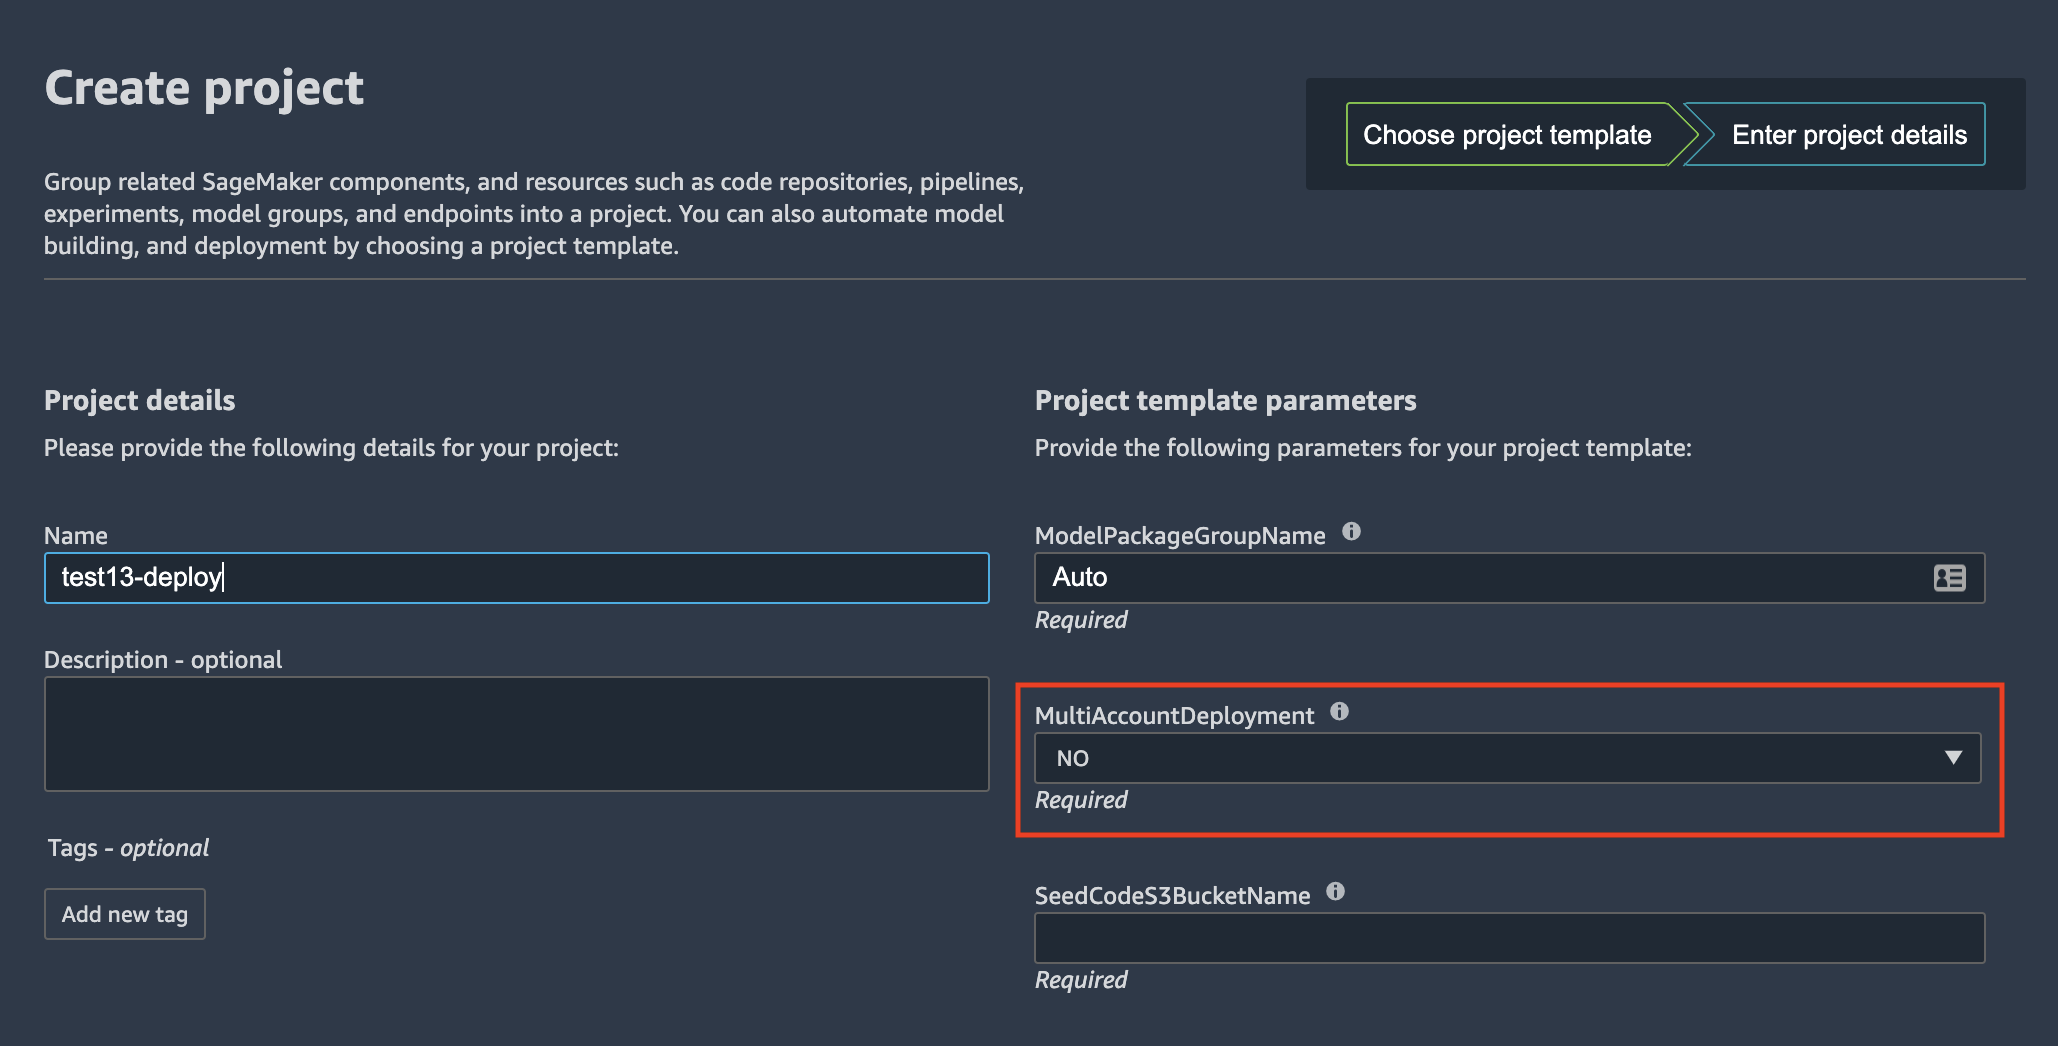
The only deployment options you can change are:
+ `CreateSharedServices`: default `NO`. Set to `YES` if you want to provision a shared services VPC with a private PyPI mirror (_not implemented at this stage_)
+ `VPCIDR`: default `10.0.0.0/16`. CIDR block for the new VPC
+ Private and public subnets CIDR blocks: default `10.0.0.0/19`
Make sure you specify the CIDR blocks which do not conflict with your existing network IP ranges.
❗ You cannot use existing VPC or existing IAM roles to deploy this stack. The stack provisions a new own set of network and IAM resources.
Initiate the stack deployment with the following command. Use the S3 bucket name you used to upload CloudFormation templates in **Package CloudFormation templates** section.
```bash
[[ unset"${S3_BUCKET_NAME}" == "unset" ]] && echo "\e[1;31mERROR: S3_BUCKET_NAME is not set" || echo "\e[1;32mS3_BUCKET_NAME is set to ${S3_BUCKET_NAME}"
STACK_NAME="ds-quickstart"
ENV_NAME="sm-mlops"
aws cloudformation create-stack \
--template-url https://s3.$AWS_DEFAULT_REGION.amazonaws.com/$S3_BUCKET_NAME/sagemaker-mlops/data-science-environment-quickstart.yaml \
--region $AWS_DEFAULT_REGION \
--stack-name $STACK_NAME \
--disable-rollback \
--capabilities CAPABILITY_NAMED_IAM \
--parameters \
ParameterKey=EnvName,ParameterValue=$ENV_NAME \
ParameterKey=EnvType,ParameterValue=dev \
ParameterKey=SeedCodeS3BucketName,ParameterValue=$S3_BUCKET_NAME
```
The full end-to-end deployment takes about 25 minutes.
### Data science quickstart clean up
Refer to [data science environment clean up](clean-up.md#delete-data-science-environment-quickstart) section.
### Two-step deployment via CloudFormation
With this option you provision a data science environment in two steps, each with its own CloudFormation template. You can control all deployment parameters.
📜 Use this option if you want to parametrize every aspect of the deployment based on your specific requirements and environment.
❗ You can select your existing VPC and network resources (subnets, NAT gateways, route tables) and existing IAM resources to be used for stack set deployment. Set the corresponding CloudFormation parameters to names and ARNs or your existing resources.
❗ You must specify the valid OU IDs for the `OrganizationalUnitStagingId`/`OrganizationalUnitProdId` **or** `StagingAccountList`/`ProductionAccountList` parameters for the `env-main.yaml` template to enable multi-account model deployment.
You can use the provided [shell script](../test/cfn-test-e2e.sh) to run this deployment type or follow the commands below.
#### Step 1: Deploy the core infrastructure
❗ Make sure you package the CloudFormation templates as described in [these instructions]((../package-cfn.md)).
In this step you deploy the _shared core infrastructure_ into your AWS Account. The stack (`core-main.yaml`) provisions:
1. Shared IAM roles for data science personas and services (optional if you bring your own IAM roles)
2. A shared services VPC and related networking resources (optional if you bring your own network configuration)
3. An AWS Service Catalog portfolio to provide a self-service deployment for the **data science administrator** user role
4. An ECS Fargate cluster to run a private PyPi mirror (_not implemented at this stage_)
5. Security guardrails for your data science environment (_detective controls are not implemented at this stage_)
The deployment options you can use are:
+ `CreateIAMRoles`: default `YES`. Set to `NO` if you have created the IAM roles outside of the stack (e.g. via a separate process) - such as "Bring Your Own IAM Role (BYOR IAM)" use case
+ `CreateSharedServices`: default `NO`. Set to `YES` if you would like to create a shared services VPC and an ECS Fargate cluster for a private PyPi mirror (_not implemented at this stage_)
+ `CreateSCPortfolio`: default `YES`. Set to `NO`if you don't want to to deploy an AWS Service Catalog portfolio with data science environment products
+ `DSAdministratorRoleArn`: **required** if `CreateIAMRoles=NO`, otherwise automatically provisioned
+ `SCLaunchRoleArn`: **required** if `CreateIAMRoles=NO`, otherwise automatically provisioned
+ `SecurityControlExecutionRoleArn`: **required** if `CreateIAMRoles=NO`, otherwise automatically provisioned
The following command uses the default values for the deployment options. You can specify parameters via `ParameterKey=,ParameterValue=` pairs in the `aws cloudformation create-stack` call:
```sh
STACK_NAME="sm-mlops-core"
[[ unset"${S3_BUCKET_NAME}" == "unset" ]] && echo "\e[1;31mERROR: S3_BUCKET_NAME is not set" || echo "\e[1;32mS3_BUCKET_NAME is set to ${S3_BUCKET_NAME}"
aws cloudformation create-stack \
--template-url https://s3.$AWS_DEFAULT_REGION.amazonaws.com/$S3_BUCKET_NAME/sagemaker-mlops/core-main.yaml \
--region $AWS_DEFAULT_REGION \
--stack-name $STACK_NAME \
--disable-rollback \
--capabilities CAPABILITY_IAM CAPABILITY_NAMED_IAM \
--parameters \
ParameterKey=StackSetName,ParameterValue=$STACK_NAME
```
The previous command launches the stack deployment and returns the `StackId`. You can track the stack deployment status in [AWS CloudFormation console](https://console.aws.amazon.com/cloudformation/home?region=us-east-1#/stacks?filteringStatus=active&filteringText=&viewNested=true&hideStacks=false) or in your terminal with the following command:
```sh
aws cloudformation describe-stacks \
--stack-name $STACK_NAME \
--query "Stacks[0].StackStatus"
```
After a successful stack deployment, the status turns to from `CREATE_IN_PROGRESS` to `CREATE_COMPLETE`. You can print the stack output:
```sh
aws cloudformation describe-stacks \
--stack-name $STACK_NAME \
--output table \
--query "Stacks[0].Outputs[*].[OutputKey, OutputValue]"
```
#### Step 2: Deploy a data science environment
The step 2 CloudFormation template (`env-main.yaml`) provides two deployment options:
+ **Deploy Studio into a new VPC**: This option provisions a new AWS network infrastructure consisting of:
- VPC
- private subnet in each Availability Zone (AZ)
- optional public subnet in each AZ. The public subnets are provisioned only if you chose to create NAT gateways
- VPC endpoints to access public AWS services and Amazon S3 buckets for data science projects
- security groups
- optional NAT gateway in each AZ
- if you select the NAT gateway option, the template creates an internet gateway and attaches it to the VPC
- routing tables and routes for private and public subnets
You specify up to four AZs and CIDR blocks for VPC and each of the subnets.
After provisioning the network infrastructure, the solution deploys Studio into this VPC.
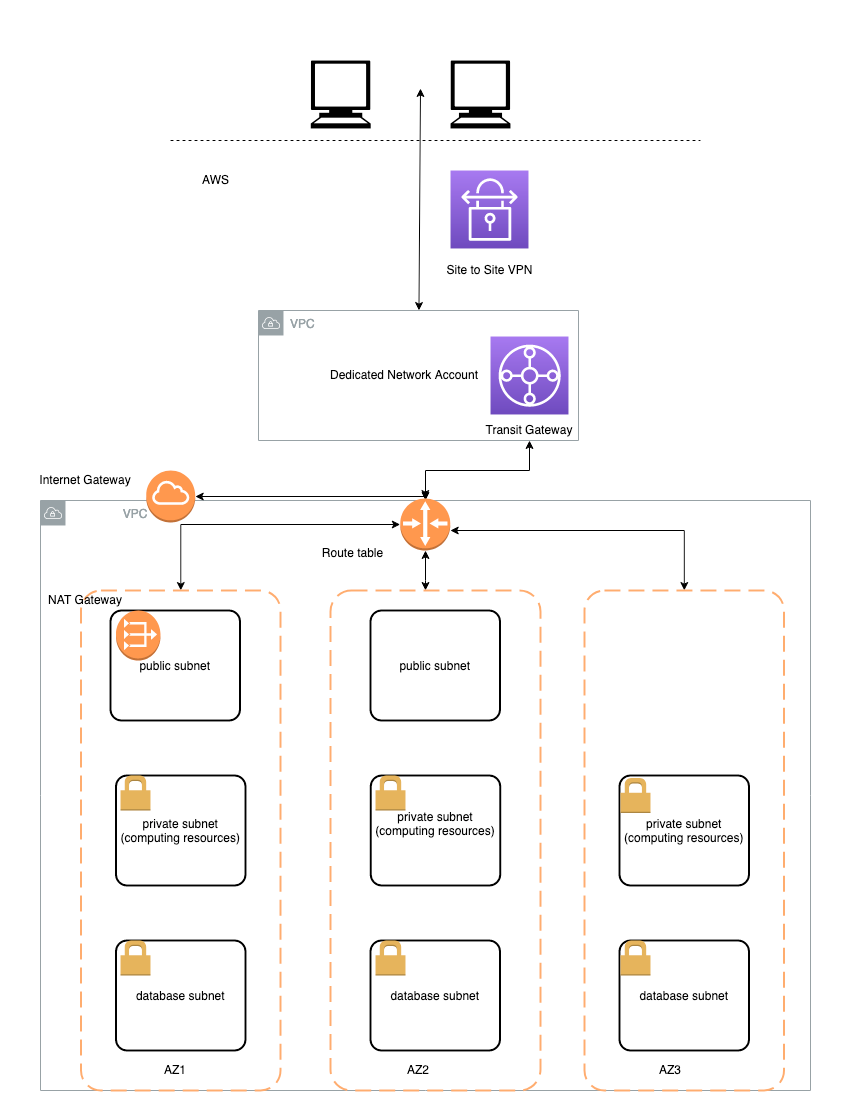
+ **Deploy Studio into an existing VPC**: This option provisions Studio in your existing AWS network infrastructure. You have several options to choose between existing or create new network resources:
- VPC: you must provide a valid existing VPC Id
- Subnets: you can choose between:
- providing existing subnet CIDR blocks (set `CreatePrivateSubnets` to `NO`) - in this case no new subnets are provisioned and NAT gateway option **is not available**. All SageMaker resources are deployed into your existing VPC and private subnets. You use your existing NAT (if available) to access internet from the private subnets
- provisioning new private (set `CreatePrivateSubnets` to `YES`) and optional (only if the NAT gateway option is selected, `CreateNATGateways` = `YES`) public subnets. The deployment creates new subnets with specified CIDR blocks inside your existing VPC.
You must specify up to four AZs you would like to deploy the network resources into.
❗ The CloudFormation template creates a new internet gateway attaches it to the VPC in "existing VPC" scenario if you select the NAT gateway option by setting `CreateNATGateways` to `YES`. The stack creation fails if there is an internet gateway _already attached_ to the existing VPC and you select the NAT gateway option.
Example of the existing VPC infrastructure:
The data science environment deployment provisions the following resources in your AWS account:
+ environment-specific IAM roles (optional, if `CreateEnvironmentIAMRoles` set to `YES`)
+ a VPC with all network infrastructure for the environment (optional) - see the considerations above
+ VPC endpoints to access the environment's Amazon S3 buckets and AWS public services via private network
+ AWS KMS keys for data encryption
+ two S3 buckets for environment data and model artifacts
+ AWS Service Catalog portfolio with environment-specific products
+ Studio domain and default user profile
If you choose the multi-account model deployment option by providing values for `OrganizationalUnitStagingId`/`OrganizationalUnitProdId` **or** `StagingAccountList`/`ProductionAccountList`, the deployment provisions the following resources in the target accounts:
+ VPC with a private subnet in each of the AZs, **no internet connectivity**
+ Security groups for SageMaker model hosting and VPC endpoints
+ Execution roles for stack set operations and SageMaker models
You can change any deployment options via CloudFormation parameters for [`core-main.yaml`](../cfn_templates/core-main.yaml) and [`env-main.yaml`](../cfn_templates/env-main.yaml) templates.
#### Single-account setup
Run command providing the deployment options for your environment. The following command uses the minimal set of the options:
```sh
# Use default or provide your own names
STACK_NAME="sm-mlops-env"
ENV_NAME="sm-mlops"
[[ unset"${S3_BUCKET_NAME}" == "unset" ]] && echo "\e[1;31mERROR: S3_BUCKET_NAME is not set" || echo "\e[1;32mS3_BUCKET_NAME is set to ${S3_BUCKET_NAME}"
aws cloudformation create-stack \
--template-url https://s3.$AWS_DEFAULT_REGION.amazonaws.com/$S3_BUCKET_NAME/sagemaker-mlops/env-main.yaml \
--region $AWS_DEFAULT_REGION \
--stack-name $STACK_NAME \
--disable-rollback \
--capabilities CAPABILITY_NAMED_IAM \
--parameters \
ParameterKey=EnvName,ParameterValue=$ENV_NAME \
ParameterKey=EnvType,ParameterValue=dev \
ParameterKey=AvailabilityZones,ParameterValue=${AWS_DEFAULT_REGION}a\\,${AWS_DEFAULT_REGION}b \
ParameterKey=NumberOfAZs,ParameterValue=2 \
ParameterKey=SeedCodeS3BucketName,ParameterValue=$S3_BUCKET_NAME
```
#### Multi-account setup
If you would like to use **multi-account model deployment**, you must provide the valid values for AWS Organizations OU IDs **or** account lists and the name for the `SetupStackSetExecutionRole` from [`env-iam-setup-stacksest-role.yaml`](../cfn_templates/env-iam-setup-stackset-role.yaml) stack output.
##### Run if you use AWS Organization OU IDs:
```sh
STACK_NAME="sm-mlops-env"
ENV_NAME="sm-mlops" # must be the same environment name you used for multi-account bootstrapping for the stack set execution role
STAGING_OU_ID=
PROD_OU_ID=
[[ unset"${S3_BUCKET_NAME}" == "unset" ]] && echo "\e[1;31mERROR: S3_BUCKET_NAME is not set" || echo "\e[1;32mS3_BUCKET_NAME is set to ${S3_BUCKET_NAME}"
[[ unset"${STAGING_OU_ID}" == "unset" ]] && echo "\e[1;31mERROR: STAGING_OU_ID is not set" || echo "\e[1;32mSTAGING_OU_ID is set to ${STAGING_OU_ID}"
[[ unset"${PROD_OU_ID}" == "unset" ]] && echo "\e[1;31mERROR: PROD_OU_ID is not set" || echo "\e[1;32mPROD_OU_ID is set to ${PROD_OU_ID}"
# provide the actual name of the role if you don't use the default name
SETUP_STACKSET_ROLE_NAME=$ENV_NAME-setup-stackset-execution-role
aws cloudformation create-stack \
--template-url https://s3.$AWS_DEFAULT_REGION.amazonaws.com/$S3_BUCKET_NAME/sagemaker-mlops/env-main.yaml \
--region $AWS_DEFAULT_REGION \
--stack-name $STACK_NAME \
--disable-rollback \
--capabilities CAPABILITY_NAMED_IAM \
--parameters \
ParameterKey=EnvName,ParameterValue=$ENV_NAME \
ParameterKey=EnvType,ParameterValue=dev \
ParameterKey=AvailabilityZones,ParameterValue=${AWS_DEFAULT_REGION}a\\,${AWS_DEFAULT_REGION}b \
ParameterKey=NumberOfAZs,ParameterValue=2 \
ParameterKey=SeedCodeS3BucketName,ParameterValue=$S3_BUCKET_NAME \
ParameterKey=OrganizationalUnitStagingId,ParameterValue=$STAGING_OU_ID \
ParameterKey=OrganizationalUnitProdId,ParameterValue=$PROD_OU_ID \
ParameterKey=SetupStackSetExecutionRoleName,ParameterValue=$SETUP_STACKSET_ROLE_NAME
```
##### Run if you use account ids:
```sh
STACK_NAME="sm-mlops-env"
ENV_NAME="sm-mlops" # must be the same environment name you used for multi-account bootstrapping for the stack set execution role
STAGING_ACCOUNTS=
PROD_ACCOUNTS=
[[ unset"${S3_BUCKET_NAME}" == "unset" ]] && echo "\e[1;31mERROR: S3_BUCKET_NAME is not set" || echo "\e[1;32mS3_BUCKET_NAME is set to ${S3_BUCKET_NAME}"
[[ unset"${STAGING_ACCOUNTS}" == "unset" ]] && echo "\e[1;31mERROR: STAGING_ACCOUNTS is not set" || echo "\e[1;32mSTAGING_ACCOUNTS is set to ${STAGING_ACCOUNTS}"
[[ unset"${PROD_ACCOUNTS}" == "unset" ]] && echo "\e[1;31mERROR: PROD_ACCOUNTS is not set" || echo "\e[1;32mPROD_ACCOUNTS is set to ${PROD_ACCOUNTS}"
# provide the actual name of the role if you don't use the default name
SETUP_STACKSET_ROLE_NAME=$ENV_NAME-setup-stackset-execution-role
aws cloudformation create-stack \
--template-url https://s3.$AWS_DEFAULT_REGION.amazonaws.com/$S3_BUCKET_NAME/sagemaker-mlops/env-main.yaml \
--region $AWS_DEFAULT_REGION \
--stack-name $STACK_NAME \
--disable-rollback \
--capabilities CAPABILITY_NAMED_IAM \
--parameters \
ParameterKey=EnvName,ParameterValue=$ENV_NAME \
ParameterKey=EnvType,ParameterValue=dev \
ParameterKey=AvailabilityZones,ParameterValue=${AWS_DEFAULT_REGION}a\\,${AWS_DEFAULT_REGION}b \
ParameterKey=NumberOfAZs,ParameterValue=2 \
ParameterKey=SeedCodeS3BucketName,ParameterValue=$S3_BUCKET_NAME \
ParameterKey=StagingAccountList,ParameterValue=$STAGING_ACCOUNTS \
ParameterKey=ProductionAccountList,ParameterValue=$PROD_ACCOUNTS \
ParameterKey=SetupStackSetExecutionRoleName,ParameterValue=$SETUP_STACKSET_ROLE_NAME
```
The previous command launches the stack deployment and returns the `StackId`. You can track the stack deployment status in [AWS CloudFormation console](https://console.aws.amazon.com/cloudformation/home?region=us-east-1#/stacks?filteringStatus=active&filteringText=&viewNested=true&hideStacks=false) or in your terminal with the following command:
```sh
aws cloudformation describe-stacks \
--stack-name $STACK_NAME \
--query "Stacks[0].StackStatus"
```
After a successful stack deployment, the status turns to from `CREATE_IN_PROGRESS` to `CREATE_COMPLETE`. You can print the stack output:
```sh
aws cloudformation describe-stacks \
--stack-name $STACK_NAME \
--output table \
--query "Stacks[0].Outputs[*].[OutputKey, OutputValue]"
```
### CloudFormation clean up
Refer to [two step deployment via CloudFormation clean up](clean-up.md#delete-two-step-deployment-via-cloudformation) section.
### Two-step deployment via CloudFormation and AWS Service Catalog
This deployment option first deploys the core infrastructure including the AWS Service Catalog portfolio of data science products. In the second step, the data science Administrator deploys a data science environment via the AWS Service Catalog.
📜 Use this option if you want to model the end user experience in provisioning a data science environment via AWS Service Catalog
❗ You can select your existing VPC and network resources (subnets, NAT gateways, route tables) and existing IAM resources to be used for stack set deployment. Set the corresponding CloudFormation and AWS Service Catalog product parameters to names and ARNs or your existing resources.
#### Step 1: Deploy the base infrastructure
Same as Step 1 from [**Two-step deployment via CloudFormation**](#step-1-deploy-the-core-infrastructure).
#### Step 2: Deploy a data science environment via AWS Service Catalog
After the base infrastructure is provisioned, data scientists and other users must assume the DS Administrator IAM role (`AssumeDSAdministratorRole`) via link in the CloudFormation output. In this role, the users can browse the AWS Service Catalog and then provision a secure Studio environment.
First, print the output from the stack deployment in Step 1:
```bash
aws cloudformation describe-stacks \
--stack-name $STACK_NAME \
--output table \
--query "Stacks[0].Outputs[*].[OutputKey, OutputValue]"
```
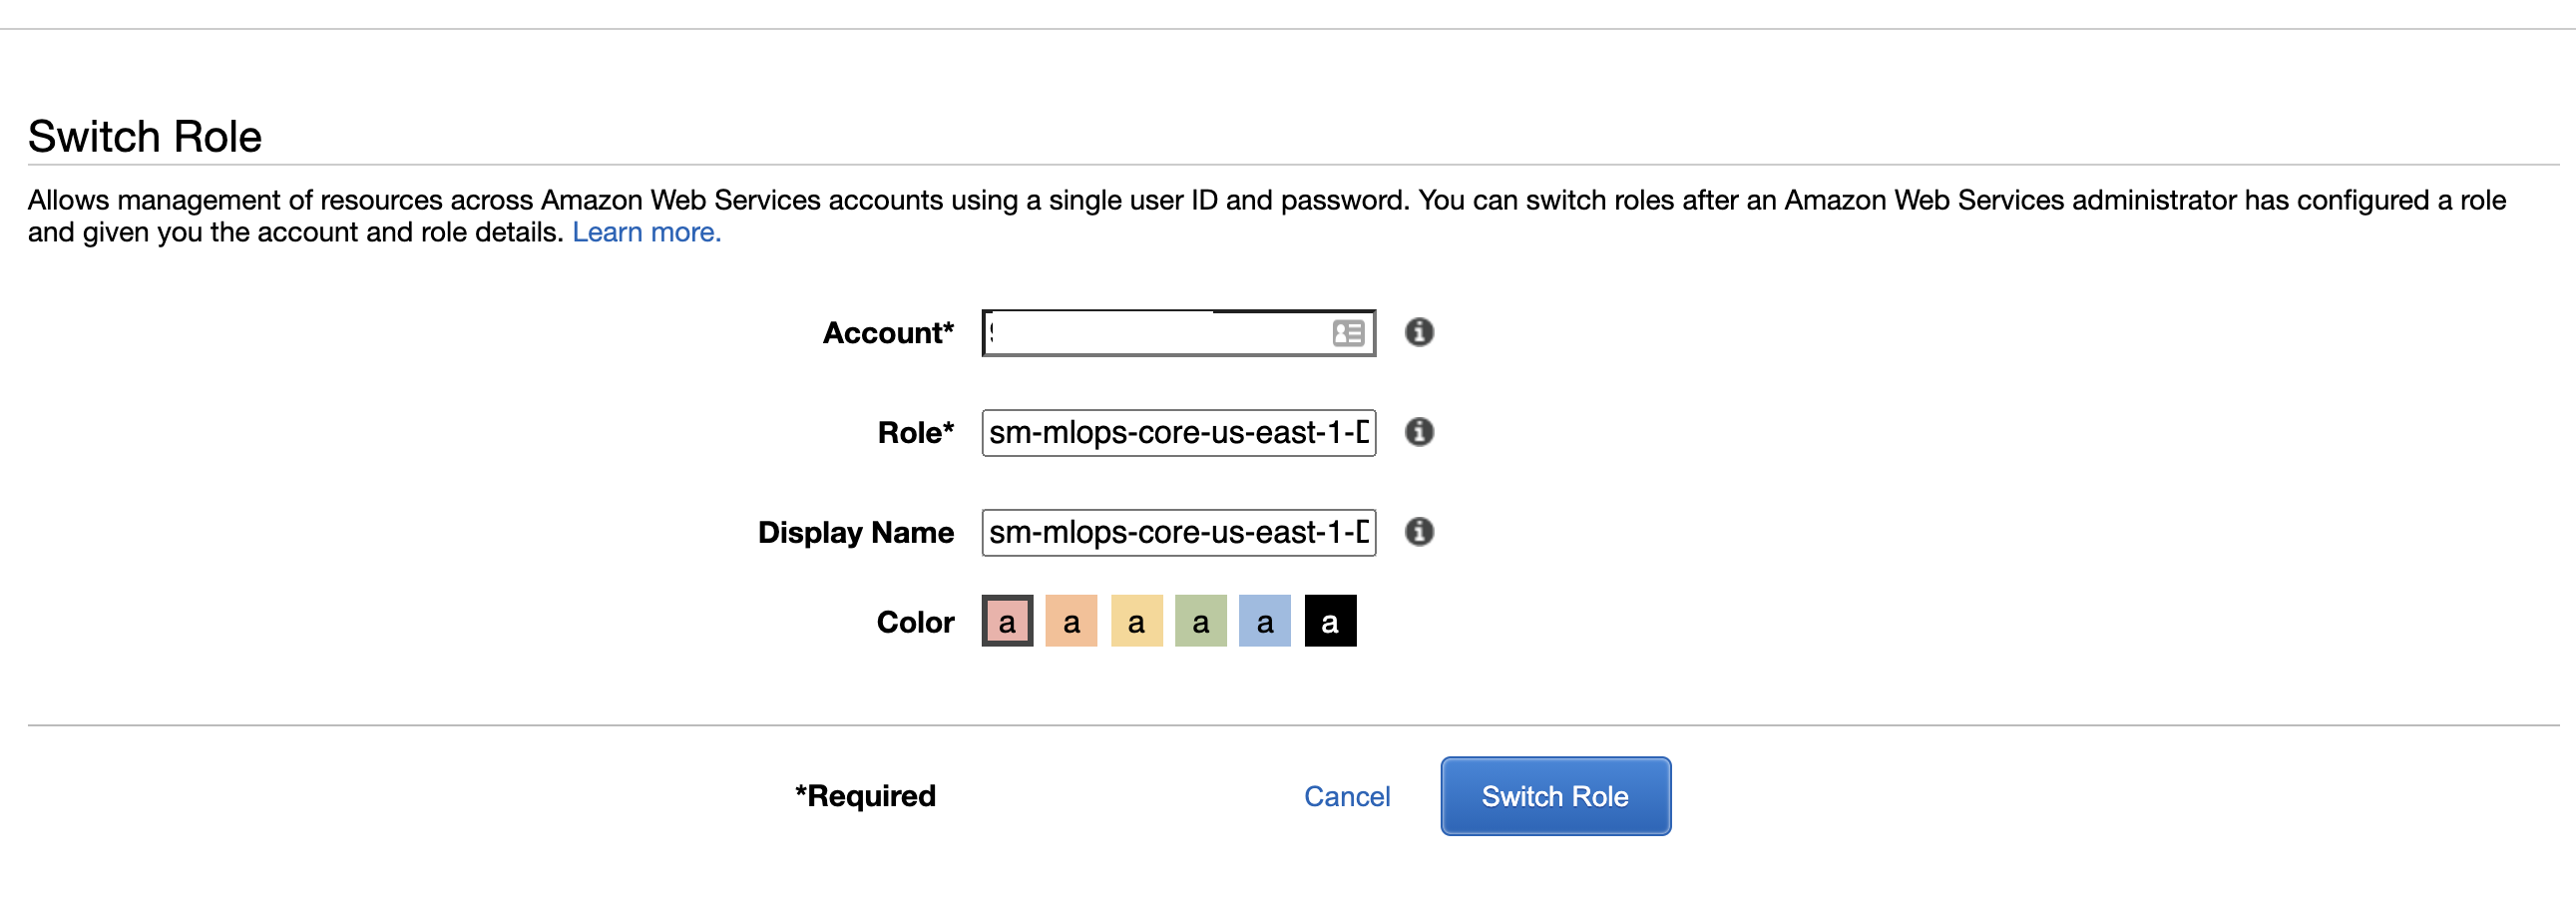
Copy and paste the `AssumeDSAdministratorRole` link to a web browser and switch role to DS Administrator.
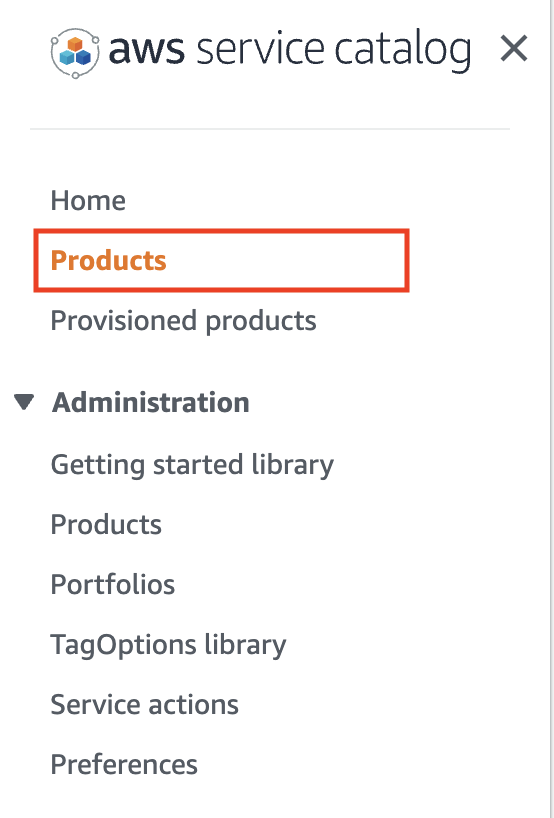
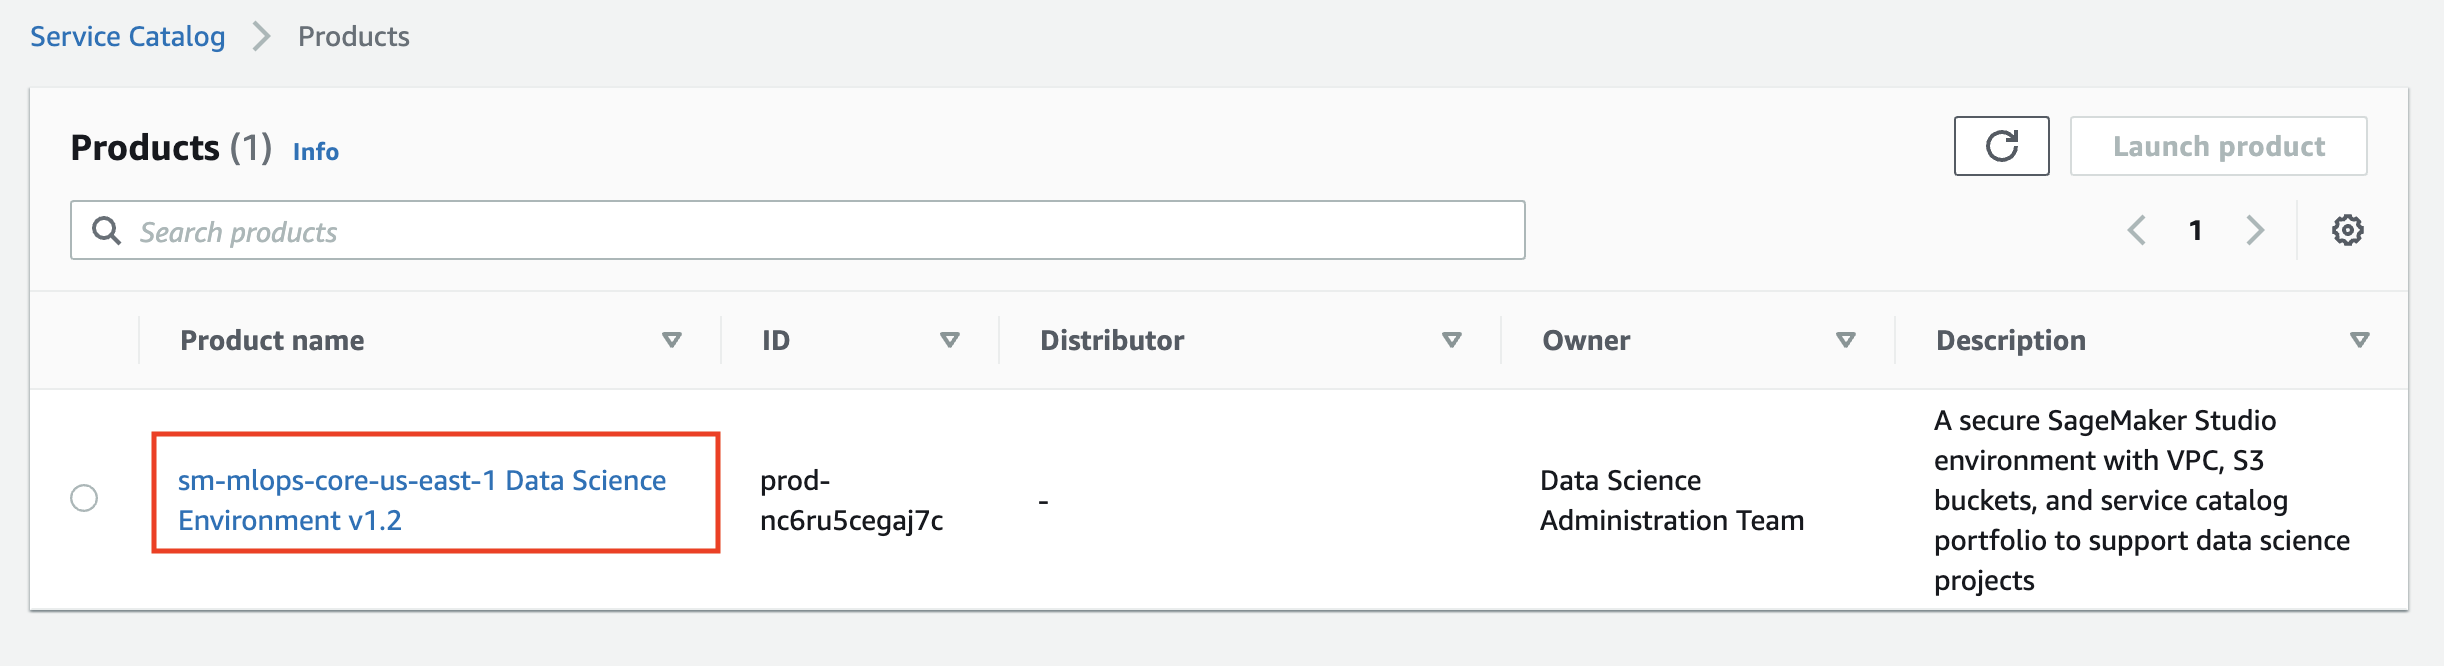
Go to AWS Service Catalog in the AWS console and select [**Products**](https://console.aws.amazon.com/servicecatalog/home?region=us-east-1#products) on the left pane:
You see the list of available products for your user role:
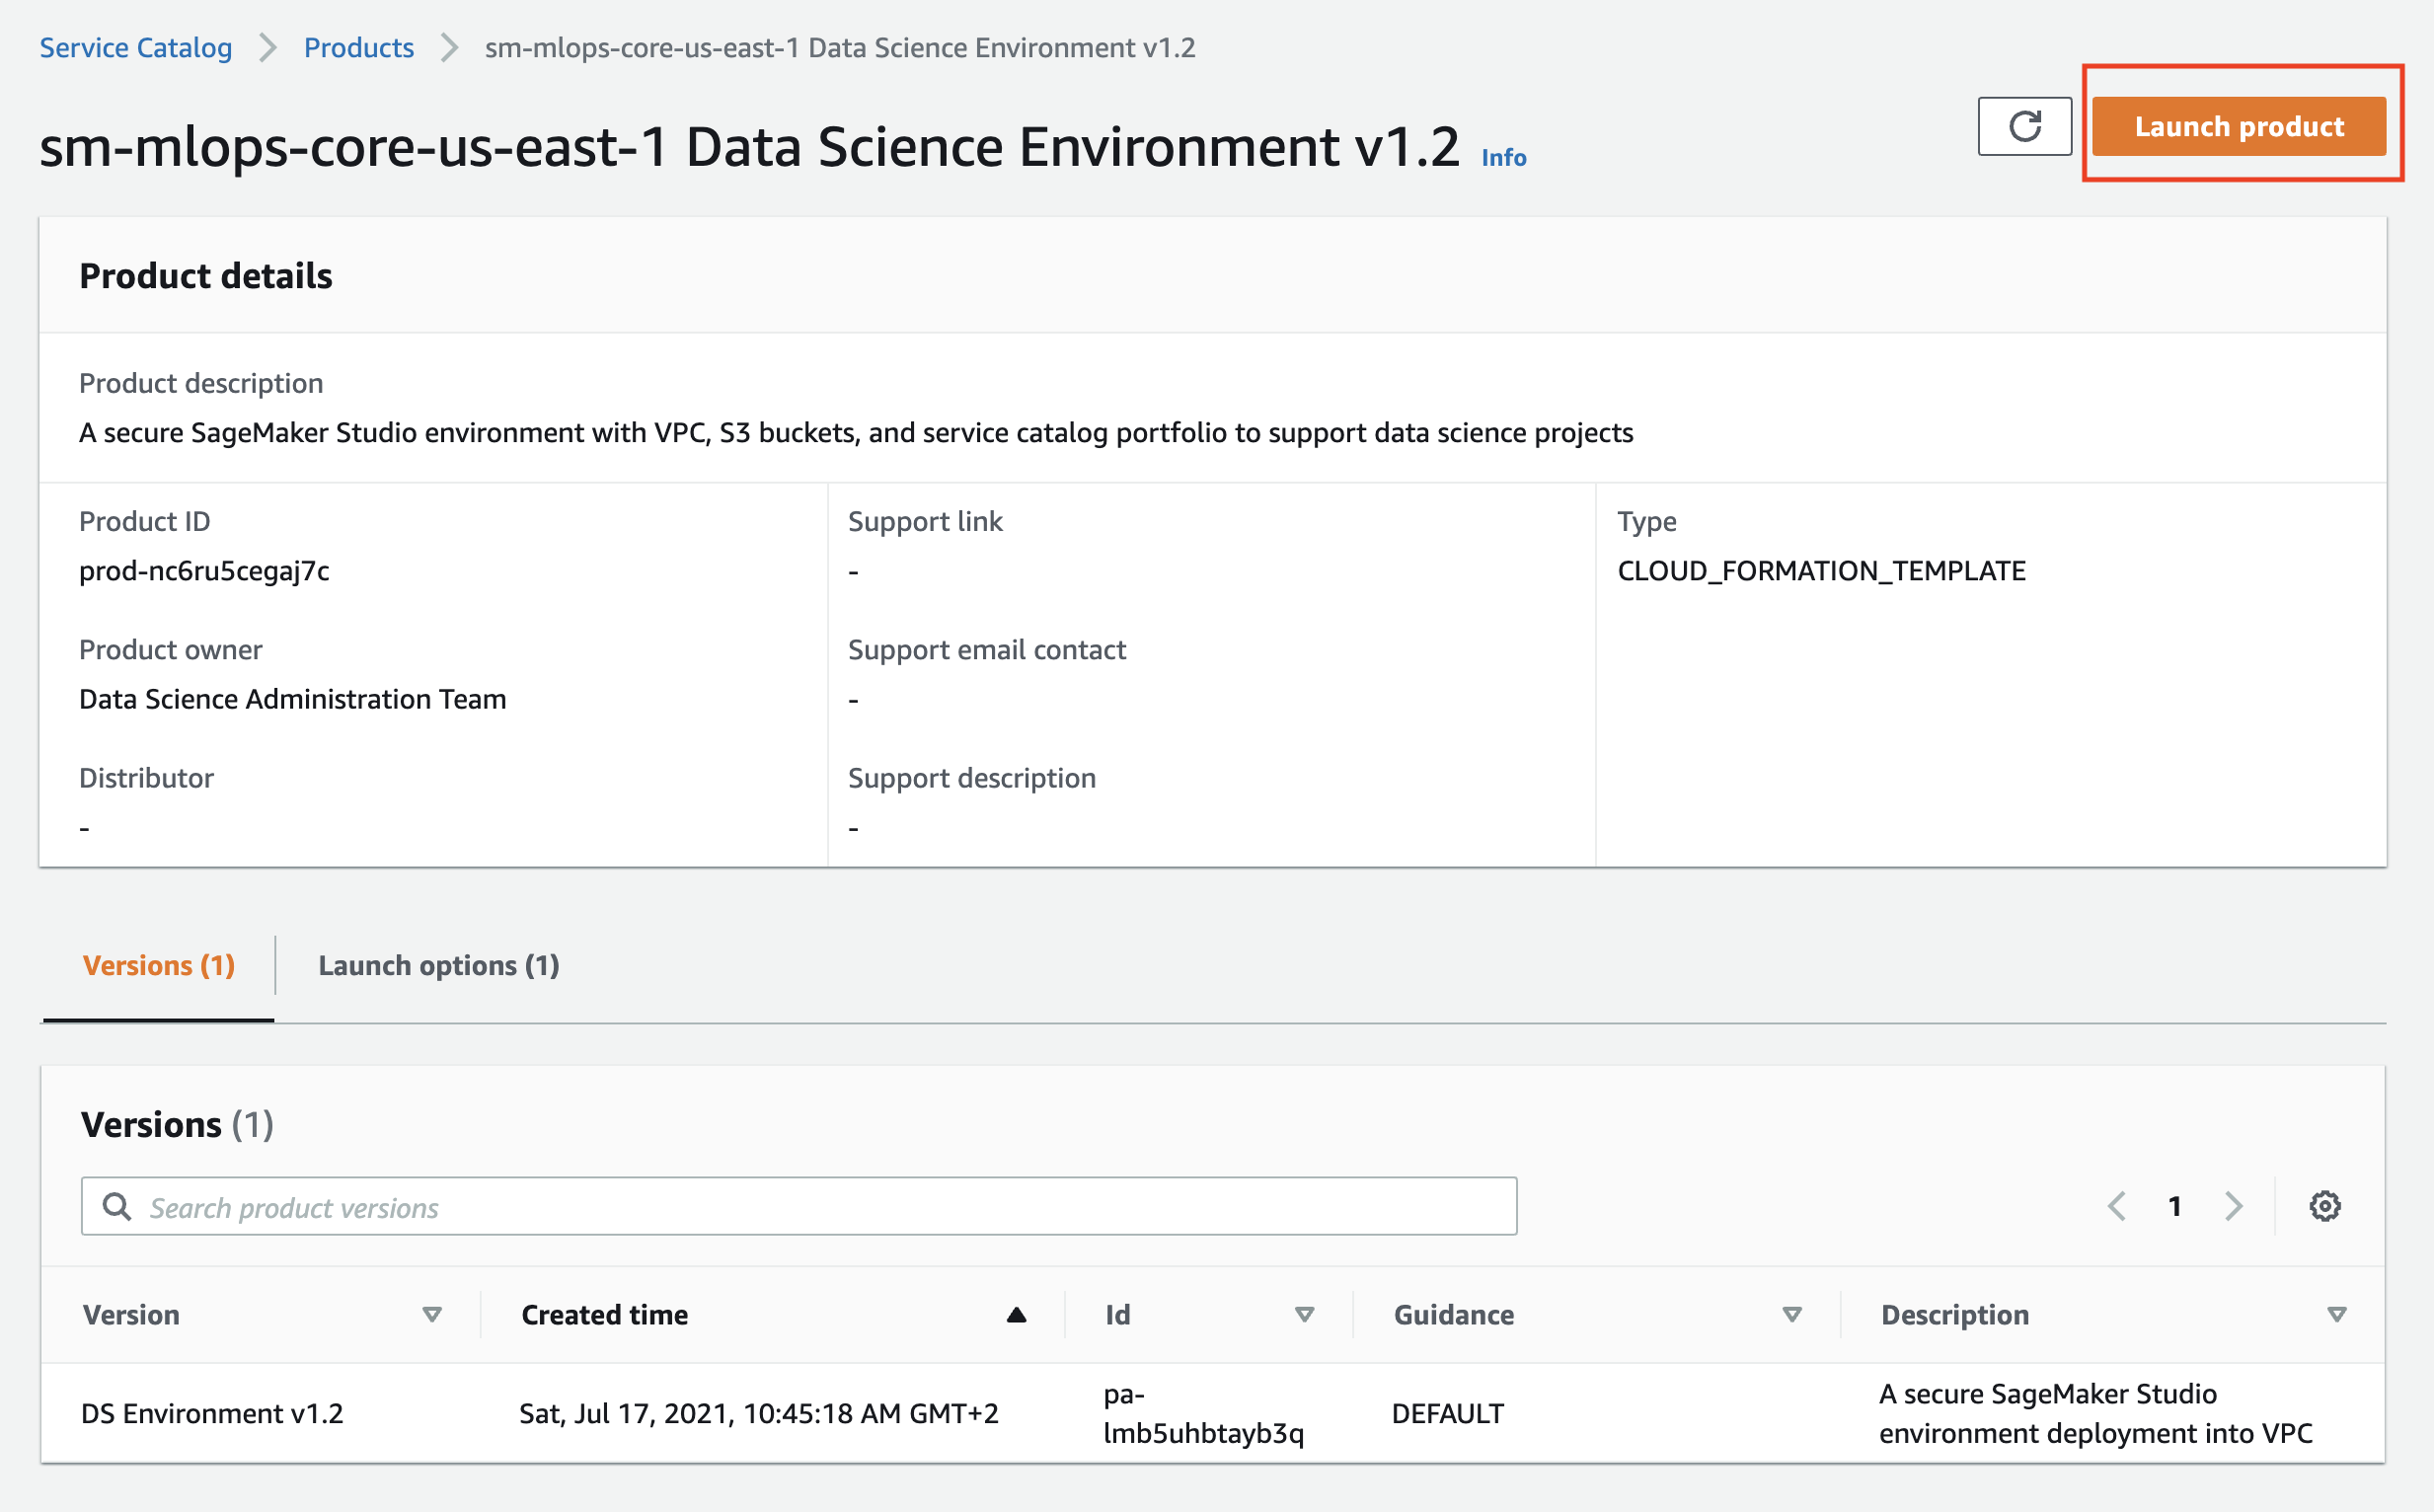
Click on the product name and and then on the **Launch product** on the product page:
Fill the product parameters with values specific for your environment. Provide the valid values for OU ids **OR** for the staging and production account lists and the name for the `SetupStackSetExecutionRole` if you would like to enable multi-account model deployment, otherwise keep these parameters empty.
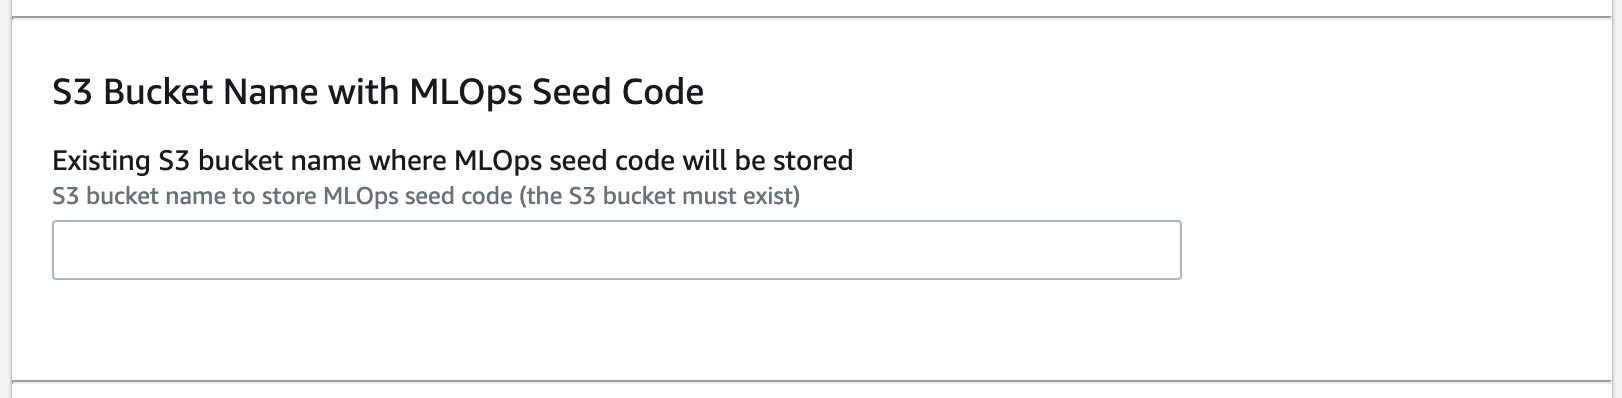
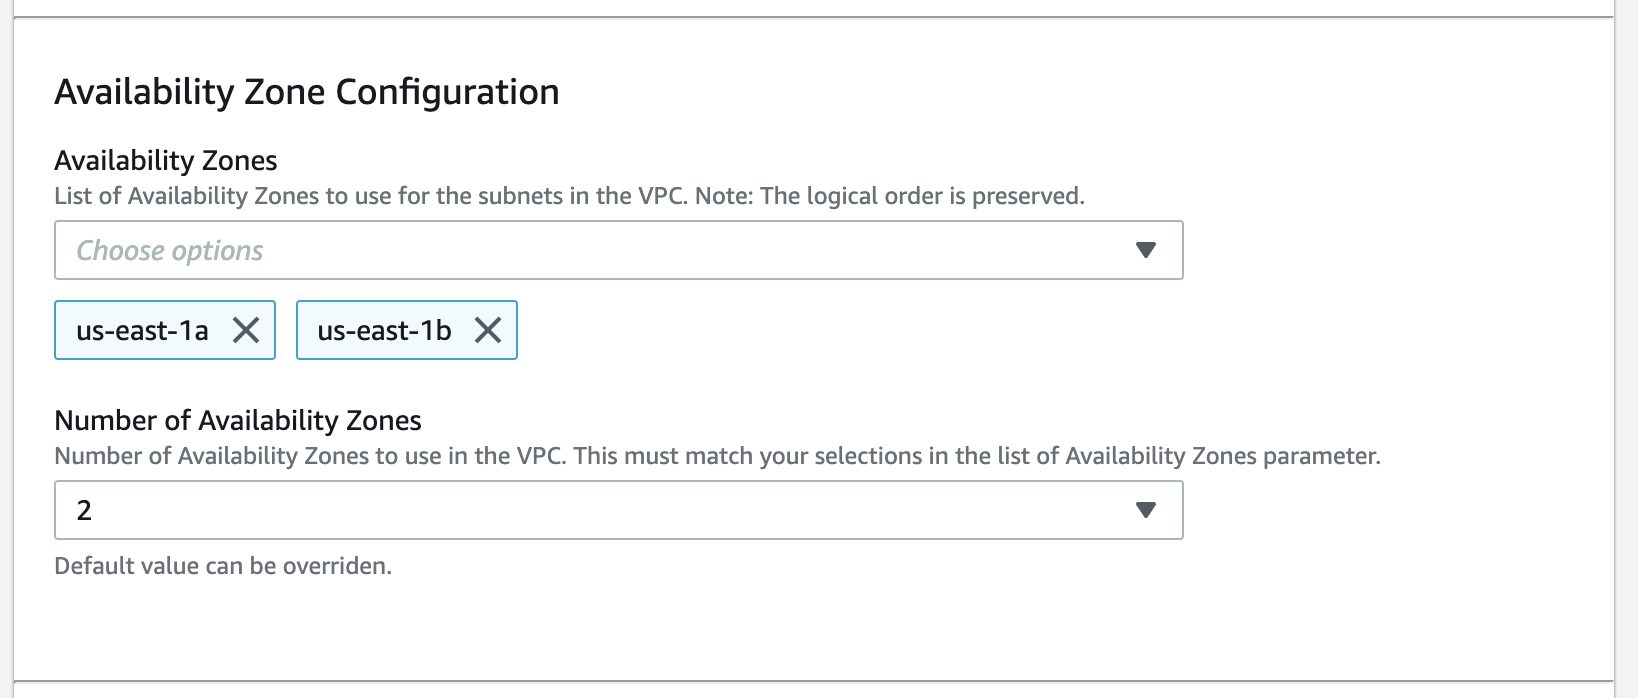
There are only two **required** parameters you must provide in the product launch console:
- S3 bucket name with MLOps seed code - use the S3 bucket where you packaged the CloudFormation templates, see the `S3_BUCKET_NAME` shell variable:
- Availability Zones: you need at least two AZs for SageMaker model deployment workflow:
Wait until AWS Service Catalog finishes the provisioning of the data science environment stack and the product status becomes **Available**. The data science environment provisioning takes about 20 minutes to complete.
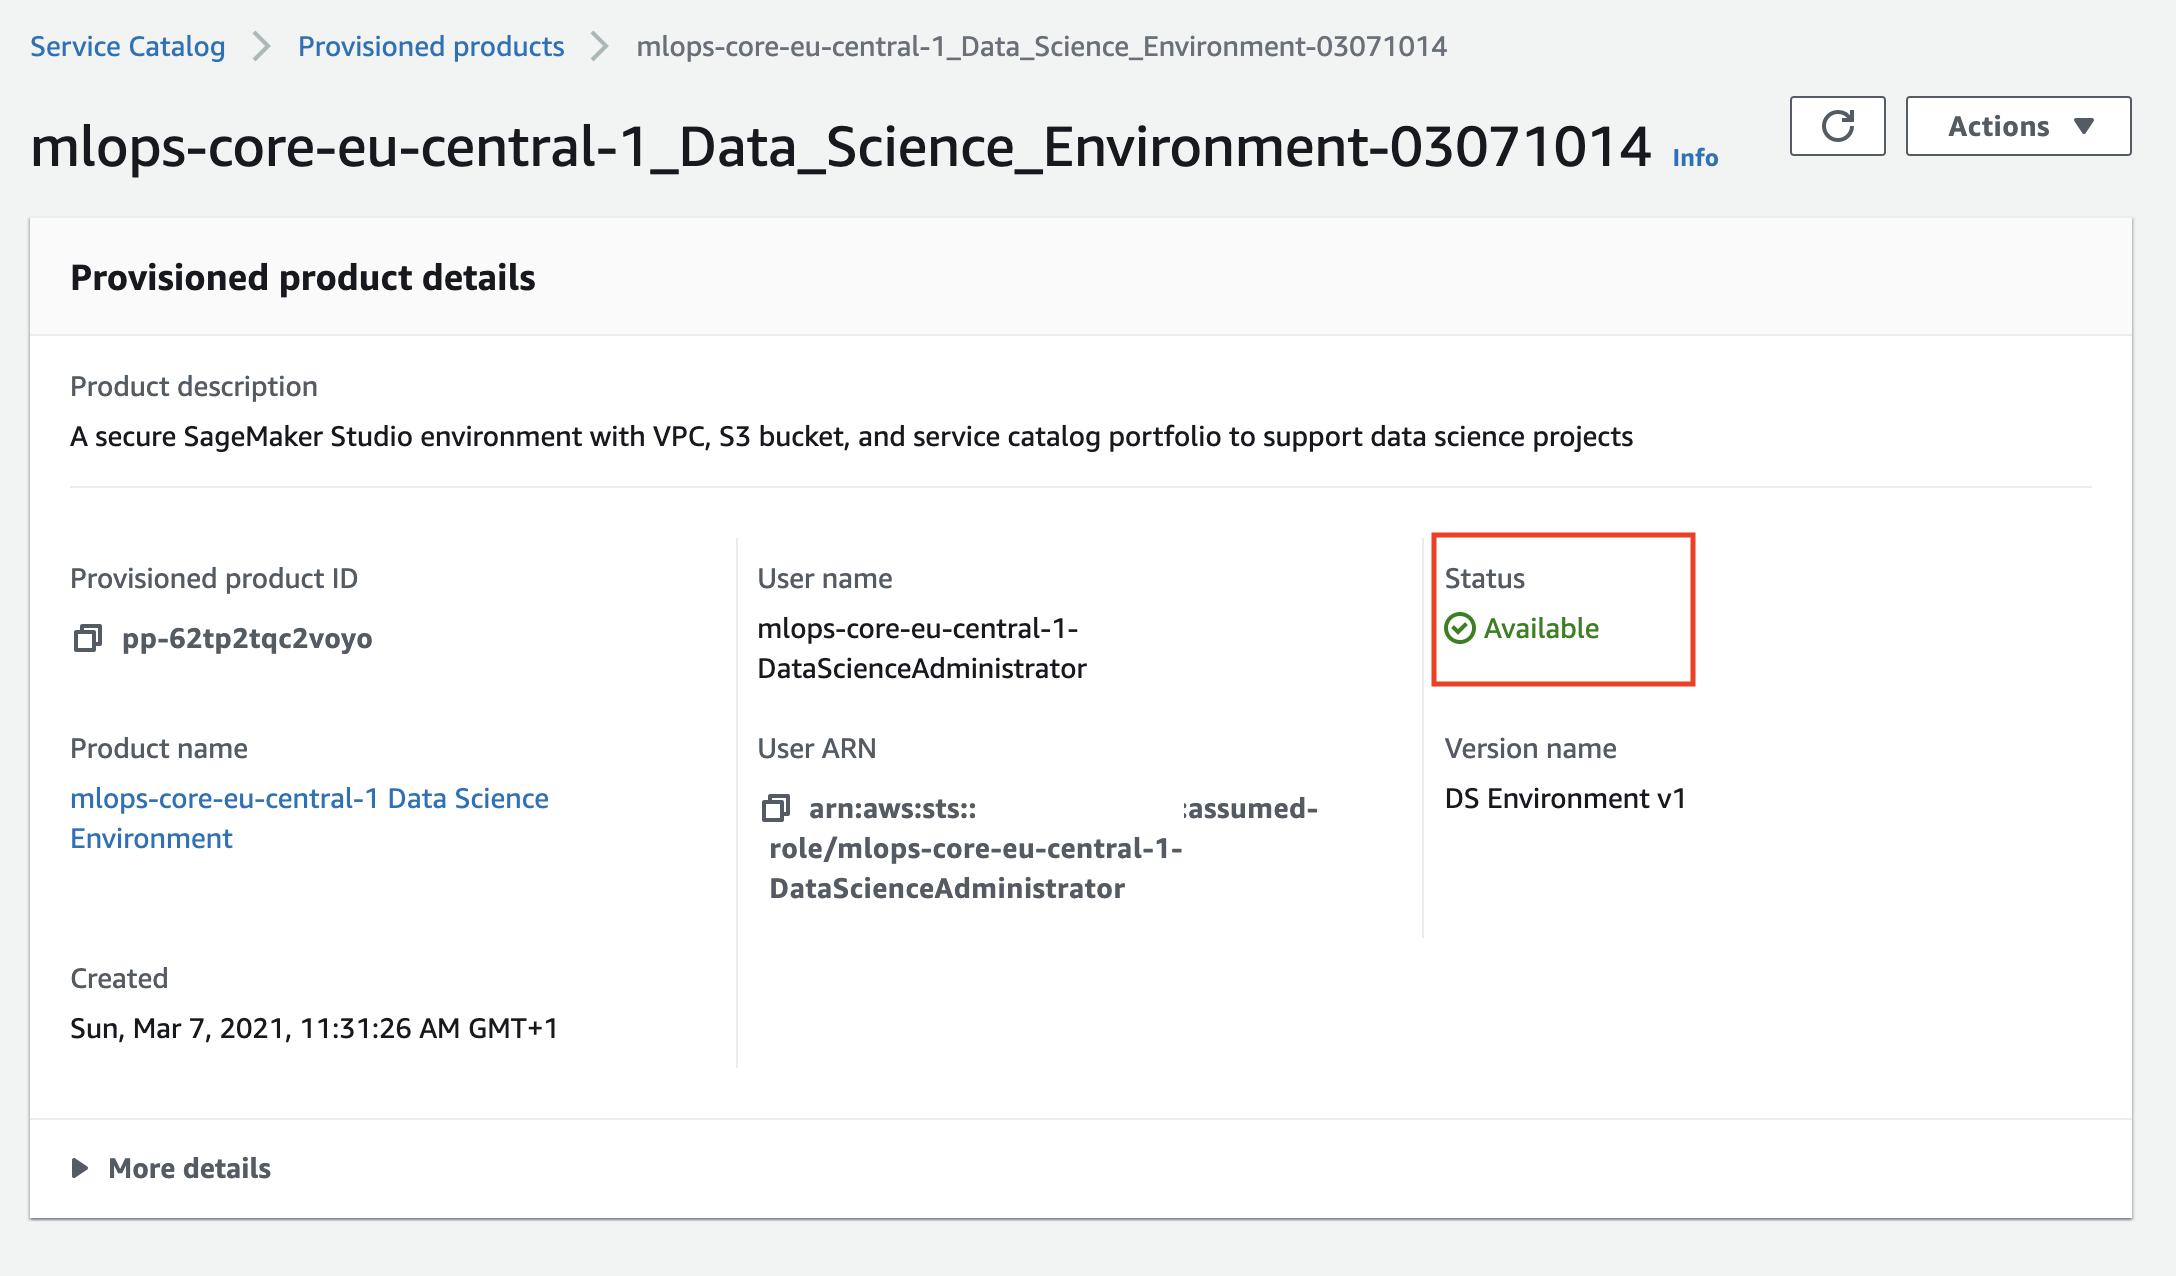
Now you provisioned the data science environment and can start working with it.
### Service Catalog clean up
Refer to [two step deployment via CloudFormation and AWS Service Catalog clean up](clean-up.md#delete-two-step-deployment-via-cloudformation-and-aws-service-catalog) section.
## Post-deployment activities
After you successfully deploy all CloudFormation stacks and created the needed infrastructure, you can start Studio and start working with the delivered notebooks.
### Start Studio
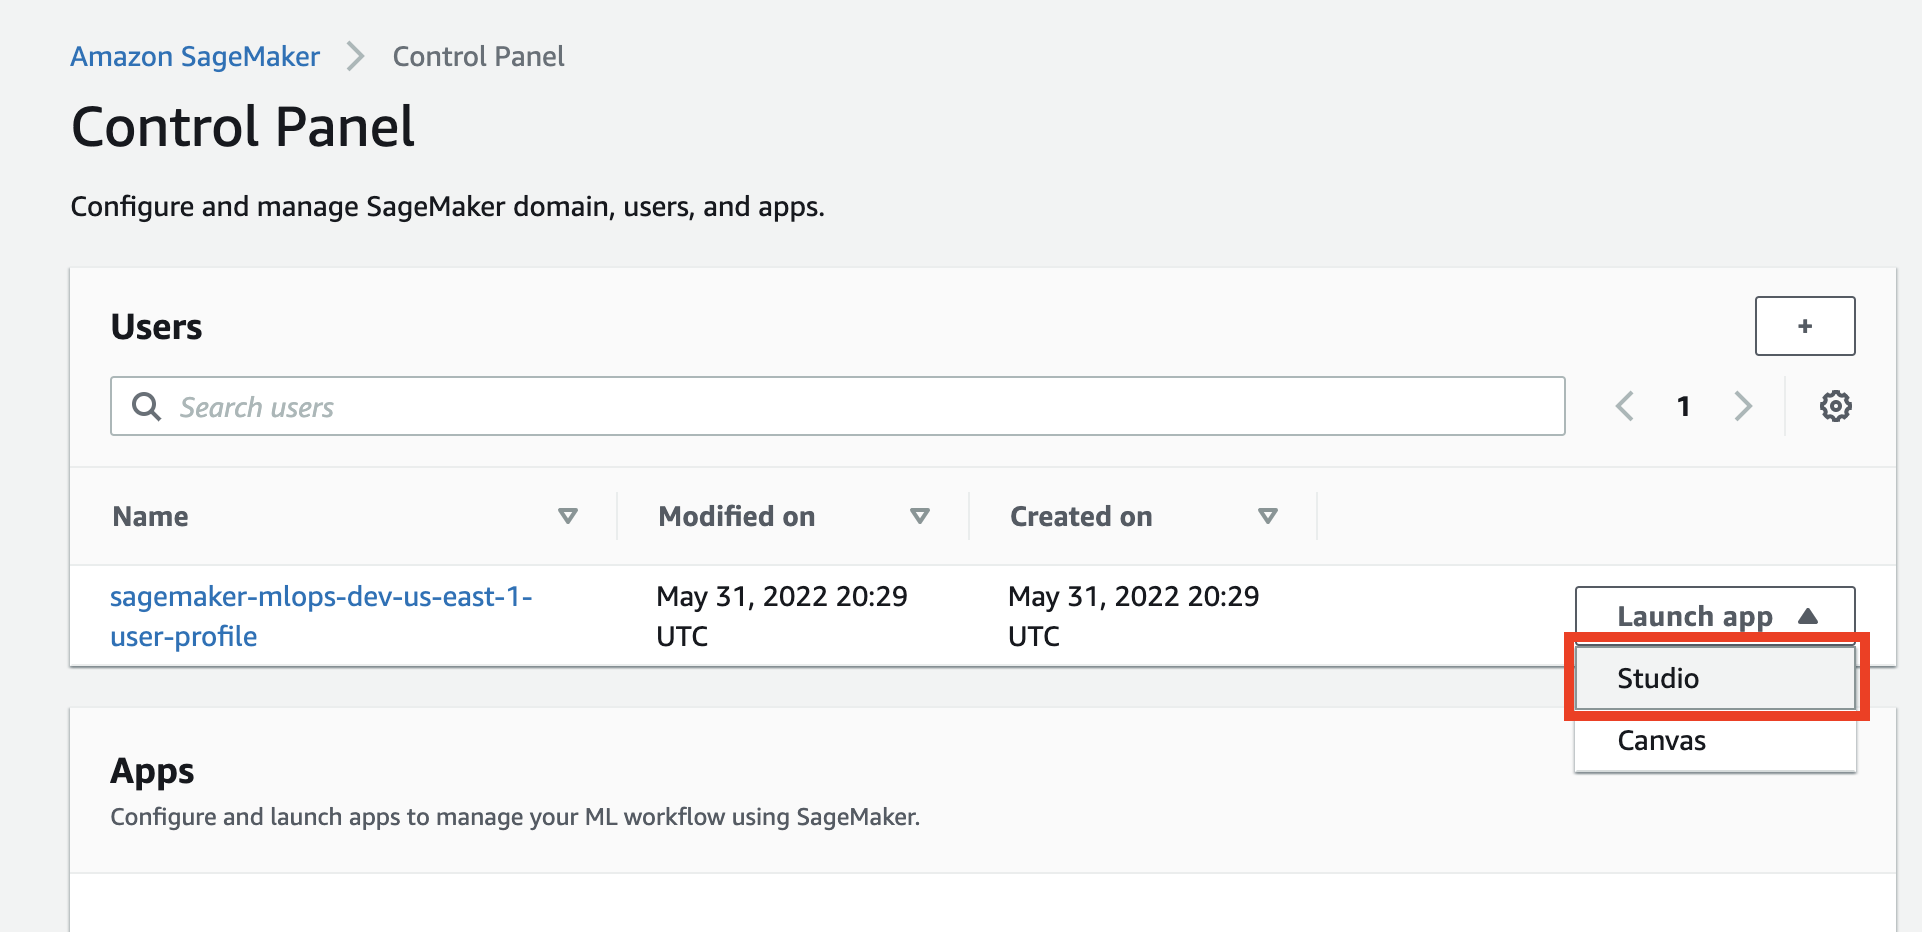
To launch Studio you must go to [SageMaker console](https://console.aws.amazon.com/sagemaker/home?#/dashboard), click **Control panel** and click on the **Studio** in **Launch app** button on the **Users** panel:
### Clone code repository
To use the provided notebooks you must clone the source code repository into your Studio environment.
Open a system terminal in Studio in the **Launcher** window:

Run the following command in the terminal:
```sh
git clone https://github.com/aws-samples/amazon-sagemaker-secure-mlops.git
```
This command downloads and saves the code repository in your home directory in Studio.
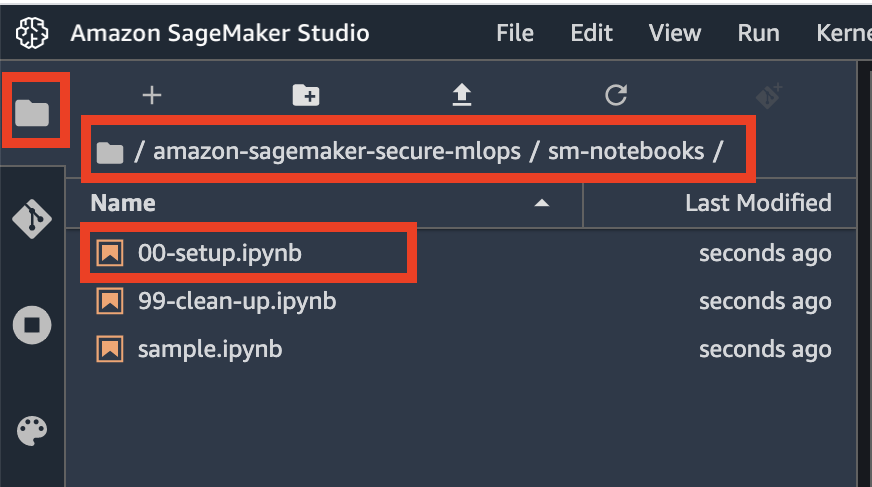
Now go to the file browser and open [`00-setup` notebook](../sm-notebooks/00-setup.ipynb):
The first start of the notebook kernel on a new KernelGateway app takes about 5 minutes. Continue with the setup instructions in the notebook after Kernel is ready.
❗ You have to run the whole notebook to setup your SageMaker environment.
Now you setup your data science environment and can start experimenting.
---
[Back to README](../README.md)
---
Copyright Amazon.com, Inc. or its affiliates. All Rights Reserved.
SPDX-License-Identifier: MIT-0