# AWS Glue DataBrew and SageMaker Canvas Hands on Lab
---
## 1. AWS Glue DataBrew를 ì´ìš©í•œ ë°ì´í„° ì „ì²˜ë¦¬
### 1-1. Dataset
본 실습ì—서는 UCI Bike sharing dataset (https://archive.ics.uci.edu/ml/datasets/bike+sharing+dataset) ì„ ì‚¬ìš©í•˜ë©° ì»¬ëŸ¼ì •ë³´ëŠ” 다ìŒê³¼ 같습니다.
> - instant: record index
> - dteday : date
> - season : season (1:springer, 2:summer, 3:fall, 4:winter)
> - yr : year (0: 2011, 1:2012)
> - mnth : month ( 1 to 12)
> - hr : hour (0 to 23)
> - holiday : weather day is holiday or not (extracted from http://dchr.dc.gov/page/holiday-schedule)
> - weekday : day of the week
> - workingday : if day is neither weekend nor holiday is 1, otherwise is 0.
> + weathersit :
> 1: Clear, Few clouds, Partly cloudy, Partly cloudy
> 2: Mist + Cloudy, Mist + Broken clouds, Mist + Few clouds, Mist
> 3: Light Snow, Light Rain + Thunderstorm + Scattered clouds, Light Rain + Scattered clouds
> 4: Heavy Rain + Ice Pallets + Thunderstorm + Mist, Snow + Fog
> - temp : Normalized temperature in Celsius. The values are divided to 41 (max)
> - atemp: Normalized feeling temperature in Celsius. The values are divided to 50 (max)
> - hum: Normalized humidity. The values are divided to 100 (max)
> - windspeed: Normalized wind speed. The values are divided to 67 (max)
> - casual: count of casual users
> - registered: count of registered users
> - cnt: count of total rental bikes including both casual and registered
### 1-2. AWS Glue DataBrew 환경준비
1. UCI 사ì´íŠ¸ì— ì ‘ì†í•˜ê³ [ë°ì´í„°ì…‹](https://archive.ics.uci.edu/ml/machine-learning-databases/00275/Bike-Sharing-Dataset.zip)ì„ ë‹¤ìš´ë¡œë“œ 받아 로컬 PCì— ì €ìž¥í•˜ê³ ì••ì¶•ì„ í•´ì œí•©ë‹ˆë‹¤.
1. ê³ ìœ í•œ ì´ë¦„ì˜ S3 ë²„í‚·ì„ ìƒì„±í•˜ê³ ë‹¤ìš´ë°›ì€ íŒŒì¼ ì¤‘ `hour.csv`파ì¼ì„ 업로드합니다.
- [S3 콘솔](https://console.aws.amazon.com/s3)ë¡œ ì´ë™í•œ 후 Create bucket ë²„íŠ¼ì„ í´ë¦í•˜ê³ ë²„í‚·ì„ ìƒì„±í•©ë‹ˆë‹¤.
- 버킷명 샘플 : `databrew-lab-<<your unique id>>`
- ìƒì„±ëœ ë²„í‚·ì„ í´ë¦í•˜ê³ Upload ë²„íŠ¼ì„ í´ë¦í•œ 후 드래그 & 드랩으로 파ì¼ì„ 업로드합니다.
1. AWS Glue Databrew ë°ì´í„°ì…‹ì„ ìƒì„±í•©ë‹ˆë‹¤.
- [AWS Glue DataBrew 콘솔](https://console.aws.amazon.com/databrew/)ë¡œ ì´ë™í•©ë‹ˆë‹¤.
- 왼쪽 메뉴ì—ì„œ DATASETS ì„ íƒ í›„ Create new dataset ë²„íŠ¼ì„ í´ë¦í•©ë‹ˆë‹¤.
- Amazon S3를 ì„ íƒí•˜ê³ ì´ì „ 단계ì—ì„œ ìƒì„±í•œ ë²„í‚·ì„ ì„ íƒí•˜ê³ ê·¸ 아래 단계ì—ì„œ `hour.csv`파ì¼ì„ ì„ íƒí•©ë‹ˆë‹¤.
- 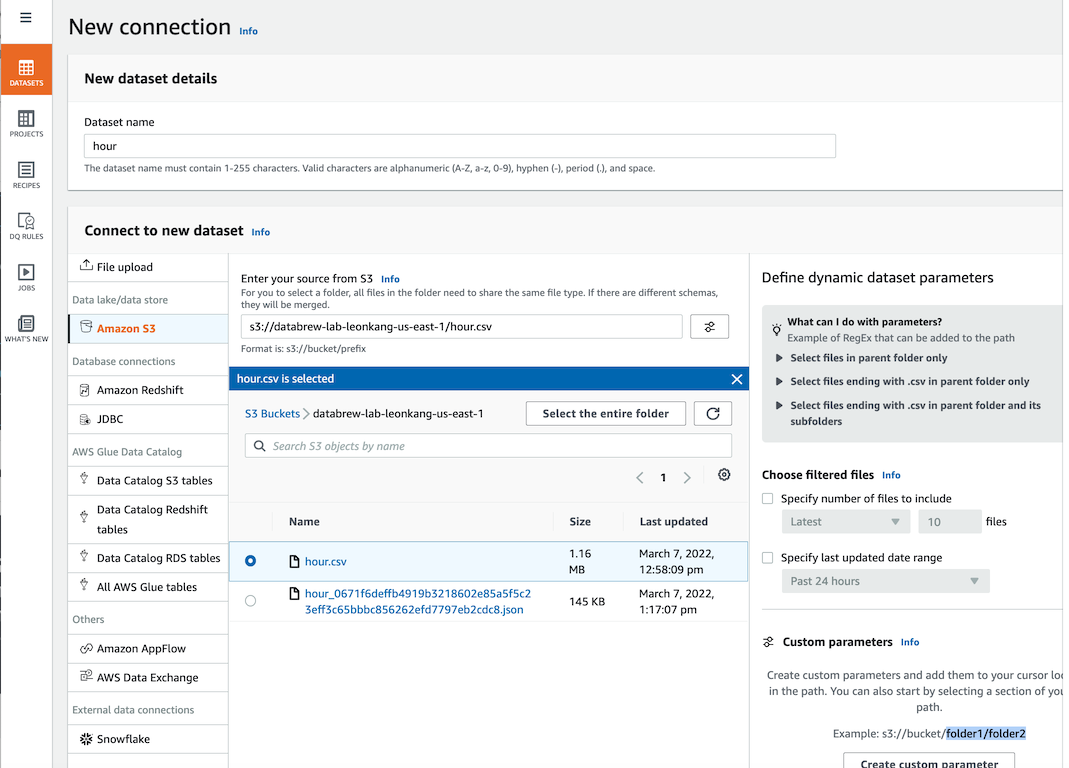
- 나머지는 ë””í´íŠ¸ê°’ì„ ì‚¬ìš©í•˜ì—¬ Create dataset ë²„íŠ¼ì„ í´ë¦í•©ë‹ˆë‹¤.
1. AWS Glue Databrew 프로ì 트를 ìƒì„±í•©ë‹ˆë‹¤.
- 왼쪽 메뉴ì—ì„œ PROJECTS ì„ íƒ í›„ Create Project ë²„íŠ¼ì„ í´ë¦í•©ë‹ˆë‹¤.
- ë‹¤ìŒ ë‚´ìš©ì„ ì°¸ê³ í•˜ì—¬ 프로ì 트 ìƒì„¸ ë‚´ìš©ì„ ìž…ë ¥í•˜ê³
- Project name : `bike-sharing-prediction-project`
- Select a dataset : `hour`
- Permissions 섹션ì—ì„œ `Create new IAM role` ì„ ì„ íƒí•©ë‹ˆë‹¤.
- 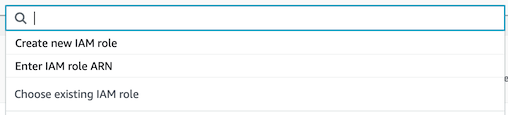
- `New IAM role suffix`í•ëª©ì˜ ìž„ì˜ì˜ ì´ë¦„(ì—:`default-role`)ì„ ê¸°ìž¬í•˜ê³ Create Project ë²„íŠ¼ì„ í´ë¦í•©ë‹ˆë‹¤.
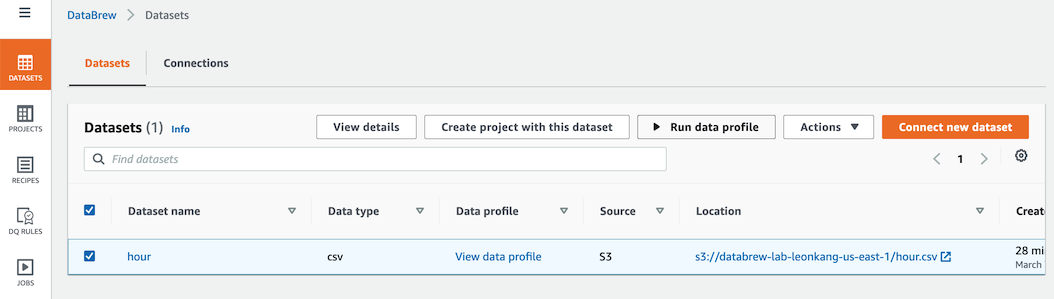
1. 프로ì 트 í™˜ê²½ì´ ì¤€ë¹„ë˜ëŠ” ë™ì•ˆ Dataset 메뉴로 ì´ë™í•˜ì—¬ Data profiling jobì„ ì‹¤í–‰í•©ë‹ˆë‹¤.
- ë°ì´í„°ì…‹ 메뉴ì—ì„œ `hour` ë°ì´í„°ì…‹ì„ ì„ íƒí•˜ê³ Run data profile ë²„íŠ¼ì„ í´ë¦í•©ë‹ˆë‹¤.
- 
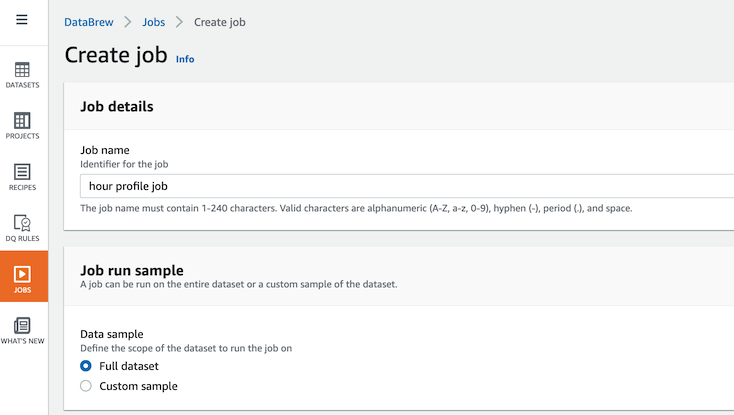
- ë””í´íŠ¸ê°’ ìƒíƒœì—ì„œ ë‹¤ìŒ ì„¸ í•ëª©ì„ 변경한 후 Create and run job ë²„íŠ¼ì„ í´ë¦í•©ë‹ˆë‹¤.
- Job run sample 섹션ì—ì„œ Full datasetì„ ì„ íƒí•©ë‹ˆë‹¤.
- 
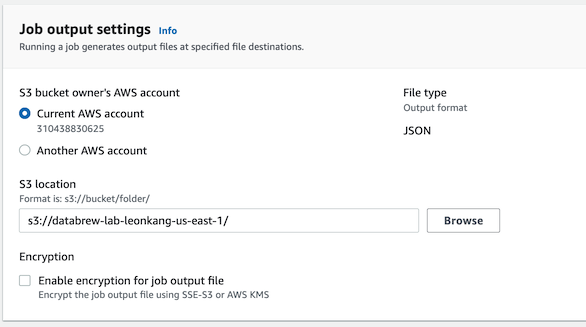
- Joub output settingsì˜ S3 location í•ëª©ì—ì„œ 첫단계ì—ì„œ ìƒì„±í•œ S3 ë²„í‚·ì„ ì„ íƒí•©ë‹ˆë‹¤.
- 
- Permissions 섹션ì—ì„œ ì•žì„œ ìƒì„±í•œ Roleì„ ì„ íƒí•©ë‹ˆë‹¤.
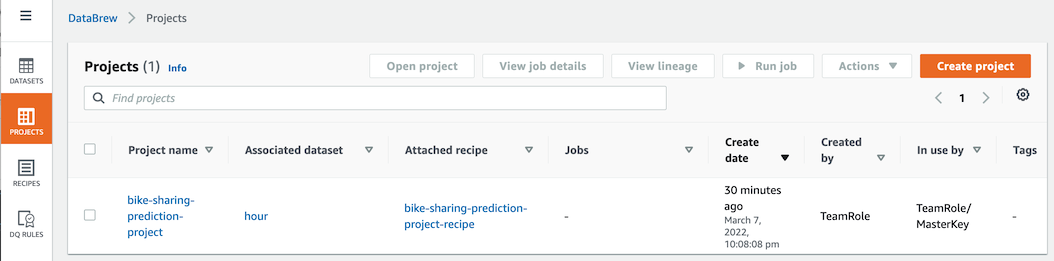
1. 프로ì 트 메뉴로 ì´ë™í•˜ì—¬ ë‹¤ìŒ ë‚´ìš©ì„ í™•ì¸í•©ë‹ˆë‹¤.
- AWS Glue DataBrew 프로ì 트 í™˜ê²½ì´ ìƒì„±ì´ 완료ë˜ë©´ 프로ì íŠ¸ëª…ì„ í´ë¦í•˜ì—¬ 작업환경으로 ì´ë™í•©ë‹ˆë‹¤.
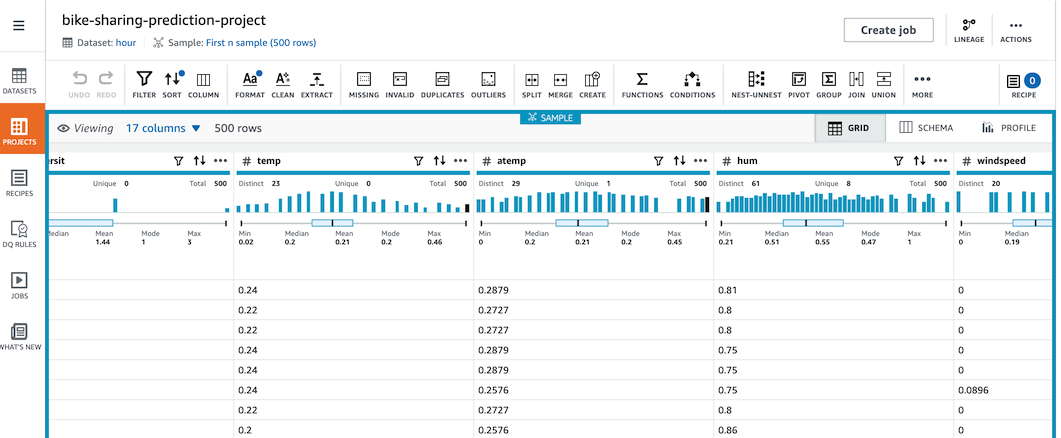
- 
- 컬럼별 ë°ì´í„°ì˜ 분í¬ì™€ 컬럼별 샘플ë°ì´í„°ë¥¼ 확ì¸í•©ë‹ˆë‹¤.
- 왼쪽 ìƒë‹¨ 프로ì 트명 ì•„ëž˜ì˜ Sample ë§í¬ë¥¼ í´ë¦í•˜ë©´ Sampling 사ì´ì¦ˆë¥¼ ì¡°ì ˆí• ìˆ˜ 있습니다.
- 
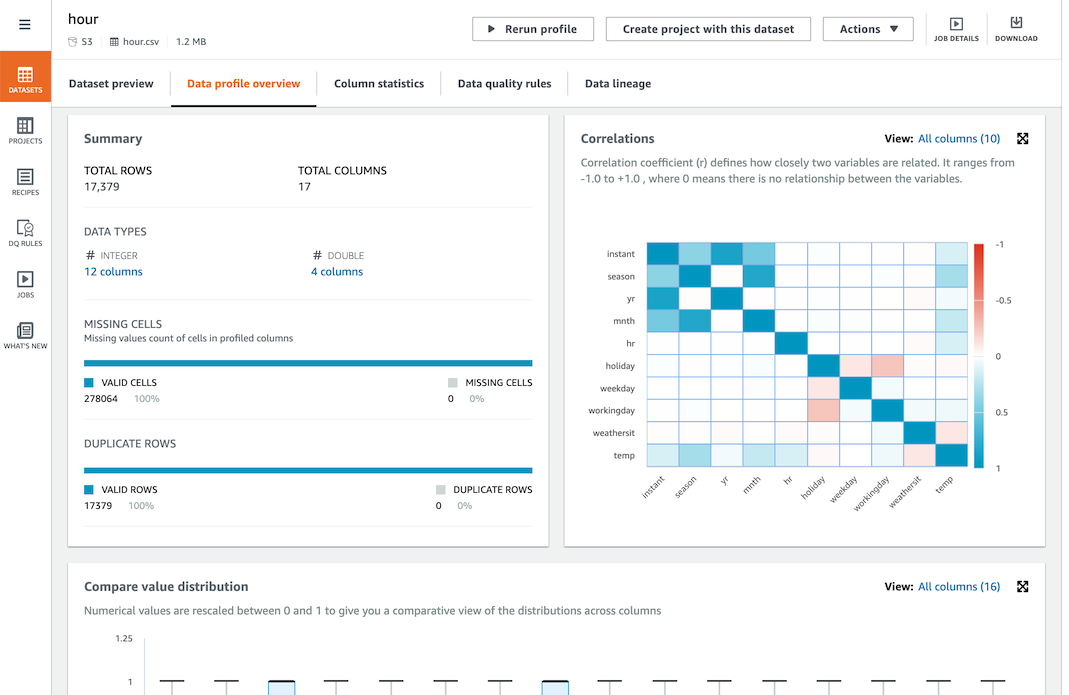
1. Data profiling jobì´ ì™„ë£Œë˜ë©´ ë‹¤ìŒ ë‚´ìš©ì„ í™•ì¸í•©ë‹ˆë‹¤.
- DATASETS 메뉴ì—ì„œ `hour`파ì¼ëª…ì„ í´ë¦í•˜ê³ Data profile overview íƒìœ¼ë¡œ ì´ë™í•©ë‹ˆë‹¤.
- Profiling ìž‘ì—…ì˜ ë‚´ìš©ì„ í™•ì¸í•©ë‹ˆë‹¤.
- 
### 1-3. AWS Glue DataBrew ë°ì´í„° 변환 Recipe 작성
1. AWS Glue DataBrew Project 작업환경으로 ì´ë™í•©ë‹ˆë‹¤.
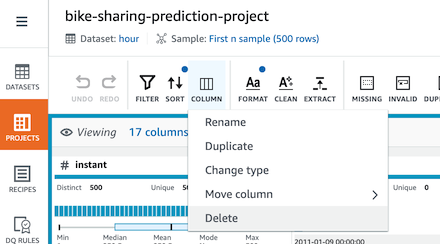
1. 메뉴바ì—ì„œ Column > Delete를 ì„ íƒí•˜ê³ casual, registered ì»¬ëŸ¼ì„ ì‚ì œí•©ë‹ˆë‹¤.
- 
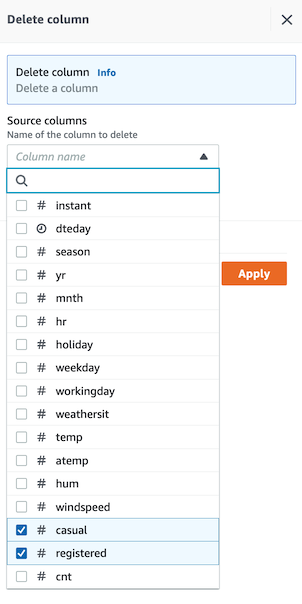
- 오른쪽 ì„¸ë¶€ì„¤ì •ì—ì„œ casual, registered ì»¬ëŸ¼ì„ ì„ íƒí•˜ê³ Preview Changes ë§í¬ë¥¼ í´ë¦í•©ë‹ˆë‹¤.
- 
- Preview ë‚´ìš©ì„ í™•ì¸í•œ 후 Apply ë²„íŠ¼ì„ í´ë¦í•©ë‹ˆë‹¤.
- 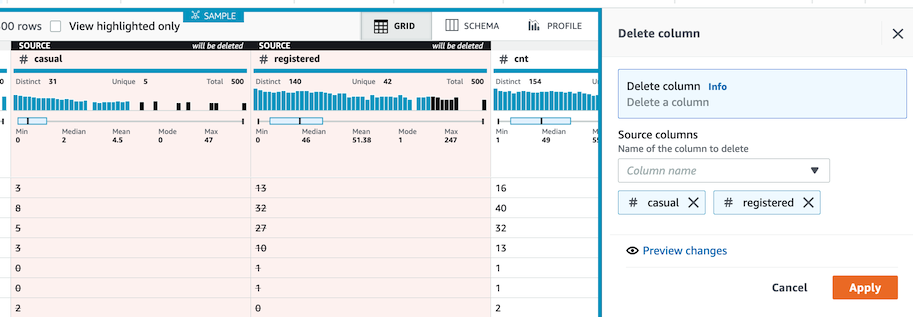
- Apply ë²„íŠ¼ì„ í´ë¦í•˜ë©´ Previewì—ì„œ 확ì¸í•œ ë‚´ìš©ì´ ë°˜ì˜ë©ë‹ˆë‹¤. (아래 ë‘ ì»¬ëŸ¼ ì‚ì œ 후 결과화면 참조)
- 
1. Extract 메뉴를 ì´ìš©í•˜ì—¬ `datetime` ì»¬ëŸ¼ì„ ìƒì„±í•©ë‹ˆë‹¤. (ì´í›„ SageMaker Canvasì—ì„œ 시계열 ë°ì´í„° ì˜ˆì¸¡ëª¨ë¸ ìƒì„±ì‹œ 요구ë˜ëŠ” í¬ë§·ìœ¼ë¡œ ìƒì„±í•©ë‹ˆë‹¤.)
- 현재 ë°ì´í„°ì…‹ì— ë…„(year), ì¼(day) ì»¬ëŸ¼ì´ ë³„ë„ë¡œ 없으므로 `dteday`컬럼으로부터 추출하여 새 ì»¬ëŸ¼ì„ ìƒì„±í•©ë‹ˆë‹¤.
- 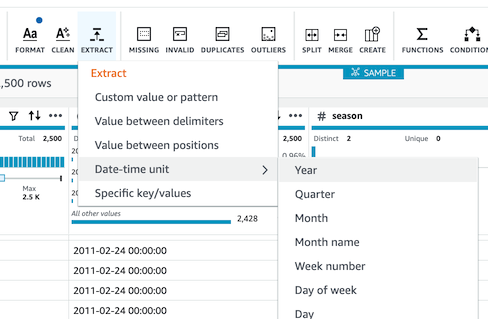
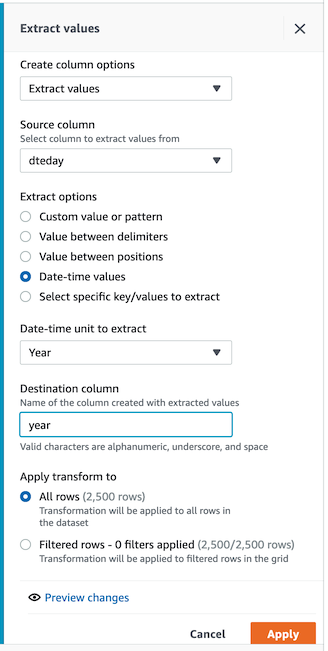
- year, day í•ëª©ì„ ê°ê° 추출하여 ë‘ê°œì˜ ì»¬ëŸ¼ì„ ì¶”ê°€í•©ë‹ˆë‹¤.(Destination columnì„ ê°ê° `year`, `day`ë¡œ ì„¤ì •í•˜ì—¬ ë‘번 실행합니다.)
- 
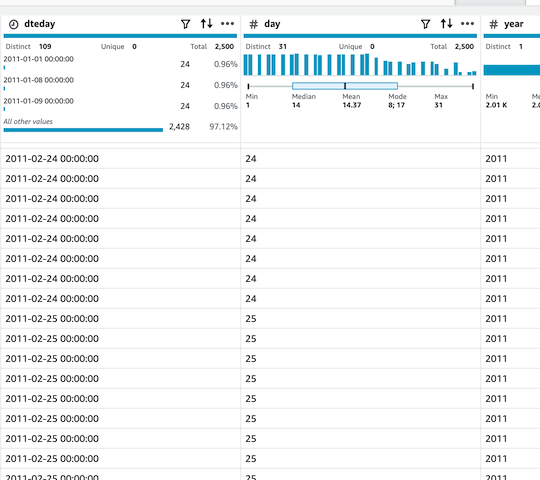
- `year`, `day`ì»¬ëŸ¼ì´ ê°ê° 추가ë˜ì—ˆìŠµë‹ˆë‹¤.
- 
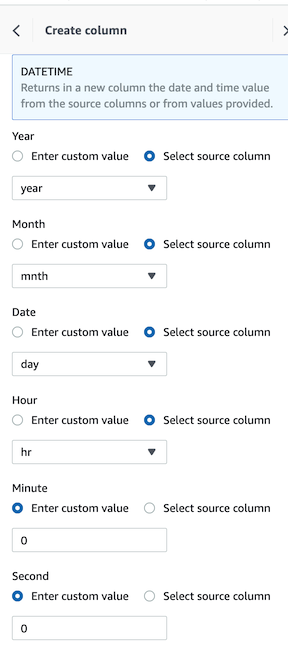
- FUNCTIONS 메뉴ì—ì„œ Date functions > DATETIME ì„ ì„ íƒí•©ë‹ˆë‹¤.
- 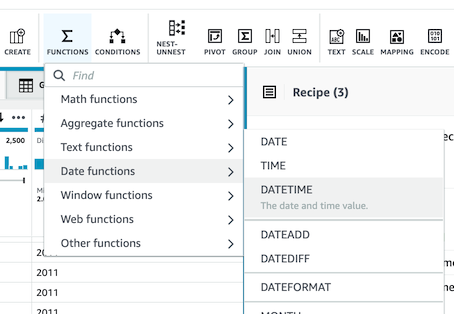
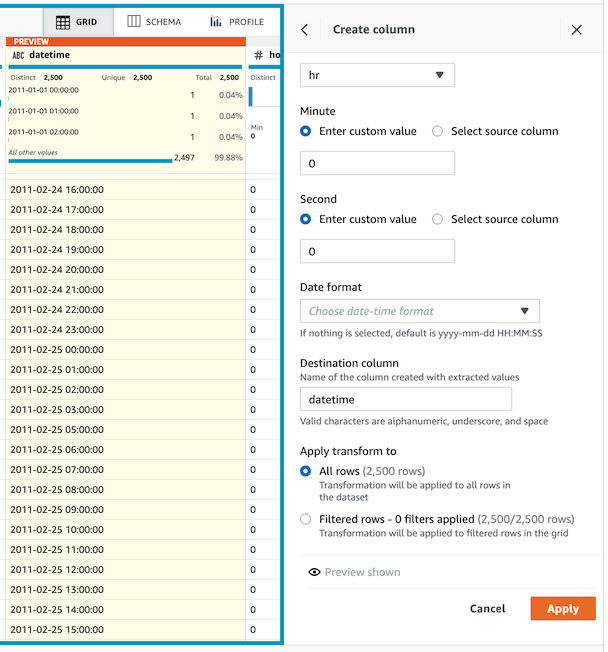
- ë…„, ì›”, ì¼, ì‹œ ì •ë³´ë¥¼ 소스컬럼으로부터 ê°€ì ¸ì˜¤ë„ë¡ ì„ íƒí•˜ê³ , 분, ì´ˆ 는 0으로 ìž…ë ¥í•©ë‹ˆë‹¤.
- 
- ì»¬ëŸ¼ëª…ì„ `datetime`으로 ìž…ë ¥í•˜ê³ Preview > Apply 를 í´ë¦í•˜ì—¬ ë°˜ì˜í•©ë‹ˆë‹¤.
- 
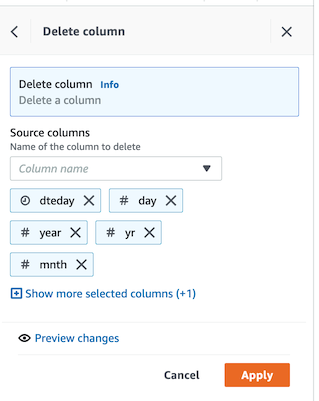
1. (옵션) ì´í›„ ìž‘ì—…ì—ì„œ 새로운 `datetime`ì»¬ëŸ¼ì„ ì‚¬ìš©í• ê²ƒìž…ë‹ˆë‹¤. 기존 컬럼 ë˜ëŠ” ìž‘ì—…ì— ì‚¬ìš©ëœ ì»¬ëŸ¼ì„ ì‚ì œí•©ë‹ˆë‹¤.
- COLUMN > Delete ê¸°ëŠ¥ì„ ì´ìš©í•˜ì—¬ `dteday`, `day`, `year`, `mnth`, `hr` ì»¬ëŸ¼ì„ ì‚ì œí•©ë‹ˆë‹¤.
- 
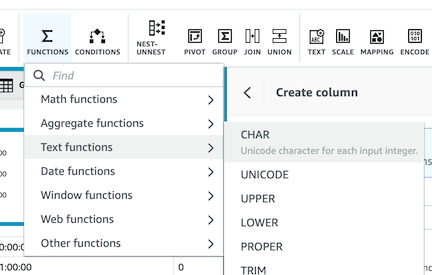
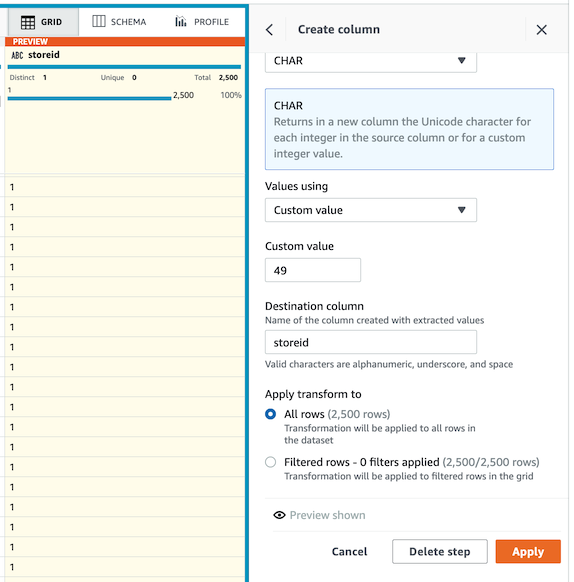
1. `storeid` ì»¬ëŸ¼ì„ ì¶”ê°€í•©ë‹ˆë‹¤. (ì´í›„ SageMaker Canvasì—ì„œ 시계열 ë°ì´í„° ì˜ˆì¸¡ëª¨ë¸ ìƒì„±ì‹œ 예측단위로 활용ë©ë‹ˆë‹¤.)
- FUNCTIONS 메뉴ì—ì„œ Text functions > CHAR 를 ì„ íƒí•©ë‹ˆë‹¤.
- 
- Value usingì„ Custom valueë¡œ ì„ íƒí•˜ê³ 49 를 ìž…ë ¥í•©ë‹ˆë‹¤. (ìœ ë‹ˆì½”ë“œ 49ì˜ ê°’ì€ '1'입니다.)
- 
1. (옵션) `season` ì»¬ëŸ¼ì— ëŒ€í•˜ì—¬ one-hot encodingì„ ì‹¤í–‰í•©ë‹ˆë‹¤. (본 실습ì—서는 기능 확ì¸ì„ 위해 진행합니다. SageMaker Canvas 사용시 one-hot encodingì´ ìžë™ìœ¼ë¡œ ì ìš©ë˜ë¯€ë¡œ ì‹¤ì œ ìž‘ì—…ì—서는 본 단계가 필요하지 않습니다.)
- 메뉴ì—ì„œ ENCODE > One-hot encode columnì„ ì„ íƒí•©ë‹ˆë‹¤.
- source 컬럼으로 `season`ì„ ì„ íƒí•©ë‹ˆë‹¤.
- Apply transform to í•ëª©ì— `All rows`를 ì„ íƒí•©ë‹ˆë‹¤.
- Preview Changes 를 í´ë¦í•˜ê³ 변경사í•ì„ í™•ì¸ í›„ Apply ë²„íŠ¼ì„ í´ë¦í•©ë‹ˆë‹¤.
### 1-4. AWS Glue DataBrew ë°ì´í„° 변환 ìž‘ì—… 실행
1. ë³€í™˜ìž‘ì—…ì„ ì‹¤í–‰í• ë°°ì¹˜ìž‘ì—…ì„ ìƒì„±í•©ë‹ˆë‹¤.
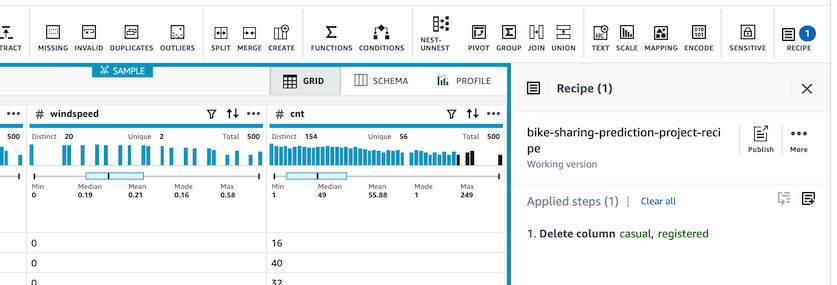
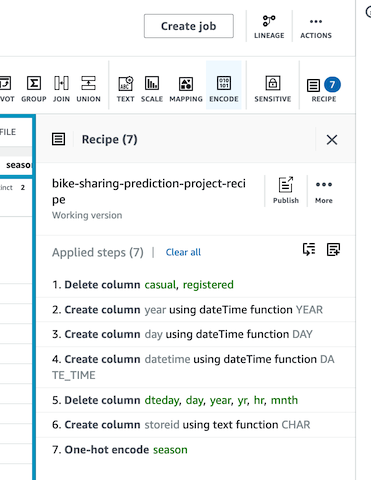
- 작업환경 ì˜¤ë¥¸ìª½ì˜ Recipe를 확ì¸í•©ë‹ˆë‹¤.(í™˜ê²½ì´ ë³´ì´ì§€ ì•Šì„ ê²½ìš° ìš°ìƒë‹¨ì˜ Recipe ë²„íŠ¼ì„ í´ë¦í•˜ë©´ í† í´ë©ë‹ˆë‹¤.)
- 
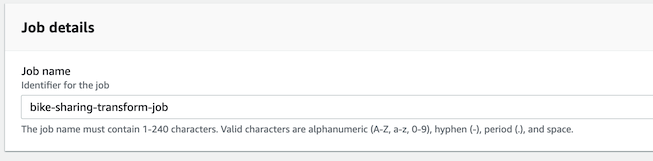
- 오른쪽 ìœ„ì˜ `Create Job`ë²„íŠ¼ì„ í´ë¦í•˜ê³ 아래 ë‚´ìš©ì„ ìž…ë ¥í•œ 후 Create job ë²„íŠ¼ì„ í´ë¦í•©ë‹ˆë‹¤.
- Job name : `bike-sharing-transform-job`
- 
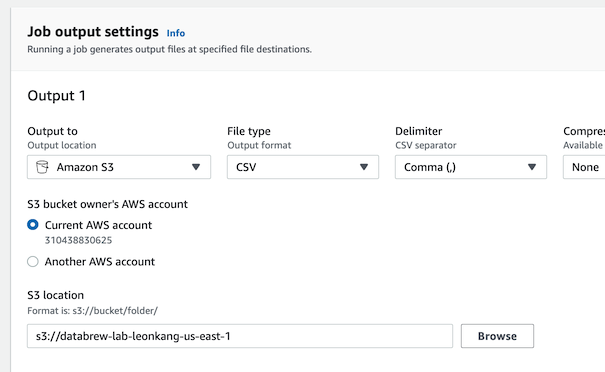
- S3 location : 초기 단계ì—ì„œ ìƒì„±í•œ 버킷 ì„ íƒ
- 
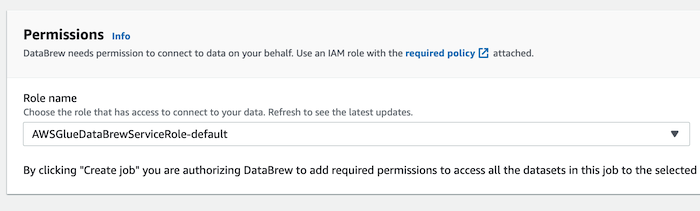
- Permissions : 초기 단계ì—ì„œ ìƒì„±í–ˆë˜ Role ì„ íƒ
- 
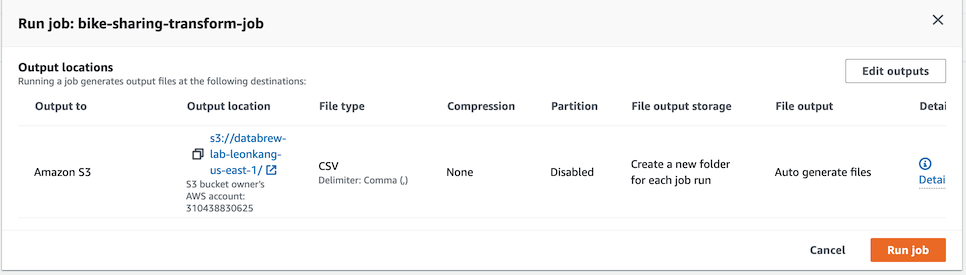
- Create jobì„ ëˆ„ë¥¸í›„ JOBS 메뉴로 ì´ë™í•˜ë©´ ìž‘ì—…ì´ ìƒì„±ëœ ê²ƒì„ í™•ì¸í• 수 있습니다. ìƒì„±ëœ ìž‘ì—…ì„ ì²´í¬í•˜ê³ Run jobì„ í´ë¦í•©ë‹ˆë‹¤.
- 
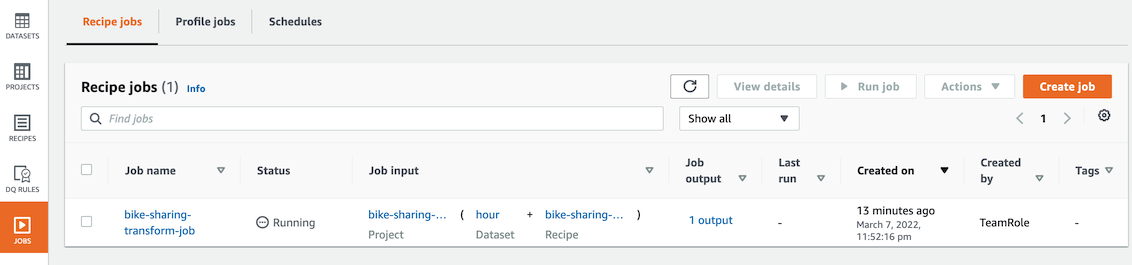
- ìž‘ì—…ì´ Running ìƒíƒœì¸ ê²ƒì„ í™•ì¸í•©ë‹ˆë‹¤. ìž‘ì—…ì€ 1~3분 ì •ë„ ì†Œìš”ë©ë‹ˆë‹¤.
- 
1. (옵션) ìž‘ì—…ì´ ì§„í–‰ë˜ëŠ” ë™ì•ˆ AWS Glueì˜ Scheduling ê¸°ëŠ¥ì„ í™•ì¸í•©ë‹ˆë‹¤.
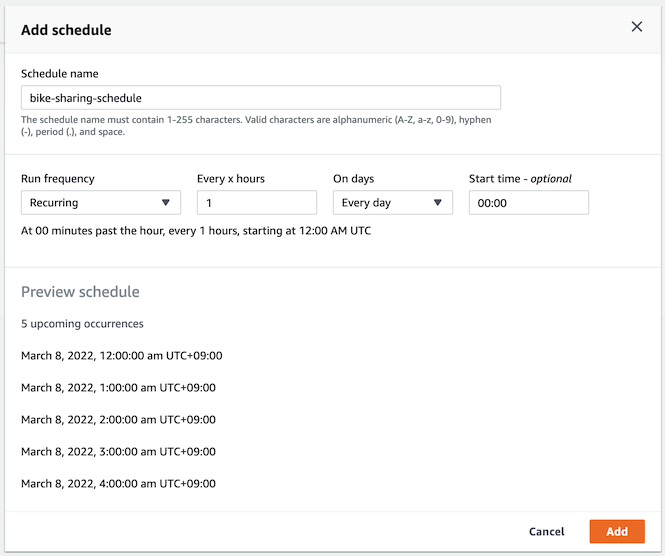
- JOBS > Schedules íƒìœ¼ë¡œë¶€í„° Create schedule ë²„íŠ¼ì„ í´ë¦í•©ë‹ˆë‹¤.
- 
- ìž„ì˜ì˜ ê°’ì„ ìž…ë ¥í•œ 후 Add ë²„íŠ¼ì„ í´ë¦í•©ë‹ˆë‹¤.
- 
- Recipe jobs íƒìœ¼ë¡œ ì´ë™ 후 ì‹¤í–‰ì¤‘ì¸ (ë˜ëŠ” 완료ëœ) Recipe job ì„ ì²´í¬í•œ 후 Actionì˜ Edit를 ì„ íƒí•©ë‹ˆë‹¤.
- Associate schedule 섹션ì—ì„œ 방금 ìƒì„±í•œ ìŠ¤ì¼€ì¤„ì„ ì—°ê²°í• ìˆ˜ 있는 ê²ƒì„ í™•ì¸í•©ë‹ˆë‹¤.
- 
---
### 2. Amazon SageMaker Canvas를 ì´ìš©í•œ ì˜ˆì¸¡ëª¨ë¸ ê°œë°œ
### 2-1. Amazon Sagemaker Canvas ë°ì´í„°ì…‹ 준비
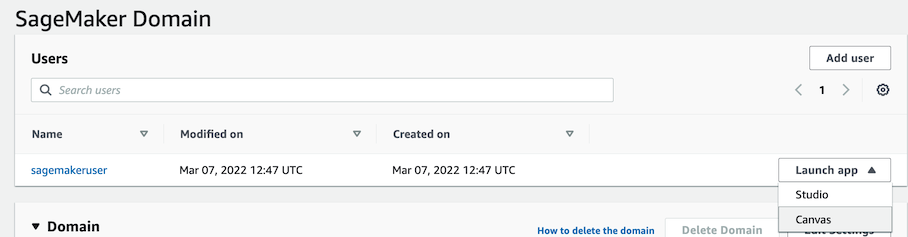
1. [SageMaker 콘솔](https://console.aws.amazon.com/sagemaker/)ë¡œ ì´ë™í•˜ê³ SageMaker Canvas를 실행합니다. (최초 실행시 수분 ì •ë„ê°€ 소요ë©ë‹ˆë‹¤.)
- 
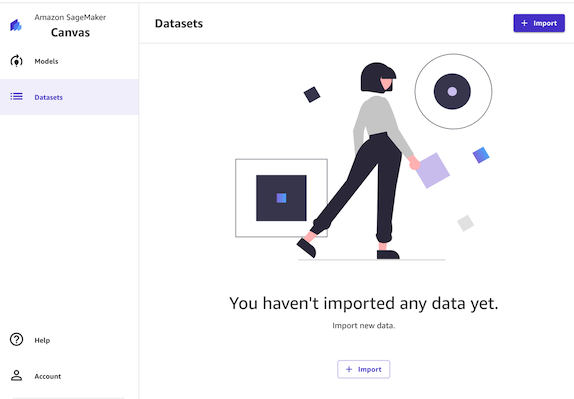
1. Datasets 메뉴ì—ì„œ Import ë²„íŠ¼ì„ í´ë¦í•©ë‹ˆë‹¤.
- 
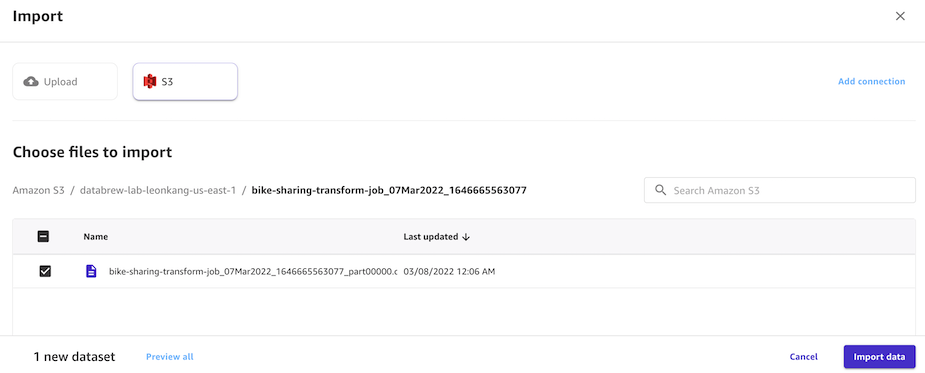
1. Glue DataBrew S3 ë²„í‚·ì— ìž‘ì—…ëª…ìœ¼ë¡œ í´ë”ê°€ ìƒì„±ë˜ì—ˆì„ 것입니다. 해당 í´ë”ì˜ ê²°ê³¼íŒŒì¼ì„ ì„ íƒí•˜ê³ Import data ë²„íŠ¼ì„ í´ë¦í•©ë‹ˆë‹¤.
- 
1. Preview ë“±ì„ í†µí•´ Importëœ íŒŒì¼ì„ 확ì¸í•©ë‹ˆë‹¤.
### 2-2. Regression ì˜ˆì¸¡ëª¨ë¸ ì‹¤í–‰
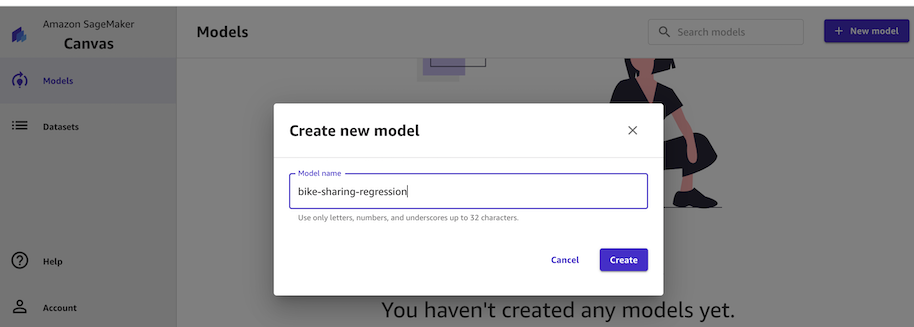
1. Models 메뉴ì—ì„œ +New model ë²„íŠ¼ì„ í´ë¦í•©ë‹ˆë‹¤.
1. Model name으로 `bike-sharing-regression` ì„ ìž…ë ¥í•˜ê³ Create ë²„íŠ¼ì„ í´ë¦í•©ë‹ˆë‹¤.
- 
1. ë°ì´í„°ì…‹ì„ ì„ íƒí•˜ê³ Select dataset ë²„íŠ¼ì„ í´ë¦í•©ë‹ˆë‹¤.
1. Build 단계ì—ì„œ ë‚´ìš©ì„ ì•„ëž˜ì™€ ê°™ì´ ë³€ê²½í•©ë‹ˆë‹¤.
- Select a column to predict ì—ì„œ Target columnì„ `cnt`ë¡œ ì„ íƒí•©ë‹ˆë‹¤.
- Model typeì—ì„œ Chage typeì„ ëˆ„ë¥´ê³ íŒì—…ì—ì„œ Numeric predictionì„ ì„ íƒí•©ë‹ˆë‹¤.
- ë°ì´í„°ì…‹ 컬럼ì—ì„œ ë‹¤ìŒ ì»¬ëŸ¼ì„ ì„ íƒí•©ë‹ˆë‹¤.
- `workingday`, `windspeed`, `weekday`, `weathersit`, `temp`, `season`, `hum`, `holiday`, `atemp` ì„ íƒ (곧, `storeid`, `season_1`, ..., `season_4`, `instant`, `datetime` ì„ ì„ íƒ í•´ì œí•©ë‹ˆë‹¤.)
- 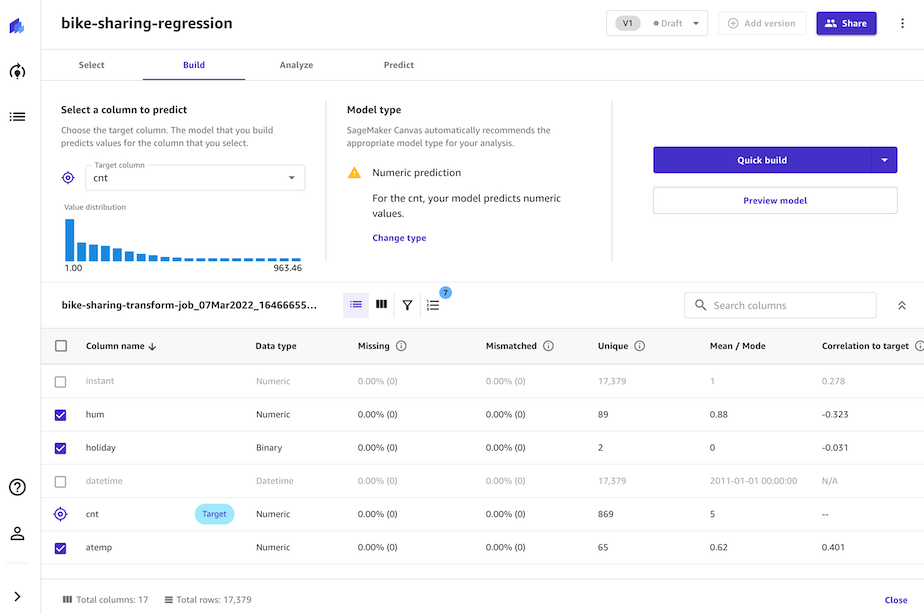
- Quick Build ë²„íŠ¼ì„ í´ë¦í•©ë‹ˆë‹¤. (ìž‘ì—…ì€ 5~10분 ì •ë„ ì†Œìš”ë©ë‹ˆë‹¤.)
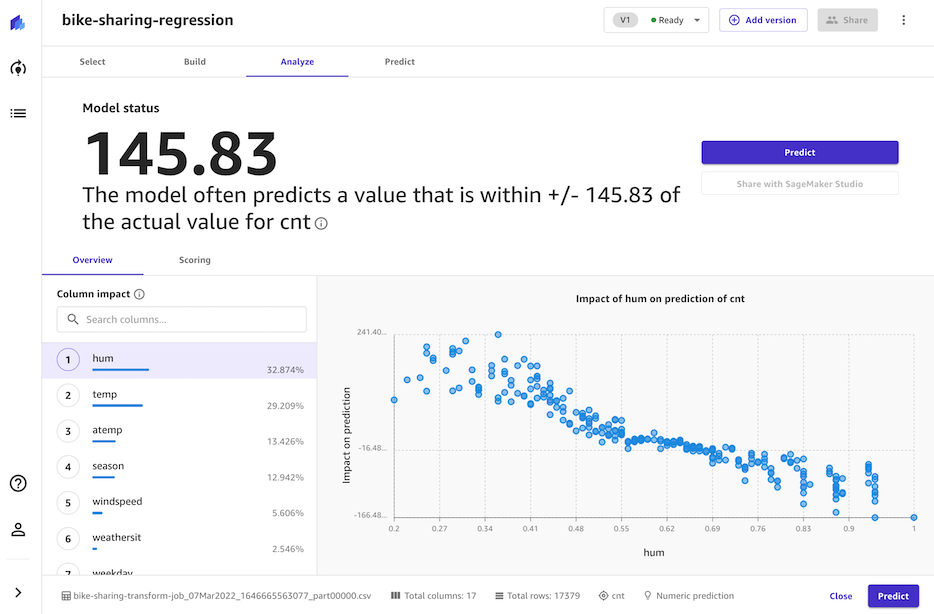
1. ëª¨ë¸ ë¹Œë“œ 결과를 확ì¸í•˜ê³ ì˜ˆì¸¡ì„ ì‹¤í–‰í•©ë‹ˆë‹¤.
- Analyze 결과가 ë„출ë˜ë©´ 모ë¸ì˜ 성능 매트ë¦ê³¼ 함께 컬럼별 중요ë„를 확ì¸í• 수 있습니다. 본 샘플ì—ì„œ ìžì „ê±° ëŒ€ì—¬ì— ê°€ìž¥ í° ì˜í–¥ì„ 미치는 ìš”ì¸ì€ 습ë„와 온ë„ì¸ ê²ƒìœ¼ë¡œ 분ì„ë˜ì—ˆìŠµë‹ˆë‹¤.
- 
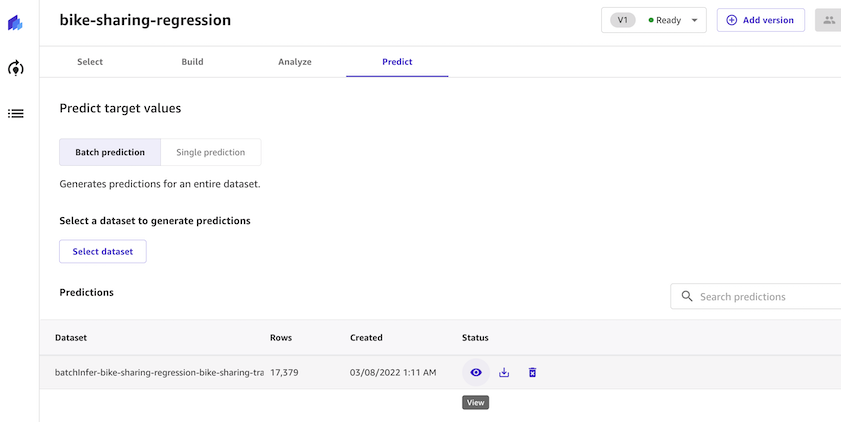
- Predict ë²„íŠ¼ì„ í´ë¦í•˜ê³ í•™ìŠµì— ì‚¬ìš©í•œ ë°ì´í„°ì…‹ì„ ì„ íƒí•˜ê³ Generate predictions ë²„íŠ¼ì„ í´ë¦í•©ë‹ˆë‹¤. (본 ì˜ˆì œì—서는 편ì˜ë¥¼ 위해 ë™ì¼íŒŒì¼ì„ 사용하지만 학습과 ì˜ˆì¸¡ì— ë™ì¼í•œ ë°ì´í„°ë¥¼ 사용하는 ê²ƒì€ ë°˜ë“œì‹œ 피해야 í• ì•ˆí‹°íŒ¨í„´ìž…ë‹ˆë‹¤.)
- ìž ì‹œ 후 ì¶”ë¡ ìž‘ì—…ì´ ì™„ë£Œë˜ë©´ 예측결과를 확ì¸í•˜ê³ ë‹¤ìš´ë°›ì„ ìˆ˜ 있습니다.
- 
### 2-3. Timeseries ì˜ˆì¸¡ëª¨ë¸ ì‹¤í–‰
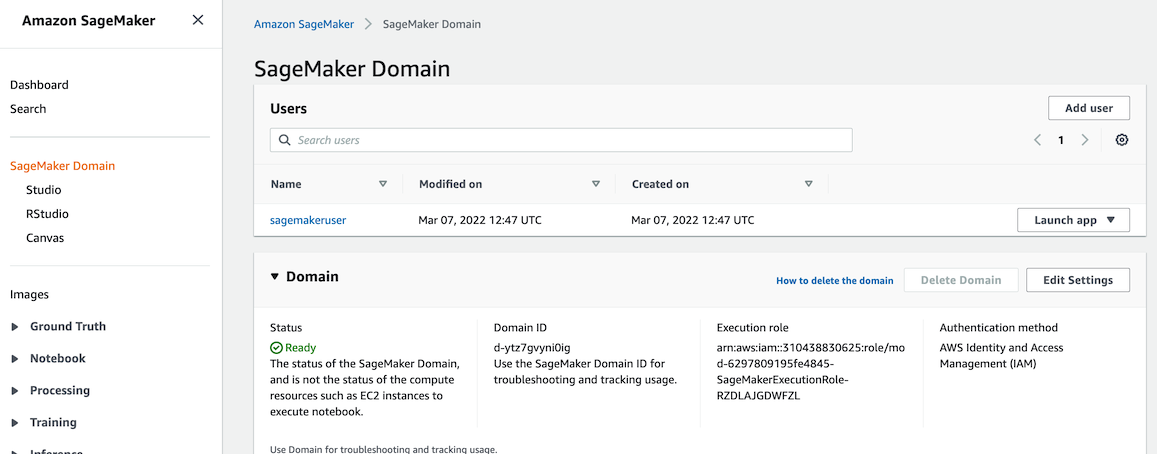
1. 다ìŒì€ ë™ì¼ 파ì¼ì„ 사용하여 Timeseries ì—측모ë¸ì„ ìƒì„±í•©ë‹ˆë‹¤. Timesereis ì˜ˆì¸¡ì‹¤í–‰ì„ ìœ„í•´ì„œ IAM 권한 ìˆ˜ì •ì´ í•„ìš”í•©ë‹ˆë‹¤.
- [SageMaker 콘솔](https://console.aws.amazon.com/sagemaker)ë¡œ ì´ë™í•œ 후 SageMaker Domain > Studio 메뉴ì—ì„œ Execution role ì´ë¦„ì„ í™•ì¸í•˜ê³ 기억합니다.(ë˜ëŠ” 복사합니다.)
- 
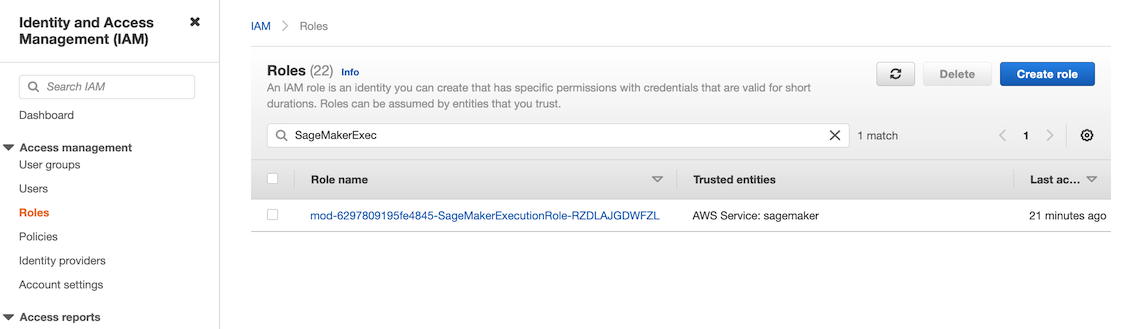
- [IAM 콘솔](https://console.aws.amazon.com/iamv2)ë¡œ ì´ë™í•œ 후 Roles 메뉴ì—ì„œ ì´ì „ 단계ì—ì„œ 조회한 Roleì„ ì°¾ìŠµë‹ˆë‹¤. (ëŒ€ë¶€ë¶„ì˜ ê²½ìš° `SageMakerExecutrionRole`.. ì„ í¬í•¨í•˜ëŠ” ì´ë¦„입니다.)
- 
- IAM Roleì˜ Permissions íƒì—ì„œ Add permissions ë²„íŠ¼ì„ í´ë¦í•˜ê³ Attach policies를 ì„ íƒí•©ë‹ˆë‹¤.
- Other permissions policies í•ëª©ì—ì„œ AmazonForecastFullAccess를 검색하여 추가합니다. (ì²´í¬ë°•ìŠ¤ ì„ íƒ í›„ Attach policies ë²„íŠ¼ì„ í´ë¦í•©ë‹ˆë‹¤.)
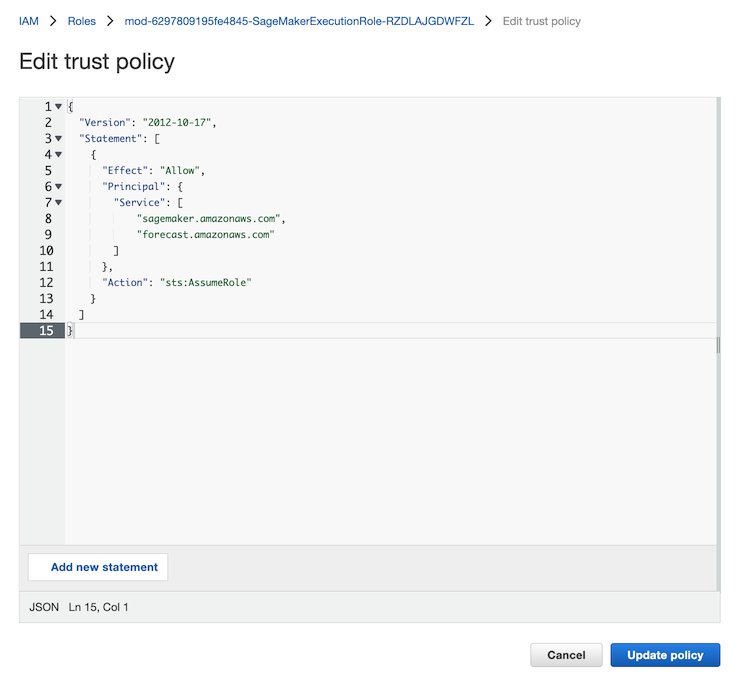
- ë™ì¼í•œ IAM Roleì—ì„œ Trust relationships íƒìœ¼ë¡œ ì´ë™í•œ 후 Edit trush policy ë²„íŠ¼ì„ í´ë¦í•©ë‹ˆë‹¤.
- íŽ¸ì§‘ì°½ì´ ì˜¤í”ˆë˜ë©´ 다ìŒë‚´ìš©ì„ 붙여넣습니다.
```
{
"Version": "2012-10-17",
"Statement": [
{
"Effect": "Allow",
"Principal": {
"Service": [
"sagemaker.amazonaws.com",
"forecast.amazonaws.com"
]
},
"Action": "sts:AssumeRole"
}
]
}
```
- 
1. SageMaker Canvas 화면으로 ëŒì•„와서 Models 메뉴ì—ì„œ +New model ë²„íŠ¼ì„ í´ë¦í•©ë‹ˆë‹¤.
1. 모ë¸ëª…ì„ `bike-sharing-timeseries`ë¡œ ìž…ë ¥í•˜ê³ Create ë²„íŠ¼ì„ í´ë¦í•©ë‹ˆë‹¤.
1. ë°ì´í„°ì…‹ì„ ì„ íƒí•˜ê³ Select dataset ë²„íŠ¼ì„ í´ë¦í•©ë‹ˆë‹¤.
1. Build 단계ì—ì„œ ë‚´ìš©ì„ ì•„ëž˜ì™€ ê°™ì´ ë³€ê²½í•©ë‹ˆë‹¤.
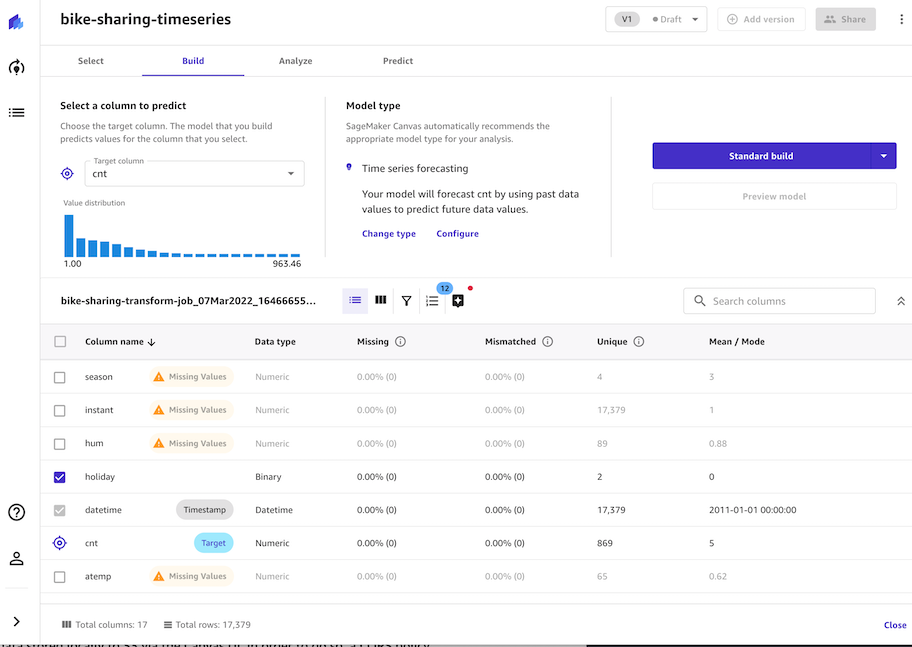
- Select a column to predict ì—ì„œ Target columnì„ `cnt`ë¡œ ì„ íƒí•©ë‹ˆë‹¤.
- Model typeì—ì„œ Chage typeì„ ëˆ„ë¥´ê³ íŒì—…ì—ì„œ Time series forecastingì„ ì„ íƒí•©ë‹ˆë‹¤.
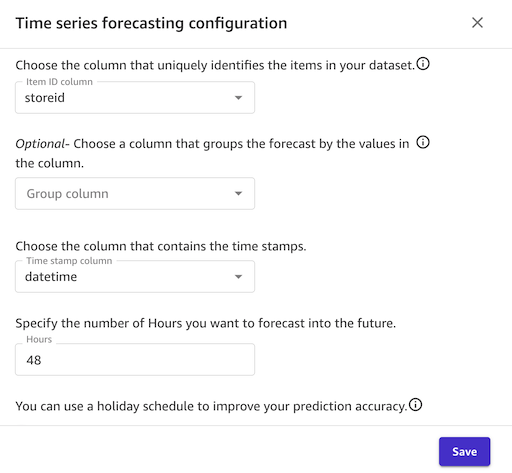
- Model typeì—ì„œ Config를 누í¬ë¡œ íŒì—…ì—ì„œ 다ìŒê³¼ ê°™ì´ ì„¤ì •í•©ë‹ˆë‹¤.
- Item ID column : `storeid`
- Group column : blank
- Select a time stamp colum :
- Hours (미래 예측구간) : 48
- 
- ë°ì´í„°ì…‹ 컬럼ì—ì„œ ë‹¤ìŒ ì»¬ëŸ¼ì„ ì„ íƒí•©ë‹ˆë‹¤.
- `workingday`, `storeid`, `holiday`, `datetime` ì„ íƒ
- 
- Standard Build ë²„íŠ¼ì„ í´ë¦í•©ë‹ˆë‹¤. (ìž‘ì—…ì€ 2~5시간 ì •ë„ ì†Œìš”ë©ë‹ˆë‹¤.)
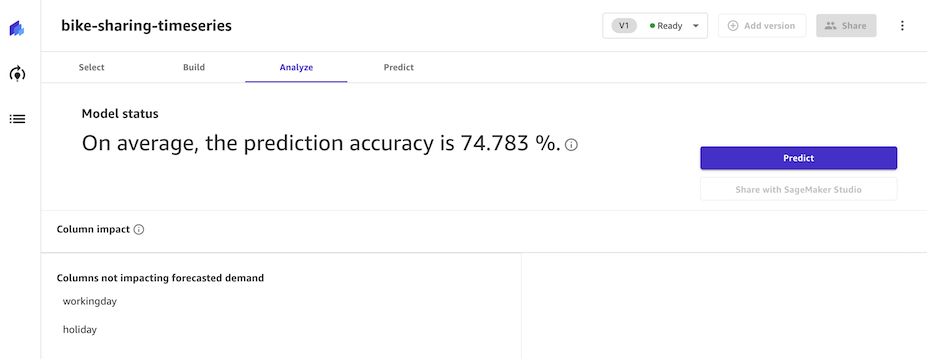
1. ëª¨ë¸ ë¹Œë“œ 결과를 확ì¸í•˜ê³ ì˜ˆì¸¡ì„ ì‹¤í–‰í•©ë‹ˆë‹¤.
- 빌드가 완료ë˜ë©´ WAPE (Weighted Average Percentage Error)ë¡œ 매트ë¦ì´ 표시ë©ë‹ˆë‹¤.
- 
- Predict íƒìœ¼ë¡œ ì´ë™í•˜ì—¬ Start predict를 í´ë¦í•˜ë©´ 배치 예측결과를 ìƒì„±í• 수 있습니다.
- 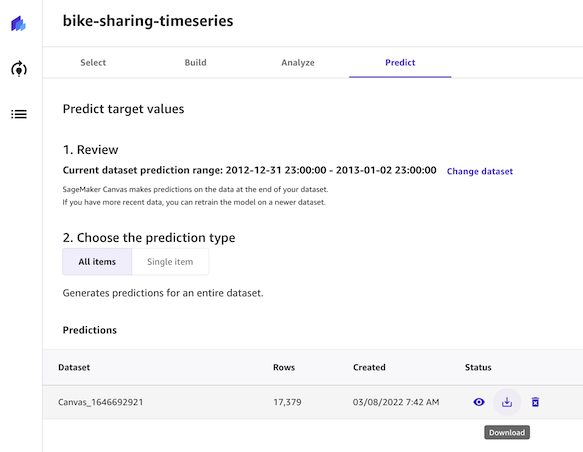
- 
ìˆ˜ê³ í•˜ì…¨ìŠµë‹ˆë‹¤.
Amazon SageMaker Canvas와 AWS Glue DataBrewì— ëŒ€í•œ 추가 ì‹¤ìŠµì´ í•„ìš”í•˜ì‹ ê²½ìš° 아래 실습가ì´ë“œë¥¼ 함께 ì°¸ê³ í•˜ì‹ì‹œì˜¤.
- SageMaker Canvas 실습 워í¬ìƒµ : https://catalog.us-east-1.prod.workshops.aws/workshops/80ba0ea5-7cf9-4b8c-9d3f-1cd988b6c071/en-US/
- AWS Glue DataBrew 실습 워í¬ìƒµ : https://catalog.us-east-1.prod.workshops.aws/workshops/44c91c21-a6a4-4b56-bd95-56bd443aa449/en-US/lab-guide/transform-glue-databrew
ì‹¤ìŠµì— ì°¸ì—¬í•´ì£¼ì…”ì„œ ê°ì‚¬í•©ë‹ˆë‹¤.