```
For example, set Environment variables as follows:
```buildoutcfg
ES_HOST=vpc-retail-xkl5jpog76d5abzhg4kyfilymq.us-west-1.es.amazonaws.com
ES_INDEX=retail
ES_TYPE=trans
REQUIRED_FIELDS=Invoice,StockCode,Customer_ID
REGION_NAME=us-west-2
DATE_TYPE_FIELDS=InvoiceDate
```
13. Click **Save**.
14. In order to execute the lambda function in the VPC and read data from Kinesis Data Streams, you need to add the IAM Policy required for the Execution role required to execute the lamba function.
Click `View the UpsertToES-role-XXXXXXXX role on the IAM console.` to edit the IAM Role.

15. After clicking the **Attach policies** button in the **Permissions** tab of IAM Role, add **AWSLambdaVPCAccessExecutionRole** and **AmazonKinesisReadOnlyAccess** in order.

16. Add the following policy statements into customer inline policy (e.g., `UpsertToESDefaultPolicyXXXXX`). The following IAM Policy enables the lambda function to ingest data into the `retail` index in the opensearch service.
    {
        "Action": [
            "es:DescribeElasticsearchDomain",
            "es:DescribeElasticsearchDomainConfig",
            "es:DescribeElasticsearchDomains",
            "es:ESHttpPost",
            "es:ESHttpPut"
        ],
        "Resource": [
            "arn:aws:es:region:account-id:domain/retail",
            "arn:aws:es:region:account-id:domain/retail/*"
        ],
        "Effect": "Allow"
    },
    {
        "Action": "es:ESHttpGet",
        "Resource": [
            "arn:aws:es:region:account-id:domain/retail",
            "arn:aws:es:region:account-id:domain/retail/_all/_settings",
            "arn:aws:es:region:account-id:domain/retail/_cluster/stats",
            "arn:aws:es:region:account-id:domain/retail/_nodes",
            "arn:aws:es:region:account-id:domain/retail/_nodes/*/stats",
            "arn:aws:es:region:account-id:domain/retail/_nodes/stats",
            "arn:aws:es:region:account-id:domain/retail/_stats",
            "arn:aws:es:region:account-id:domain/retail/retail*/_mapping/trans",
            "arn:aws:es:region:account-id:domain/retail/retail*/_stats"
        ],
        "Effect": "Allow"
    }
17. Click the **Edit** button in the VPC category to go to the Edit VPC screen. Select `Custom VPC` for VPC connection.
Choose the VPC and subnets where you created the domain for the OpenSearch service, and choose the security groups that are allowed access to the OpenSearch service domain.
18. Select **Edit** in Basic settings. Adjust Memory and Timeout appropriately. In this lab, we set Timout to `5 min`.
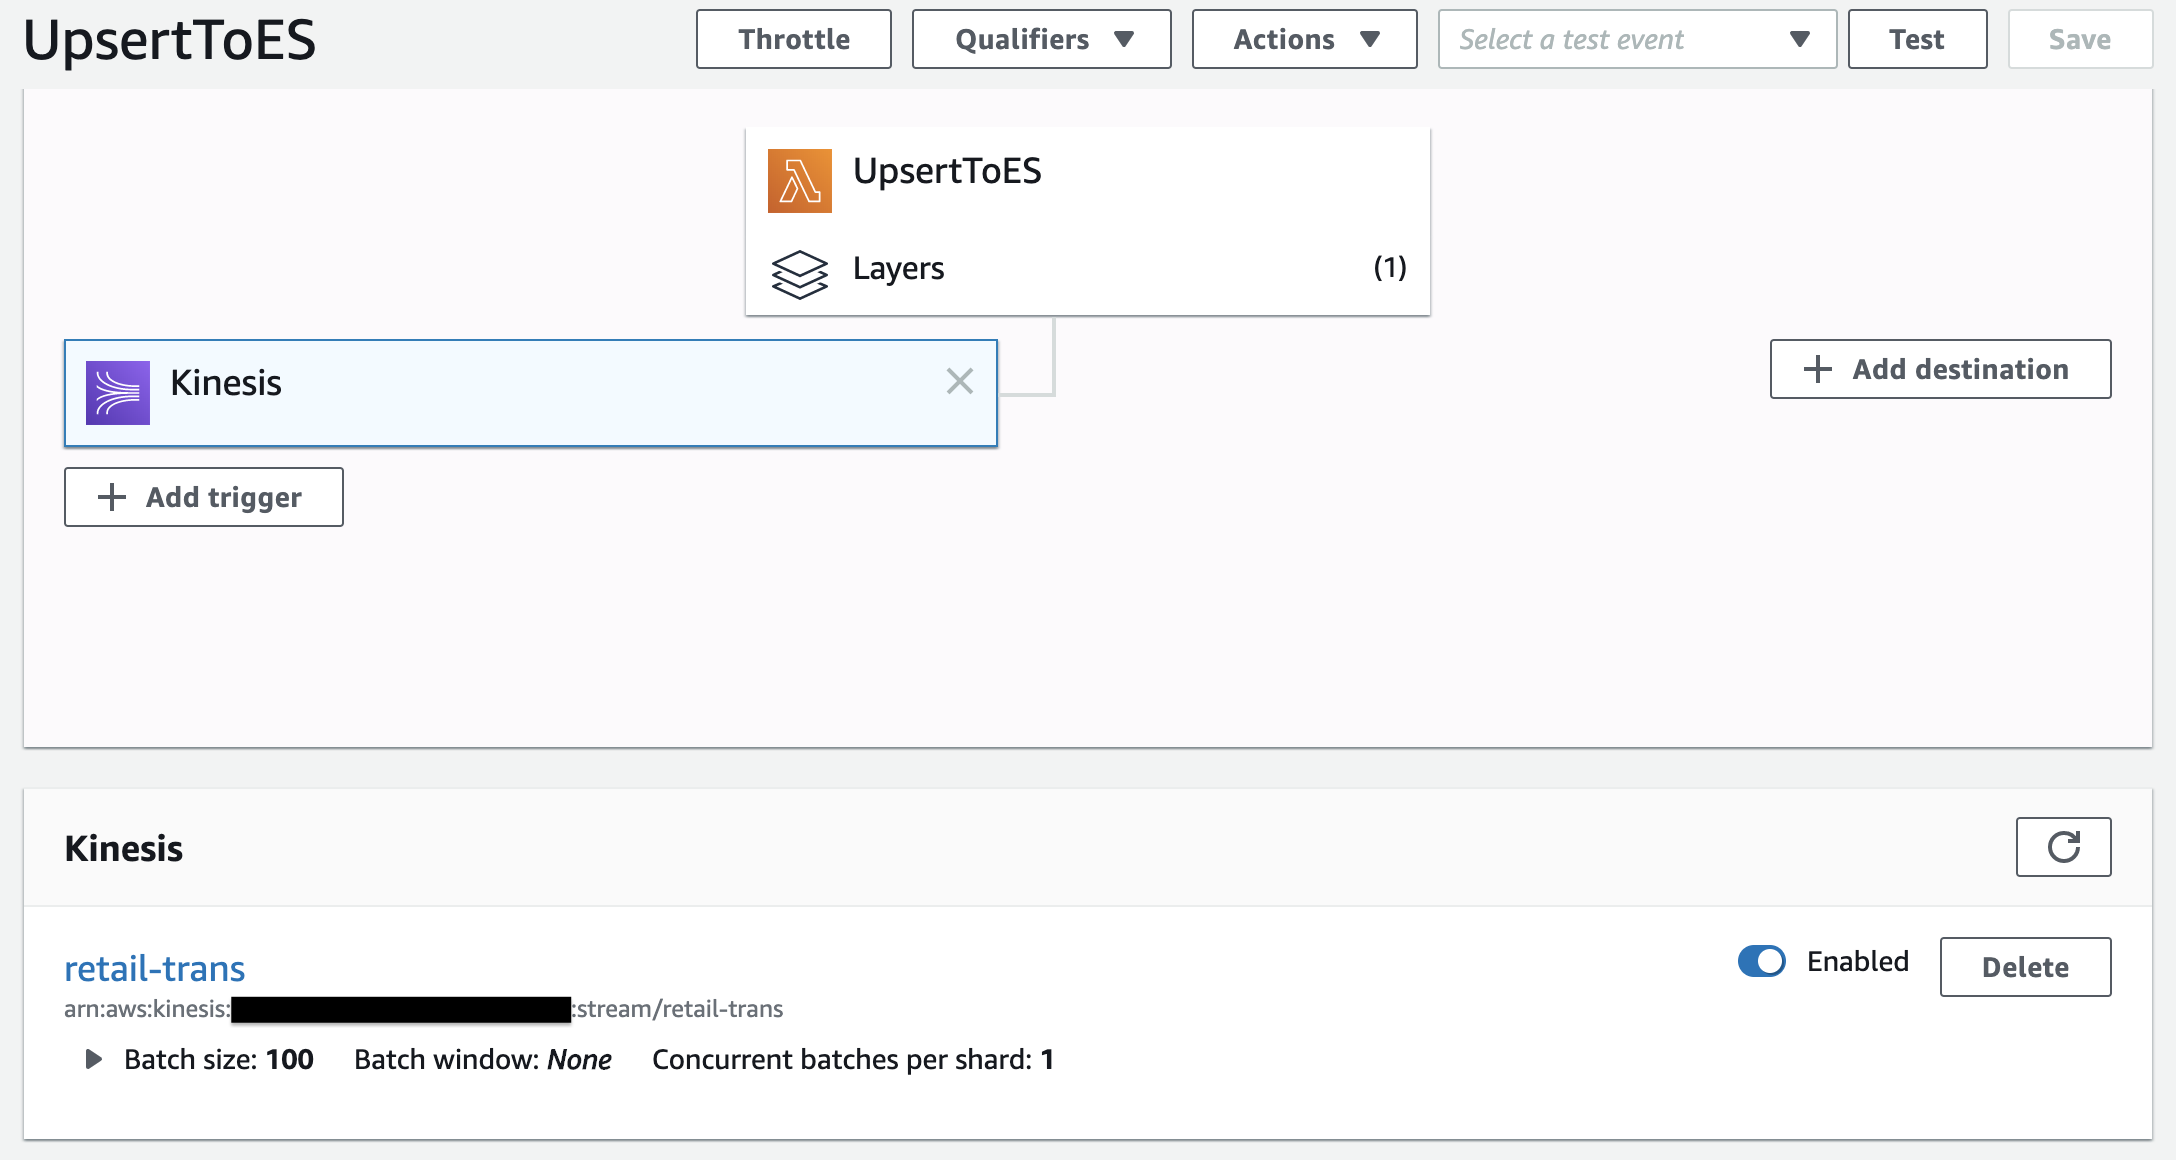
19. Go back to the Designer tab and select **Add trigger**.
20. Select **Kinesis** from `Select a trigger` in the **Trigger configuration**.
21. Select the Kinesis Data Stream (`retail-trans`) created earlier in **Kinesis stream**.
22. Click **Add**.
### Enable the Lambda function to ingest records into Amazon OpenSearch
The lambda function uses the delivery role to sign HTTP (Signature Version 4) requests before sending the data to the Amazon OpenSearch Service endpoint.
You manage Amazon OpenSearch Service fine-grained access control permissions using roles, users, and mappings.
This section describes how to create roles and set permissions for the lambda function.
Complete the following steps:
1. The Amazon OpenSearch cluster is provisioned in a VPC. Hence, the Amazon OpenSearch endpoint and the Kibana endpoint are not available over the internet. In order to access the endpoints, we have to create a ssh tunnel and do local port forwarding.
* Option 1) Using SSH Tunneling
1. Setup ssh configuration
For Winodws, refer to [here](#SSH-Tunnel-with-PuTTy-on-Windows).
For Mac/Linux, to access the OpenSearch Cluster, add the ssh tunnel configuration to the ssh config file of the personal local PC as follows.
```shell script
# OpenSearch Tunnel
Host estunnel
HostName
User ec2-user
IdentitiesOnly yes
IdentityFile ~/.ssh/analytics-hol.pem
LocalForward 9200 :443
```
+ **EC2 Public IP of Bastion Host** uses the public IP of the EC2 instance created in the **Lab setup** step.
+ ex)
```shell script
~$ ls -1 .ssh/
analytics-hol.pem
config
id_rsa
~$ tail .ssh/config
# OpenSearch Tunnel
Host estunnel
HostName 214.132.71.219
User ubuntu
IdentitiesOnly yes
IdentityFile ~/.ssh/analytics-hol.pem
LocalForward 9200 vpc-retail-qvwlxanar255vswqna37p2l2cy.us-west-2.es.amazonaws.com:443
~$
```
2. Run `ssh -N estunnel` in Terminal.
* Option 2) Connect using the EC2 Instance Connect CLI
1. Install EC2 Instance Connect CLI
```
sudo pip install ec2instanceconnectcli
```
2. Run
mssh ec2-user@{bastion-ec2-instance-id} -N -L 9200:{opensearch-endpoint}:443
+ ex)
```
$ mssh ec2-user@i-0203f0d6f37ccbe5b -N -L 9200:vpc-retail-qvwlxanar255vswqna37p2l2cy.us-west-2.es.amazonaws.com:443
```
2. Connect to `https://localhost:9200/_dashboards/app/login?` in a web browser.
3. Enter the master user and password that you set up when you created the Amazon OpenSearch Service endpoint.
4. In the Welcome screen, click the toolbar icon to the left side of **Home** button. Choose **Security**.

5. Under **Security**, choose **Roles**.
6. Choose **Create role**.
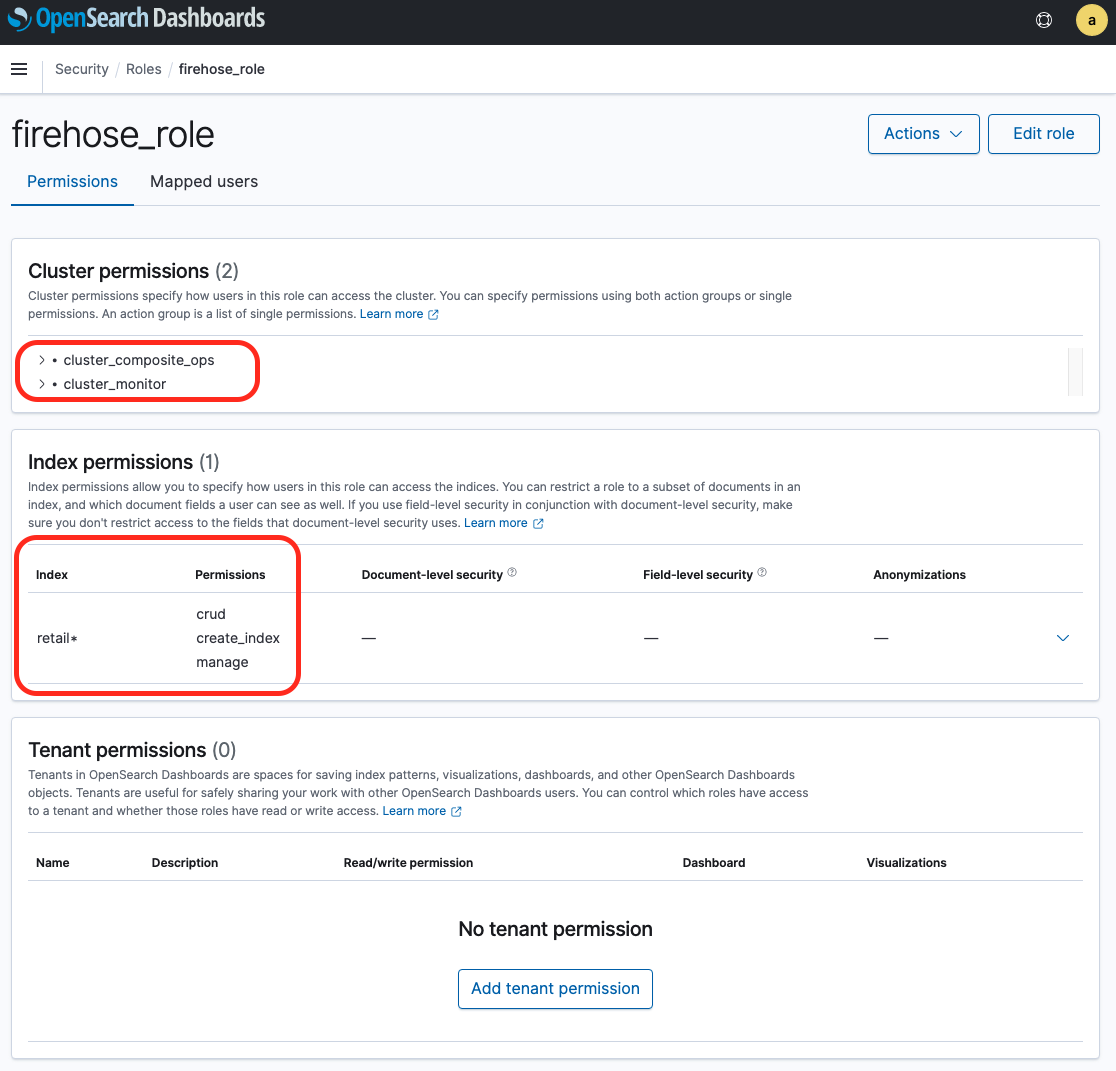
7. Name your role; for example, `firehose_role`.
8. For cluster permissions, add `cluster_composite_ops` and `cluster_monitor`.
9. Under **Index permissions**, choose **Index Patterns** and enter index-name*; for example, `retail*`.
10. Under **Permissions**, add three action groups: `crud`, `create_index`, and `manage`.
11. Choose **Create**.
In the next step, you map the IAM role that the lambda function uses to the role you just created.
12. Choose the **Mapped users** tab.

13. Choose **Manage mapping** and under **Backend roles**,
14. For **Backend Roles**, enter the IAM ARN of the role the lambda function uses:
`arn:aws:iam::123456789012:role/UpsertToESServiceRole709-xxxxxxxxxxxx`.

15. Choose **Map**.
**Note**: After OpenSearch Role mapping for the lambda function, you would not be supposed to meet a data delivery failure with the lambda function like this:
[ERROR] AuthorizationException: AuthorizationException(403, 'security_exception', 'no permissions for [cluster:monitor/main] and User [name=arn:aws:iam::123456789012:role/UpsertToESServiceRole709-G1RQVRG80CQY, backend_roles=[arn:aws:iam::123456789012:role/UpsertToESServiceRole709-G1RQVRG80CQY], requestedTenant=null]')
\[[Top](#top)\]
## Data visualization with Kibana
Visualize data collected from Amazon OpenSearch Service using Kibana.

1. The Amazon OpenSearch cluster is provisioned in a VPC. Hence, the Amazon OpenSearch endpoint and the Kibana endpoint are not available over the internet. In order to access the endpoints, we have to create a ssh tunnel and do local port forwarding.
* Option 1) Using SSH Tunneling
1. Setup ssh configuration
For Winodws, refer to [here](#SSH-Tunnel-with-PuTTy-on-Windows).
For Mac/Linux, to access the OpenSearch Cluster, add the ssh tunnel configuration to the ssh config file of the personal local PC as follows.
```shell script
# OpenSearch Tunnel
Host estunnel
HostName
User ec2-user
IdentitiesOnly yes
IdentityFile ~/.ssh/analytics-hol.pem
LocalForward 9200 :443
```
+ **EC2 Public IP of Bastion Host** uses the public IP of the EC2 instance created in the **Lab setup** step.
+ ex)
```shell script
~$ ls -1 .ssh/
analytics-hol.pem
config
id_rsa
~$ tail .ssh/config
# OpenSearch Tunnel
Host estunnel
HostName 214.132.71.219
User ubuntu
IdentitiesOnly yes
IdentityFile ~/.ssh/analytics-hol.pem
LocalForward 9200 vpc-retail-qvwlxanar255vswqna37p2l2cy.us-west-2.es.amazonaws.com:443
~$
```
2. Run `ssh -N estunnel` in Terminal.
* Option 2) Connect using the EC2 Instance Connect CLI
1. Install EC2 Instance Connect CLI
```
sudo pip install ec2instanceconnectcli
```
2. Run
mssh ec2-user@{bastion-ec2-instance-id} -N -L 9200:{opensearch-endpoint}:443
+ ex)
```
$ mssh ec2-user@i-0203f0d6f37ccbe5b -N -L 9200:vpc-retail-qvwlxanar255vswqna37p2l2cy.us-west-2.es.amazonaws.com:443
```
2. Connect to `https://localhost:9200/_dashboards/app/login?` in a web browser.
3. Enter the master user and password that you set up when you created the Amazon OpenSearch Service endpoint. The user name and password of the master user are stored in the [AWS Secrets Manager](https://console.aws.amazon.com/secretsmanager/listsecrets) as a name such as `OpenSearchMasterUserSecret1-xxxxxxxxxxxx`.
4. In the Welcome screen, click the toolbar icon to the left side of **Home** button. Choose **Stack Managerment**.

5. (Management / Create index pattern) In **Step 1 of 2: Define index pattern** of **Create index pattern**, enter `retail*` in Index pattern.

6. (Management / Create index pattern) Choose **> Next step**.
7. (Management / Create index pattern) Select `InvoiceDate` for the **Time Filter field name** in **Step 2 of 2: Configure settings** of the Create index pattern.

8. (Management / Create index pattern) Click **Create index pattern**.
9. (Management / Advanced Settings) After selecting **Advanced Settings** from the left sidebar menu, set **Timezone for date formatting** to `Etc/UTC`. Since the log creation time of the test data is based on `UTC`, **Kibana**'s **Timezone** is also set to `UTC`.

10. (Discover) After completing the creation of **Index pattern**, select **Discover** to check the data collected in OpenSearch.

11. (Discover) Let's visualize the `Quantity` by `InvoicdDate`. Select **invoicdDate** from **Available fields** on the left, and click **Visualize** at the bottom

12. (Visualize) After selecting **Y-Axis** in **Metrics** on the Data tab, apply `Sum` for **Aggregation**, and `Quantity` for **Field** as shown below.

13. (Visualize) Click **Save** in the upper left corner, write down the name of the graph you saved, and then click **Confirm Save**.

14. (Dashboards) Click **Dashboard** icon on the left and click the **Create new dashboard** button.

15. (Dashboards) You can see the following Dashboards.

\[[Top](#top)\]
## Recap and Review
:warning: **At the end of this lab, you should delete the resources you used to avoid incurring additional charges for the AWS account you used.**
Through this lab, we have built a Business Intelligent System with Lambda Architecture such that consists of real-time data processing and batch data processing layers.
\[[Top](#top)\]
## Resources
+ slide: [AWS Analytics Immersion Day - Build BI System from Scratch](http://tinyurl.com/serverless-bi-on-aws)
+ data source: [Online Retail II Data Set](https://archive.ics.uci.edu/ml/datasets/Online+Retail+II)
\[[Top](#Top)\]
## Reference
### AWS Developer Guide By Services
+ [Amazon Simple Storage Service (Amazon S3)](https://docs.aws.amazon.com/AmazonS3/latest/dev/Introduction.html)
+ [Amazon Athena](https://docs.aws.amazon.com/athena/latest/ug/what-is.html)
+ [Amazon OpenSearch Service](https://docs.aws.amazon.com/opensearch-service/latest/developerguide/what-is.html)
+ [AWS Lambda](https://docs.aws.amazon.com/lambda/latest/dg/welcome.html)
+ [Amazon Kinesis Data Firehose](https://docs.aws.amazon.com/firehose/latest/dev/what-is-this-service.html)
+ [Amazon Kinesis Data Streams](https://docs.aws.amazon.com/streams/latest/dev/introduction.html)
+ [Amazon QuickSight](https://docs.aws.amazon.com/quicksight/latest/user/welcome.html)
+ [AWS Lambda Layers](https://docs.aws.amazon.com/lambda/latest/dg/configuration-layers.html#configuration-layers-path)
+ Example of creating a python package to register with AWS Lambda layer: **elasticsearch**
:warning: **You should create the python package on Amazon Linux, otherwise create it using a simulated Lambda environment with Docker.**
      [ec2-user@ip-172-31-6-207 ~] $ python3 -m venv es-lib
      [ec2-user@ip-172-31-6-207 ~] $ cd es-lib
      [ec2-user@ip-172-31-6-207 ~] $ source bin/activate
      (es-lib) $ mkdir -p python_modules
      (es-lib) $ pip install 'elasticsearch>=7.0.0,< 7.11' requests requests-aws4auth -t python_modules
      (es-lib) $ mv python_modules python
      (es-lib) $ zip -r es-lib.zip python/
      (es-lib) $ aws s3 mb s3://my-bucket-for-lambda-layer-packages
      (es-lib) $ aws s3 cp es-lib.zip s3://my-bucket-for-lambda-layer-packages/var/
      (es-lib) $ deactivate
+ [How to create a Lambda layer using a simulated Lambda environment with Docker](https://aws.amazon.com/premiumsupport/knowledge-center/lambda-layer-simulated-docker/)
```
$ cat < requirements.txt
> elasticsearch>=7.0.0,<7.11
> requests==2.23.0
> requests-aws4auth==0.9
> EOF
$ docker run -v "$PWD":/var/task "public.ecr.aws/sam/build-python3.7" /bin/sh -c "pip install -r requirements.txt -t python/lib/python3.7/site-packages/; exit"
$ zip -r es-lib.zip python > /dev/null
$ aws s3 mb s3://my-bucket-for-lambda-layer-packages
$ aws s3 cp es-lib.zip s3://my-bucket-for-lambda-layer-packages/var/
```
### SSH Tunnel for Kibana Instructions with PuTTy on Windows
+ [Windows SSH / Tunnel for Kibana Instructions - Amazon Elasticsearch Service](https://search-sa-log-solutions.s3-us-east-2.amazonaws.com/logstash/docs/Kibana_Proxy_SSH_Tunneling_Windows.pdf)
+ [Use an SSH Tunnel to access Kibana within an AWS VPC with PuTTy on Windows](https://amazonmsk-labs.workshop.aws/en/mskkdaflinklab/createesdashboard.html)
\[[Top](#top)\]
### Further readings
##### Amazon S3
+ [New – Automatic Cost Optimization for Amazon S3 via Intelligent Tiering](https://aws.amazon.com/ko/blogs/aws/new-automatic-cost-optimization-for-amazon-s3-via-intelligent-tiering/)
##### Amazon Athena
+ [Top 10 Performance Tuning Tips for Amazon Athena](https://aws.amazon.com/ko/blogs/big-data/top-10-performance-tuning-tips-for-amazon-athena/)
+ [Extract, Transform and Load data into S3 data lake using CTAS and INSERT INTO statements in Amazon Athena](https://aws.amazon.com/ko/blogs/big-data/extract-transform-and-load-data-into-s3-data-lake-using-ctas-and-insert-into-statements-in-amazon-athena/)
+ [Query Amazon S3 analytics data with Amazon Athena](https://aws.amazon.com/blogs/storage/query-amazon-s3-analytics-data-with-amazon-athena/)
##### Amazon Elasticsearch Service
+ [Elasticsearch tutorial: a quick start guide](https://aws.amazon.com/blogs/database/elasticsearch-tutorial-a-quick-start-guide/)
+ [Run a petabyte scale cluster in Amazon Elasticsearch Service](https://aws.amazon.com/blogs/database/run-a-petabyte-scale-cluster-in-amazon-elasticsearch-service/)
+ [Analyze user behavior using Amazon Elasticsearch Service, Amazon Kinesis Data Firehose and Kibana](https://aws.amazon.com/blogs/database/analyze-user-behavior-using-amazon-elasticsearch-service-amazon-kinesis-data-firehose-and-kibana/)
##### AWS Lambda
+ [Introduction to Messaging for Modern Cloud Architecture](https://aws.amazon.com/blogs/architecture/introduction-to-messaging-for-modern-cloud-architecture/)
+ [Understanding the Different Ways to Invoke Lambda Functions](https://aws.amazon.com/blogs/architecture/understanding-the-different-ways-to-invoke-lambda-functions/)
##### Amazon Kinesis Data Firehose
+ [Amazon Kinesis Data Firehose custom prefixes for Amazon S3 objects](https://aws.amazon.com/blogs/big-data/amazon-kinesis-data-firehose-custom-prefixes-for-amazon-s3-objects/)
+ [Amazon Kinesis Firehose Data Transformation with AWS Lambda](https://aws.amazon.com/blogs/compute/amazon-kinesis-firehose-data-transformation-with-aws-lambda/)
##### Amazon Kinesis Data Streams
+ [Under the hood: Scaling your Kinesis data streams](https://aws.amazon.com/blogs/big-data/under-the-hood-scaling-your-kinesis-data-streams/)
+ [Scale Amazon Kinesis Data Streams with AWS Application Auto Scaling](https://aws.amazon.com/blogs/big-data/scaling-amazon-kinesis-data-streams-with-aws-application-auto-scaling/)
##### Amazon Kinesis Data Analytics
+ [Streaming ETL with Apache Flink and Amazon Kinesis Data Analytics](https://aws.amazon.com/ko/blogs/big-data/streaming-etl-with-apache-flink-and-amazon-kinesis-data-analytics/)
##### Amazon QuickSight
+ [10 visualizations to try in Amazon QuickSight with sample data](https://aws.amazon.com/blogs/big-data/10-visualizations-to-try-in-amazon-quicksight-with-sample-data/)
+ [Visualize over 200 years of global climate data using Amazon Athena and Amazon QuickSight](https://aws.amazon.com/blogs/big-data/visualize-over-200-years-of-global-climate-data-using-amazon-athena-and-amazon-quicksight/)
+ [Advanced analytics with table calculations in Amazon QuickSight](https://aws.amazon.com/ko/blogs/big-data/advanced-analytics-with-table-calculations-in-amazon-quicksight/)
##### Etc
+ [Optimize downstream data processing with Amazon Kinesis Data Firehose and Amazon EMR running Apache Spark](https://aws.amazon.com/blogs/big-data/optimizing-downstream-data-processing-with-amazon-kinesis-data-firehose-and-amazon-emr-running-apache-spark/)
+ [Serverless Scaling for Ingesting, Aggregating, and Visualizing Apache Logs with Amazon Kinesis Firehose, AWS Lambda, and Amazon Elasticsearch Service](https://aws.amazon.com/blogs/database/serverless-scaling-for-ingesting-aggregating-and-visualizing-apache-logs-with-amazon-kinesis-firehose-aws-lambda-and-amazon-elasticsearch-service/)
+ [Analyze Apache Parquet optimized data using Amazon Kinesis Data Firehose, Amazon Athena, and Amazon Redshift](https://aws.amazon.com/blogs/big-data/analyzing-apache-parquet-optimized-data-using-amazon-kinesis-data-firehose-amazon-athena-and-amazon-redshift/)
+ [Our data lake story: How Woot.com built a serverless data lake on AWS](https://aws.amazon.com/blogs/big-data/our-data-lake-story-how-woot-com-built-a-serverless-data-lake-on-aws/)
##### Securely Connect Bastion Hosts
+ [Securing your bastion hosts with Amazon EC2 Instance Connect](https://aws.amazon.com/blogs/infrastructure-and-automation/securing-your-bastion-hosts-with-amazon-ec2-instance-connect/)
```
$ # (1) Create a new ssh key.
$ ssh-keygen -t rsa -f my_rsa_key
$ # (2) Push your SSH public key to the instance.
$ aws ec2-instance-connect send-ssh-public-key \
--instance-id $BASTION_INSTANCE \
--availability-zone $DEPLOY_AZ \
--instance-os-user ec2-user \
--ssh-public-key file:///path/to/my_rsa_key.pub
$ # (3) Connect to the instance using your private key.
$ ssh -i /path/to/my_rsa_key ec2-user@$BASTION_DNS_NAME
```
+ [Connect using the EC2 Instance Connect CLI](https://docs.aws.amazon.com/AWSEC2/latest/UserGuide/ec2-instance-connect-methods.html#ec2-instance-connect-connecting-ec2-cli)
   $ sudo pip install ec2instanceconnectcli
   $ mssh ec2-user@i-001234a4bf70dec41EXAMPLE # ec2-instance-id
\[[Top](#top)\]
## Deployment by AWS CDK
:warning: **At the end of this lab, you should delete the resources you used to avoid incurring additional charges for the AWS account you used.**
Introducing how to deploy using the AWS CDK.
### Prerequisites
1. Install AWS CDK Toolkit.
```shell script
npm install -g aws-cdk
```
2. Verify that cdk is installed properly by running the following command:
```
cdk --version
```
ex)
```shell script
$ cdk --version
2.41.0 (build 56ba2ab)
```
##### Useful commands
* `cdk ls` list all stacks in the app
* `cdk synth` emits the synthesized CloudFormation template
* `cdk deploy` deploy this stack to your default AWS account/region
* `cdk diff` compare deployed stack with current state
* `cdk docs` open CDK documentation
\[[Top](#top)\]
### Deployment
When deployed as CDK, `1(a), 1(b), 1(c), 1(f), 2(b), 2(a)` in the architecture diagram below are automatically created.

1. Refer to [Getting Started With the AWS CDK](https://docs.aws.amazon.com/cdk/latest/guide/getting_started.html) to install cdk.
Create an IAM User to be used when running cdk and register it in `~/.aws/config`. (**cf.** [Creating an IAM User](#preliminaries))
For example, after creating an IAM User called cdk_user, add it to `~/.aws/config` as shown below.
```shell script
$ cat ~/.aws/config
[profile cdk_user]
aws_access_key_id=AKIAIOSFODNN7EXAMPLE
aws_secret_access_key=wJalrXUtnFEMI/K7MDENG/bPxRfiCYEXAMPLEKEY
region=us-west-2
```
2. Create a Python package to register in the Lambda Layer and store it in the s3 bucket. For example, create an s3 bucket named `lambda-layer-resources` so that you can save the elasticsearch package to register in the Lambda Layer as follows.
```shell script
$ aws s3 ls s3://lambda-layer-resources/var/
2019-10-25 08:38:50 0
2019-10-25 08:40:28 1294387 es-lib.zip
```
3. After downloading the source code from git, enter the s3 bucket name where the package to be registered in the lambda layer is stored in an environment variable called `S3_BUCKET_LAMBDA_LAYER_LIB`.
After setting, deploy using the `cdk deploy` command.
```shell script
$ git clone https://github.com/aws-samples/aws-analytics-immersion-day.git
$ cd aws-analytics-immersion-day
$ python3 -m venv .env
$ source .env/bin/activate
(.env) $ pip install -r requirements.txt
(.env) $ export CDK_DEFAULT_ACCOUNT=$(aws sts get-caller-identity --query Account --output text)
(.env) $ export CDK_DEFAULT_REGION=us-west-2
(.env) $ cdk bootstrap aws://${CDK_DEFAULT_ACCOUNT}/${CDK_DEFAULT_REGION}
(.env) $ export S3_BUCKET_LAMBDA_LAYER_LIB=lambda-layer-resources
(.env) $ cdk --profile cdk_user deploy --require-approval never --all
```
:white_check_mark: `cdk bootstrap ...` command is executed only once for the first time to deploy **CDK toolkit stack**, and for subsequent deployments, you only need to execute `cdk deploy` command without distributing **CDK toolkit stack**.
```shell script
(.env) $ export CDK_DEFAULT_ACCOUNT=$(aws sts get-caller-identity --query Account --output text)
(.env) $ export CDK_DEFAULT_REGION=us-west-2
(.env) $ export S3_BUCKET_LAMBDA_LAYER_LIB=lambda-layer-resources
(.env) $ cdk --profile cdk_user deploy --require-approval never --all
```
3. [Enable the Lambda function to ingest records into Amazon OpenSearch.](#create-firehose-role)
### Clean Up
To delete the deployed application, execute the `cdk destroy` command as follows.
(.env) $ cdk --profile cdk_user destroy --force --all
\[[Top](#top)\]
## Security
See [CONTRIBUTING](CONTRIBUTING.md#security-issue-notifications) for more information.
## License
This library is licensed under the MIT-0 License. See the LICENSE file.