# Welcome to the Software Development Life Cycle (SDLC) Organization CDK app
As described in root [README](../../README.md), this [CDK](https://docs.aws.amazon.com/cdk/latest/guide/apps.html) app strive to give you a clean and easy to use set of environments (AWS Accounts) to develop and operate sofware on AWS following best practices.
## MUST READ
* This first CDK app is deploying several AWS accounts which are resources with specific contraints in regards to deletion ([Official doc](https://aws.amazon.com/premiumsupport/knowledge-center/close-aws-account/), such as 90 days wait period). Therefore, be aware that rolling back the creation of those resources is not supported.
* Since everything is code in a repository, access and permission of to this repository needs to be carefully managed.
Step # | Feature | Description
-- | -- | --
0 | [Under the hood](#under-the-hood) | Details about what we are doing
1 | [Enable Access to Billing data for IAM Users](#Enable-Access-to-Billing-data-for-IAM-Users) | Enable billing access for IAM Users
2 | [Configure your local credentials](#configure-your-local-credentials) | `aws configure --profile main-admin`
3 | [Fork and init the repo](#clone-and-init-the-repo) | Get the code
4 | [Deploy the pipeline](#install-dependencies-and-deploy-the-pipeline) | Deploy your organization through a CI/CD pipeline
5 | [Setup your IAM Identity Center domain](#setup-your-sso-domain) | Prepare you user permissions and groups
6 | [Setup your dev environment](#setup-your-dev-environment) | Prepare your local environment to be ready to develop
7 | [Start coding](#next-step) | Jump to next section about developing and deploying your first web site
## Under the hood
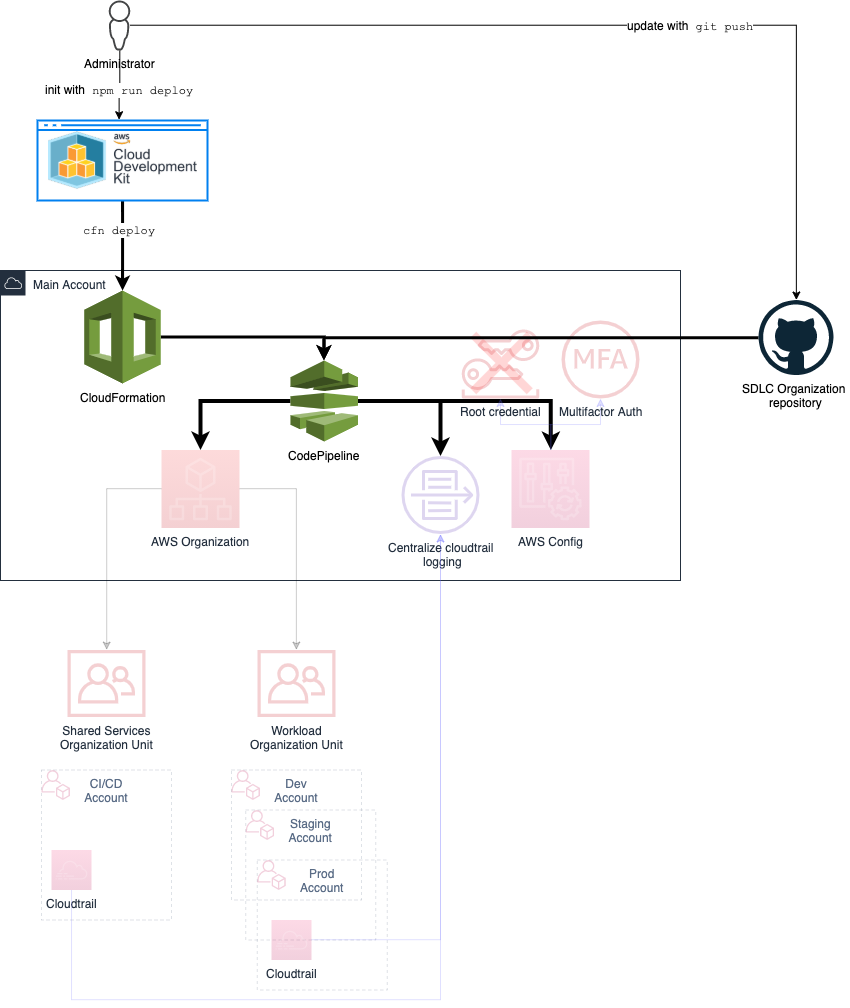
This CDK app will instanciate the following resources:
* An [AWS Organizations](https://docs.aws.amazon.com/organizations/latest/userguide/orgs_introduction.html) (unless an organization already exists).
* Multiple [AWS Accounts](https://aws.amazon.com/organizations/faqs/#Organizing_AWS_accounts) under different [Organizational Units](https://docs.aws.amazon.com/organizations/latest/userguide/orgs_manage_ous.html) (OUs). When deploying bootstrap kit on an existing organization, OUs with the same name and parent are reused. You can also choose to import existing accounts in the bootstrap kit OU hierarchy.
* A central [AWS CloudTrail for organizations](https://docs.aws.amazon.com/awscloudtrail/latest/userguide/creating-trail-organization.html)
* Few basics security guard rails using [AWS Config](https://docs.aws.amazon.com/config/latest/developerguide/WhatIsConfig.html)
* A DNS Zone (if a domain is provided) using [Route53 HostedZone](https://docs.aws.amazon.com/Route53/latest/DeveloperGuide/AboutHZWorkingWith.html)
Those are exposed through the **AwsOrganizationsStack**.
The deployment of this organization is automated through a CI/CD pipeline that is going to be deployed in your main account through the deployment of the **AWSBootstrapKit-LandingZone-PipelineStack**. Which enable to track any update made to it through git source control.
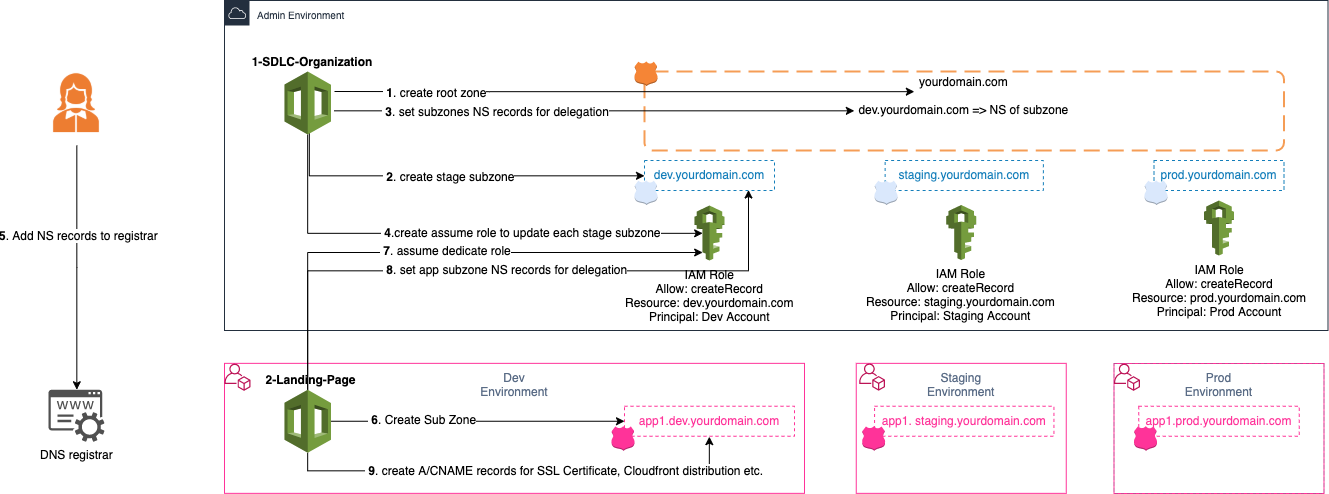
DNS hierarchy:
## Deployments
### Prerequisites
* A [GitHub](https://github.com) account
* [npm](https://npmjs.org) and [awscli](https://docs.aws.amazon.com/cli/latest/userguide/install-cliv2.html) installed
* A valid email (can be your root account one)
* without "+" in it
* provided by a provider supporting [subaddressing](https://en.wikipedia.org/wiki/Plus_address) which means supporting '+' email extension (Most providers such as gmail/google, outlook etc. support it. If you're not sure check [this page](https://en.wikipedia.org/wiki/Comparison_of_webmail_providers#Features) "Address modifiers" column or send an email to yourself adding a plus extension such as `myname+test@myemaildomain.com` . if you receive it, you're good).
* An AWS account with an IAM user with Administrator permission
### Enable Access to Billing data for IAM Users
Click to go through this step
Let's enable access to Billing data for IAM users, so that administrators are able to see and analyze the AWS usage and cost without having to login as the root user. This is an important step since it is a best practice to perform day-to-day activities through IAM users, and not the root user. To enable this setting, make sure you login to your AWS account as the root user (i.e. using the email and password that were used for creating the AWS account).
1) While logged in as the root user: in the AWS Management Console's navigation bar, choose your account name and then choose My Account.
2) Next to IAM User and Role Access to Billing Information, choose Edit.
3) Select the Activate IAM Access check box.
4) Choose Update.
Now that this setting is enabled, IAM users with appropriate privileges will be able to access the Billing and Cost Management console on AWS accounts within the organization. This is especially useful for administrators or operations staff in order to monitor cost.
Note: if you don't see the setting, you are probably logged in as an IAM user. Please log out and log back in as the root user of the account, using email and password.
### Configure your local credentials
Click to go through this step
To authenticate requests made using the CLI, we need to give your IAM user credentials (If you don't have one follow [this instruction](https://docs.aws.amazon.com/IAM/latest/UserGuide/id_users_create.html) with *Programmatic access Access type* selected and *AdministratorAccess* policy) and the region you want to use to the Command line:
```sh
aws configure --profile main-admin
AWS Access Key ID [None]: AKIAIOSFODNN7EXAMPLE
AWS Secret Access Key [None]: wJalrXUtnFEMI/K7MDENG/bPxRfiCYEXAMPLEKEY
Default region name [None]: eu-west-1
Default output format [None]: json
```
Here we use the `--profile` parameter with `main-admin` in order to, in the future be able to swtich between accounts.
You can now test our set up:
```sh
aws --profile=main-admin sts get-caller-identity
{
"UserId": "A1B2C3D4E5F6G7EXAMPLE",
"Account": "111122223333",
"Arn": "arn:aws:iam::111122223333:user/Administrator"
}
```
This command show you basically what your current crendentials are attached to :
* `Account` tell you which Account Id you are talking to
* `Arn` tell you which Role you are using
To learn more, check the [official doc](https://docs.aws.amazon.com/cli/latest/userguide/cli-configure-quickstart.html#cli-configure-quickstart-config).
### Fork and init the repo
Click to go through this step
1. Fork the repository on your GitHub account by clicking [here](https://github.com/aws-samples/aws-bootstrap-kit-examples/fork).
1. Clone the repository locally:
```
git clone https://github.com//aws-bootstrap-kit-examples
```
1. Link your GitHub repository to AWS by
1. Pushing your github personal secret token (follow [this instruction](https://docs.github.com/en/free-pro-team@latest/github/authenticating-to-github/creating-a-personal-access-token) if you don't have one with **admin:repo_hook** full control and **repo** full control) in AWS Secrets Manager, a service that stores your secret securely
```sh
aws --profile main-admin secretsmanager create-secret --name GITHUB_TOKEN --secret-string
```
1. Set in `source/1-SDLC-organization/cdk.json` the following variables:
* `email` corresponding to the administrator email that will be used to create additional AWS account (without "+" character)
> You will receive an email with a verification link to validate it
* `github_alias` coresponding to your github username (`your_alias` in `https://github.com/your_alias/your_repo`)
* `github_repo_name` corresponding to the name when you created the repository (`your_repo` in this example)
* `github_repo_branch` corresponding to the main branch of your repo. (should be called `main`)
* `pipeline_deployable_regions` corresponding to the lists of [AWS regions](https://docs.aws.amazon.com/AWSEC2/latest/UserGuide/using-regions-availability-zones.html#concepts-regions) you plan to deploy your future applications to.
* (optional) `domain_name` a DNS domain name to use to expose your services publicly (it needs to be already registered in a registrar such [Amazon route53](https://docs.aws.amazon.com/Route53/latest/DeveloperGuide/domain-register.html))
it should look like:
```
cd
cat 1-SDLC-organization/cdk.json
{
"app": "npx ts-node bin/sdlc-organization.ts",
"context": {
"@aws-cdk/core:newStyleStackSynthesis": true,
"github_alias": "your_alias",
"github_repo_name": "aws-bootstrap-kit-examples",
"github_repo_branch": "main",
"email": "admin@yourdomain.com",
"force_email_verification": true,
"pipeline_deployable_regions": [
eu-west-1,
eu-west-2
],
"domain_name": "yourdomain.com"
}
}
```
1. Push new changes to your repo
```
git add source/1-SDLC-organization/cdk.json
git commit -m "set required bootstrap variables"
git push
```
### Install dependencies and deploy the pipeline
Click to go through this step
1. Go to the SDLC Organization folder
```
cd source/1-SDLC-Organization
```
1. Install dependencies
```
npm install
```
1. Bootstrap AWS account
```
npm run bootstrap
```
1. build and deploy package
```
npm run build
npm run deploy
```
1. Check the status of the deployed CI/CD pipeline in AWS CodePipeline Console
(click here to learn more about AWS Code Pipeline)
1. When all green, unlock deployment to prod by approving the change to be deployed by clicking the "review" button in prod section of the pipeline.
PS: You can inspect what is going to be deployed by clicking "Details" link of "orgStack.Prepare" action.
1. A Validation Email is sent to your inbox, please click on the confirmation link for the deployment to complete. **THIS WILL BLOCK YOUR DEPLOYMENT, IF YOU DO NOT CLICK ON VERIFICATION LINK RECEIVED IN YOUR EMAIL**
> This was step was enabled by the `force_email_verification` boolean set in your `cdk.json`. to ensure that the email provided satisfies the rules we previously mentioned (the email doesn't contain `+` and the email providor supports subaddressing)
1. When all green, you should be able to
1. check your organization structure in AWS Organizations console
1. Get into any of those sub accounts by getting the Account ID from AWS Organizations console and using the switch role button on top left drop down of the screen and the `OrganizationAccountAccessRole` Role name.
Check the [doc](https://docs.aws.amazon.com/organizations/latest/userguide/orgs_manage_accounts_access.html) for more details.
**Your Operator Environment is ready! Now let's open it to the team!**
### Deploying bootstrap-kit on an existing organization
Click if you want to reuse an existing organization with bootstrap-kit
While the aim of bootstrap-kit is to help you create an AWS environment from scratch (Organization, OU structure and accounts), you may already have an existing organization and some accounts you would like to reuse. bootstrap-kit is able to deploy on an existing Organization and to reuse it. If you already defined Organizational Units (OUs), they are also reused if they are at the same place in the hierarchy (see below example). As for the accounts, you can specify if you want to reuse some of the existing ones and put them in the account structure. Existing accounts will be automatically moved to the specified OU.
In the following example, we want to create the structure on the right, starting from the one on the left, and reuse all existing accounts:
```
Root Root
|- OU Dev |- OU SDLC (new)
| |- Account ProjectA | |- OU Dev (new, because new parent)
| |- Account ProjectB | |- Account ProjectA (moved)
|- OU Shared | |- Account ProjectB (moved)
| |- Account CICD ==> (reuse all accounts) ==> |- OU Shared (reuse)
|- OU Prod | |- Account CICD (don't move)
|- Account ProjectA |- OU Prod (reuse)
|- Account ProjectB | |- Account ProjectA (don't move)
| |- Account ProjectB (don't move)
|- OU Dev (remains from source, with no account, up to you to remove it)
```
bootstrap-kit takes care of:
* reusing the existing Organization and Root OU,
* creating new OUs: SDLC, SDLC/Dev (as Dev OU is under Root and cannot be moved under SDLC),
* creating new accounts (nothing in that example),
* reusing existing accounts and moving them to the appropriate OU. To do so you need to specify the account id to reuse in the OU configuration with the field `existingAccountId`:
```typescript
const nestedOU = [
{
name: 'Shared',
accounts: [
{
name: 'CICD',
type: AccountType.CICD,
existingAccountId: '123456789012'
}
]
}
// ...
];
```
Note that accounts and OUs cannot be removed automatically. You have to remove them manually (ex: the Dev OU in previous example).
## Going further
If you added `domain_name` in your config file (`cdk.json`) earlier, a last step is need to delegate your registered domain to the new hosted zone created by the previous delployment. Otherwise you can skip this section.
### Finalize DNS setup
Click to go through this step
1. First let's get the NS servers registered in the new hosted zone by
1. Got to [AWS Route53 Hosted Zone page](https://console.aws.amazon.com/route53/v2/hostedzones#)
1. click on the hosted zone with 5 Record count and with the Domain name coresponding to your root domain name specified in `domain_name` earlier
1. Copy the Value of the `NS` Type Record row of your domain name
1. Go to your registrar configuration console and replace NS servers by the one copied earlier.
**Your Done! Now you can manage your domain through AWS Route53**
### Enable IAM Identity Center
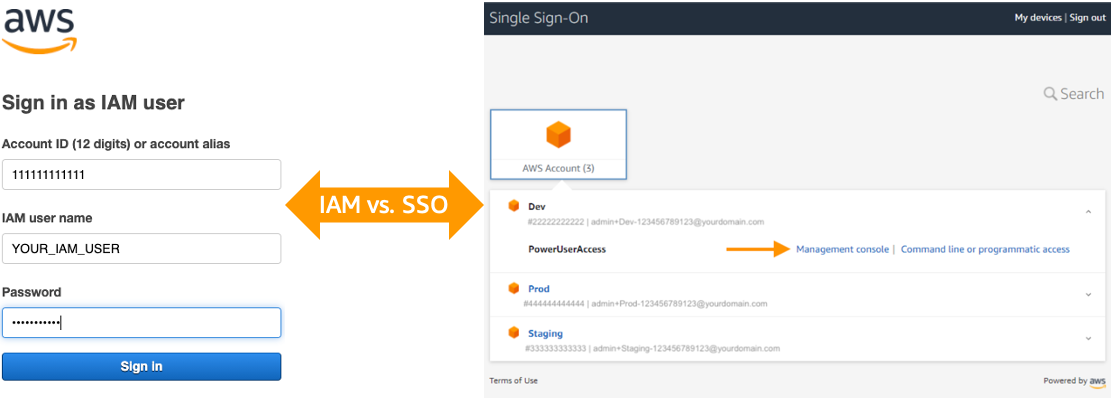
In order to facilitate the management of permissions on the access to this different accounts we suggest to setup an AWs access portal following the steps described bellow. That's going to give you the capability to centrally manage and access your different AWS account with a single identity (login and password) or even delegate this to a third party provider such as Google Workspace (GSuite).
Staying with IAM users and groups would means not getting a central portal with a single identity and would force you to remember the different account ID and role to login into:
*Whatch this quick presentation video to learn more:*
 ### Setup your IAM Identity Center domain
Click to go through this step
Sorry we can't automate those step yet :cry:
1. Go to the AWS IAM Identity Center Home page and Click *Enable*
#### Create permission sets
We want to be able to manage two groups of users:
* the **Administrators** who will have access to all accounts with **AdministratorAccess** permissions
* the **Developers** who will have access only to the Dev account with **DeveloperAccess** permissions and **ViewOnlyAccess** permissions to the Staging and Prod accounts
Through 5 set of permissions:
* **AdministratorAccess** grants administrator access to an AWS account. A user with this permission set is able to create, update or delete any resources in an AWS account including IAM users, roles and groups. It relies on the AdministratorAccess AWS managed job function policy.
* **DeveloperAccess** allows developers to create, update or delete AWS resources from an account excluding users and groups. A developer with this permission set is also able to create, delete and update roles as well as creating, updating, deleting and attaching role policies to a resource. It allows a developer to deploy a CDK app into and account directly with the cdk deploy command. It relies on the PowerUserAccess AWS managed job function policy plus a set of IAM actions.
* **DevOpsAccess** allows DevOps engineers to deploy and manage CI/CD pipelines through CDK. It relies on 5 AWS managed policies: *AWSCloudFormationFullAcces, AWSCodeBuildAdminAccess, AWSCodePipelineFullAccess, AmazonS3FullAccess, AmazonEC2ContainerRegistryFullAccess, SecretsManagerReadWrite*. It relies on a set of IAM, KMS and Organizations actions.
* **ApproverAccess** allows users to view and approve manual changes for all pipelines. It relies on the *AWSCodePipelineApproverAccess* AWS managed policy.
* **ViewOnlyAccess** allows users to view resources and basic metadata across all AWS services. It relies on the *ViewOnlyAccess* AWS managed policy.
##### AdministratorAccess
To set up these accesses, we first need to create a permission set which correspond to the set of permissions that an Administrator will have when going to a specific account:
1. Click on the *AWS Accounts* section
1. Go to *Permission sets* tab and click *Create permission set*
1. Select *Create a custom permission set* and click *Next: Details*
1. Type in the info
1. Name: *AdministratorAccess*
1. Session duaration: *X hours*
1. Check the *Attach AWS managed policies* and *Create a custom permissions policy* boxes.
1. Select the *AdministratorAccess* managed policy
1. Enter the following custom permissions policy:
```{}```
1. click *Next: Tags*
1. Skip *tags* by click *Next: Review*
1. Click *Create* to finalize the creation of the permissions set
##### DeveloperAccess
1. Repeat previous steps with
1. Name: *DeveloperAccess*
1. Manage policies:
* *PowerUserAccess*
1. Custom policy:
```
{
"Version": "2012-10-17",
"Statement": [
{
"Action": [
"iam:CreateRole",
"iam:DeleteRole",
"iam:GetRole",
"iam:PassRole",
"iam:UpdateRole",
"iam:AttachRolePolicy",
"iam:DetachRolePolicy",
"iam:PutRolePolicy",
"iam:DeleteRolePolicy"
],
"Effect": "Allow",
"Resource": "*"
}
]
}
```
##### DevOpsAccess
1. Repeat previous steps with
1. Name: *DevOpsAccess*
1. Manage policies:
* *AWSCloudFormationFullAccess*
* *AWSCodeBuildAdminAccess*
* *AWSCodePipelineFullAccess*
* *AmazonS3FullAccess*
* *AmazonEC2ContainerRegistryFullAccess
* *SecretsManagerReadWrite*
1. Custom policy:
```
{
"Version": "2012-10-17",
"Statement": [
{
"Action": [
"iam:CreateRole",
"iam:DeleteRole",
"iam:GetRole",
"iam:PassRole",
"iam:AttachRolePolicy",
"iam:DetachRolePolicy",
"iam:PutRolePolicy",
"iam:GetRolePolicy",
"iam:DeleteRolepolicy",
"kms:CreateKey",
"kms:PutKeyPolicy",
"kms:DescribeKey",
"kms:CreateAlias",
"kms:DeleteAlias",
"kms:ScheduleKeyDeletion",
"organizations:ListAccounts"
],
"Effect": "Allow",
"Resource": "*"
},
{
"Action": [
"sts:AssumeRole"
],
"Effect": "Allow",
"Resource": "arn:aws:iam::*:role/cdk*"
}
]
}
```
##### ApproverAccess
1. Repeat previous steps with
1. Name: *ApproverAccess*
1. Manage policies:
* *AWSCodePipelineApproverAccess*
1. Custom policy:
```
{}
```
##### ViewOnlyAccess
1. Repeat previous steps with
1. Name: *ViewOnlyAccess*
1. Manage policies:
* *ViewOnlyAccess*
1. Custom policy:
```
{}
```
You must end with the following permission sets:
* ViewOnlyAccess
* ApproverAccess
* DevOpsAccess
* DeveloperAccess
* AdministratorAccess
#### Create your groups
Now we are going to create the **Administrators**, **Developers**, **DevOpsEngineers** and **Approvers** groups, we basically will follow the steps listed in the [official documentation](https://docs.aws.amazon.com/singlesignon/latest/userguide/addgroups.html):
1. Click on the *Groups* Tab
1. Click *Create group*
1. Type **Administrators** as group name and click *Create*
1. Repeat steps 1 to 3 for **Developers**, **DevOpsEngineers**, **Approvers**
#### Link groups to accounts and permission sets
Now we are going to assign the **Administrators** group to all the accounts with the the **AdministratorAccess** permission set. It will result to giving *Administrator* access to users in the **Administrators** group to all your accounts:
1. Come back to *AWS Accounts* section
1. Select all your accounts and click *Assign users*
1. Go to *Groups* tab, select *Administrators* group and click *Next: Permissions set*
1. Select *AdministratorAccess* permissions set and click *Finish*
1. It will take a few seconds to configure all your accounts
1. When all is complete, click on *Proceed to AWS accounts*
1. Repeat 1 to 6 with **Developers**, **DevOpsEngineers** and **Approvers** groups with the following associations:
| Groups | PermissionSets | Accounts |
|---|---|---|
| Developers | DeveloperAccess | Dev |
| Developers | ViewOnlyAccess | Staging, Prod |
| DevOpsEngineers | DevOpsAccess | CICD |
| Approvers | ApproverAccess | CICD |
**Now let's create your Administrator user !**
#### Create your administrator user
Now we are going to create an Administrator user, we basically will follow the steps listed in the [official documentation](https://docs.aws.amazon.com/singlesignon/latest/userguide/addusers.html):
1. Click on the *Users* section
1. Click *Add user*
1. Fill in the form with your personal data and click *Next Groups*:
* *username* will be used for future login
* *Email address* will be used for enrolling so need to be a valid email
1. Select the *Administrators* group created previously and click *Add user*
1. Check your email and *Accept invitation*
1. You should be redirected to a page to set your password then click *Update user*
1. Well done your account has been successfully activated! Click *Continue*
1. You have now access to your app list. Click on *AWS Account* card to expand the list of accounts
1. Click on your main account to expand the list of your access to this account
1. Click on *Management console* to access to the console of your main account
1. Your are now connected with your new Administrator user
**Let's assign the Developers group to Dev, Staging and Prod accounts with this new Administrator user**
#### Customize your AWS access portal URL
From now on, you or any of your developers won't have to login anymore directly to AWS console but directly through AWS access portal. In the previous step you might have noticed that your AWS user portal is accessible through a unique URL such as `https://d-123456789a.awsapps.com/start ` which is not that easy to remember, let's customize it to match your company domain:
1. Search for *Identity Center* on the console home page and go to the service
1. At the bottom of the page, click the *Customize* link located in *User portal* section
1. Type your domain name and click *Save*
**Tada !! You can now login to AWS Console through your AWS access portal using your customized url !**
### Setup your dev environment
Click to go through this step
#### Create a developer user
(This section is optional but will be one to use each time you want to onboard a new dev in your team)
Now we are going to create a Developer user with enough rate to develop and publish an app to the different environemnt, we basically will follow the steps listed in the [official documentation](https://docs.aws.amazon.com/singlesignon/latest/userguide/addusers.html):
1. Click on the *Users* section
1. Click *Add user*
1. Fill in the form with your personal data and click *Next Groups*:
* *username* will be used for future login
* *Email address* will be used for enrolling so need to be a valid email
1. Select the *Developers* groups created previously and click *Add user*
1. Check your email and *Accept invitation*
1. You should be redirected to a page to set your password then click *Update user*
1. Well done your account has been successfully activated! Click *Continue*
1. You have now access to your app list with your Developer user
#### AWS CLI V2
---
**TL;DR**
Just run
```
aws configure sso --profile dev
```
and choose
* The previously customized URL as **SSO Start URL** with the **/start/** at the end
* your dev account in the list.
And login with
```
aws sso login --profile dev
```
---
In order to interact with your different environment through the [awscli](https://docs.aws.amazon.com/cli/latest/userguide/install-cliv2.html) or any AWS SDKs locally, you will need to get your credentials.
To authenticate requests made using the CLI, we need to give the credentials generated by AWS IAM Identity Center and link them to what we call `profile`. So for each environment you want to have access to through AWS CLI v2 and CDK you will have to configure a specific profile for it running the command below.
Here we setup your first profile that will be used to replace your IAM user administrator one (`--profile dev`):
```sh
aws configure sso --profile dev
SSO start URL [None]: https://yourdomain.awsapps.com/start
SSO Region [None]: eu-west-1
Attempting to automatically open the SSO authorization page in your default browser.
If the browser does not open or you wish to use a different device to authorize this request, open the following URL:
https://device.sso.eu-west-1.amazonaws.com/
Then enter the code:
ABCD-ABCD
There are 5 AWS accounts available to you.
Using the account ID 111122223333
The only role available to you is: DeveloperAccess
Using the role name "DeveloperAccess"
CLI default client Region [None]: eu-west-1
CLI default output format [None]: json
To use this profile, specify the profile name using --profile, as shown:
aws s3 ls --profile dev
```
Here we use the `--profile` parameter with `dev` in order to, in the future be able to swtich between accounts.
You can now test our set up:
```sh
aws --profile=dev sts get-caller-identity
{
"UserId": "A1B2C3D4E5F6G7EXAMPLE:admin",
"Account": "111122223333",
"Arn": "arn:aws:sts::111122223333:assumed-role/AWSReservedSSO_AdministratorAccess_1234a12345a12aa1/admin"
}
```
This command show you basically what your current crendentials are attached to :
* `Account` tell you which Account Id you are talking to
* `Arn` tell you which Role you are using
To learn more, check the [official doc](https://docs.aws.amazon.com/cli/latest/userguide/cli-configure-sso.html).
This procedure should be repeted for all the AWS Account you want to interact with.
Then, when token expire, you can refresh it by running
```
aws sso login --profile dev
```
**Now you can interact with your different AWS Accounts using AWS CLI**
#### CDK and IAM Identity Center
CDK and AWS IAM Identity Center are not yet friends (see github issue [5455](https://github.com/aws/aws-cdk/issues/5455)). So since in the future we will have to deploy infrastructure as code apps into multiple environment, we will need to make it work.
There is several workaround and here is one using a quick utility written in nodejs called "cdk-sso-sync":
```
npm install -g cdk-sso-sync
```
Then simply run
```
aws sso login --profile dev
cdk-sso-sync dev
```
This will simply extract the credentials you got from the `aws sso login` command and sync them with the CDK credentials source (`~/.aws/credentials`).
**Now you can deploy CDK apps in your different AWS Accounts using CDK CLI**
### Leverage AWS IDE Toolkits
In order to improve your productivity, do not hesitate to leverage AWS IDE Toolkits by checking the [official docmumentation](https://aws.amazon.com/getting-started/tools-sdks/#IDE_and_IDE_Toolkits).
At the time of writting, we support the following IDEs:
* [AWS Cloud9](https://aws.amazon.com/cloud9/)
* [Eclipse](https://aws.amazon.com/eclipse/)
* [IntelliJ](https://aws.amazon.com/intellij/)
* [PyCharm](https://aws.amazon.com/pycharm/)
* [Visual Studio](https://aws.amazon.com/visualstudio/)
* [Visual Studio Code](https://aws.amazon.com/visualstudiocode/)
* [Azure DevOps](https://aws.amazon.com/vsts/)
* [Rider](https://aws.amazon.com/rider/)
**You are now Ready to start coding !**
## Next step
Click to go through this step
Start coding and deploy your first website by jumping to the [landing page app example](../2-landing-page/README.md).