## 0. Prerequisites setup
This document describes how to set up your AWS account and Cloud9 IDE, which will be used to execute all of the steps in the workshop.
### 0.1. Setup AWS Account
For this workshop, you may use your own AWS account, or use an account generated by AWS Event Engine. If you are using your own AWS account, please proceed to Section 0.2. If you would like to receive a temporary AWS Account through AWS Event Engine follow these steps:
1. Go to the Event Engine link provided by your workshop host
2. Follow the on-screen instructions to gain access to your temporary AWS account
Once you have logged in successfully, proceed to create an IAM user.
### 0.2. Create IAM user with admin rights
Once logged into the account through the [AWS console](https://console.aws.amazon.com/console/home?region=us-west-2#), navigate to [IAM Users](https://console.aws.amazon.com/iamv2/home?#/users) and add a new user by clicking the **Add users** button and filling out the form as shown below. Use **inferentia_user** as the User Name.

Fig. 0.1 - Add user screen
Click **Next: Permissions** and click the **Create group** button on the screen.

Fig. 0.2 - Set permissions screen
Provide group name **admins** and select the **AdministratorAccess** policy as shown below.

Fig. 0.3 - Create group
Click the **Create group** button and you will be brought back to the **Set permissions** screen. Select the **admins** group as shown on the figure below, then click **Next: Tags** .

Fig. 0.4 - Add user to admins group
Follow the wizard through to the end to create the user (remaining options can be left as default). When the user is added successfully, you will see a confirmation screen from which you can copy the user's Access Key and Secret Access Key.

Fig. 0.5 - Confirmation screen with access key information for new user
Click the **Download .csv** button to download the user's credentials as a `.csv` file. Alternatively you can press the **Show** link and copy/paste the **Access key ID** and **Secret access key** locally. You will need to enter the crecentials later while you are completing the exercises in this workshop. This is the only time these credentials will be available for download or display. You will be able to generate new credentials if necessary.
### 0.3) Sign into the AWS Console
In this step you will sign in to the AWS Console as the user you just created.
Pull down the user menu from your current AWS Console screen and copy the Account number displayed next to **My Account** as shown on the figure below.

Fig. 0.6 - Sign out of AWS Console
Once you have copied the account number, cick **Sign Out**, then click **Sign In to the Console**.

Fig. 0.7 - Sign in landing screen
On the **Sign in** screen select **IAM user**, enter the **Account ID** that you just copied, and click Next.

Fig. 0.8 - Sign in as IAM user
When presented with the login screen shown below, fill in the IAM username and password that you created in the previous step.
Next, click the **Sign in** button and sign in as the new IAM user.
### 0.4. Setup Cloud9 IDE
Please verify that the `us-west-2` region **Oregon** is selected in your console and is showing in the upper right corner of your browser as highlighted in the figure below. We will use [Cloud9](https://us-west-2.console.aws.amazon.com/cloud9/home/product) to execute the steps in this workshop. To provision a Cloud9 IDE, click on the **Services** menu (from the top left of the screen) then select **Developer Tools** and choose **Cloud9**, or just open the following link to Cloud9.
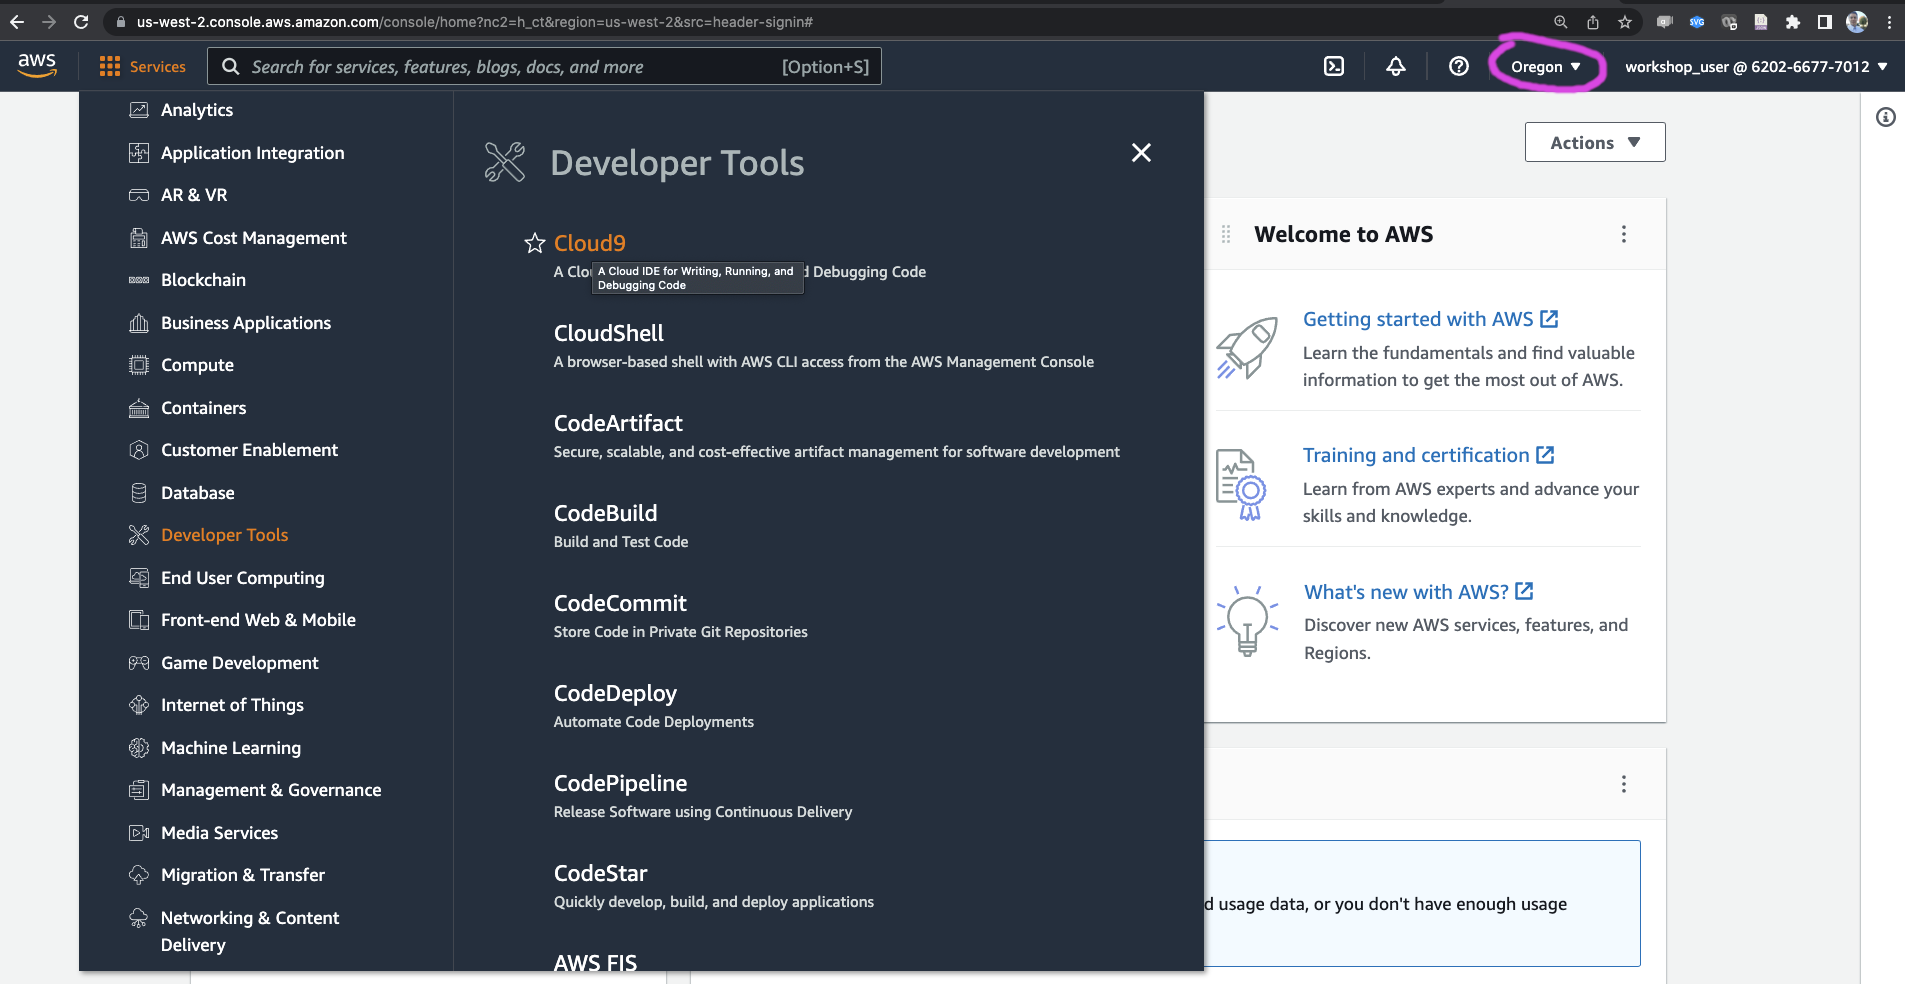
Fig. 0.9 - Cloud9 link
Following the link will open the Cloud9 landing page.

Fig. 0.10 - Cloud9 landing page
Click on the `Create environment` button.

Fig. 0.11 - Cloud9 name environment screen
Type a name for your Cloud9 environment, then click `Next`.

Fig. 0.12 - Cloud9 configure settings screen
Under **Instance type** selcet `Other instance type` and `c5.9xlarge`. Then click **Next step** and **Create environment**.
This will launch your Cloud9 instance. Provisioning of the instance can take a few minutes.
Fig. 0.13 - Cloud9 instance
The default Cloud9 instance comes with a root EBS volume that is only 10GB in size.

Fig. 0.14 - Cloud9 Manage EC2 Instance
We will increase the root volume size, to avoid running out of space later in the workshop.
Click on the user icon in the upper-right corner and select **Manage EC2 Instance**.

Fig. 0.15 - Cloud9 EC2 Instance Storage
Select the instance, then click on the **Storage** tab and click on the link under **Volume ID** to select the current root volume.

Fig. 0.16 - Cloud9 EC2 Instance Volume
Select the volume, then click on Actions and select **Modify volume**.

Fig. 0.16 - Cloud9 Modify Volume
Increase the size of the volume by typing the desired size in the **Size (GiB)** field, then click **Modify**, and confirm.

Fig. 0.17 - Cloud9 volume optimizing
The volume status changes to **In-use - modifying** and in a few seconds becomes **In-use - optimizing**. As soon as the status changes to **optimizing** we need to reboot the instance in order for the resized volume to become available in Cloud9.

Fig. 0.18 - Cloud9 reboot instance
To reboot the instance, select **Instances** from the console navigation menu, then highlight the instance and select **Instance state -> Reboot**.

Fig. 0.19 - Cloud9 IDE with resized volume
Once the instance is restarted, refresh the Cloud9 IDE window and type `df -h` in the terminal window. You should see that the root volume has the size you specified earlier.
Open the IDE Preferences by clicking on the settings icon in the upper-right corner of the screen, or by clicking the Cloud9 icon in the menu and selecting Preferences. Scroll the list of preferences down and selct the `AWS Settings` section. Disable the `AWS managed temporary credentials` setting as shown below.

Fig. 0.20 - Disable Cloud9 IDE `AWS managed temporary credentials` setting
### 0.5 Clone workshop repository
```
git clone https://github.com/aws-samples/aws-distributed-training-workshop-eks.git
```
and
```
cd aws-distributed-training-workshop-eks
```
Your Cloud9 work environment is now completely set up and you are ready to dive into the [Distributed Model Training Workshop for AWS EKS](README.md).