# Run standalone HDFS on Amazon EKS
YARN NodeManager and HDFS DataNode daemons are co-existing on core nodes. When down-scaling core nodes is required, both NodeManager and DataNode daemons must be decommissioned for the instance group to reduce. Potentially, the cluster autoscaling could be delayed or hang, even if a node was idle, ie. zero running container on the node, because the node still contained HDFS data blocks that couldn’t moved out of the affected core node.
To improve autoscaling performance, we can decouple compute and HDFS storage. This repository will demonstrate how to run HDFS remotely. For the simplicity, we will install the HDFS cluster to EKS to prove the concept.
Additionally, moving the HDFS storage out of the core node's local storage and to be a standalone cluster, we need a better storage solution designed for high throughput and low laterncy. In this demo, we will use FSx for Lustre - Amazon fully managed shared storage built on the high-performance file system. The SSD-based FSx file system can provide sub-millisecond latency that suits time-sensitive workloads. Its S3 synchronization feature supports data access and process concurrently from both a high-performance file system and from the S3 API.
## Infrastructure Summary
The repository contains a helm chart to simplify the HDFS installation in Kubernetes environment. Storage wise, we intentionally choose the smallest volume size 1.2TB and the lowest throughput capacity 150 MB/s per FSx system, which is $0.073 per GB-month, cheaper than gp3 storage.
Follow the [instruction](https://github.com/aws-samples/aws-emr-utilities/tree/main/utilities/emr-on-eks-remote-shuffle-service#infrastructure) to provision `c5` type of instances and configure an [AWS EKS cluster](https://aws.amazon.com/eks/) that the HDFS Helm Chart can be deployed on.
By default, this chart deploys:
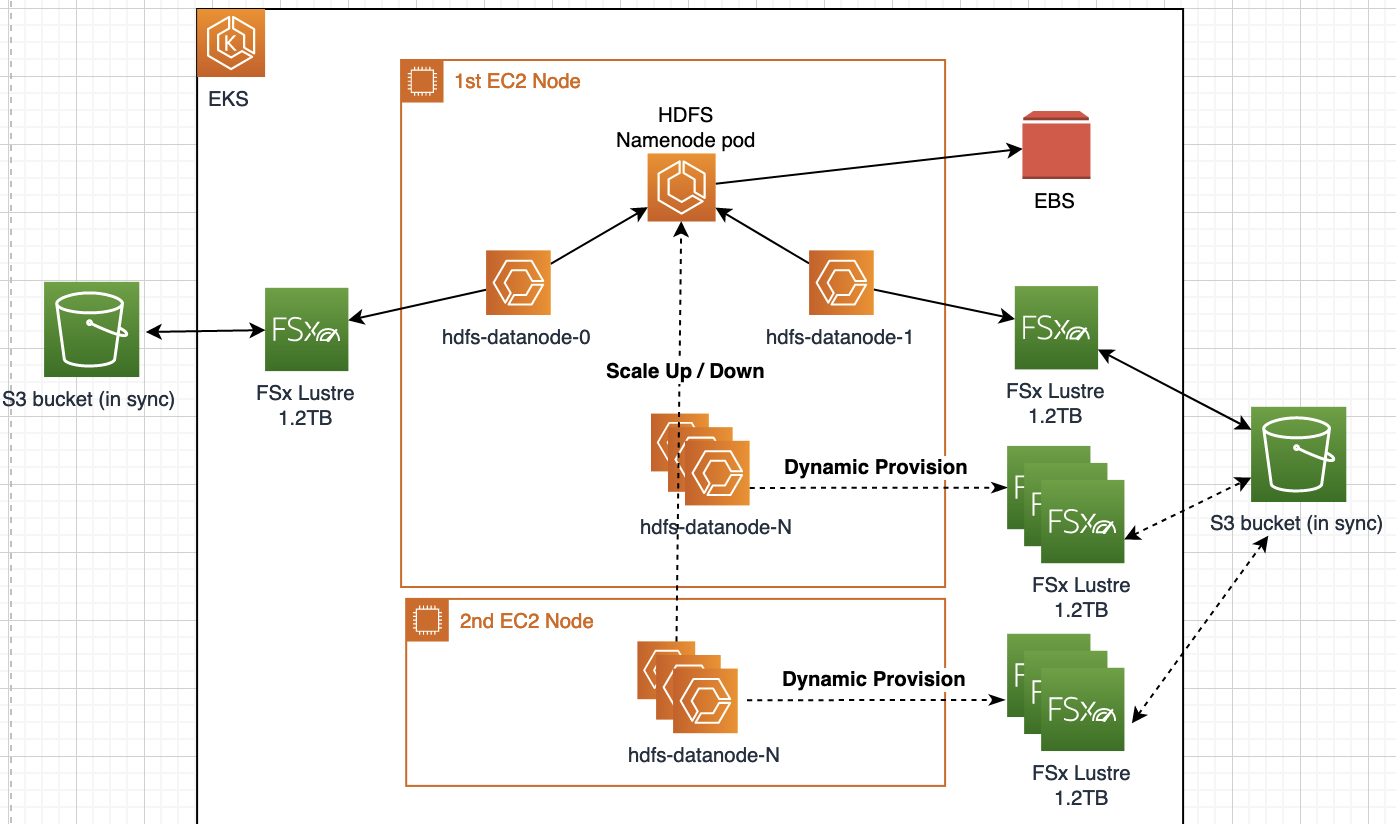 * a single name node, configured with 1 x 50GB data volume backed by EBS
* 2 x data nodes, each configured with 2 x 550GB data volumes backed by Fsx for Lustre.
* configuration for a replication factor of 3
* dyanmically provisioned FSx for Lustre volume per datanode pod, ie. the PV & PVC are not required to create manually.
NOTE: to create a new FSx file system on the fly, the datanode pod will be in pending status for approx. 5 minutes.
## Quick start
Spin up the namenode and datanode containers locally for a quick test. They automatically attach your local disk as the storage.
```bash
docker-compose -f docker/docker-compose.yaml up
```
Access the HDFS NameNode web UI at: http://localhost:9870
```
docker-compose -f docker/docker-compose.yaml stop
```
## Deploy Helm chart
### Prerequisite
1. Install [kubectl & awscli](https://www.eksworkshop.com/020_prerequisites/k8stools/)
2. Deploy [FSx for Lustre CSI driver](https://docs.aws.amazon.com/eks/latest/userguide/fsx-csi.html) to an Amazon EKS
```bash
kubectl apply -k "github.com/kubernetes-sigs/aws-fsx-csi-driver/deploy/kubernetes/overlays/stable/?ref=master"
```
3. Create the storage class manifest
```bash
kubectl -f helm/fsx/storage-class.yaml
kubectl get sc
```
4. (OPTIONAL) if you provision FSx dynamically, add the IAM policy to the node instance IAM role. For example:`eks-rss-nodegroup-c59b-NodeInstanceRole`
```yaml
{
"Effect": "Allow",
"Action": [
"fsx:CreateFileSystem",
"fsx:DescribeFileSystems",
"fsx:TagResource"
],
"Resource": "arn:aws:fsx:${AWS_REGION}:${ACCOUNTID}:file-system/*"
}
```
Before the deployment, adjust the [values.yaml](./helm/values.yaml) based on your EKS settings. For example, we use the `nodeSelector` to assign a specific compute instance type and the AZ-b to the HDFS cluster:
```yaml
nodeSelector:
app: sparktest
eks.amazonaws.com/nodegroup: c59b
```
### Deploy to EKS
By default, the HDFS uses Hadoop version 3.2.1. See the [details](./helm/docs/aws-eks-deployment.md) in terms of how to build a custom image for a differnt version.
```bash
cd helm
helm install hdfs . -f ./values-eks-alb.yaml -n YOUR_NAMESPACE
# test
helm test hdfs -n YOUR_NAMESPACE
kubectl port-forward hdfs-namenode-0 9870:9870 -n YOUR_NAMESPACE
```
Access the HDFS NameNode web UI at: http://localhost:9870
### Scale the datanode
```bash
kubectl get pod -n YOUR_NAMESPACE
#EXAMPLE
kubectl scale statefulsets hdfs-datanode -n YOUR_NAMESPACE --replicas=3
kubectl scale statefulsets hdfs-datanode -n YOUR_NAMESPACE --replicas=
```
* a single name node, configured with 1 x 50GB data volume backed by EBS
* 2 x data nodes, each configured with 2 x 550GB data volumes backed by Fsx for Lustre.
* configuration for a replication factor of 3
* dyanmically provisioned FSx for Lustre volume per datanode pod, ie. the PV & PVC are not required to create manually.
NOTE: to create a new FSx file system on the fly, the datanode pod will be in pending status for approx. 5 minutes.
## Quick start
Spin up the namenode and datanode containers locally for a quick test. They automatically attach your local disk as the storage.
```bash
docker-compose -f docker/docker-compose.yaml up
```
Access the HDFS NameNode web UI at: http://localhost:9870
```
docker-compose -f docker/docker-compose.yaml stop
```
## Deploy Helm chart
### Prerequisite
1. Install [kubectl & awscli](https://www.eksworkshop.com/020_prerequisites/k8stools/)
2. Deploy [FSx for Lustre CSI driver](https://docs.aws.amazon.com/eks/latest/userguide/fsx-csi.html) to an Amazon EKS
```bash
kubectl apply -k "github.com/kubernetes-sigs/aws-fsx-csi-driver/deploy/kubernetes/overlays/stable/?ref=master"
```
3. Create the storage class manifest
```bash
kubectl -f helm/fsx/storage-class.yaml
kubectl get sc
```
4. (OPTIONAL) if you provision FSx dynamically, add the IAM policy to the node instance IAM role. For example:`eks-rss-nodegroup-c59b-NodeInstanceRole`
```yaml
{
"Effect": "Allow",
"Action": [
"fsx:CreateFileSystem",
"fsx:DescribeFileSystems",
"fsx:TagResource"
],
"Resource": "arn:aws:fsx:${AWS_REGION}:${ACCOUNTID}:file-system/*"
}
```
Before the deployment, adjust the [values.yaml](./helm/values.yaml) based on your EKS settings. For example, we use the `nodeSelector` to assign a specific compute instance type and the AZ-b to the HDFS cluster:
```yaml
nodeSelector:
app: sparktest
eks.amazonaws.com/nodegroup: c59b
```
### Deploy to EKS
By default, the HDFS uses Hadoop version 3.2.1. See the [details](./helm/docs/aws-eks-deployment.md) in terms of how to build a custom image for a differnt version.
```bash
cd helm
helm install hdfs . -f ./values-eks-alb.yaml -n YOUR_NAMESPACE
# test
helm test hdfs -n YOUR_NAMESPACE
kubectl port-forward hdfs-namenode-0 9870:9870 -n YOUR_NAMESPACE
```
Access the HDFS NameNode web UI at: http://localhost:9870
### Scale the datanode
```bash
kubectl get pod -n YOUR_NAMESPACE
#EXAMPLE
kubectl scale statefulsets hdfs-datanode -n YOUR_NAMESPACE --replicas=3
kubectl scale statefulsets hdfs-datanode -n YOUR_NAMESPACE --replicas=
```