1. Right click the **Launch Stack** link below and "open in new tab" Region| Launch ------|----- EU (Ireland) | [](https://console.aws.amazon.com/cloudformation/home?region=eu-west-1#/stacks/new?stackName=storage-workshop-2a&templateURL=https://specialist-cloudformation-templates.s3-us-west-1.amazonaws.com/pl/reinvent2017/scenario2-step1-deploy-linux1-(eu-west-1).json) 2. Click **Next** on the Select Template page. 3. Select your default VPC and any one of the subnets within that vpc. Note the subnet need to have a IGW attached. 4. If you already have an Access Key Pair for this region that you have access to, enter that key pair. Otherwise, you will need to create a new key pair. [creating a key pair using amazon EC2](http://docs.aws.amazon.com/AWSEC2/latest/UserGuide/ec2-key-pairs.html#having-ec2-create-your-key-pair) 5. Leave the Allow SSH access from as 0.0.0.0/0 or enter the public IP of the computer from which you plan to access the Windows server. You can find your public IP address at http://www.whatismypublicip.com/ 6. Click **Next**. 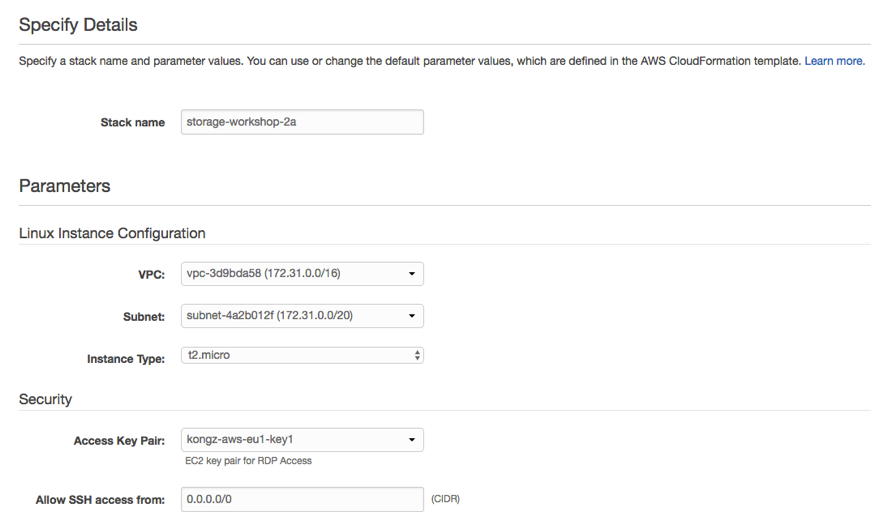 7. Click **Next** Again. (skipping IAM advanced section) 8. On the Review page, check the box to acknowledge that CloudFormation will create IAM resources and click **Create**. 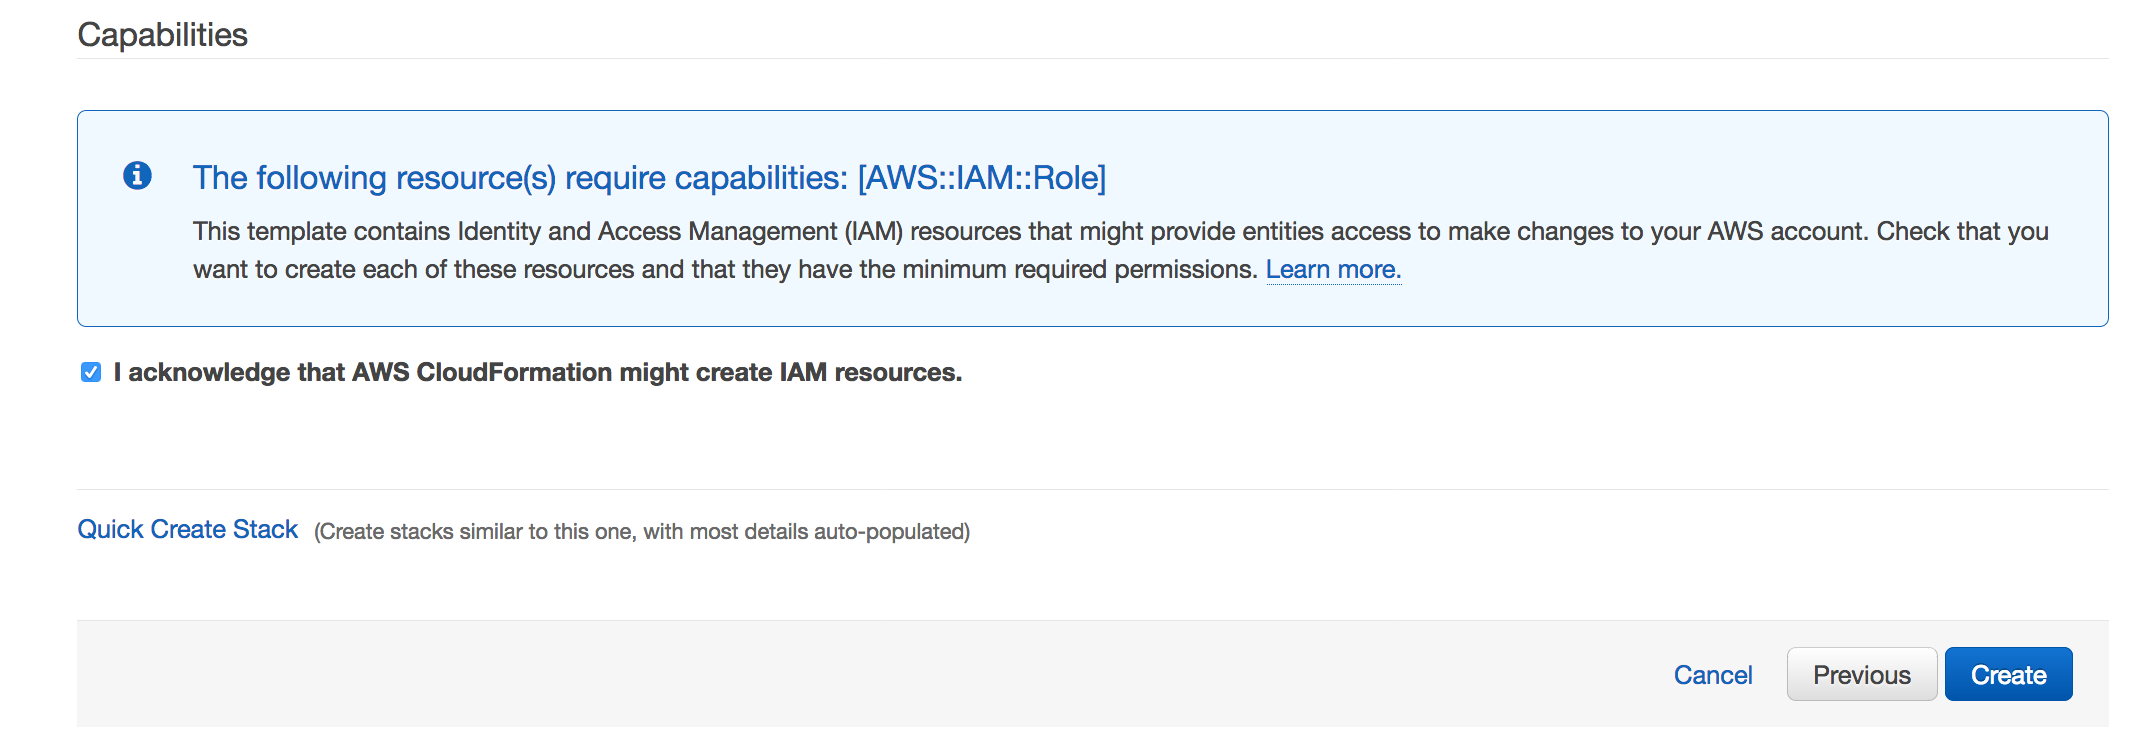 Once the Cloudformation Stack shows a status of *CREATE_COMPLETE*, you can continue to the next step. Note: Instances that are launched as part of this CloudFormation template may be in the initializing state for few minutes.
1. From the AWS Console, select EC2 in Services Tab, find the instance created by previous CloudFormation Stack. The instance should have a name start with “Hybrid Workshop – Deploy – Linux Server 1”. Write down the IPv4 Public IP in Description. 2. Connect to the above Linux Instance. For detailed instruction, please refer to [Connecting to Your Linux Instance Using SSH](http://docs.aws.amazon.com/AWSEC2/latest/UserGuide/AccessingInstances.html) 3. In the Linux OS, type `cd /media/data` 4. Type `ls –l`, you should see 200 image files, which make up our sample data
1. Change the AWS console region to eu-central-1 (Frankfurt), by selecting **EU (Frankfurt)** from the region list in the top right corner of the console. 2. In the AWS Management Console select **Services** then select **S3** under Storage. 3. Select **Create Bucket** 4. Provide a globally unique name for your bucket such as my-storage-workshop-bucket1. 5. Select the Region to **EU (Frankfurt)** 6. Choose **Create** in the lower left of the dialog as a shortcut to create the bucket without advanced options. 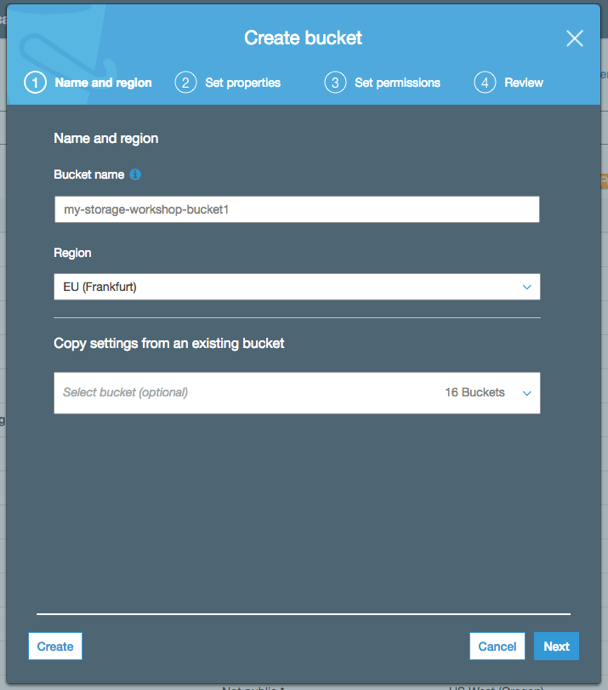
1. In the AWS Management Console select **Services** then select **S3** under Storage. 2. Select **+Create Bucket** 3. Provide a globally unique name for your bucket such as my-storage-workshop-bucket2. 4. Select the Region to EU (London) 5. Choose **Create** in the lower left of the dialog. 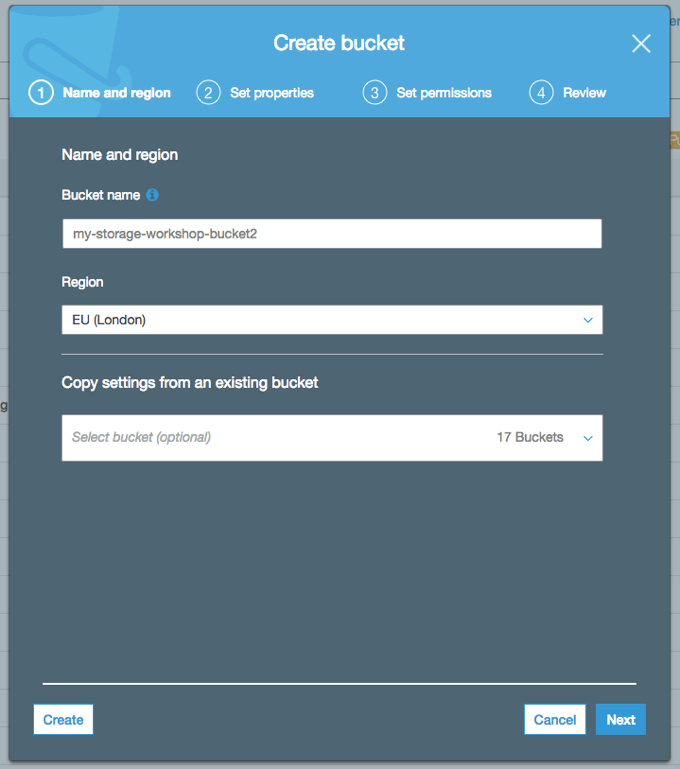
1. In AWS Management Console, S3 service, all the buckets are listed. Click the name of the S3 bucket you created in Step 3. 2. Click Management Tab, and click Replication 3. Click **Get started**, the Replication Rule will display a window to ask Enable versioning  4. Click **Enable Versioning**, the Replication rule window goes to Step 1 - Source, select source as All contents and select Enabled for Status. Will leave the KMS encryption uncheck in this case. 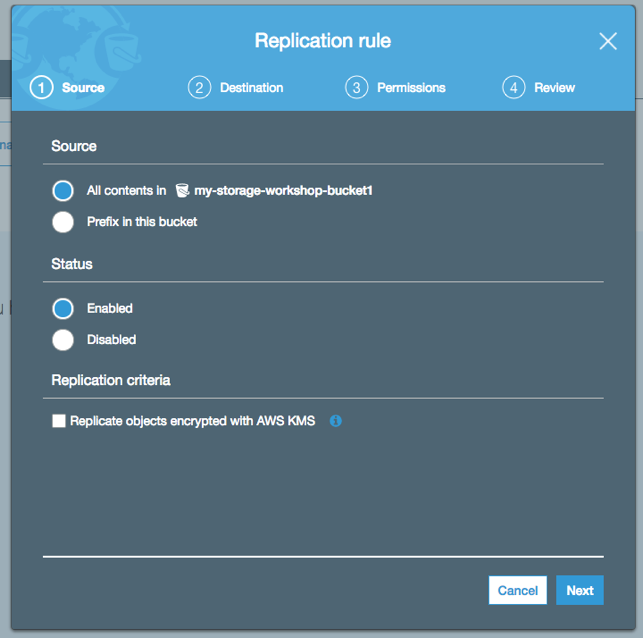 5. Click Next, Replication rule windows goes to step 2 – Destination. Click the input box under Destination bucket and a drop-down list will display all the existing buckets in this account. Select the S3 bucket that was created in eu-west-2  6. Another warning window will display to ask to Enable versioning on S3 bucket . Click **Enable versioning**. 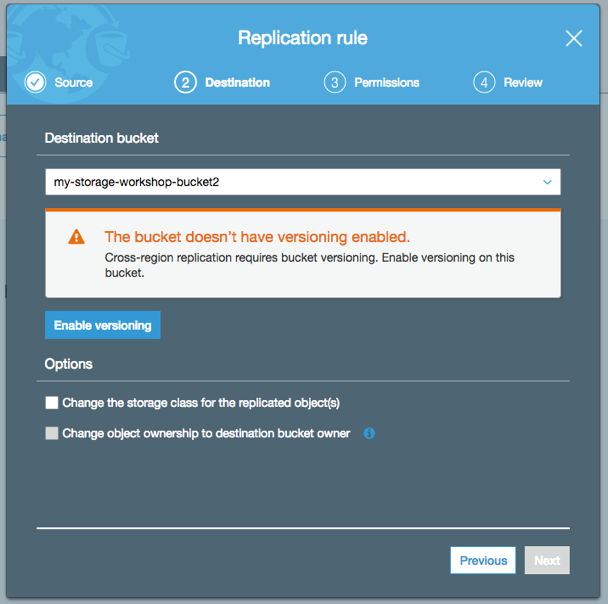 7. Once Versioning is enabled, leave the option unchecked and click **Next** 8. The Replication rule move to Step 3 – Permissions. Click the input box under **Select IAM Role**, and select create new role. 9. In Step 4 – review window. Click **Save.** 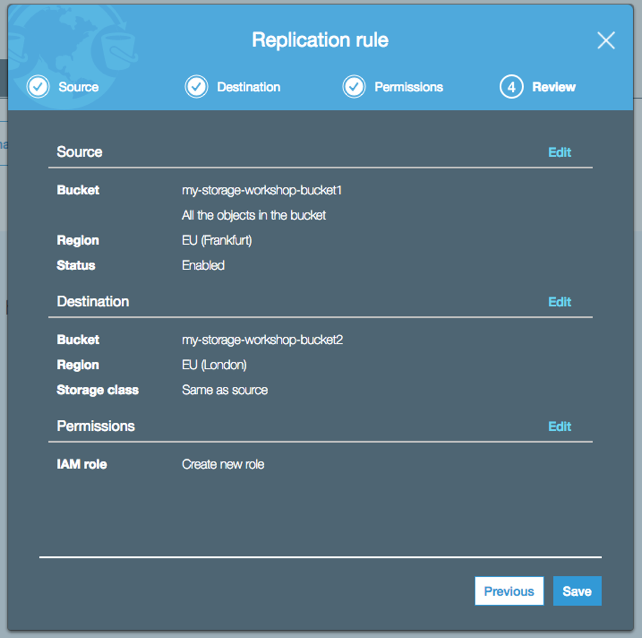 10. You should see a rule under Replication tab.
1. In AWS Management Console, S3 service, all the buckets are listed. Click the name of the S3 secondary bucket you created in Step 4. 2. Click Management Tab, and click Lifecycle 3. Click Get started or **+Add lifecycle rule** 4. In the first step of Lifecycle Rule Window, enter a rule name, click **Next** 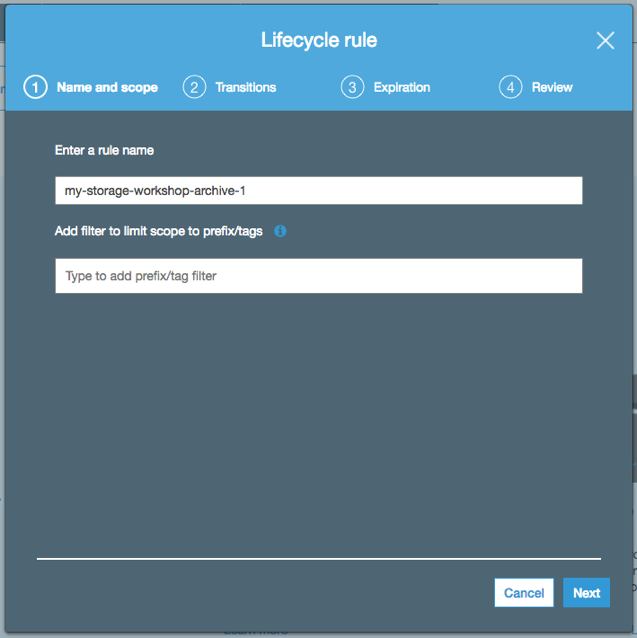 5. In the second step of Lifecycle Rule Window to configure Transitions. Check the Current version, and click + Add transition. Select “Transition to Amazon glacier after” and add “30” in Days after object creation. 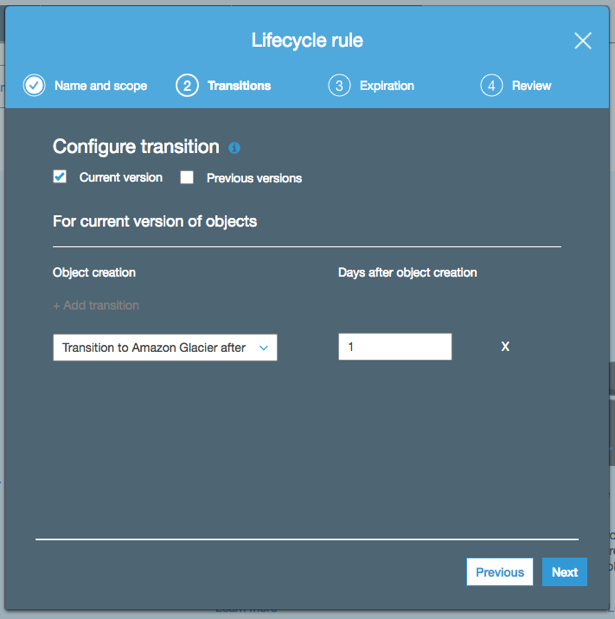 6. In step 3 of Lifecycle Rule, leave all the option unchecked. Click **Next** 7. In review window, click **Save.** 