**Step 1** : Retrieve temporary credentials from Event Engine
1. Navigate to the Event Engine dashboard 2. Enter your **team hash** code. 3. Click **AWS Console** 4. Copy the **export** commands under the **Credentials** section for the temporary credentials (you will need these in the next step.) 5. Click **Open Console** from the Event Engine window ??? info "Click here if you're at an AWS-sponsored event and AWS provided an account to you" 1. In a separate tab in your web browser, go to the URL provided to you and login. 2. After you login click the **AWS Account** box, then click on the Account ID displayed below that (the red box in the image.) You should see a link below that for the **Management console**. Click on that and you will be taken to the AWS console. 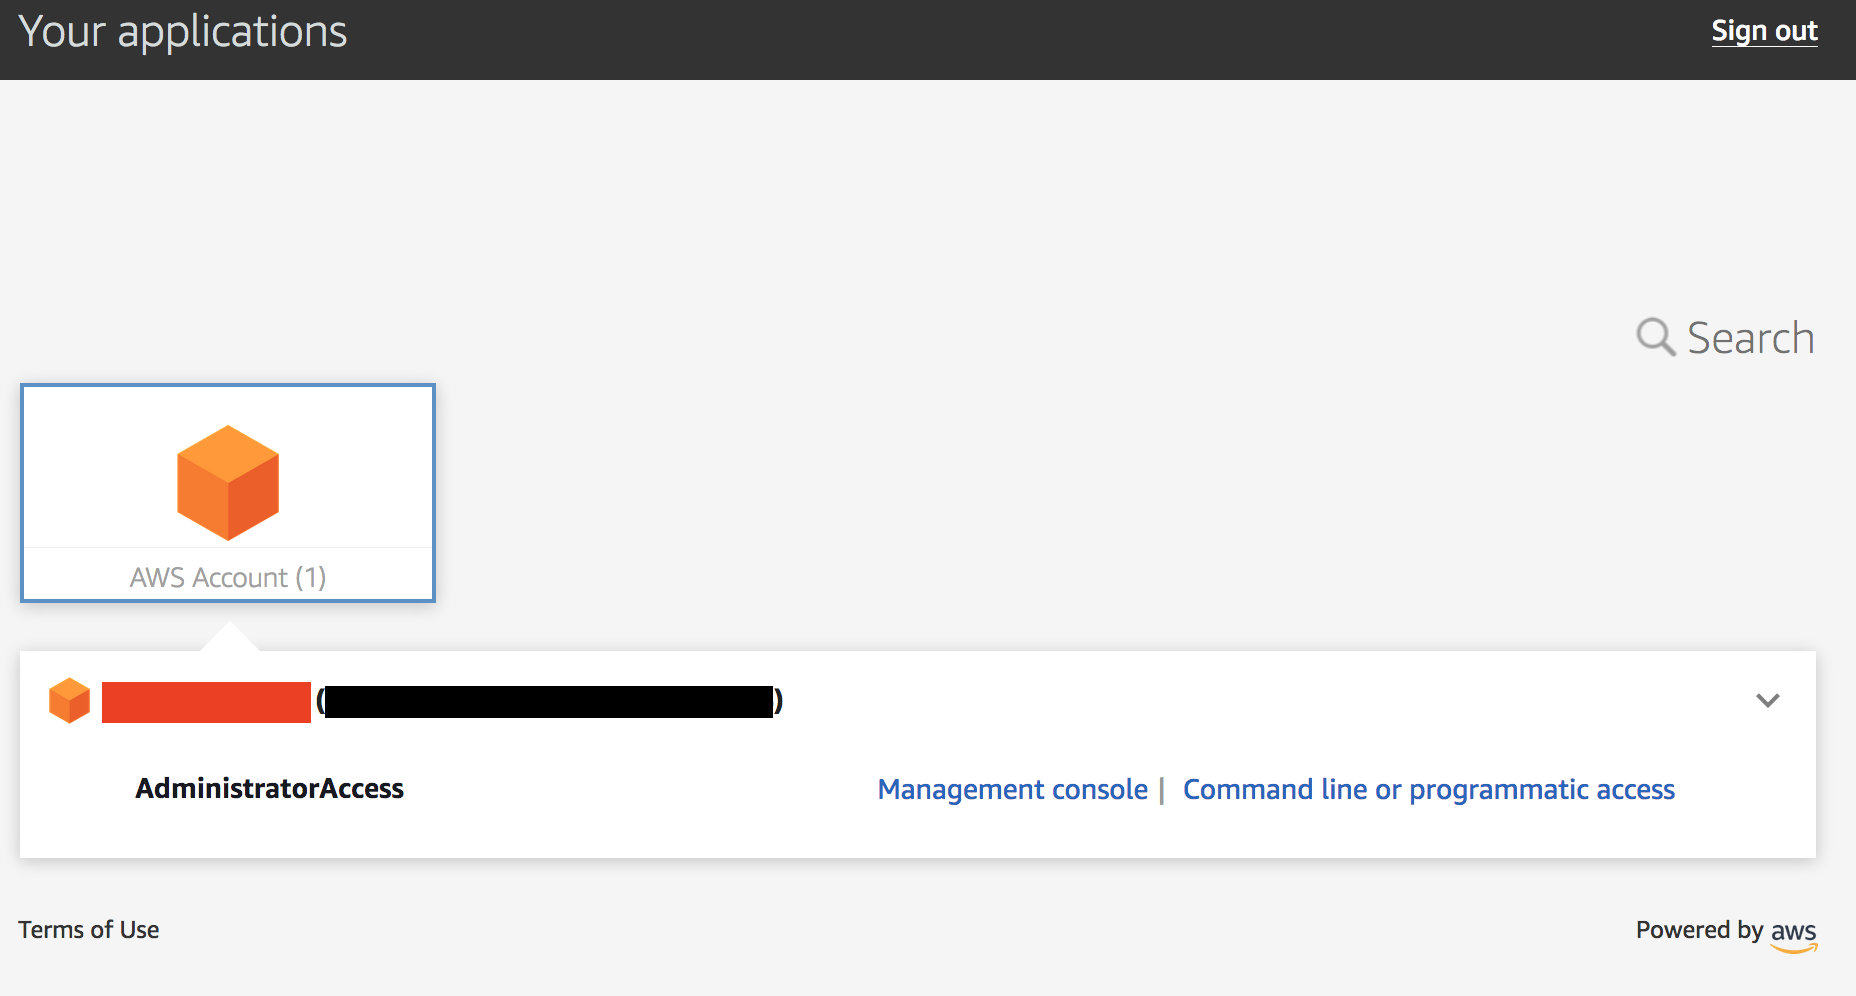 ??? info "Click here if you are using your own AWS account (whether you are at an AWS event, a separate event or online)" In a separate tab in your web browser, go to https://aws.amazon.com/console and log into your account. ## Enable Macie 1. You will need Macie for this lab so you must make sure Amazon Macie is running. Select **Macie** from the main console. Macie will open in a new browser tab. 2. Select the us-east-1 (N. Virginia) region in the Macie console. 3. When the Macie console appears, if a **Getting Started** button appears, it means that Amazon Macie is disabled. In that case, click **Getting Started**, confirm that US East (N. Virginia) is selected as the region, and click **Enable Macie**. This may take from several seconds to complete. The Macie console will appear after Macie has been enabled. Close the browser tab containing the Macie console. ## Enable GuardDuty 1. You will also need GuardDuty for this lab so you will now enable GuardDuty. 2. Return to the AWS Console, signing into the account again if necessary. Select **GuardDuty** from the main console. 3. If the region is not set to Northern Virginia, select Northern Virginia (or N. Virginia) for the region. 4. If you see a **Get Started** button, click it. If you do not see the button and have the **GuardDuty** findings screen instead, it means **GuardDuty** is already enabled. You can skip to the next section. 5. Click **Enable GuardDuty**. ## Build out the environment > **NOTE*: The instructions that follow are based on the classic version of the CloudFormation console. CloudFormation also offers a redesigned console that offers a different overall look and feel. You are welcome to use the redesigned CloudFormation console. If you choose to do so, you will notice some minor differences from the instructions below. 1. Open the **Deploy to AWS** link that follows in a **new browser** tab to deploy the logging environment in the us-east-1 region: [](https://console.aws.amazon.com/cloudformation/home?region=us-east-1#/stacks/new?stackName=esslab&templateURL=https://s3.amazonaws.com/sa-security-specialist-workshops-us-east-1/identity-workshop/essround/EssInitAccount.yaml) 3. In the new browser tab that you just opened, you will see the Select Template page. Click **Next**. 4. On the Specify Details/Parameters page, the values have been filled in for you. Click **Next**. 5. On the Options page, click **Next**. 6. On the Review page, check the **I acknowledge** box and click **Create**. The acknowledgement is requested because of the creation of resources with custom names. The CloudFormation template does this when it creates certain resources with names that make it easier to identify them. CloudFormation will now begin to create the resources. **Refresh the entire browser window to view the progress.** This takes about five minutes. Wait until the Status value for the **esslab** stack shows **CREATE_COMPLETE**. You can refresh the browser window to update the status. 7. Take a look at the outputs for the **esslab** CloudFormation stack. They will look similar to the picture below. You may need to drag the horizontal dividing line upwards to see all the output values.  The output value assigned to *LoggingBucketName* is the name of the bucket into which AWS CloudTrail will deliver its logs. Copy the value of *LoggingBucketName* to a scratch file on your workstation so you have it available later. The value assigned to *SecAdministratorRoleURL* is a URL that you will use later in the lab to temporarily "switch to" (meaning take on the access privileges of) a Security Administrator role. This role has full administrative privileges for AWS CloudTrail, Amazon GuardDuty, Amazon Inspector, and Amazon Macie. The value assigned to *SecOperatorRoleURL* is a URL that you will use later in the lab to temporarily "switch to" a Security Operator role. You will later modify the policy associated with this role so it only has "read only" privileges for AWS CloudTrail, Amazon GuardDuty, Amazon Inspector, and Amazon Macie. 8. Let's take a look at CloudTrail logging. The most important part of collecting AWS CloudTrail information into an Amazon S3 bucket is setting the correct permissions on the Amazon S3 bucket. Go to the S3 console, click on the name assigned to *LoggingBucketName* which you note in Step 6, click on the **Permissions** tab, and then scroll down to **Bucket Policy**. Note that the policy allows the CloudTrail service to read the ACL of the *LoggingBucket* and also to create logs with prefixes containing the AWS account ID. you can read more about this policy at this [link](https://docs.aws.amazon.com/awscloudtrail/latest/userguide/create-s3-bucket-policy-for-cloudtrail.html). 9. Click the **AWSLogs** folder prefix. You should then see the AWS account ID of your account as shown below. 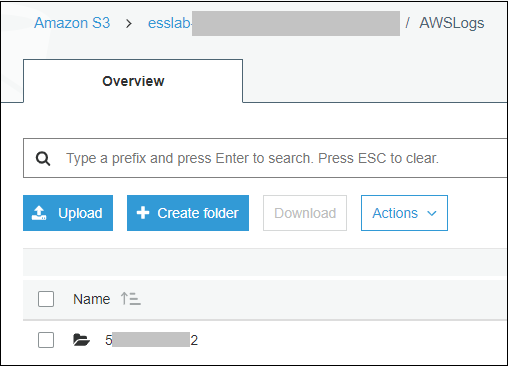 This shows that AWS CloudTrail logs for your account have started to make their way to the S3 bucket. It may take up to five minutes for logs to start appearing. You can go further into the directory by year, month, and day to see logs as they appear. The logs are stored in ".gz" (gzip) format. If you have an archive management tool and you see one of these log files, feel free to download it to your workstation and expand the archive. Again, it may take several minutes for the logs to begin to appear. ## Understanding Roles A role is a security principal, an actor, that has a set of policies and a trust relationship. A user, an application, or an AWS service can *assume* the role in order to substitute its own access privileges for those associated with the role. The *policies* define what AWS actions the role can perform. The *trust relationship* defines who is allowed to assume the role. The CloudFormation stack you just built created two roles. One role is for a Security Administrator who has full access to CloudTrail, GuardDuty, Inspector, and Macie. The other role is for a Security Operator who, after changes you make later on, will have read-only access to these services. You are going to switch to the Security Administrator role but before doing so, let's look at the privileges associated with that role so you can see what it does. 1. Go to the IAM console, select **Roles** on the left and search for the string *SecAdministrator*. You can search either by using your browser's search capability or you can type *SecAdministrator* into the search box. Click on the role that you retrieve. The policy definition will be similar to the image below. 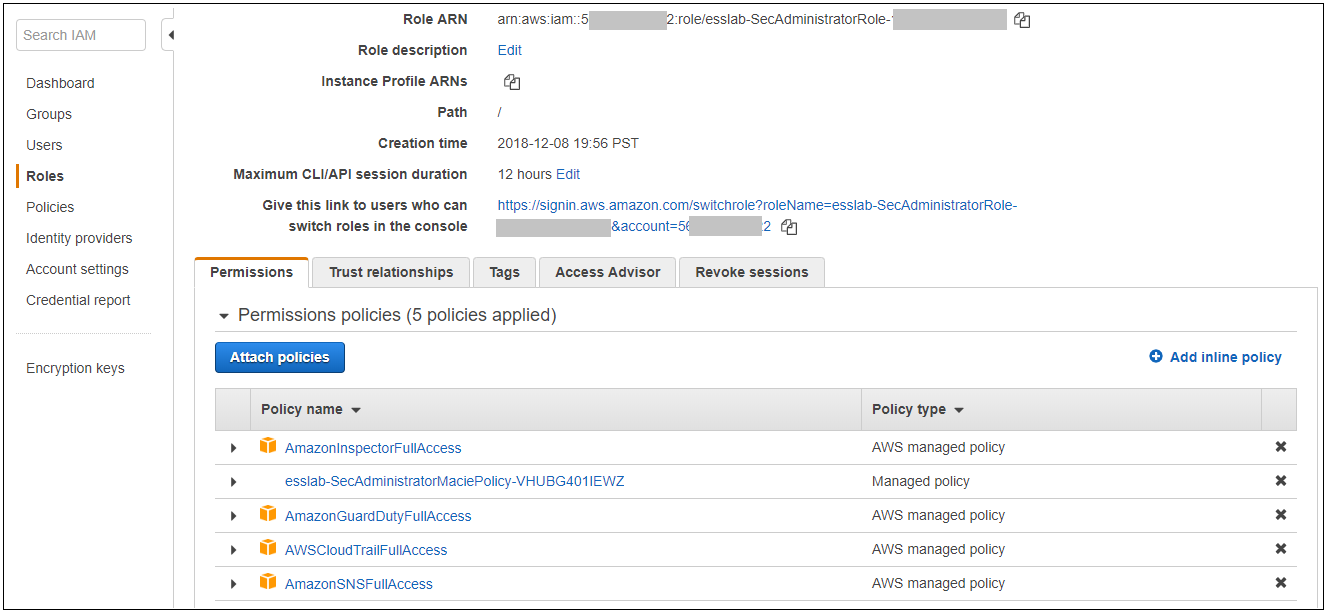 You may need to click **Show more** to see all of the policies. There are five managed policies attached to this role, four of them are provided by AWS for GuardDuty, Inspector, CloudTrail, and SNS. While you will not be working directly with SNS, the policies for SNS are included because including them provides for a better console experience. There is a fifth managed policy that was created for Amazon Macie to illustrate how custom managed policies can be developed. Click on each of the managed policies to see the underlying privileges of each. Note that there are some services, such as Amazon EFS (Elastic File System), that are not granted by any of these policies. You will confirm this lack of access later in this workshop. 2. From the main page of the role, click the **Trust relationships** tab. You will see a section on the page telling you that the trusted entity (the entity that can assume the role) is the 12-digit AWS account ID as shown below. This means that any principal in the account can assume the role. 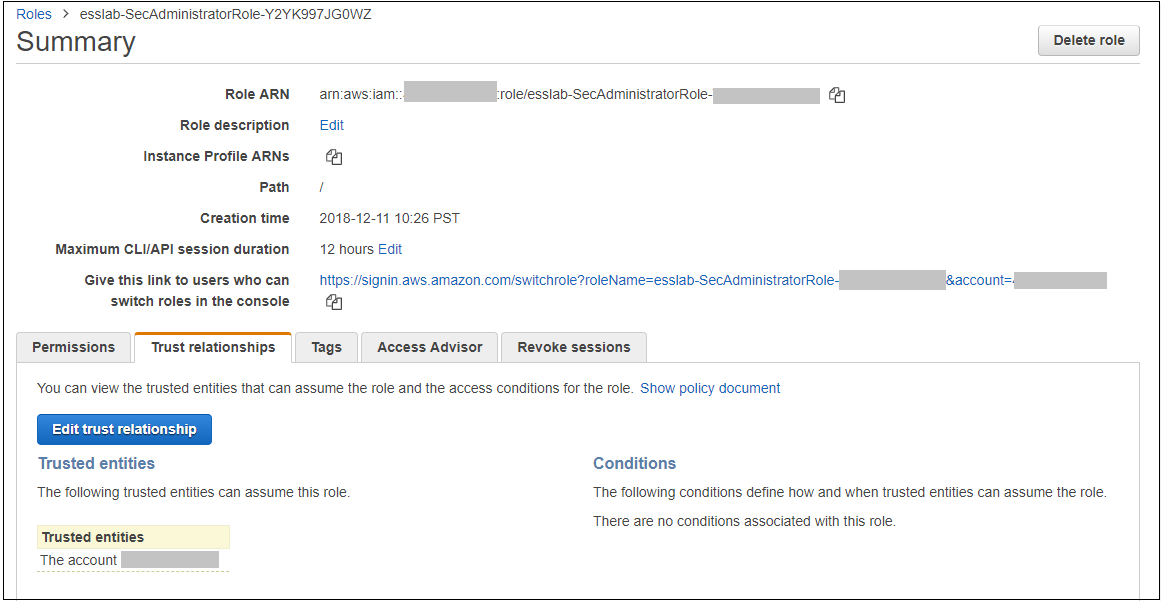 3. The internal representation of the trust relationship is a JSON policy document. Click **Show policy document**. You will see a policy similar to that shown in the picture below. 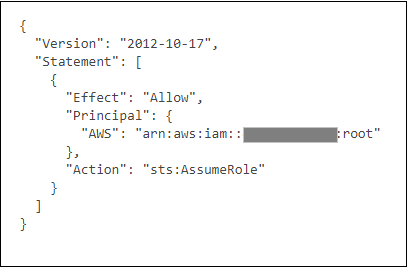 In the principal entry, you will see a value that ends in ":root." This is a special *principal identifier* that refers to the account itself. This policy says that every principal in the account (users, roles, etc.) is allowed to use the sts:AssumeRole action to take on the identity of the role. You can read more about principal identifiers [here](https://docs.aws.amazon.com/IAM/latest/UserGuide/reference_identifiers.html). STS stands for *Security Token Service*. The AssumeRole API associated with the service creates temporary credentials when you call the API that are associated with the security policies of the role including an access key and a secret access key. Your application then uses these security tokens to make calls to other AWS APIs with the policies defined in the role. ## Switching to the Security Administrator role You are now going to learn about how to switch to a new role in the AWS console. Switching to a new role allows you to temporarily *substitute* your AWS console permissions for those contained in another role. In this lab, you will be switching to roles that are in your own AWS account. You can also switch to roles in other AWS accounts to gain access to resources in accounts other than your own. This is known as *cross-account access*. You will not be doing *cross-account access* in this lab. There are two ways you can switch roles. You can use the Switch Role command that's available as a drop down from the console under your account name. Alternatively, you can use a URL that does the switching for you. You will use both methods below. 1. Go to the CloudFormation console and view the outputs tab of the CloudFormation stack named *esslab* you just built. 2. Click on the URL next to *SecAdministratorRoleURL*. You may need to scroll down to see it. A new browser tab window will appear showing information similar to the image below. 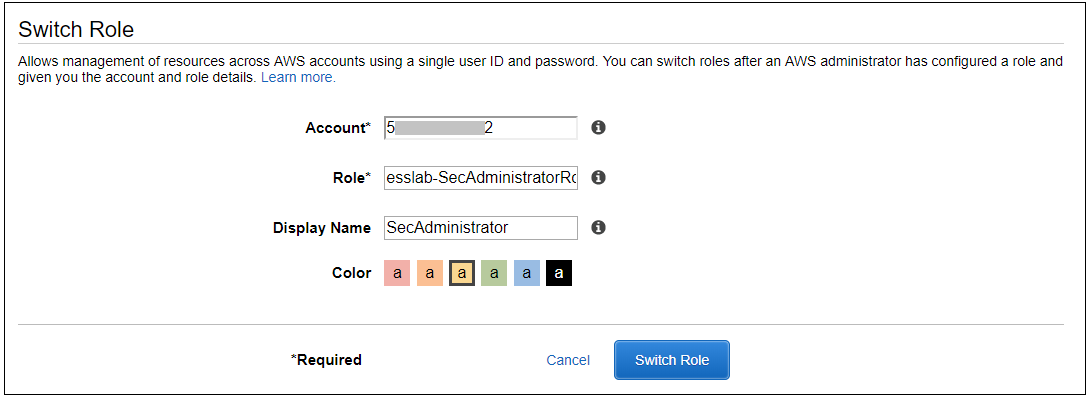 The box contains the account ID (which is the ID of your AWS account), a role name that was created by CloudFormation, and a Display Name. You can also select a color that will be used to display the role you assume in the console. Click **Switch Role**. You will now see a new role label named *SecAdministrator* in the top of your console window as shown below. 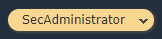 This means that your *effective* privileges have been *temporarily* replaced with those of the SecAdministrator role. 3. Go to the Amazon EFS console, click **File Systems** menu option. Notice that you get a message telling you that you do not have access to any of the features of the console. This is because none of the underlying policies grant any access to any part of Amazon EFS.  4. Now go to the Amazon Inspector Console. Click **Options/Menu** in top left side and select **Switch to inspector classic**. To verify that you have administrative capabilities for Inspector, you are going to clone an existing template. Click **Assessment Templates** and check the box to the left of the template name that begins with *LampInspectorAssessmentTemplate* and click **Clone**. A section of the form will appear. Scroll down towards the bottom and click the **Create** button. Refresh the screen. You should now see two templates that begin with *LampInspectorAssessment*. If you widen the Name column you will see that the newly created template contains the string "Cloned." You have just successfully cloned an assessment template which shows that you have administrative access privileges for Inspector. 5. Now go to the GuardDuty console and select the Settings menu item. To verify that you do have administrative capabilities for GuardDuty, scroll down to the field named *Findings export options* and change the *Frequency for updated findings* value to **Update CWE and S3 every 1 hour** and click **Save**. You will see a message at the top of your window (you may need to scroll up) saying that the settings have been saved. This shows you do have full access to *GuardDuty*. 6. Go to the Macie console, make sure you are in the US East (N. Virginia) region, click Settings, scroll down and click the **Suspend Macie** button. Confirm you want to suspend Macie by typing *Suspend* in the text box when prompted. Click ok. This shows that you have administrative access to Macie. 7. Navigate to the CloudTrail console. 8. Click **Trails** and then click the trail whose name begins with *esslab*. 9. Click the **Stop logging** button on the top right and select **Stop logging** in the pop up window. Now toggle logging back on by clicking **Start logging** on the top right. This shows that you have administrative access to CloudTrail. 10. Now that you have confirmed that you have administrative access to Inspector, Macie, GuardDuty, and CloudTrail, you no longer need your temporary permissions. Click on the SecAdministrator label and select **Back to** on the bottom right of the menu as shown below. Also note that the console maintains a role history to make it easier for you to switch back to the SecAdministrator role later. 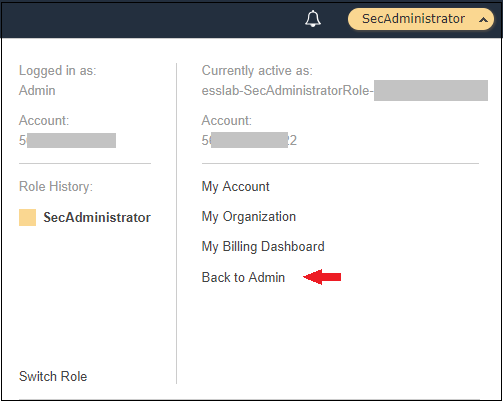 After you switch back to your regular role the special role label for SecAdministrator is no longer displayed. ## Refine the Security Operator role permissions Now that you know how to switch to the Security Administrator role, you are going to make some changes to the permissions for the Security Operator role so that it only has read-only access to Macie, GuardDuty, Inspector, and CloudTrail. 1. Go to the IAM console, select **Roles** and search for *SecOperator*. Click on the resulting role that you see. The role will have permissions similar to those shown in the picture below. 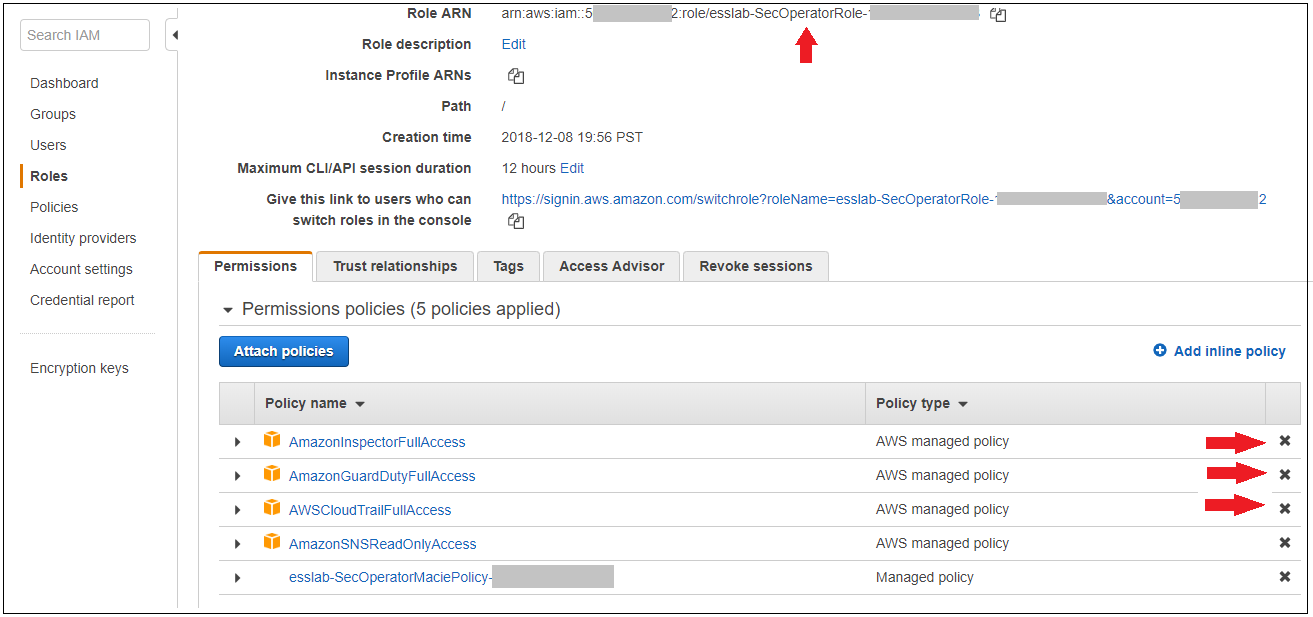 2. Notice that there are once again managed policies, four AWS-managed policies for Inspector, GuardDuty, CloudTrail, and SNS, and a custom managed policy for Macie. The managed policies for Inspector, GuardDuty, and CloudTrail still provide full access to the services. The Macie policy (whose name contains *SecOperatorMaciePolicy*), despite its name, still provides full access to Macie. There are also SNS policies to provide for a better console experience. 3. Remove the AmazonCloudTrailFullAccess, AmazonGuardDutyFullAccess, and Amazon InspectorFullAccess policies. Add read-only access policies for Inspector, CloudTrail, and GuardDuty. You will also need list access for Inspector, Guard Duty and Macie so that the AWS console can display the service pages correctly. Remember to modify the Macie policy for read and list only. If you need some hints, open the dropdown below.
Here are some links that offer information that may be helpful to you. Open them in a *new* browser tab for more information.
[Controlling access to Amazon CloudTrail](https://docs.aws.amazon.com/awscloudtrail/latest/userguide/control-user-permissions-for-cloudtrail.html)
[Controlling access to Amazon GuardDuty](https://docs.aws.amazon.com/guardduty/latest/ug/guardduty_managing_access.html)
[Controlling access to Amazon Inspector](https://docs.aws.amazon.com/IAM/latest/UserGuide/list_amazoninspector.html)
[Controlling access to Amazon Macie](https://docs.aws.amazon.com/macie/latest/userguide/macie-access-control.html)