# Serverless Identity Round Task 2
## Build Phase Set up application user management
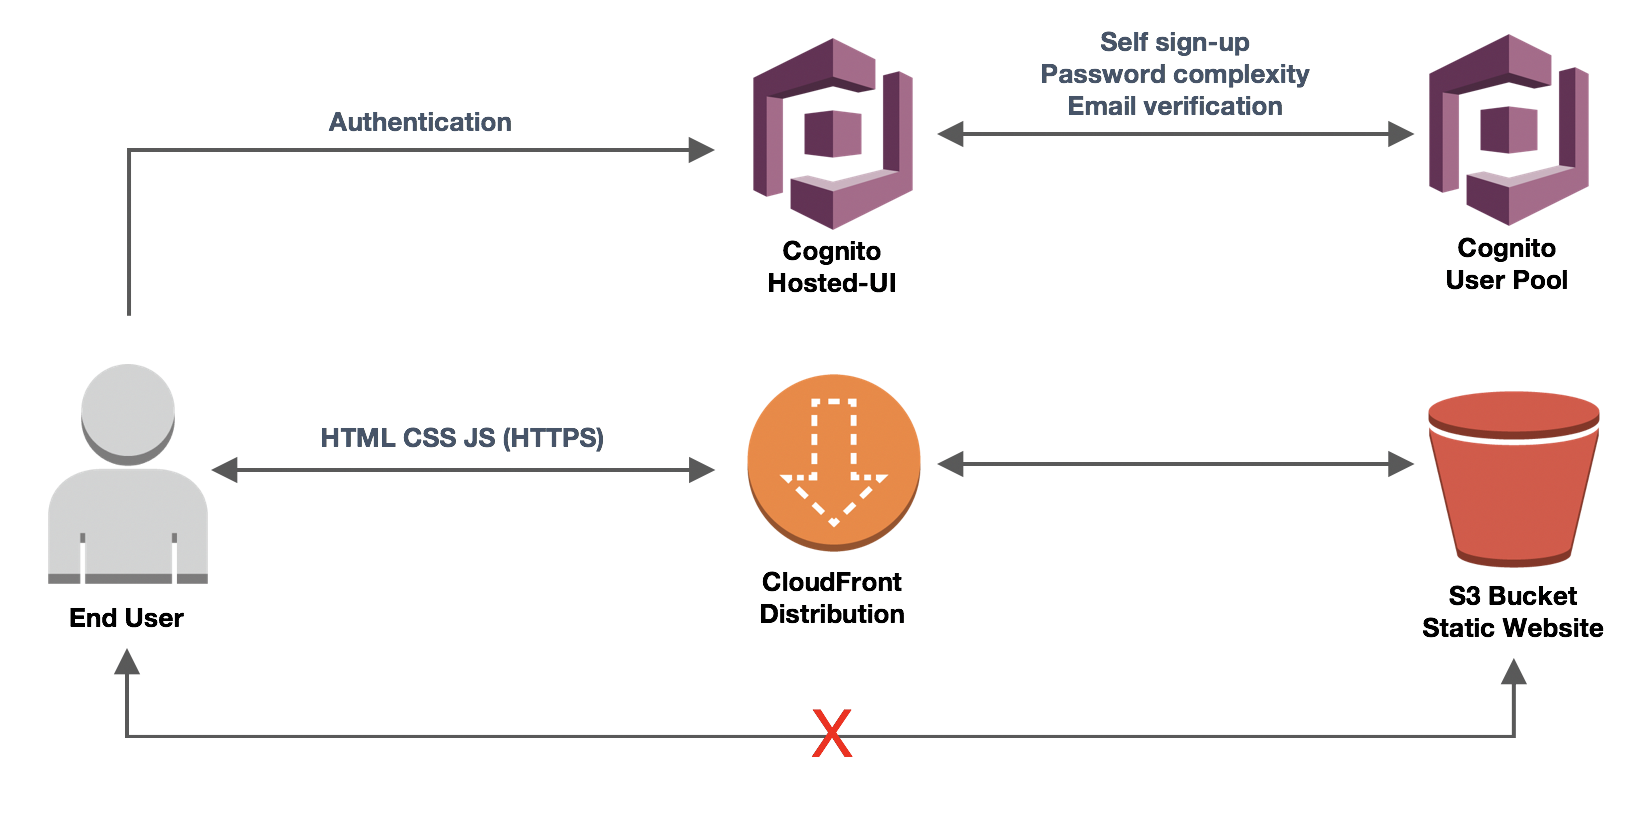
Set up user management for the application using Cognito User pools. To reduce the operational overhead of creating and maintaining forms and custom logic for authentication, the decision has been made to use the Cognito hosted-UI to integrate the application with the User Pool.
As part of the user experience users should be able to sign themselves up, they should have to validate their email address, and be required to create a password that meets the *password complexity requirements for applications* set in your security standards.
!!! info "Password Complexity Requirements for Applications"
* Minimum length of 10 characters
* Must include symbols
* Must include numbers
* Must include uppercase characters
* Must include lowercase characters
!!! info "Application Integration Requirements"
* Implicit grant OAuth flow
* Scopes: email openid
* Upon successful authentication the user should be redirected to ride.html
### Configure User Pool
1. Go to the Amazon Cognito console (us-east-1)
2. Click on **Manage User Pools** and then click on the **WildRydes** pool.
3. Click on **Policies** in the left navigation and modify the password policy, enable users to sign themselves up, and save your changes.
4. Click on **MFA and Verifications** in the left navigation, enable email verification, and save your changes.
### Configure App Integration
1. Click on **App Client Settings** in the left navigation and enter the following and click **Save changes**:
* Enabled Identity Providers: **Cognito User Pool**
* Callback URL: **/ride.html**
* Sign Out URL: **/index.html**
* Allowed OAuth Flows: **Implicit Grant**
* Allowed OAuth Scope: **email** **openid**
2. Click on **Domain Name** in the left navigation, enter a unique domain name, and save your changes.
### Construct the Hosted-UI URL
Now that your User Pool and App Integration have been configured you can construct the URL to allow users to sign-in via the Cognito Hosted Wed UI (built-in webpages for signing up and signing in your users).
```
/login?response_type=&client_id=&redirect_uri=
```
!!! tip
Replace the values in <> (including the carrots) to the correct values. All can be found in your Cognito configuration. The response type is based on the OAuth flow.
Reference Documentation
1. Go to the [S3 console](https://s3.console.aws.amazon.com/s3/home) and click on the bucket named:
**identity-wksp-serverless--us-east-1-wildrydes**.
2. Open **index.html** and add the hosted UI URL to the **Giddy Up** button.
3. Upload **index.html** back to the S3 bucket.
## Verify Task 2 Set up application user management
Now that the additional identity control has been added to the application, you have been tasked with acting as an end user and manually testing to verify that the control has been put in place correctly and that the requirements have been met.
*Set up user management for the application using Cognito User pools. To reduce the operational overhead of creating and maintaining forms and custom logic for authentication, the decision has been made to use the Cognito hosted-UI to integrate the application with the User Pool.*
*As part of the user experience users should be able to sign themselves up, they should have to validate their email address, and be required to create a password that meets the password complexity requirements for applications set in your security standards.*
!!! tip "Verification Checklist"
* You are taken to the hosted UI when clicking on **Giddy Up**.
* You are able to sign your self up for the site.
* You are required to create a password with the following complexity:
* *Minimum length of 10 characters*
* *Must include symbols*
* *Must include numbers*
* *Must include uppercase characters*
* You are required to verify your email address.
* After authentication, you are redirected to ride.html and are presented with your JWT IdToken.
## Final Architecture
## Cleanup
In order to prevent charges to your account we recommend cleaning up the infrastructure that was created, especially if you are doing other Identity rounds. Expand one of the following dropdown sections and follow the instructions:
You will need to manually delete some resources before you delete the CloudFormation stacks so please do the following steps in order.
1. Delete the Amazon Cognito Domain for the hosted-UI.
* Go to the Amazon Cognito console.
* Click on the **WildRydes** pool.
* On the left navigation under **App Integration**, click on **Domain Name**.
* Click **Delete**
* Click the acknowledgement checkbox and click **Delete**
2. Delete the CloudFormation stack (**Identity-RR-Wksp-Serverless-Round**).
* Go to the AWS CloudFormation console.
* Select the appropriate stack.
* Select **Action**.
* Click **Delete Stack**.
***
Congratulations on completing the Serverless Round!