# Publishing data into an Amazon Kinesis Stream with the AWS SDK for .NET
## Overview
This walk-through illustrates how to use Amazon Kinesis from .NET applications using the [AWS SDK for .NET](https://docs.aws.amazon.com/sdk-for-net/). The walk-through will use the AWS Management Console to make a Kinesis Data Stream. Next, we’ll create a new .NET console application and add the AWS SDK for Kinesis to use it. The sample application will run like simulated IoT devices which are sending temperature and humidity values collected from their sensors into the Amazon Kinesis stream. Finally, we will use Amazon Kinesis Data Analytics to aggregate average temperature values in real-time.
* Links to documentation
* [Amazon Kinesis](https://aws.amazon.com/kinesis/)
* [Amazon Kinesis Data Streams](https://aws.amazon.com/kinesis/data-streams/)
* [Amazon Kinesis Data Streams Developer Guide](https://docs.aws.amazon.com/streams/latest/dev/)
* [Amazon Kinesis Data Streams API Reference](https://docs.aws.amazon.com/kinesis/latest/APIReference/)
* [Amazon Kinesis Data Analytics](https://aws.amazon.com/kinesis/data-analytics/)
* [Amazon Kinesis Data Analytics Developer Guide](https://docs.aws.amazon.com/kinesisanalytics/latest/dev/)
* [AWS Kinesis Data Analytics SQL Reference](https://docs.aws.amazon.com/kinesisanalytics/latest/sqlref/)
### Prerequisites
* .NET Core SDK 3.x ***or*** .NET Framework on Windows
* Visual Studio 2019 or another IDE/editor suitable for working with C# code.
* AWS Account with credentials configured locally in the [AWS Toolkit for Visual Studio](https://aws.amazon.com/visualstudio/), or using the [AWS Tools for PowerShell](https://aws.amazon.com/powershell/) or the [AWS CLI](https://aws.amazon.com/cli/)\*
**AWS Experience:** Beginner\
**Time to Complete:** 1 hour\
**Cost to Complete:** Please note that Amazon Kinesis Data Streams and Amazon Kinesis Data Analytics are not currently available in AWS Free Tier.
* Amazon Kinesis Data Streams: in the US East (N. Virginia) region, one shard costs %0.015 per hour or \$0.36 per day (\$0.015\*24)\*.
* Amazon Kinesis Data Analytics: you pay only for what you use. You are charged an hourly-rate based on the average number of Kinesis Processing Units (or KPUs) used to run your stream processing application. In the US East (N. Virginia) region, one KPU costs \$0.110 per hour\*\*.
\* Accounts that have been created within the last 24 hours might not yet have access to the resources required for this walk-through.\
\*\*Refer to
## Introduction
Amazon Kinesis makes it easy to collect, process, and analyze real-time, streaming data so you can get timely insights and react quickly to new information. Amazon Kinesis offers key capabilities to cost-effectively process streaming data at any scale, along with the flexibility to choose the tools that best suit the requirements of your application.
The sample application developed in the walk-through will use a .NET console application configured with the appropriate NuGet packages to support calling Amazon Kinesis service APIs from the AWS SDK for .NET. The sample application will simulate IoT devices that are sending temperature and humidity values collected from their sensors into a Kinesis stream. Kinesis Data Analytics will be used to aggregate average temperature and humidity values every 10 seconds.
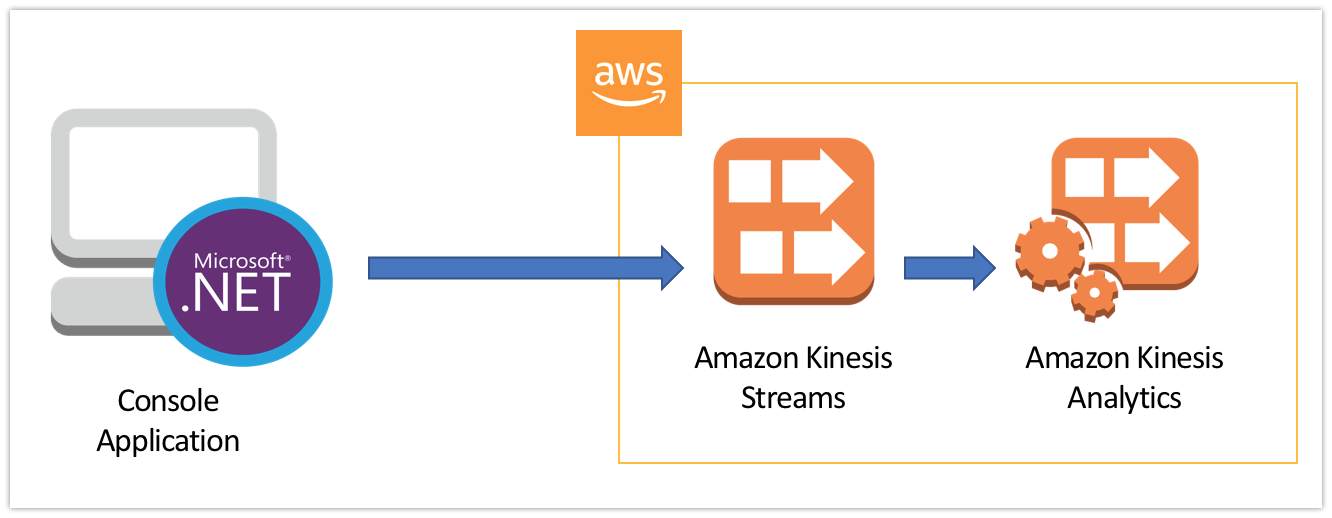
### Application Architecture
The application architecture uses AWS Kinesis Data Streams to receive stream data published from our .NET application. It uses Amazon Kinesis Data Analytics to aggregate stream data in real time as pictured below.
### Modules
This workshop is broken up into four modules. You must complete each module before proceeding to the next.
1. Amazon Kinesis Data Stream Creation
1. IAM User Setup
1. Create a .NET Console Application
1. Create a Kinesis Analytics Application
1. Clean Up
## Module 1: Amazon Kinesis Data Stream Creation
In this module you will set up an Amazon Kinesis Data Streams for the .NET sample application, which you will implement in module two.
**Time to complete:** 5 minutes
### Step 1: Select a Region
Log into the AWS Management Console and select a region to create in which to create an Amazon Kinesis Stream by using the region selector. You can select any AWS region that supports the Amazon Kinesis Streams service. This walk-through will default to using US East (N. Virginia) by default.
### Step 2: Create a Kinesis stream
1. In the AWS Management Console click **Services**.
1. Select *Kinesis* under *Analytics*.
1. Ensure that the *Kinesis Data Streams* radio button is selected
2. Click the **Create data stream** button in the *Get started* section.
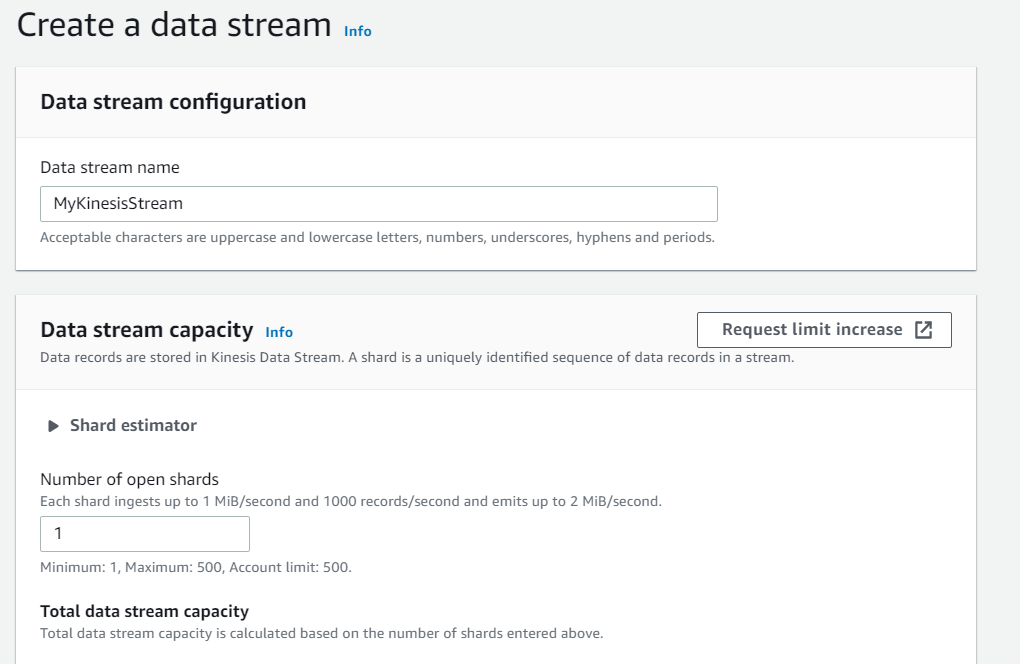
3. In the *Create a data stream* page that is displayed:
1. Type a name for your Kinesis stream name
2. Type a number for Number of shards
3. Click the **Create data stream** button.
> **Note:** Be sure to remember or make a note of the Kinesis stream name you have chosen. It will be required in module 3.
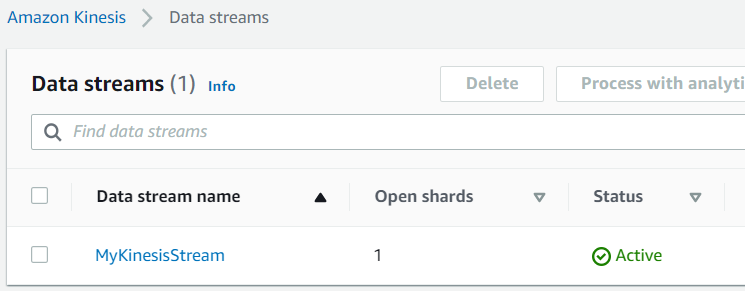
Once created, the Status value will be changed to Active in a few seconds:
## Module 2: IAM User Setup
In this module you will set up an IAM User and configure permissions to permit access to the data stream you have just created.
**Time to complete:** 15 minutes
### Step 1: Create a policy
1. In the AWS Management Console click **Services**.
1. Select *IAM* under *Security, Identity & Compliance*.
1. In the navigation pane select *Policies* and then click the **Create policy** button.
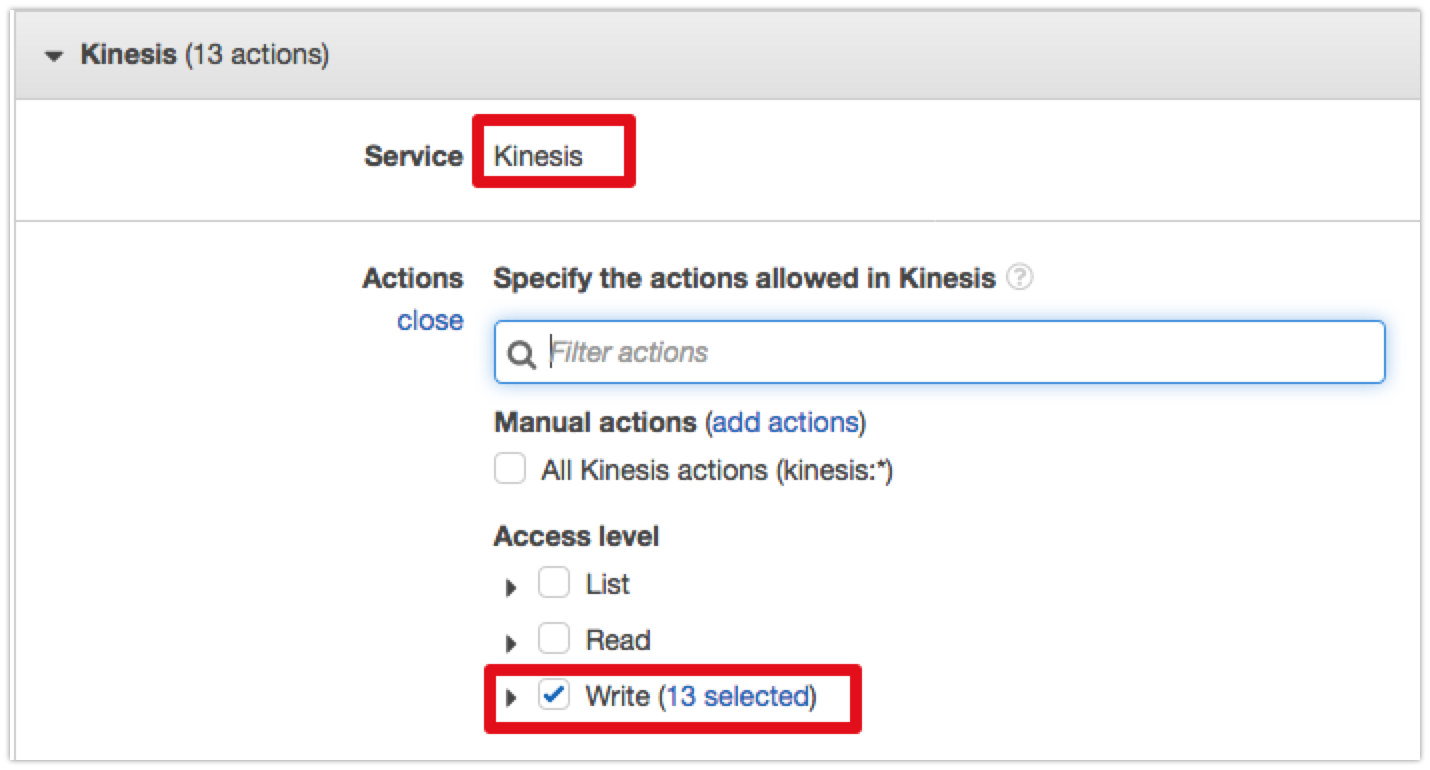
1. Click **Choose a service** and select *Kinesis* from the list.
1. In the *Actions* section, select **Write** for *Access level*.
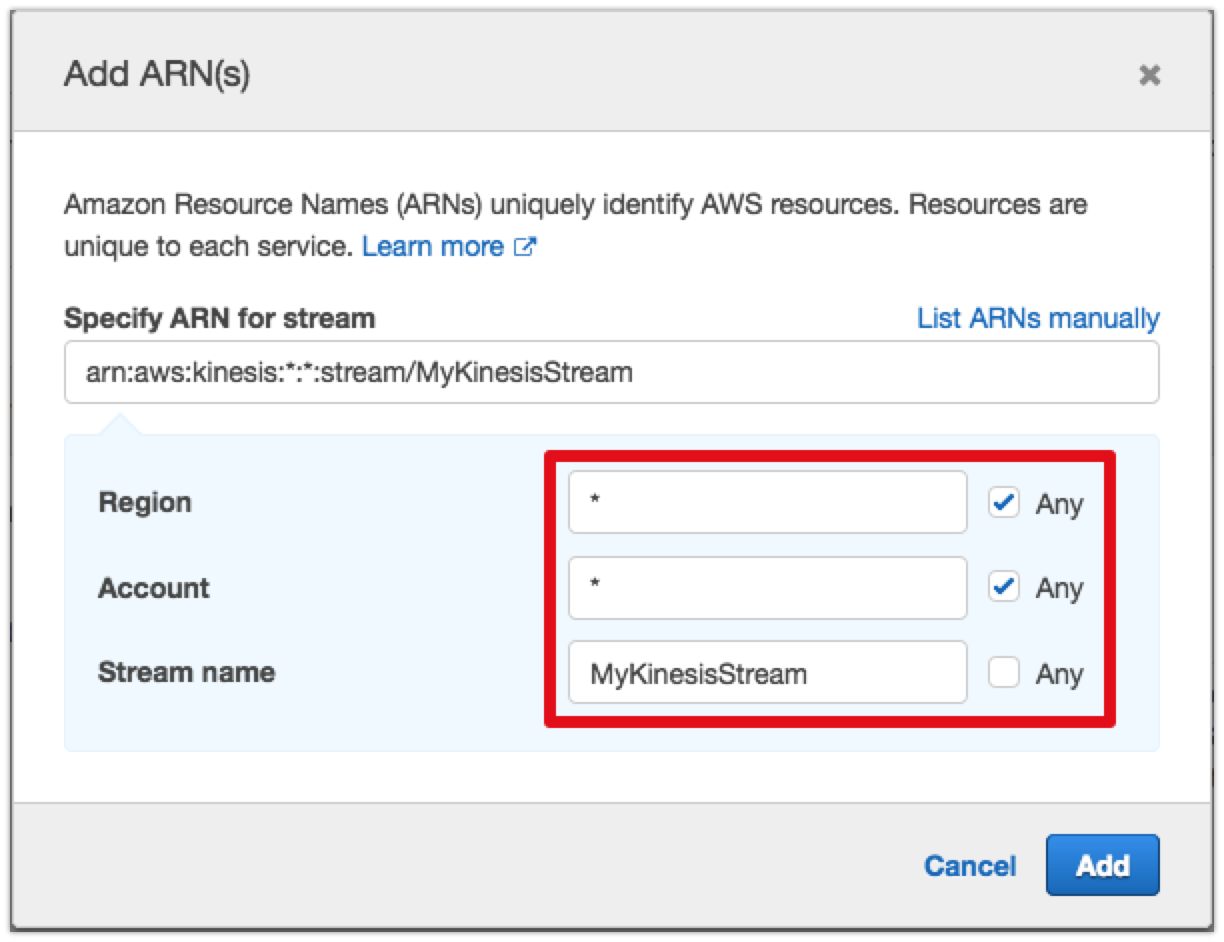
1. Expand the *Resources* section and click the **Specific** radio button.
1. For **stream** click the **Add ARN to restrict access** link.
1. Enter the name of the stream you created in the *Stream name* field.
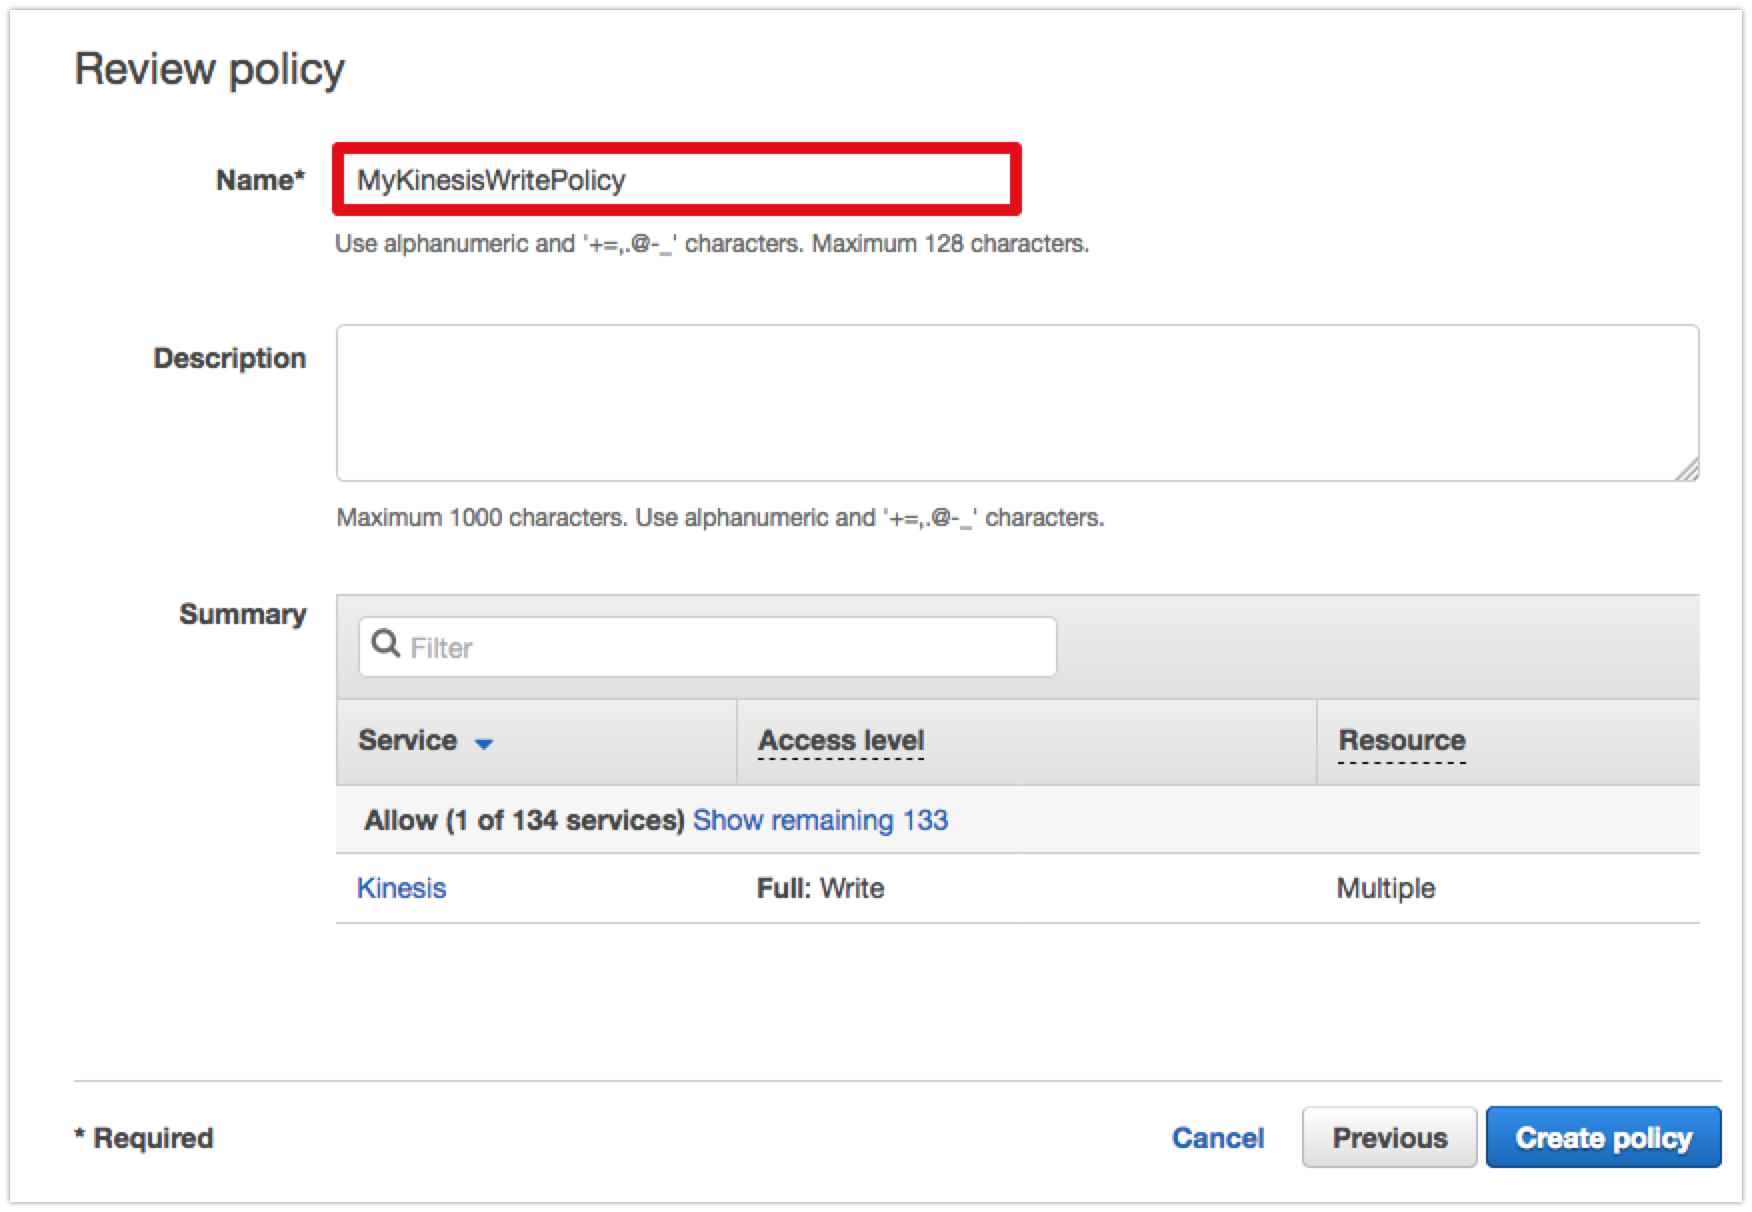
1. Click the **Review policy** button.
2. Enter a name for the policy and then click the **Create policy** button.
### Step 2: Add an IAM user
The IAM user we add in this section will be used exclusively in our console sample application to forward the data from our imaginary sensors into our stream.
1. In the IAM Management Console select *Users* in the navigation pane.
1. Click the **Add user** button.
1. Enter a name for your user in the *User name* field.
1. In the *Select AWS access type* section. check **Programmatic access**. We do not need console access for this user so leave that option unchecked.
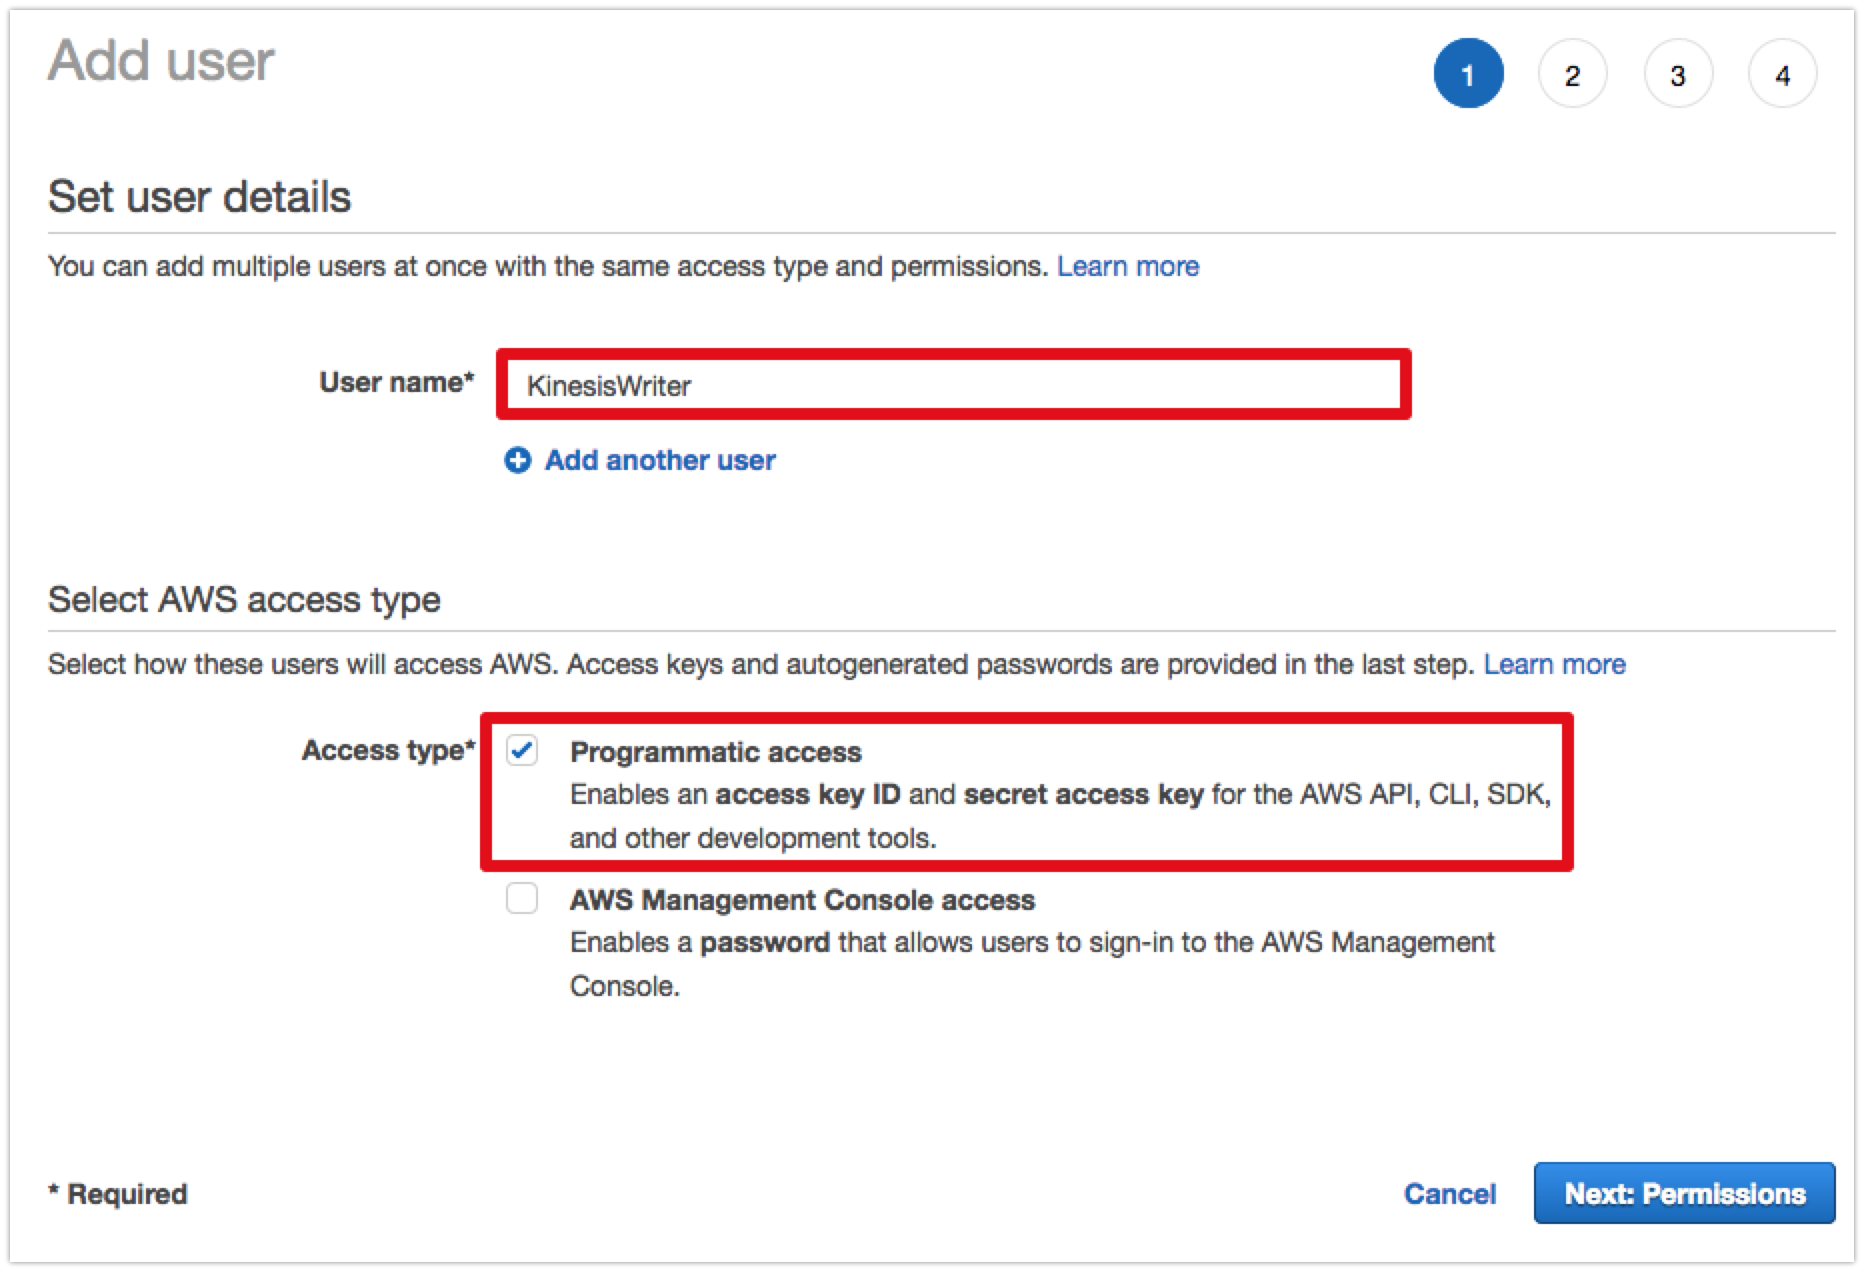
1. Click the **Next: Permissions** button.
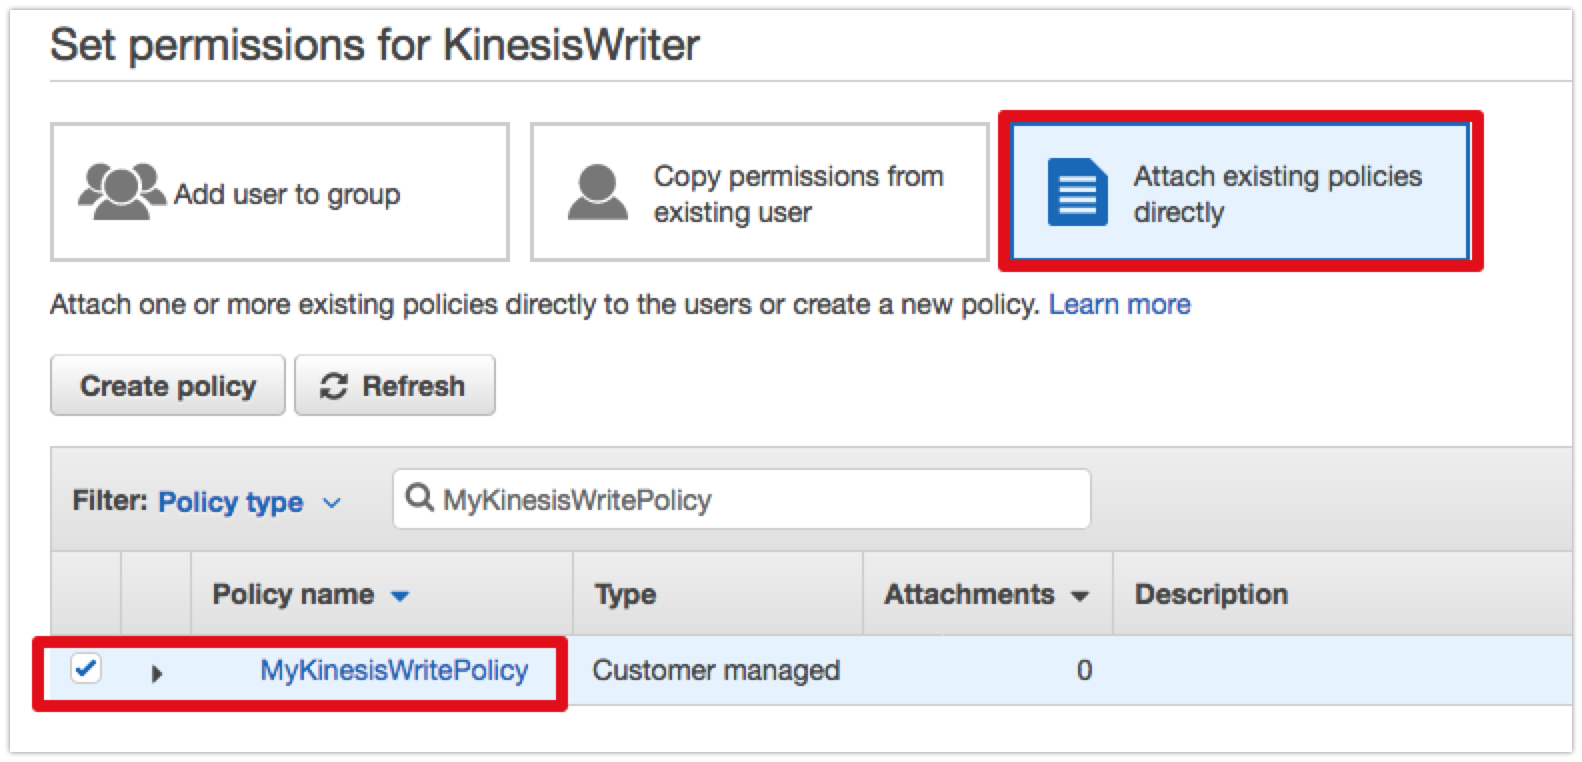
1. Select the **Attach existing policies directly** option.
1. In the *Filter policies* search field, enter the name of the policy you created in the previous step. Click the checkbox next to the policy that is listed to select it.
1. Click the **Next: Tags** button.
1. Attaching tags to resources is considered a good practice but is out of scope for this walk-through so click the **Next: Review** button.
1. Review the user information and then click the **Create user** button.
1. The console will now display the programmatic access and secret keys for the new user user. The secret key will be maked by default. Programmatic keys look like this:
* Access key ID:\
*AKIAIOSFODNN7EXAMPLE*
* Secret access key: (click **Show** to display)\
*wJalrXUtnFEMI/K7MDENG/bPxRfiCYEXAMPLEKEY*
> **Note:**
>
> This is the **only** time you will be able to view the secret access key for this user. Be sure to download the CSV file containing the credentials, or make a note of them as we will need them later in this walk-through.
>
> **Always keep the keys confidential to protect your AWS account and never share or email them.**
To complete this step ensure you have saved or noted the generated credentials and then click **Close**.
### Step 3: Set up an AWS Credential Profile for our sample application
In this step we will create a credential profile that will be used to supply the programmatic credentials we created in step 2 to the AWS SDK for .NET in our application code.
> Note: the instructions in this step create a credential profile with the name *default*. If you have already used any of the AWS tools and SDKs for developers on your local system you may already have a credential profile with this name and may want to consider using a different name or mechanism to supply credentials to your application code. See for more in-depth details on how credentials can be supplied to your application.
To set up a credential profile you can use either the [AWS Tools for PowerShell](https://aws.amazon.com/powershell/), [AWS CLI](https://aws.amazon.com/cli/) or the [AWS Toolkit for Visual Studio](https://aws.amazon.com/visualstudio/). The instructions below focus on using the command line tools. Refer to the toolkit's [user guide](https://docs.aws.amazon.com/toolkit-for-visual-studio/latest/user-guide/credentials.html) for instructions on how to set up credential profiles inside Visual Studio.
#### 3.1: Set up a credential profile using the AWS Tools for PowerShell
* Users on Windows running PowerShell versions 2 through 5.x should install the AWS Tools for Windows PowerShell module:
* Users on Windows, Mac, or Linux running PowerShell version 6.x should install the AWS Tools for PowerShell Core module:
Once the correct module for your version of PowerShell is installed you can configure the tools by opening a PowerShell shell and running the following commands:
```powershell
PS C:\> Import-Module AWSPowerShell # replace with AWSPowerShell.NetCore on PowerShell version 6 or higher
PS C:\> Set-AWSCredential -AccessKey "ACCESS-KEY-HERE" -SecretKey "SECRET-KEY-HERE" -StoreAs "default"
```
For more information on configuring the AWS Tools for PowerShell please refer to the [user guide](https://docs.aws.amazon.com/powershell/latest/userguide/pstools-welcome.html).
#### 3.2: (Alternative) Set up a credential profile with the AWS CLI
1. Install the AWS CLI for Windows, Mac, or Linux:
1. Once installed, you can configure the CLI by running the `aws configure` command in a terminal or command-line window.
1. When prompted, enter your AWS Access Key ID and press **Return**.
1. Enter your AWS Secret Access Key when prompted and then press **Return**.
1. For the default region name you should enter your chosen region code (e.g. eu-west-1)
1. Finally, for the default output format you can just press **Return**.
## Module 3. Create a .NET Console Application
In this module you will create and configure a .NET console application to publish data into the Amazon Kinesis Data Stream we created in step 1.
*Time to complete*: 20 minutes
### Step 1. Create an empty console application project
Our sample application for this walk-through is a console application that can be created using either the .NET Framework (on Windows) or .NET Core (on Windows, MacOS or Linux). The included application code is based on .NET Core.
The instructions below assume you are using .NET Core and the dotnet CLI tools to create and manage the project. If you are using Visual Studio on Windows you can use the IDE's *File > New Project* wizard to create the application and the NuGet tools within Visual Studio to add the necessary dependencies.
#### 1.1: Create the sample project
1. Open a shell or command line prompt.
1. Create a folder for the new project and `cd` into it, then run the dotnet CLI command to create a new console application:
```bash
mkdir kinesis-sample
cd kinesis-sample
dotnet new console
```
#### 1.2: Add NuGet Dependencies
In this step we will add the necessary NuGet packages for the AWS SDK for .NET to enable our application to make calls to Kinesis. The instructions below assume use of the dotnet CLI in a .NET Core based application; if you are using the .NET Framwork, or Visual Studio, you can add the dependencies via the *Manage NuGet Packages...* option on the project menu or the NuGet Package Manager console.
1. Add a dependency on the [AWSSDK.Kinesis](https://www.nuget.org/packages/AWSSDK.Kinesis/) NuGet package:
```bash
dotnet add package AWSSDK.Kinesis
```
1. Add a dependency on the [Newtonsoft.Json](https://www.nuget.org/packages/Newtonsoft.Json/) package (this is an additional dependency required by our application code, not the AWS SDK):
```bash
dotnet add package Newtonsoft.Json
```
### Step 2: Write the C# Code
> Note: The completed sample application can be found in the SampleApplication subfolder of this guide.
1. In Visual Studio or an editor of your choice, open the *Program.cs* file.
1. Replace the generated sample code with the following. The sample code simulates IoT devices that are sending temperature and humidity values collected from their sensors into our Kinesis Data Stream:
```csharp
using System;
using System.Collections.Generic;
using System.IO;
using System.Text;
using System.Threading;
using Amazon.Kinesis;
using Amazon.Kinesis.Model;
using Newtonsoft.Json;
namespace KinesisPublishSample
{
public class DeviceData
{
public string DeviceId { get; set; }
public int Humidity { get; set; }
public int Temperature { get; set; }
}
class Program
{
// NOTE: replace the value with your Kinesis stream name
static string _kinesisStreamName ="YOUR-KINESIS-STREAM-NAME-HERE";
// NOTE: update with the region in which you created your stream
static Amazon.RegionEndpoint _regionEndpoint = Amazon.RegionEndpoint.USEast1;
static int _maxExecutionCount = 1000;
static int _publishInterval = 3000;
static int _deviceCount = 5;
static bool _cancelled = false;
static void Main(string[] args)
{
Console.WriteLine($"Now ready to publish data into Kinesis stream : {_kinesisStreamName}\n");
Console.WriteLine("Press Ctrl+C to exit...\n");
Console.CancelKeyPress += new ConsoleCancelEventHandler(Console_CancelKeyPress);
for (var i = 0; i < _maxExecutionCount; i++)
{
List dataList = GetDeviceData();
PublishDeviceDataToKinesis(dataList);
Thread.Sleep(_publishInterval);
if (_cancelled) break;
}
Console.WriteLine("Task Completed!\n");
Console.Write("To publish more data, please run the application again.\n");
Console.CancelKeyPress -= new ConsoleCancelEventHandler(Console_CancelKeyPress);
}
private static void Console_CancelKeyPress(object sender, ConsoleCancelEventArgs e)
{
if (e.SpecialKey == ConsoleSpecialKey.ControlC)
{
_cancelled = true;
e.Cancel = true;
}
}
private static void PublishDeviceDataToKinesis(List dataList)
{
// note: this constructor relies on you having set up a credential profile
// named 'default', or have set credentials in environment variables
// AWS_ACCESS_KEY_ID & AWS_SECRET_ACCESS_KEY, or have an application settings
// file. See https://docs.aws.amazon.com/sdk-for-net/v3/developer-guide/net-dg-config-creds.html
// for more details and other constructor options.
var kinesisClient = new AmazonKinesisClient(_regionEndpoint);
foreach (DeviceData data in dataList)
{
var dataAsJson = JsonConvert.SerializeObject(data);
var dataAsBytes = Encoding.UTF8.GetBytes(dataAsJson);
using (var memoryStream = new MemoryStream(dataAsBytes))
{
try
{
var requestRecord = new PutRecordRequest
{
StreamName = _kinesisStreamName,
PartitionKey = data.DeviceId,
Data = memoryStream
};
var responseRecord = kinesisClient.PutRecordAsync(requestRecord).Result;
Console.WriteLine($"Successfully published. Record:{data.DeviceId},{data.Humidity},{data.Temperature} Seq:{responseRecord.SequenceNumber}");
}
catch (Exception ex)
{
Console.WriteLine($"Failed to publish. Exception: {ex.Message}");
}
}
}
}
private static List GetDeviceData()
{
var dataList = new List();
var url = Path.GetRandomFileName();
for (var i = 0; i < _deviceCount; i++)
{
var rnd = new Random(Guid.NewGuid().GetHashCode());
var data = new DeviceData
{
DeviceId = string.Format("Device{0}", i),
Temperature = rnd.Next(0, 40),
Humidity = rnd.Next(0, 100)
};
dataList.Add(data);
}
return dataList;
}
}
}
```
1. Replace *YOUR-KINESIS-STREAM-NAME-HERE* with the name of your actual Kinesis stream that was created in module 1.
1. If your Kinesis stream was created in a region other than US East (N. Virginia), update the value of the _regionEndpoint as appropriate.
> *Note:* Amazon Kinesis is a regional service. If you try to access a Kinesis stream in another region, you will get a 'stream not found' error.
***Additional notes***
* The sample code will run 1000 times. You can change the value by modifying the *_maxExecutionCount* variable.
* The sample will publish data every 3 seconds. You can change the interval by modifying the *_publishInterval* variable.
* The sample will simulate 5 IoT devices. You can change the device count by modifying the *_deviceCount* variable.
### Step 3: Test the application
1. In your shell command prompt execute the command `dotnet run` to build and run the application. In Visual Studio, press *F5*.
1. While the application runs it will output progress messages:
```bash
Now ready to publish data into Kinesis stream : MyKinesisStream
Press Ctrl+C to exit...
Successfully published. Record:Device0,19,5 Seq:49593850145254330957453609702703505252154159559671283714
Successfully published. Record:Device1,52,16 Seq:49593850145254330957453609702704714177973774188845989890
Successfully published. Record:Device2,27,7 Seq:49593850145254330957453609702705923103793388818020696066
Successfully published. Record:Device3,34,7 Seq:49593850145254330957453609702707132029613003447195402242
...
Successfully published. Record:Device4,96,0 Seq:49593850145254330957453609702753071210758360798943248386
Task Completed!
To publish more data, please run the application again.
```
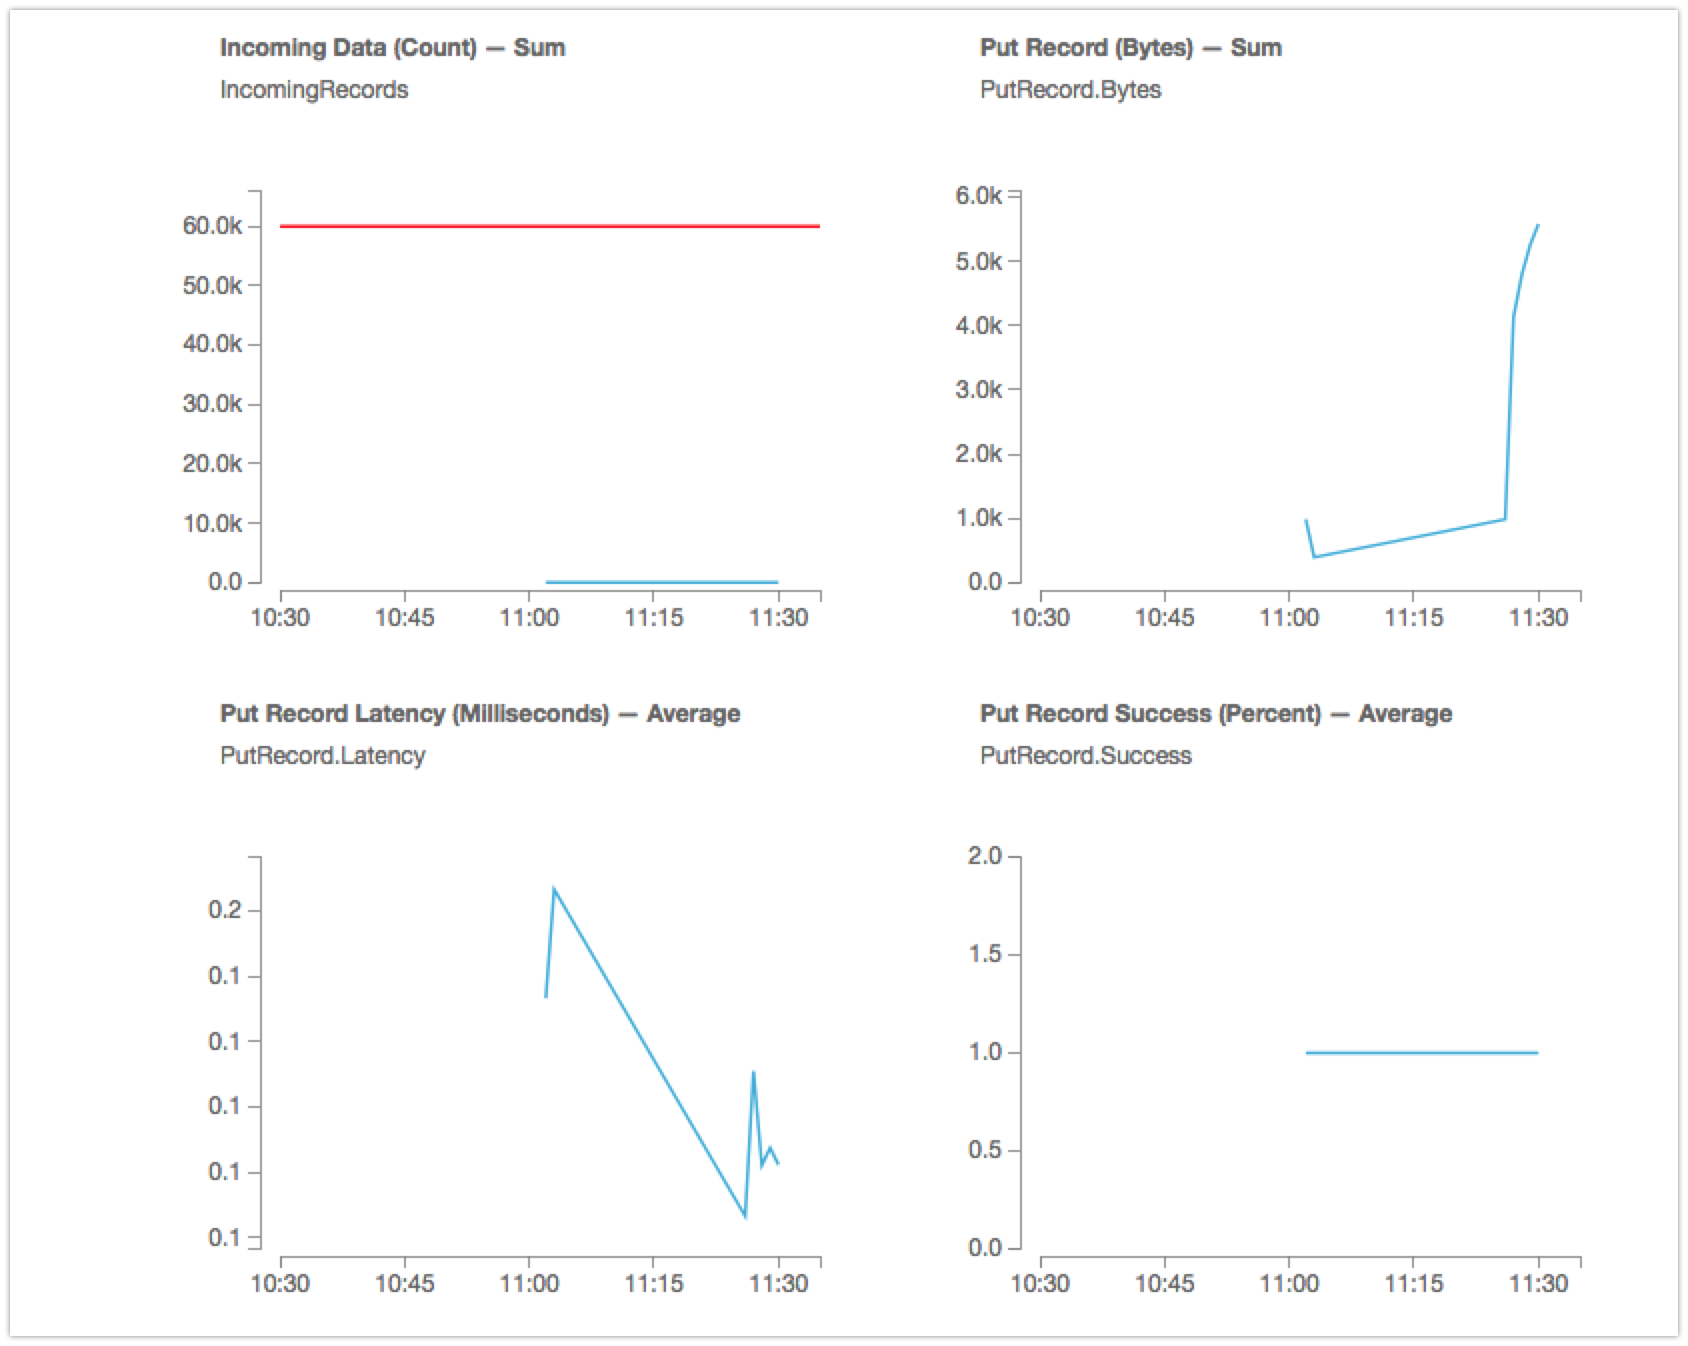
1. To see the status of the Kinesis stream, in the AWS Management Console navigate to the Kinesis dashboard .
1. In the *Kinesis data streams* panel click on your stream name.
1. Select the *Monitoring* tab in the resulting view and scroll down until you see the *Put Record* graphs.
## Module 4. Create a Kinesis Analytics application
Amazon Kinesis Data Analytics is the easiest way to process streaming data in real time with standard SQL without having to learn new programming languages or processing frameworks. In this module you will create and configure a Kinesis Analytics application to analyze stream data in real-time.
**Time to complete:** 15 minutes
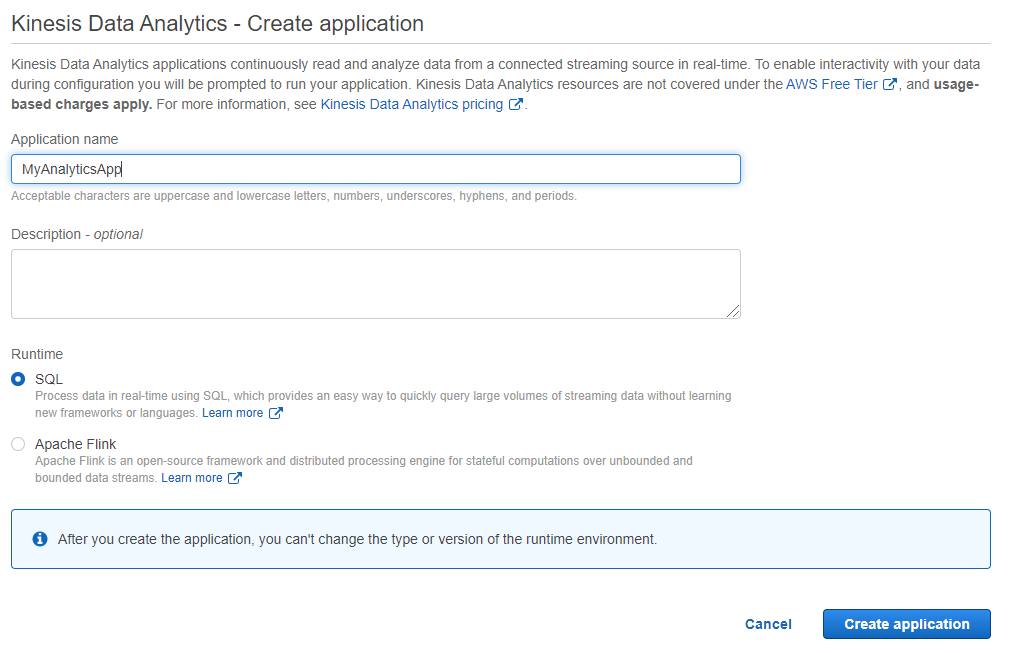
### Step 1: Create a Kinesis Analytics application
1. In the AWS Management Console click **Services**.
1. Select *Kinesis* under *Analytics*.
1. In the navigation panel click **Data Analytics**.
1. Click **Create application**.
1. Enter a name for the application and then click the **Create application** button.
### Step 2: Connect to source and discover schema
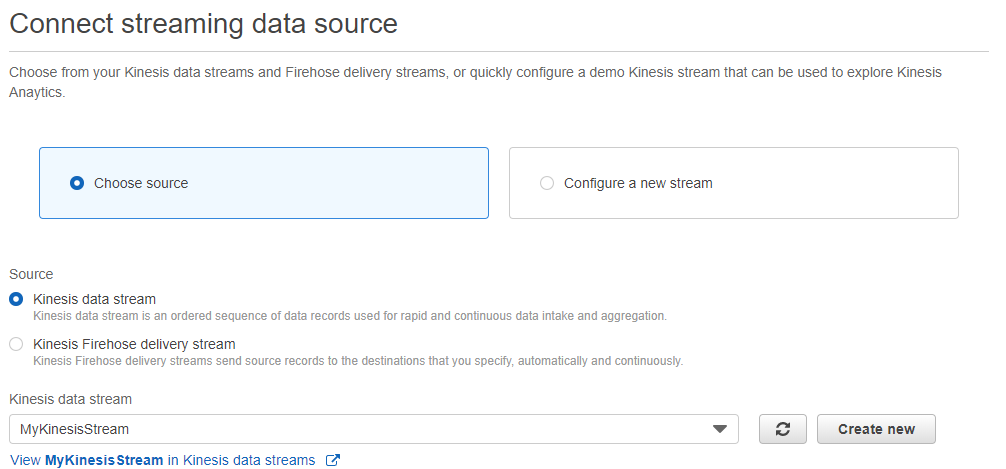
1. Click **Connect streaming data**.
1. On the *Connect streaming data source* page click **Choose source**.
1. Select **Kinesis stream** for *Source* and in the *Kinesis stream* drop-down select the name of the stream that was created in module 1.
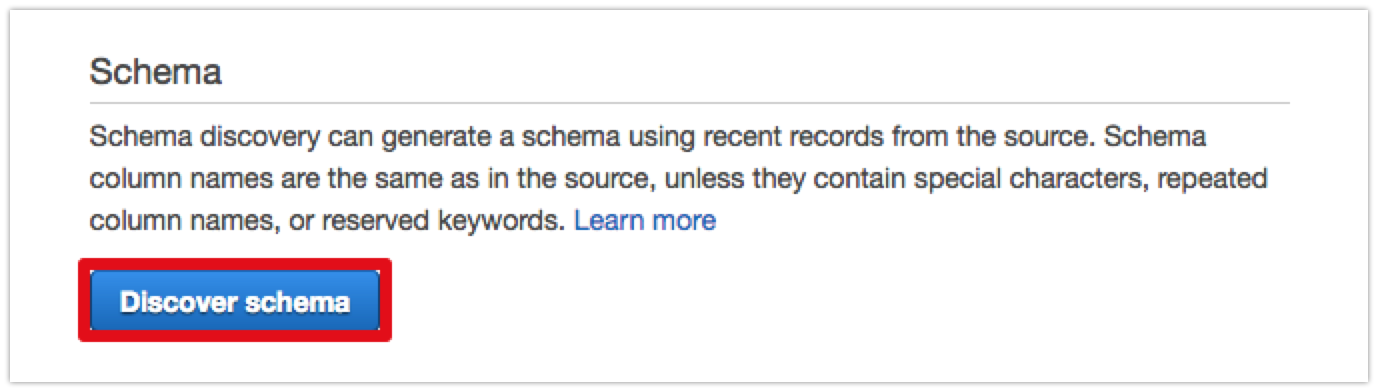
1. Scroll down and click the **Discover schema** button. Kinesis will then begin generating a schema from recent records from the source stream.
1. When schema discovery has completed you can see the formatted schema as below:
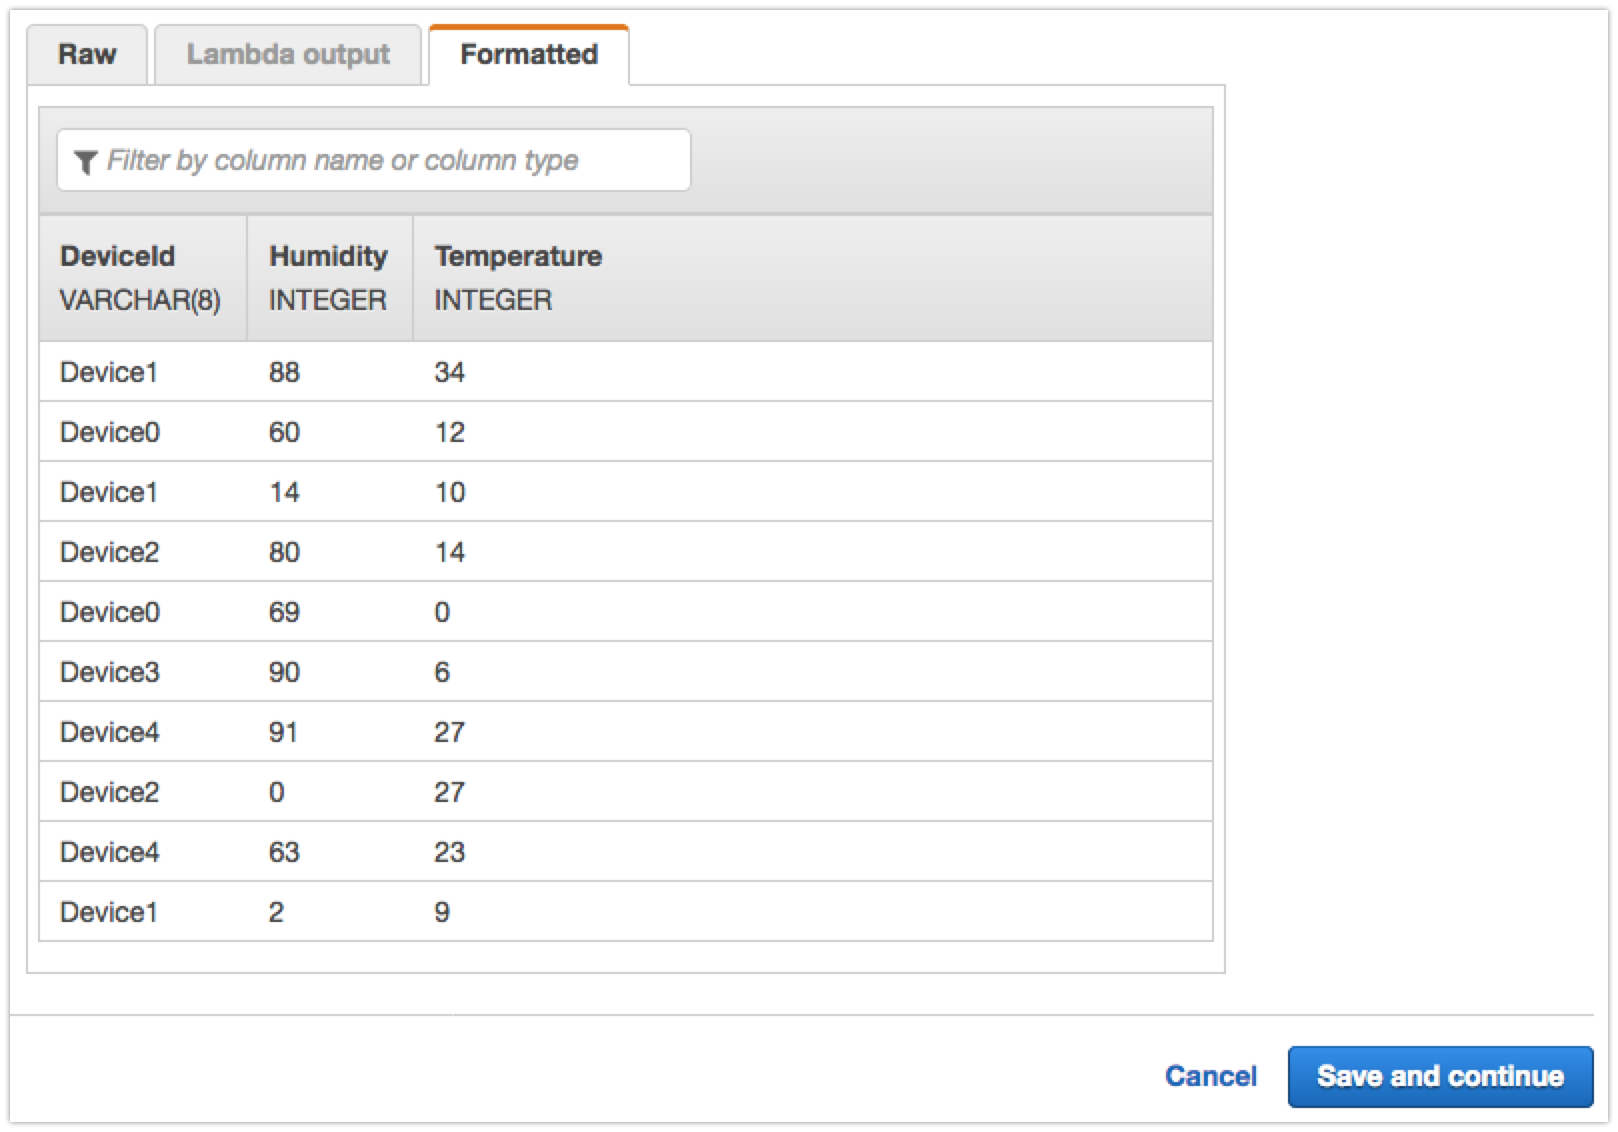
1. Click the **Save and continue** button.
### Step 3: Configure Real-time Analytics
1. In the *Real time analytics* section click the **Go to SQL editor** button.
1. A pop-up dalog will be displayed asking if you want to start running the application. Click the **Yes, start application** button. Kinesis will start the application, which can take 30 seconds or so.
1. Copy and paste the following SQL queries into the SQL editor. For each query click the **Save and run SQL** button.
```sql
CREATE OR REPLACE STREAM "DESTINATION_SQL_STREAM" (device_id VARCHAR(8), avg_humidity INTEGER, avg_temperature INTEGER);
CREATE OR REPLACE PUMP "STREAM_PUMP" AS INSERT INTO "DESTINATION_SQL_STREAM"
SELECT STREAM "DeviceId",
AVG("Humidity") AS avg_humidity,
AVG("Temperature") AS avg_temperature
FROM "SOURCE_SQL_STREAM_001"
GROUP BY "DeviceId", FLOOR(("SOURCE_SQL_STREAM_001".ROWTIME - TIMESTAMP '1970-01-01 00:00:00') SECOND / 10 TO SECOND);
```
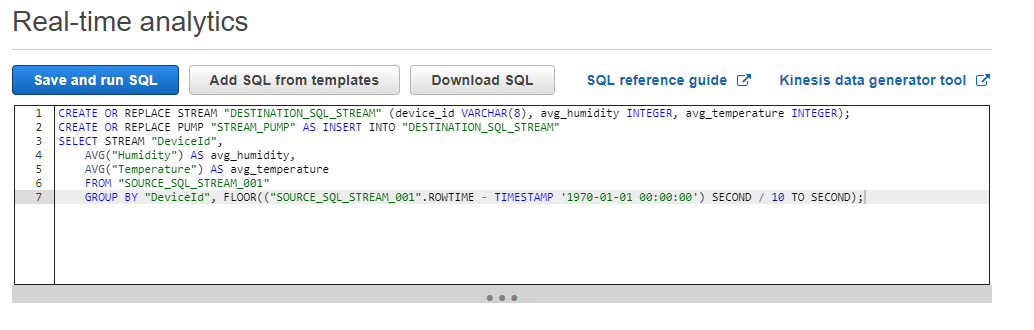
1. The sample SQL script runs on the aggregate stream data over a 10 second tumbling window for Temperature and Humidity column.
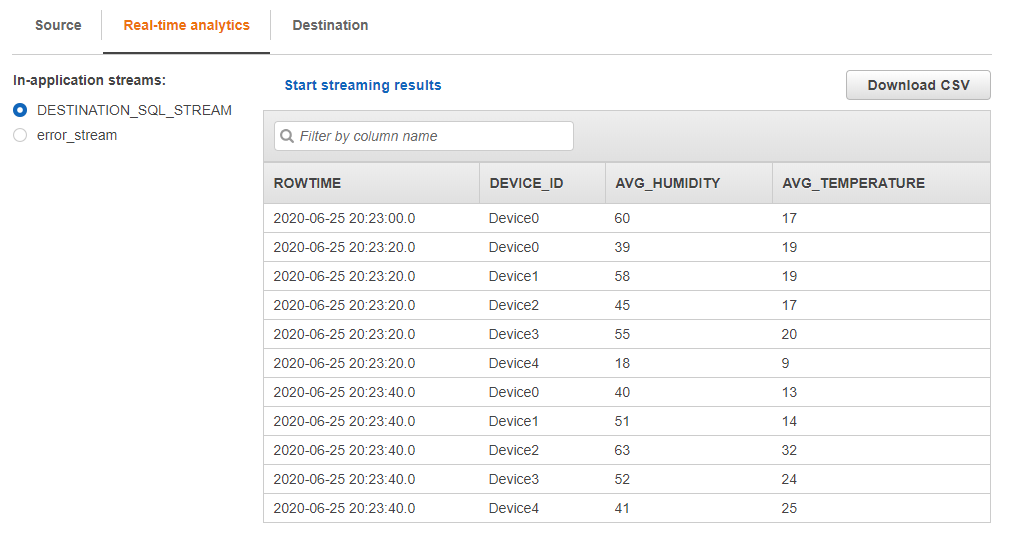
1. You can see the analytic results from the **Real-time analytics**
tab as below.
> Note: We used a simple aggregation function to get average temperature and humidity data from stream data received from devices. The following diagram illustrates the overall process.
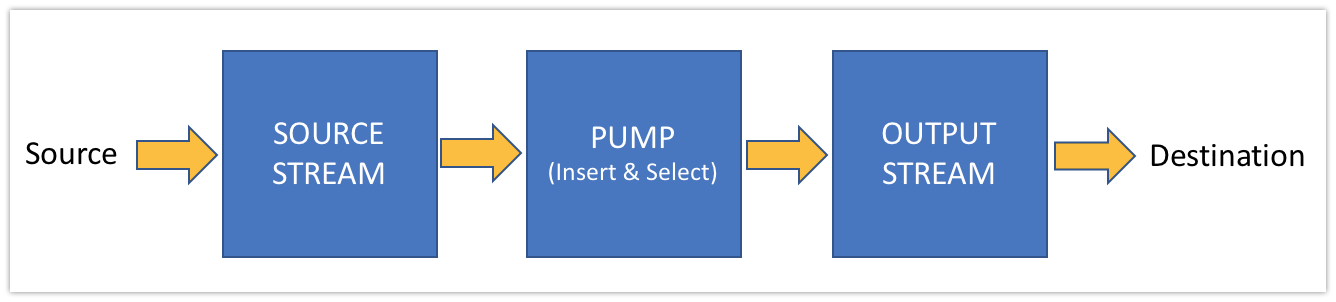
* *SOURCE STREAM* - a continuously updated entity that you can `SELECT` from and `INSERT` into like a `TABLE`
* *PUMP* - an entity used to continuously `SELECT ... FROM` a source STREAM, and `INSERT` SQL results into an output STREAM
* *OUTPUT STREAM* - used to send to a destination
To see more examples, please refer to the following article: [Example Amazon Kinesis Data Analytics Applications](https://docs.aws.amazon.com/kinesisanalytics/latest/dev/example-apps.html)
You can also connect an in-application stream to a Kinesis stream, or to a Firehose delivery stream, to continuously deliver SQL results to an AWS destination. For example, you can integrate with BI tools like QuickSight or other 3rd party visualization tools.
## Module 5. Cleanup
In this module you will clean up resources to avoid charges.
**Time to complete:** 5 minutes
### Step 1. Delete the Kinesis stream
1. Go to the **Kinesis** dashboard page in the AWS Management Console.
1. Click **Data Streams** in the navigation pane.
1. Check the box next to your Kinesis stream.
1. Click **Delete** button to delete the stream and follow directions on *Delete* confirmation screen.
### Step 2. Delete the Analytics application
1. Go to the **Kinesis** dashboard page in the AWS Management Console.
1. Click **Data Analysis** in the navigation pane.
1. Select the radio button next to your Kinesis Analytics application.
1. Select the *Actions* drop down menu.
1. Click **Delete Application**.
1. In the confirmation pop-up dialog click **Delete application** to confirm deletion.
Congratulations! You have completed this walk-through of how to publish data from a .NET application to Amazon Kinesis.