1. In the AWS Management Console, choose **Services** then select **S3** under Storage. 1. Choose **+Create Bucket** 1. Provide a globally unique name for your bucket such as `smworkshop-firstname-lastname`. 1. Select the Region you've chosen to use for this workshop from the dropdown. 1. Choose **Next** in the lower right of the dialog without selecting a bucket to copy settings from. 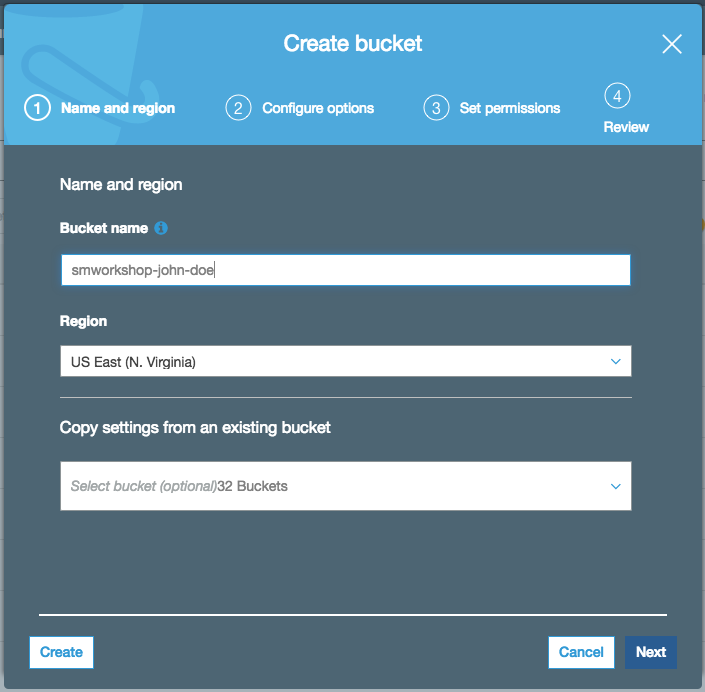 1. Leave everything default on `Configure options` screen and choose **Next** in the lower right of the dialog. 1. On `Permissions` screen, esnure that public permissions are not granted to this bucket, by checking that under the dropdown for `Manage public permissions`, the option `Do not grant public read access to this bucket (Recommended)` remains selected. 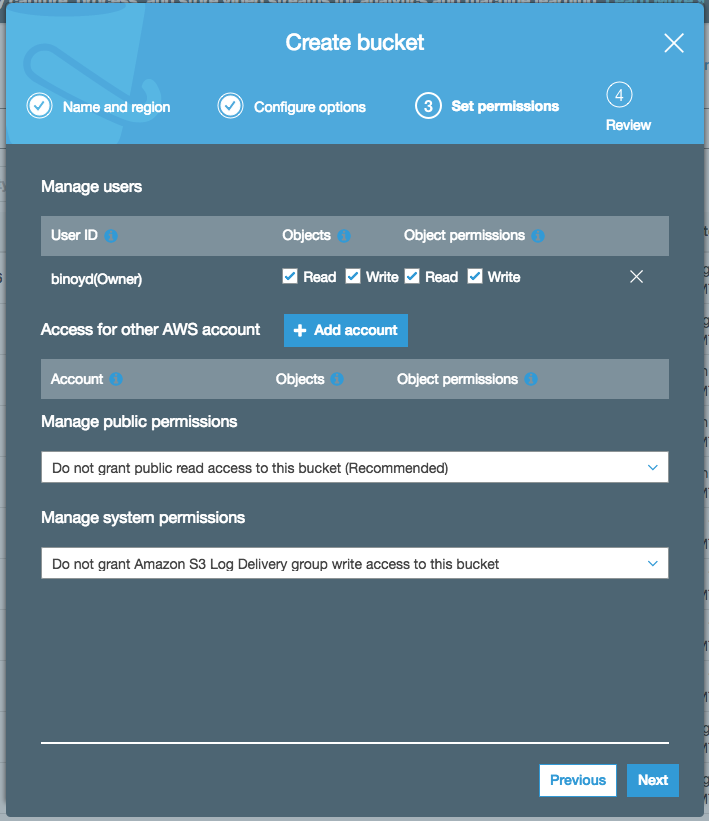 1. Choose **Next** in the lower right of the dialog to go to Review screen, and verify the screen showed is similar to the example shown below. 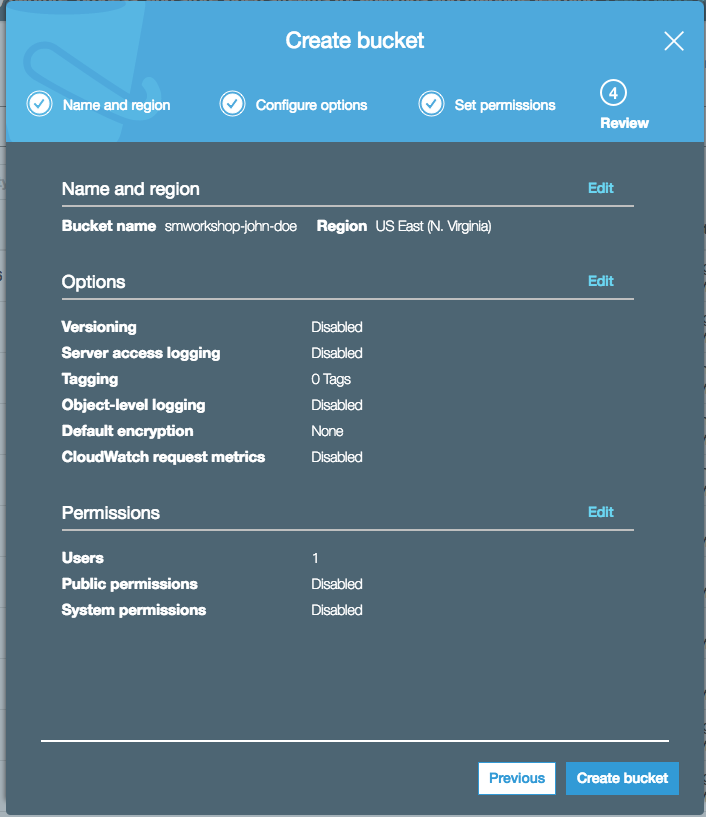 1. Choose **Create Bucket** to complete the S3 bucket creation. You'll use this bucket to host your training data, and also to store the model artifacts.
1. In the AWS Management Console choose **Services** then select **Amazon SageMaker** under Machine Learning. 1. Choose **Lifecycle configurations** under the section **Notebook** on the left panel.  1. Choose **Create configuration** to open the create dialog. 1. Type the name `smworkshop-notebook-lifecycle-config` in the `Name` field. 1. In the tab **Start notebook**, type or copy-paste the `Start Notebook` script from above. (This is required to run docker service, neccessary only if you are following the low level approach for model training and hosting). 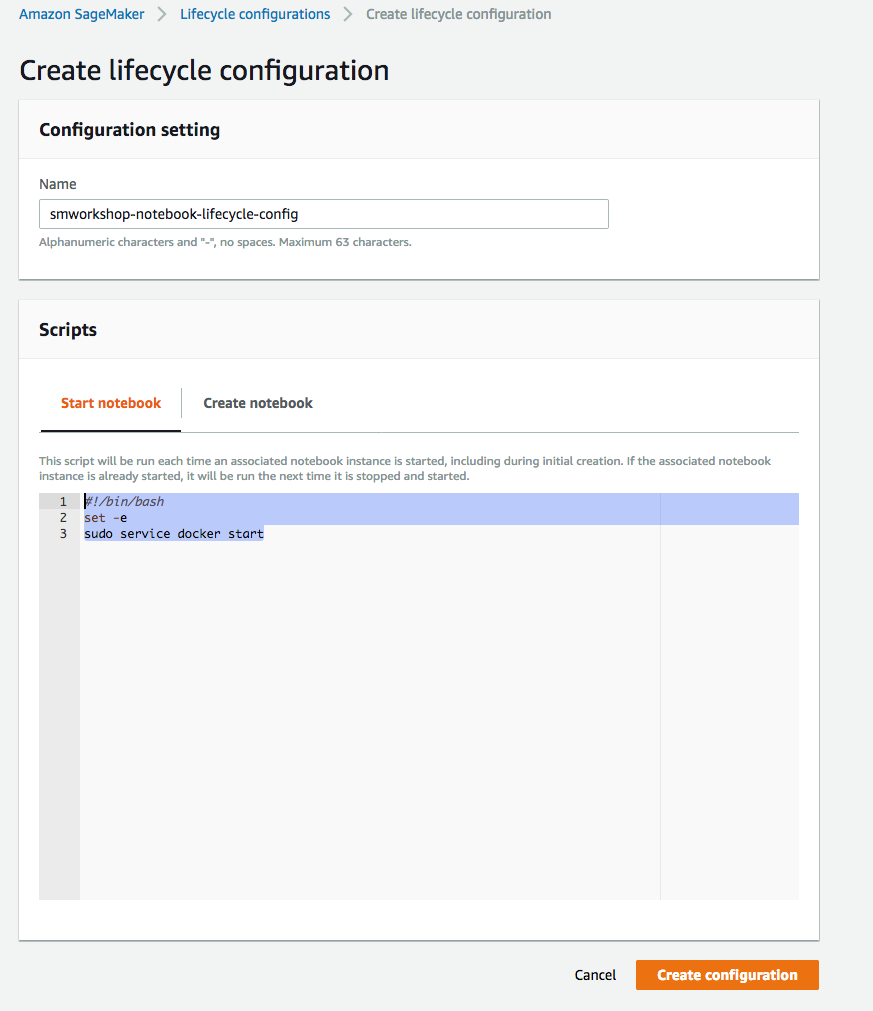 1. In the tab **Create notebook**, type or copy-paste the `Create Notebook` script from above. (You can omit the commands to retain `container` folder and to install `docker`, if you choose to follow the high level approach for model training and hosting). 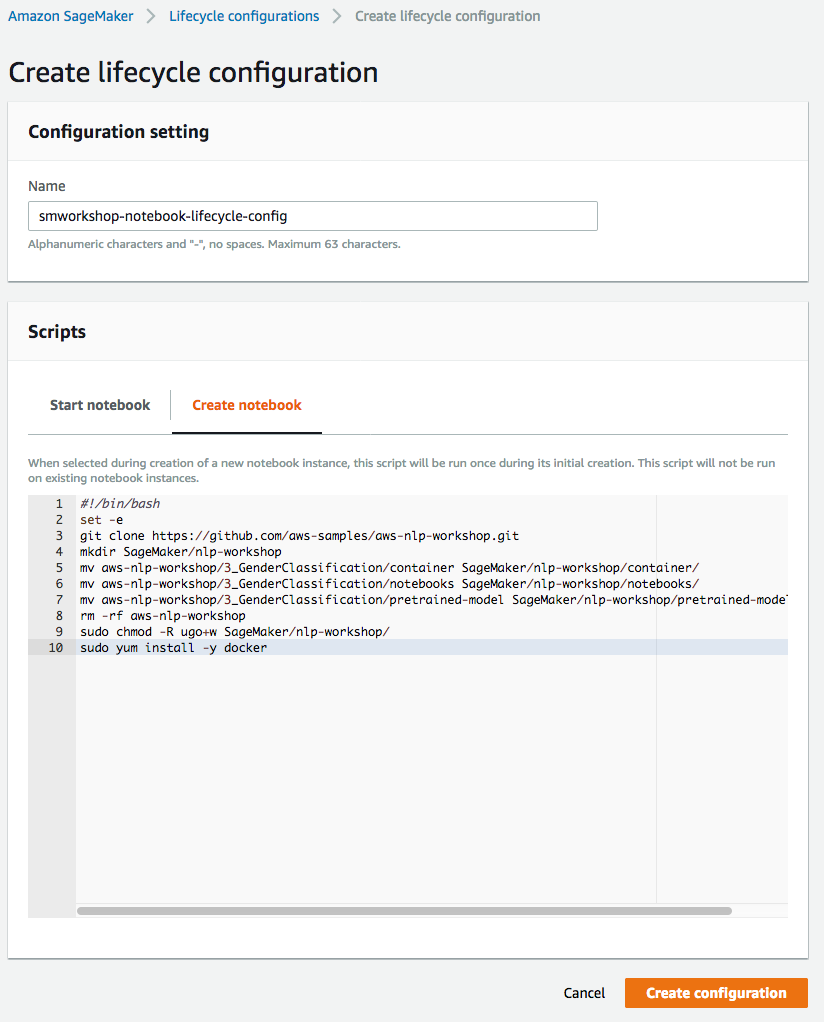 1. Finish configuration by clicking **Create configuration**.
1. In the AWS Management Console choose **Services** then select **Amazon SageMaker** under Machine Learning. 1. Choose **Notebook instances** under the section **Notebook** on the left panel. 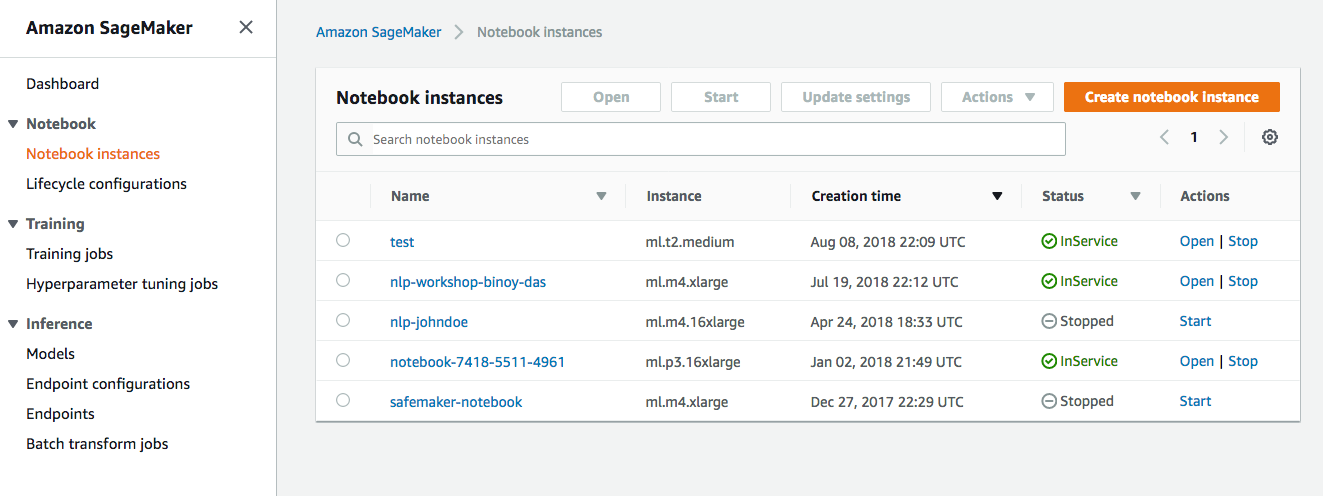 1. Choose **Create notebook Instance** to open the create dialog. 1. Type the name `smworkshop-notebook` in the `Name` field. 1. From `Notebook instance type dropdown`, choose `ml.m4.xlarge`. 1. From `IAM role` dropdown, choose `Create a new role`. 1. In the dialog that pops up, keep the radio button for `Specific S3 buckets` selected, and type the S3 bucket name, that you used in section-1 of this module, such as `smworkshop-firstname-lastname`.  1. Choose **Create Role** to return to notebook creation dialog. Notice that SageMaker creates a new execution role with the current timestamp appended at the end of its name, and that this role remains selected under `IAM role` dropdown. 1. From the `Lifecycle configuration` dropdown, choose the configuration named `smworkshop-notebook-lifecycle-config`, that you created in section-2. 1. Leave the VPC selection and Encryption Keys empty for the purpose of this workshop, and choose **Create notebook instance** to finish creation. 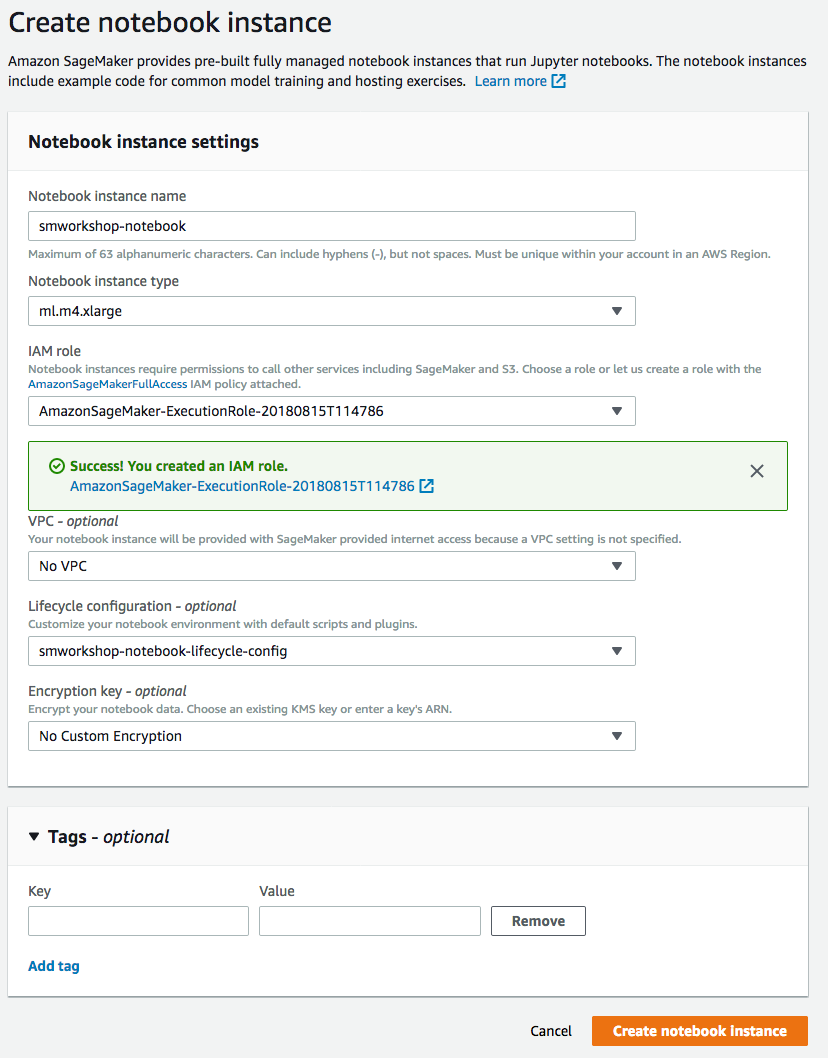 1. You'll be returned to the list of notebooks, with the status of curren notebook shown as `Pending`. Wait till the status changes to `InService`, before proceeding to the next section. 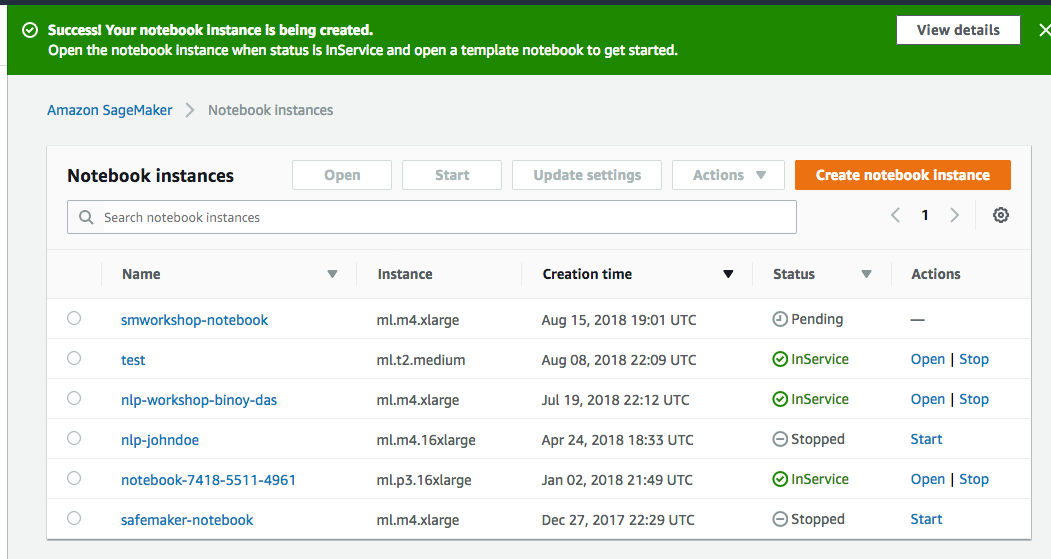
1. From the **Notebook instances** page, click on the hyperlink displayed as the `Name` of the notebook you just created, in this case - `smworkshop-notebook`. 1. From the **Notebook instance settings** page, follow the hyperlink displayed as the IAM role ARN. 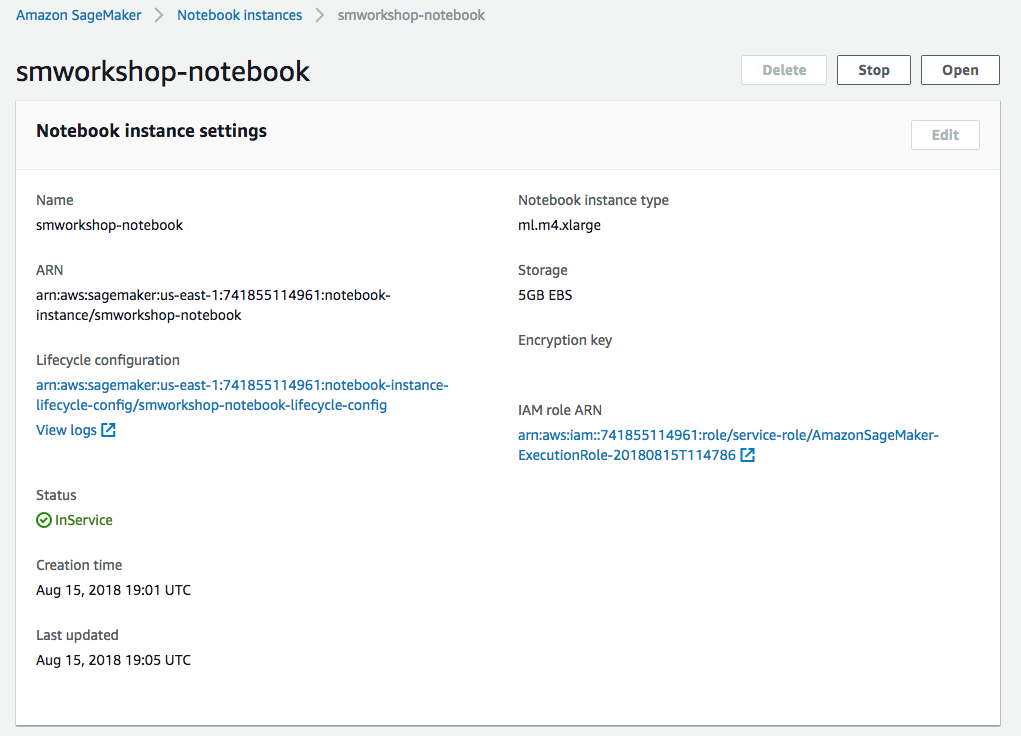 1. From the IAM console page that opens in a new browser tab, displying the role summary, choose **Add Inline policy** 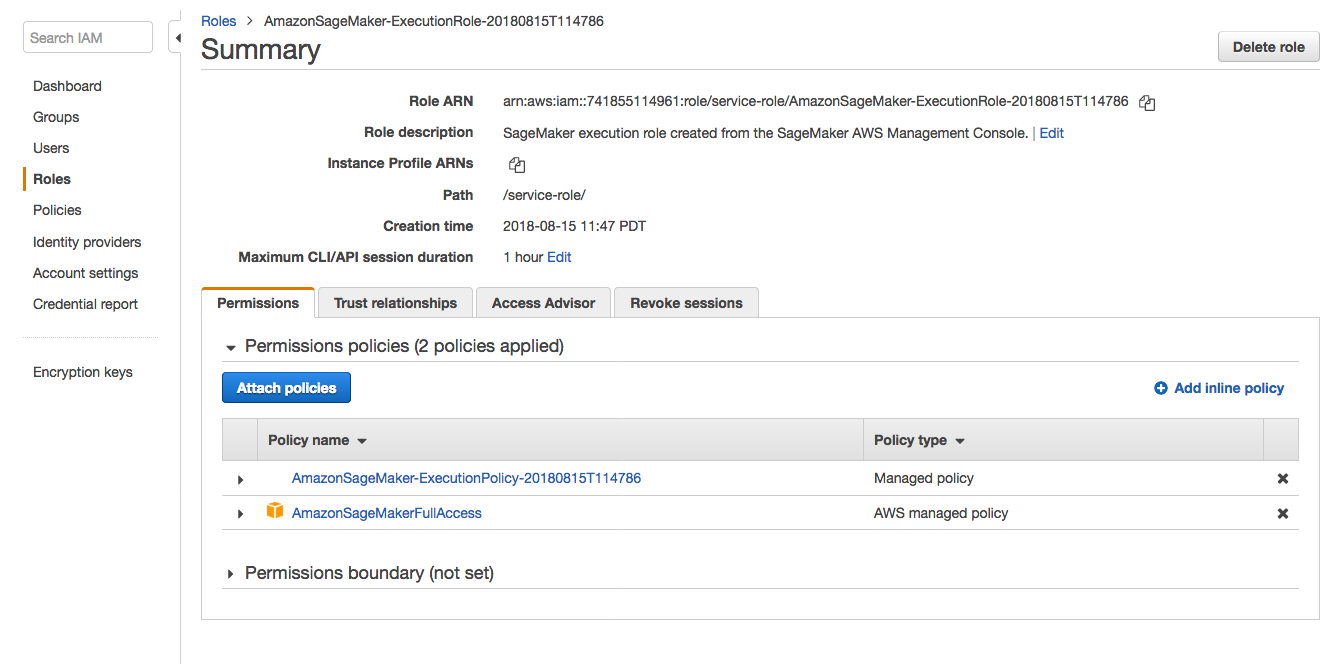 1. On **Create policy** page, click on **Choose a service** 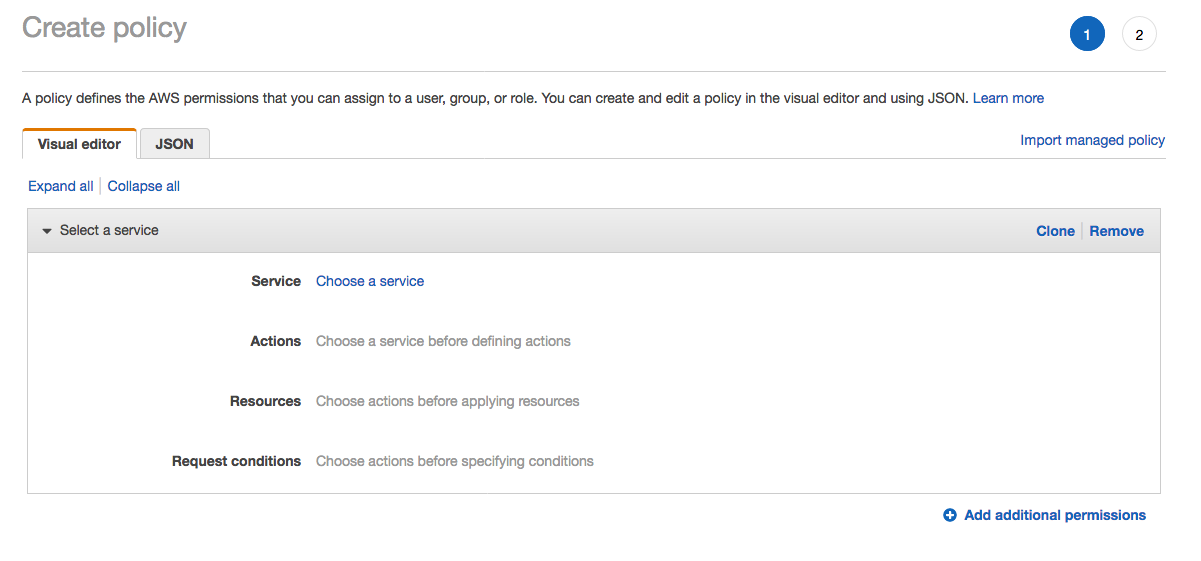 1. In the suggestive search box, type "IAM", to have the list of displayed service filtered down, then choose **IAM** from the narrowed down list. 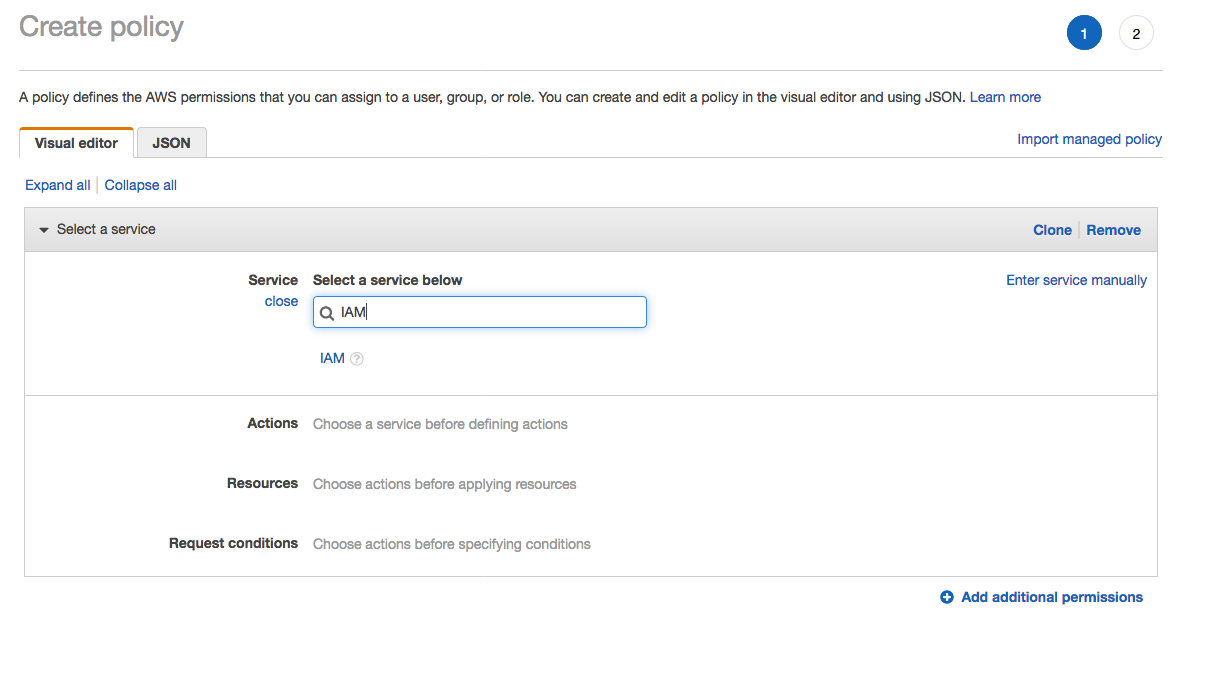 1. Under `Actions` section, expand `Read` Access level 1. Select only actions - **GetPolicy** and **GetPolicyVersion** 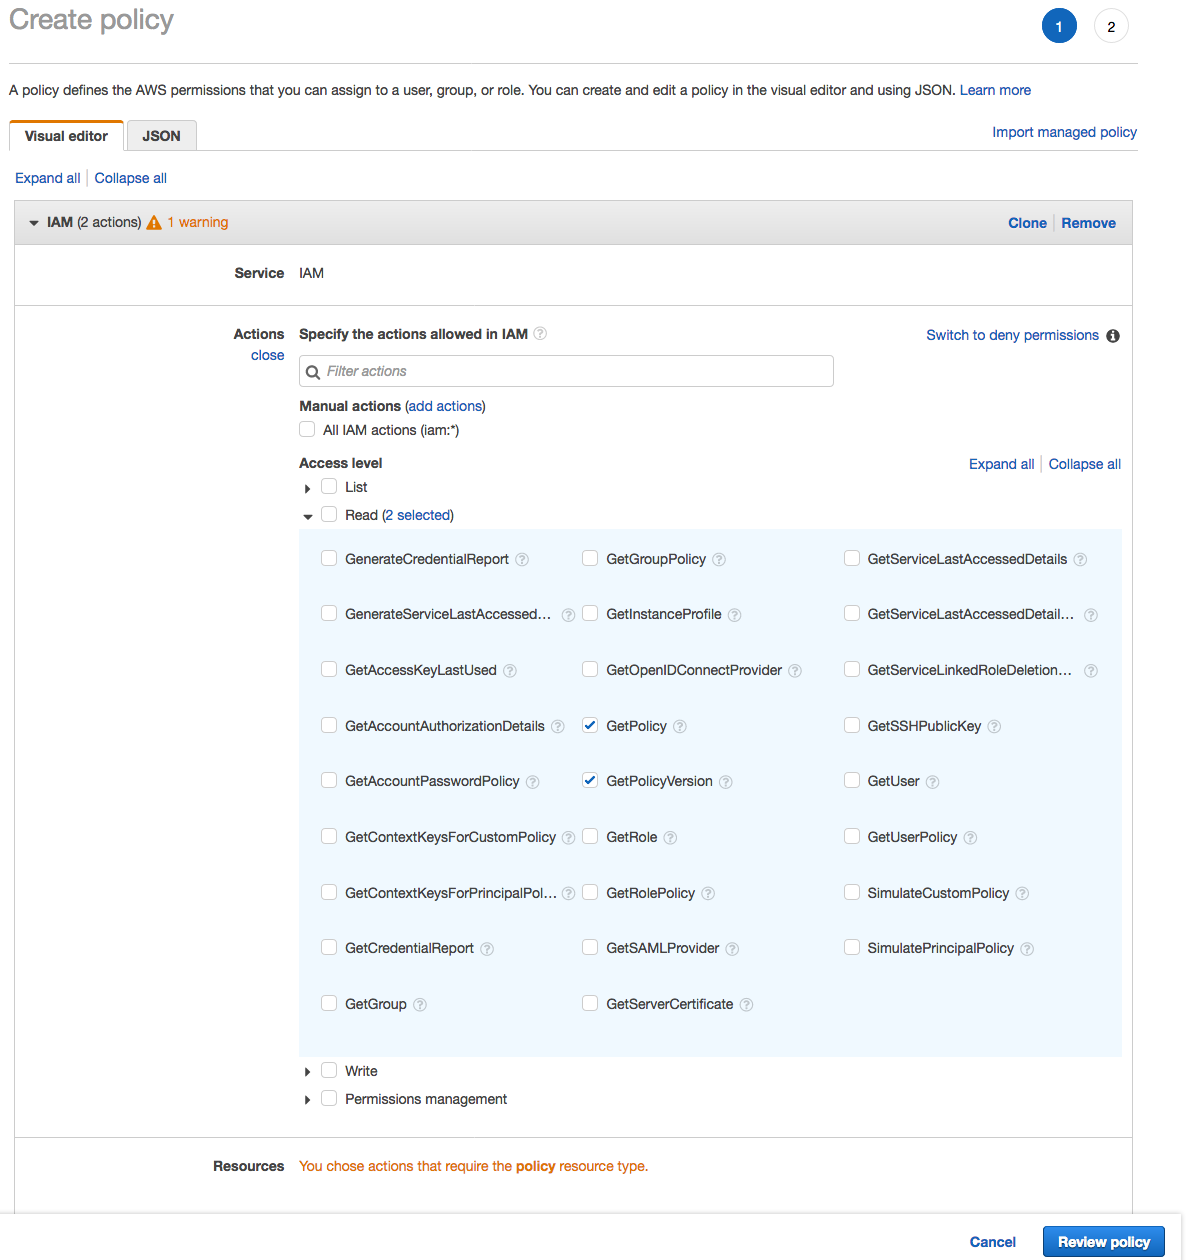 1. Under `Resources` section, click on the text displaying `You chose actions that require the policy resource type`. 1. Choose **All resources** radio button under `Resources` section. 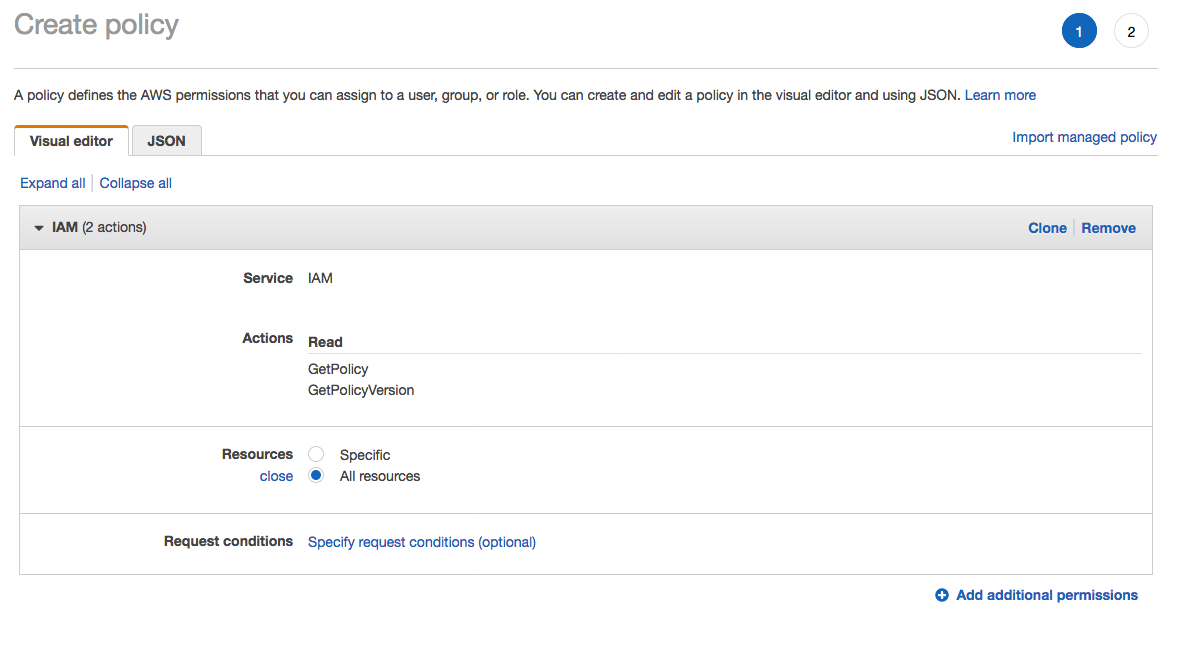 1. Choose **Review policy** at the bootom right-hand corner of the screen. 1. In the review screen, ensure there are no errors or warnings displayed. 1. Type a name of the policy in `Name` field, Choose a meaningful name, such as `IAMRoleRead`. 1. Choose **Create policy** at the bootom right-hand corner of the screen. 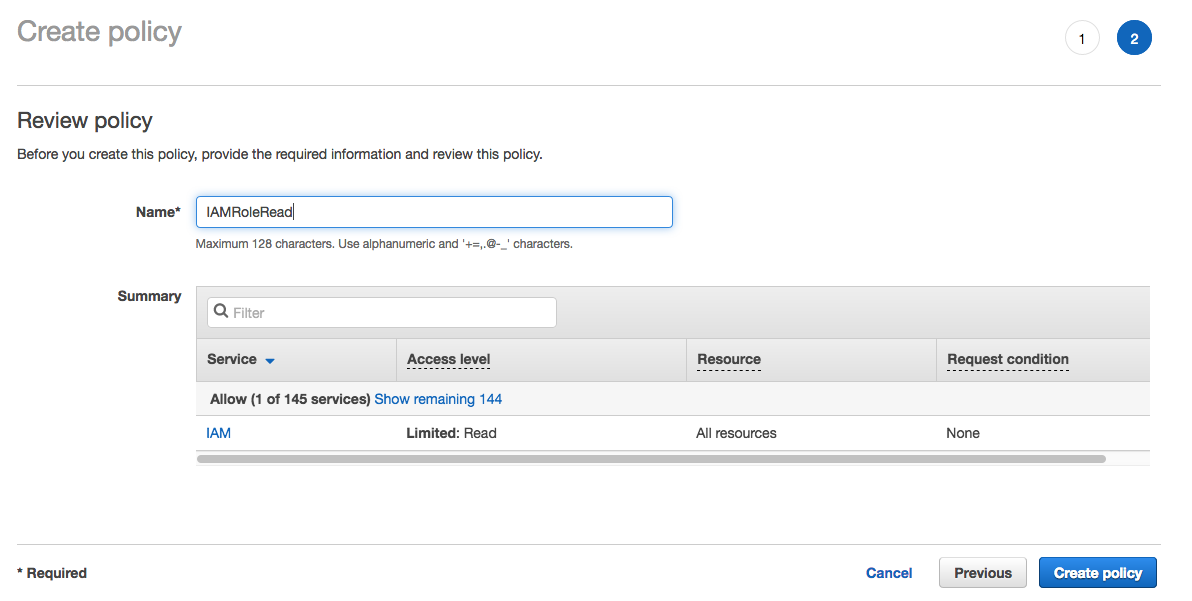 1. Close the browser tab
1. From the **Notebook instances** page, click on the hyperlink displayed as the `Name` of the notebook you just created, in this case - `smworkshop-notebook`. 1. From the **Notebook instance settings** page, follow the hyperlink displayed as the IAM role ARN.  1. From the IAM console page that opens in a new browser tab, displying the role summary, choose **Add Inline policy**  1. On **Create policy** page, click on **Choose a service**  1. In the suggestive search box, type "EC2", to have the list of displayed service filtered down, then choose **EC2 Container Registry** from the narrowed down list. 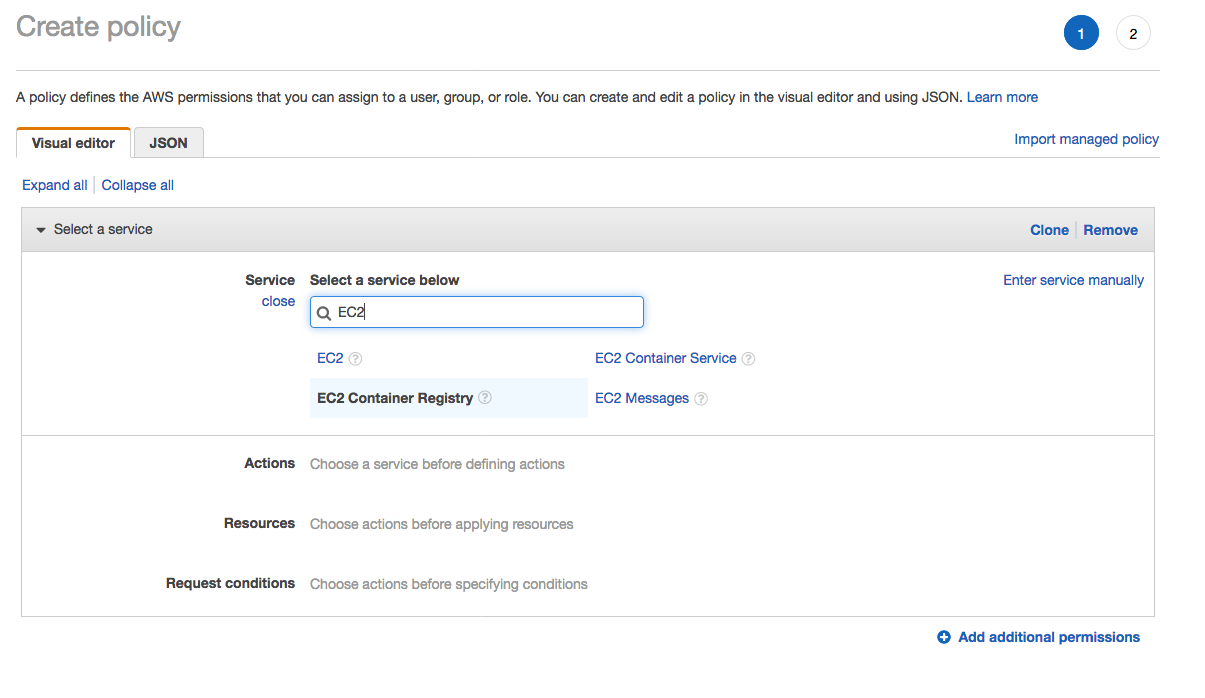 1. Under `Actions` section, expand `Write` Access level 1. Select actions - **CreateRepository**, **InitiateLayerUpload**, **UploadLayerPart**, **CompleteLayerUpload** and **PutImage** 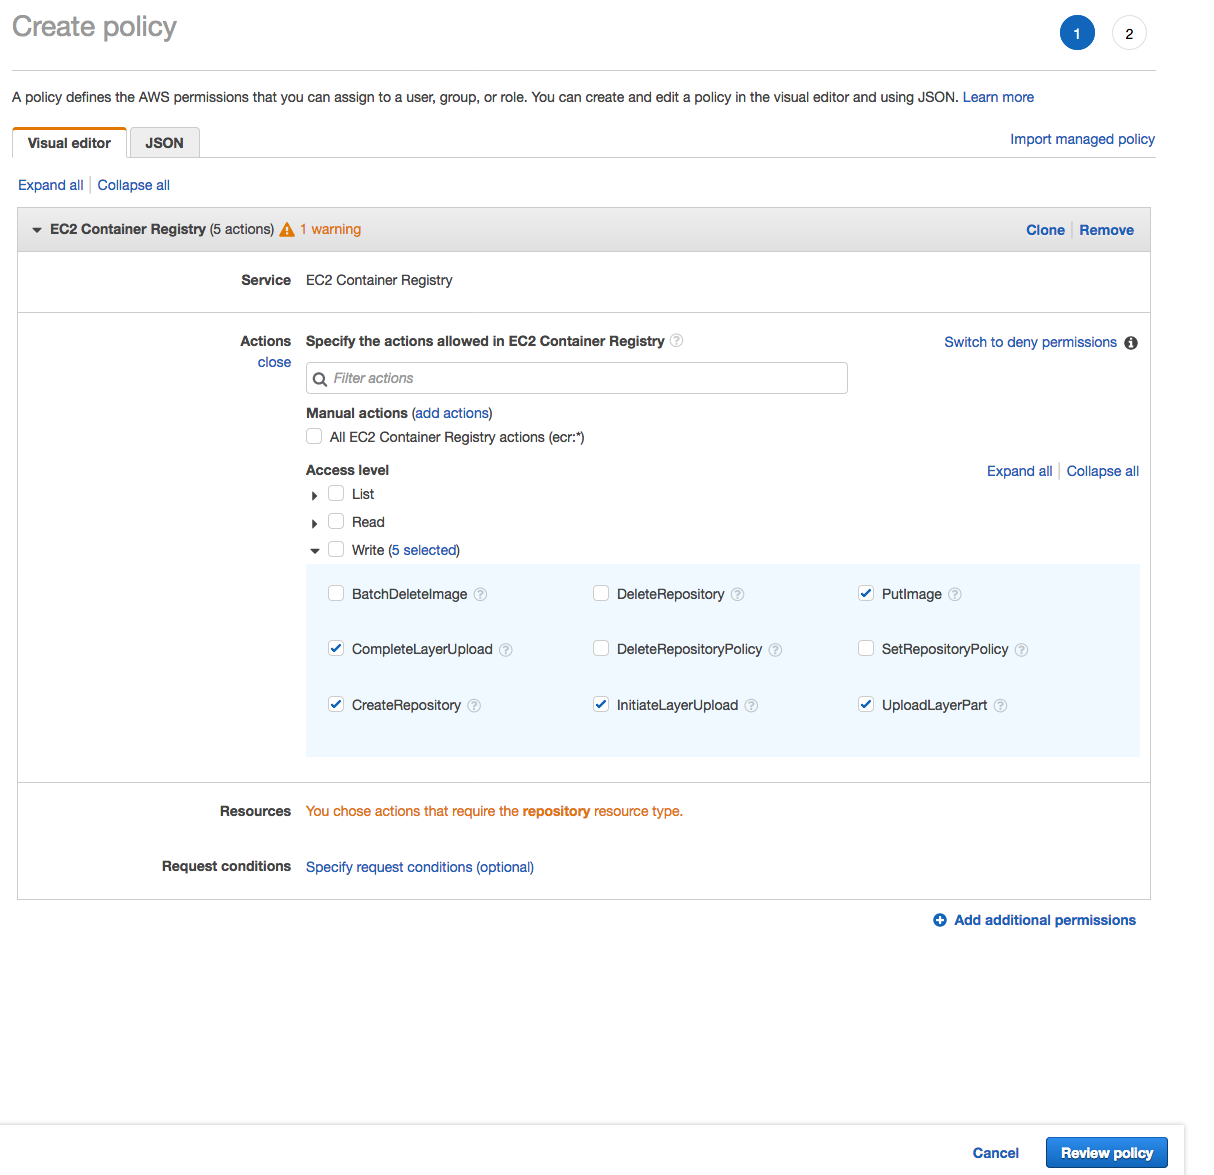 1. Under `Resources` section, click on the text displaying `You chose actions that require the policy resource type`. 1. Choose **All resources** radio button under `Resources` section.  1. Choose **Review policy** at the bootom right-hand corner of the screen. 1. In the review screen, ensure there are no errors or warnings displayed. 1. Type a name of the policy in `Name` field, Choose a meaningful name, such as `ECRUpload`. 1. Choose **Create policy** at the bootom right-hand corner of the screen. 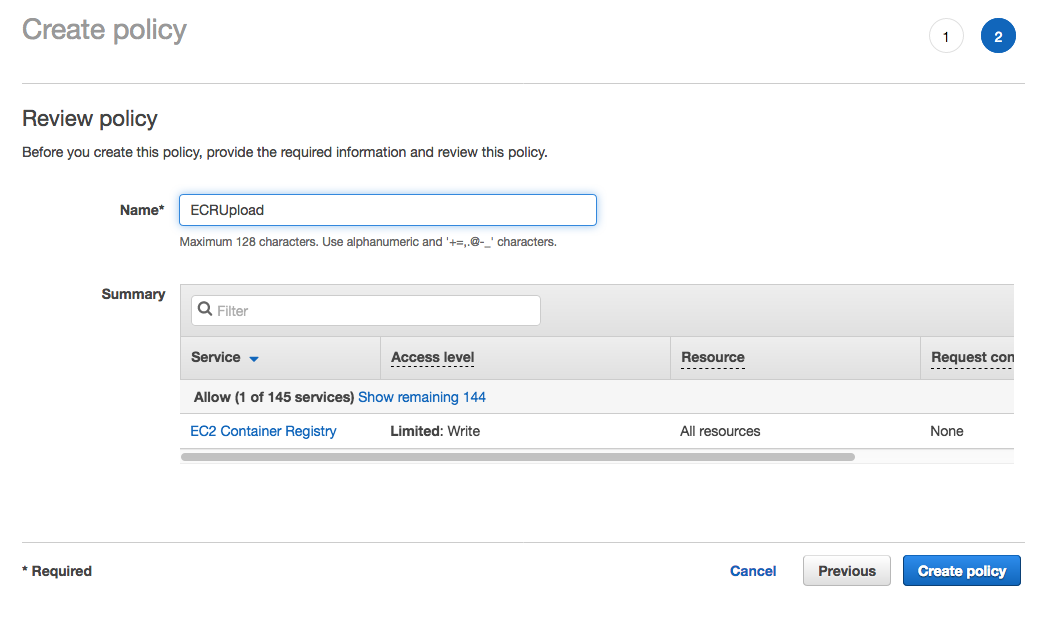 1. Close the browser tab
1. From the **Notebook instances** page, click on the hyperlink displayed as the `Name` of the notebook you just created, in this case - `smworkshop-notebook`. 1. Wait for the server status to change to **InService**. This will take several minutes, possibly up to ten but likely less. 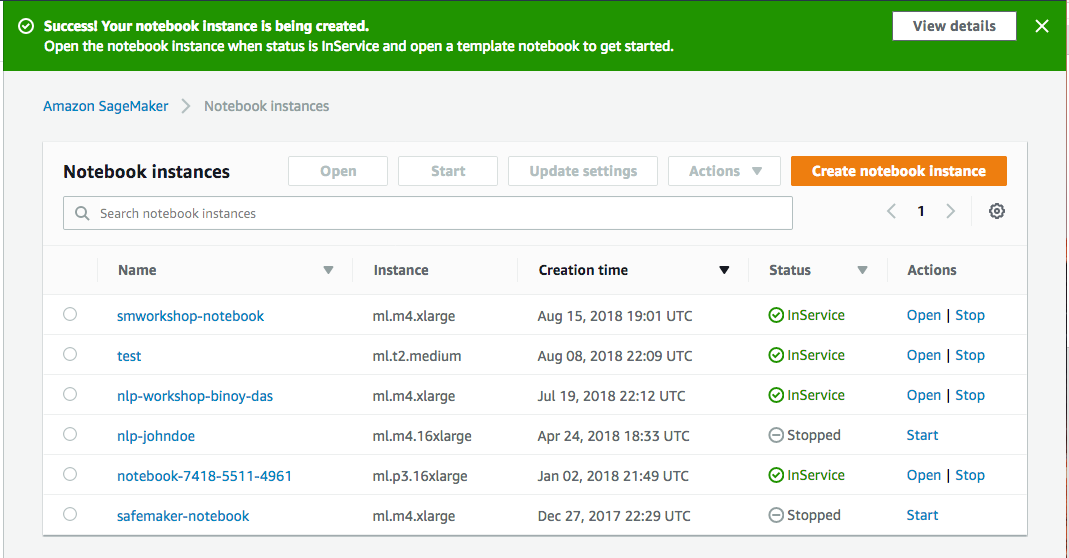 1. Click **Open**. You will now see the Jupyter homepage for your notebook instance. 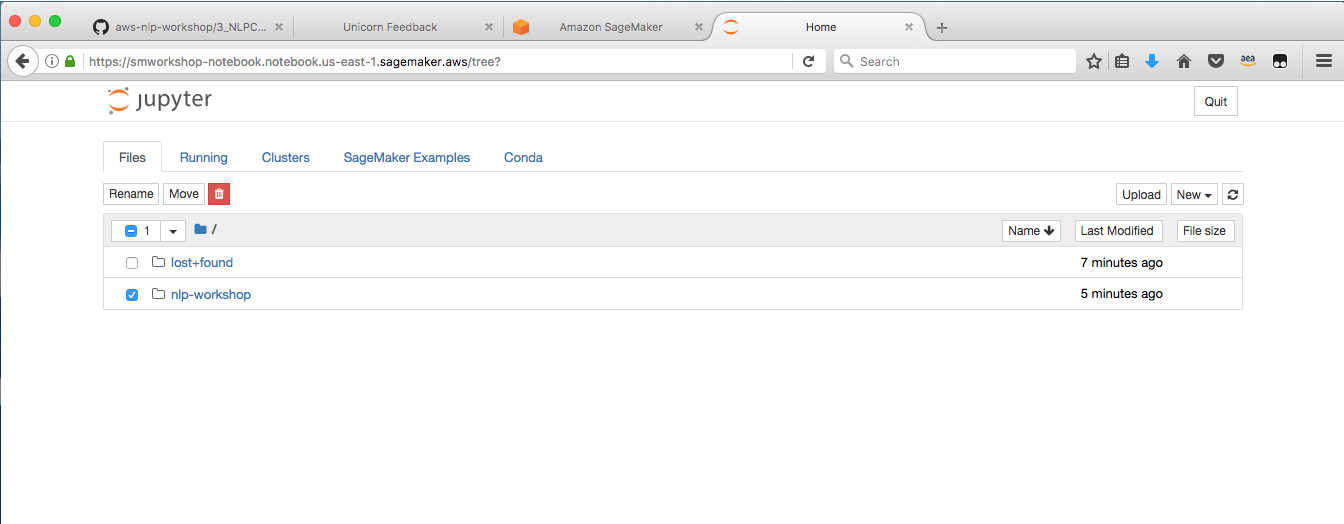 1. The folder named `nlp-workshop` contains the required notebooks and containerization framework neede for the following section. Click on the folder name to navigate into the folder, then follow one of the two approaches from the section to train and host a gender identification model.
Once you open the notebook, you will see a file browser. Browse to the folder called "nlp-workshop/notebooks/". Click on the "highlevel-tensorflow-classifer.ipynb" file to open the Jypyter notebook. The remaining instructions to run the notebook are embeddeded in the notebook itself. After successfully creating an endpoint, the next step would be to create a new API Gateway method, a Lambda function in the backend to integrate with the hosted endpoint, and update the configuration Javsacript of your webapplication so that when `Identify Gender` button is clicked, this new endpoint recieved the HTTP request. If you're eager to see the end result of all the hard work you put in to identify customers' genders, you can launch one of these AWS CloudFormation templates in the Region of your choice to build the necessary resources automatically.
#### 1. Experimentation In the experimentation phase you'll use the notebook named `dockerizer-preperation-gender-classifier.ipynb` to collect data, format data for your experiment, build and tweak the model and do some quick test to validate the propose model works. So head over to that notebook, and come back to the next sub-section once you finish running the notebook - `dockerizer-preperation-gender-classifier.ipynb` #### 2. Containerization In the containerization phase, you'll package the training and prediction code that you perfected during the experimentation phase, and use SageMaker to orchestrate training and hosting, possibly running training for more epochs, to get better accuracy of predictions. So, from your notebook instance, open the notebook named `dockerizer-orchestration-gender-classifier.ipynb`, and follow along. Once completed, come back to the next sub-section. #### 3. Integration Now that you have the trained model hosted behind a SageMaker managed endpoint, the next step would be to create a new API Gateway method, a Lambda function in the backend to integrate with the hosted endpoint, and update the configuration Javsacript of your webapplication. Once configured, this will enable the `Identify Gender` button, which when clicked, would send HTTP request to the new endpoint.
In this method you'll completely bypass data analysis, model creation and training. Instead you'll use the notebook named `dockerizer-model-import-gender-classifier.ipynb` to quickly test the pre-trained model that was available on this Github repository, host it on your S3 bucket and deploy it behind an SageMaker endpoint. So head over to that notebook, and come back to the this section once you finish running the notebook. Now that you have the trained model hosted behind a SageMaker managed endpoint, the next step would be to create a new API Gateway method, a Lambda function in the backend to integrate with the hosted endpoint, and update the configuration Javsacript of your webapplication. Once configured, this will enable the `Identify Gender` button, which when clicked, would send HTTP request to the new endpoint.