**CREATE KEY PAIR** ------------------- 1. In the AWS Console window that you opened, in the top right hand corner, next to your account name, click on the drop down and change your region to **us-west-2 (Oregon)**
 1. From the top left of the screen click **Services** and type & select **EC2**
2. From the left hand window pane, navigate to **Network & Security**, click on **Key Pairs** and from the right hand window
select **Create Key Pairs** from the top menu
- Enter the Key pair name of : **stg316-key**
- Select **PEM** file format
- Select **Create**
3. It will then download a **.pem** file to your users **downloads** folder (or
a location you have specified). If you are using Google Chrome, the
downloaded file will also be shown at the bottom of the screen for
reference.
1. From the top left of the screen click **Services** and type & select **EC2**
2. From the left hand window pane, navigate to **Network & Security**, click on **Key Pairs** and from the right hand window
select **Create Key Pairs** from the top menu
- Enter the Key pair name of : **stg316-key**
- Select **PEM** file format
- Select **Create**
3. It will then download a **.pem** file to your users **downloads** folder (or
a location you have specified). If you are using Google Chrome, the
downloaded file will also be shown at the bottom of the screen for
reference.
> **Note:** Take note of the location of this **.pem** file you downloaded, as you will copy this key to your deployed Amazon Windows EC2 instance, once you have deployed it as part of the subsequent instructions
**DEPLOY VPC ENVIRONMENT** -------------------------- **Note:** Make sure you set your region to **us-west-2 (Oregon)** 1. From the AWS console on your local laptop/workstation, click **Services** and type & select **CloudFormation** 2. In the top right hand corner, next to your account name, click on the drop down and change your region to **us-west-2 (Oregon)**
- Now in the CloudFormation page click on **Create stack**
- Click on **With new resources** from the drop down
- Under Amazon S3 URL copy and paste this URL
 5. Click on **Next** to continue
6. On the next page scroll to the bottom and click on **Next** to continue
7. Click on **Create stack**
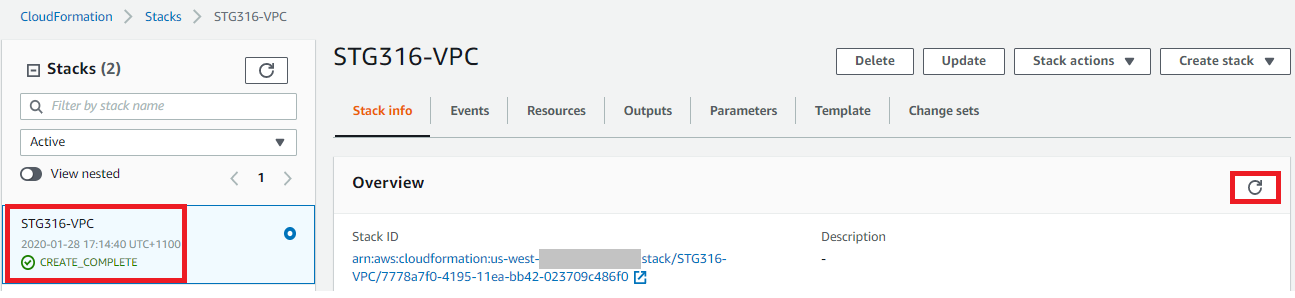
8. Click on the **Stack info** tab and click on the **refresh** icon as
highlighted in **RED** until the status value changes
to **CREATE_COMPLETE** (this may take 1-2 minutes) as shown below, you can
then progress to the next steps
5. Click on **Next** to continue
6. On the next page scroll to the bottom and click on **Next** to continue
7. Click on **Create stack**
8. Click on the **Stack info** tab and click on the **refresh** icon as
highlighted in **RED** until the status value changes
to **CREATE_COMPLETE** (this may take 1-2 minutes) as shown below, you can
then progress to the next steps
**DEPLOY WORKSHOP RESOURCES** ----------------------------- **Note:** Make sure your region is set to **us-west-2 (Oregon)** 1. From the AWS console on your local laptop/workstation, click **Services** and type & select **CloudFormation** - Click on **Create stack** - Click on **With new resources** from the drop down - Under Amazon S3 URL enter this address
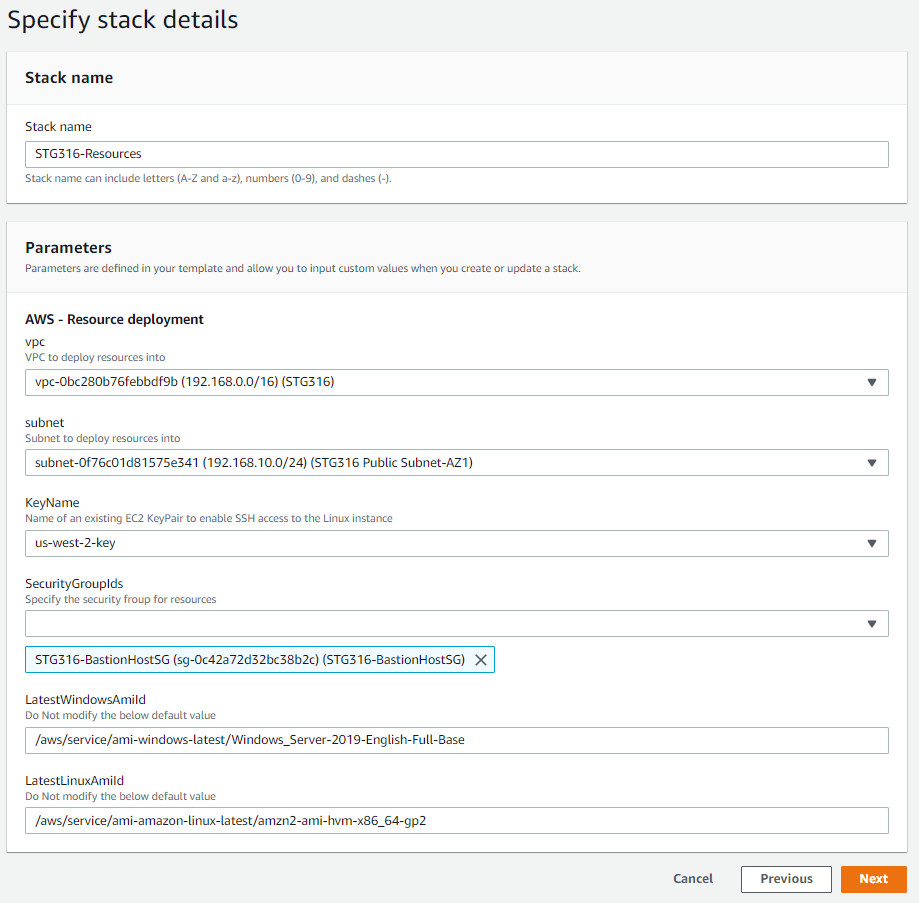 5. Scroll to the bottom of the next screen and click on **Next**
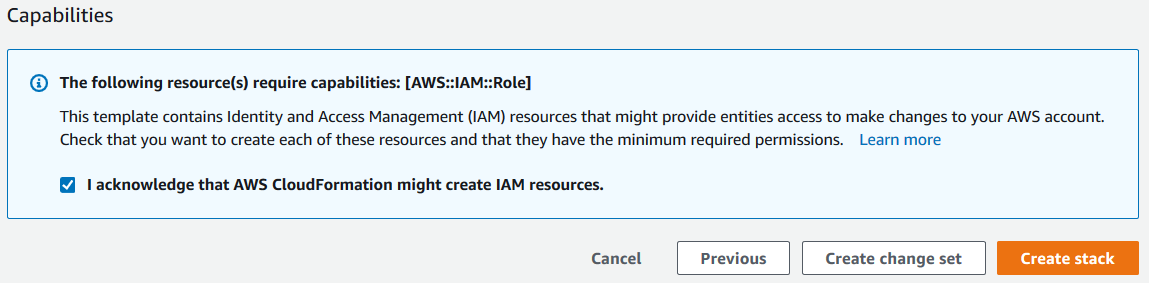
6. Scroll to the bottom of the next screen, check the **CloudFormation
acknowledgement** box and click on **Create stack**
5. Scroll to the bottom of the next screen and click on **Next**
6. Scroll to the bottom of the next screen, check the **CloudFormation
acknowledgement** box and click on **Create stack**
 - You will be taken to the CloudFormation stack status page
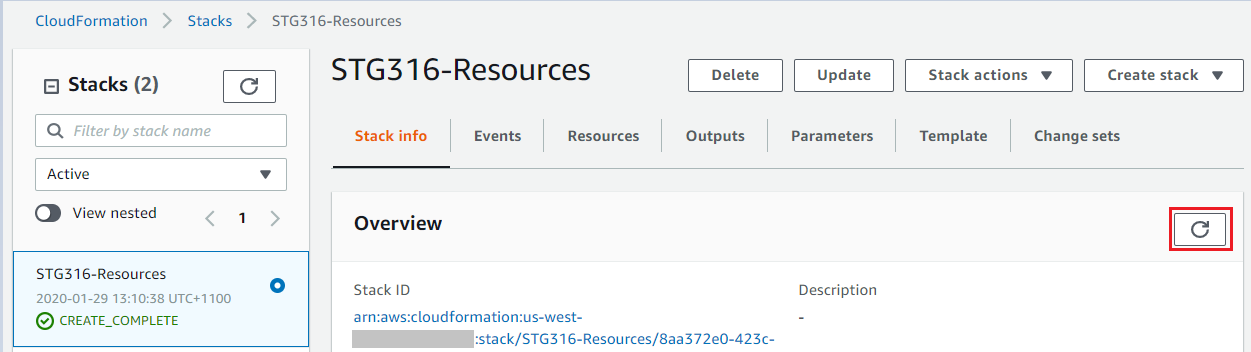
- Click on the **Stack info** tab and click on the **refresh** icon as
highlighted in **RED** until the status value changes
to **CREATE_COMPLETE** (this may take approx. 4-5 minutes) as shown below,
you can then progress to the next steps
- You will be taken to the CloudFormation stack status page
- Click on the **Stack info** tab and click on the **refresh** icon as
highlighted in **RED** until the status value changes
to **CREATE_COMPLETE** (this may take approx. 4-5 minutes) as shown below,
you can then progress to the next steps
**CONNECT TO YOUR INSTANCE** ---------------------------- **Firstly let’s retrieve the Windows administrator password from Secrets manager** 1. From **your laptop** connect to the AWS console, click **Services** and type & select **Secrets Manager** 2. Click on the value shown under **Secret name** (i.e. AdminSecret-abczxy) 3. Scroll down the page and click on **Retrieve secret value** 4. Copy and paste the password value shown into a notepad file 5. Next let’s connect to your Windows Server EC2 instance 6. From **your laptop** connect to the AWS console, click **Services** and type & select **EC2** 7. From the left hand menu, select **Instances** - In the right hand pane, select the box next to “**Workshop Windows instance 1**”, then right click and select **Connect** - Click on **Download Remote Desktop File** - Open the downloaded Remote Desktop File and select Connect at the prompt - Enter the credentials below and click on OK - username : Administrator - Password : the value you obtained from Secrets manager 7. When you have successfully logged into your Windows EC2 instance via the Remote Desktop Session, navigate back to your local workstation/laptop to where you stored the **\*.pem** key file earlier. **Right click** & select **copy** on the **\*.pem** file, and then go into your Remote Desktop Session (Windows EC2 instance) and **right click** on a free space on the desktop screen and select **paste** to copy the **\*.pem** key file across.
**Note:** All remaining tasks for the workshop will be performed through the **Remote Desktop Session to the Windows EC2 Instance you just connected to in the previous steps**. ----------------
9. Open the Chrome icon located on the desktop of the **Windows EC2 instance** and log into your AWS Account URL
**SUMMARY** ----------- In this module you deployed your base VPC, subnets, security groups, Amazon EC2 instances and the SSH key that that you will use for the remainder of the workshop.
**END OF MODULE 1** ------------------- Click here to go to [module 2](/module2/README.md)