 5. On the next screen click on the Permissions tab and expand the
**s3ROAccessPolicy located** under the Policy Name
6. Click on the **Edit Policy**
7. Click on the **JSON** tab
8. Replace the contents with the below via copy and paste, and **replace** the **Target-S3-Bucket** value with your value
{
"Version": "2012-10-17",
"Statement": [
{
"Effect": "Allow",
"Action": "s3:*",
"Resource": ["arn:aws:s3:::Target-S3-Bucket/*"]
}
]
}
5. On the next screen click on the Permissions tab and expand the
**s3ROAccessPolicy located** under the Policy Name
6. Click on the **Edit Policy**
7. Click on the **JSON** tab
8. Replace the contents with the below via copy and paste, and **replace** the **Target-S3-Bucket** value with your value
{
"Version": "2012-10-17",
"Statement": [
{
"Effect": "Allow",
"Action": "s3:*",
"Resource": ["arn:aws:s3:::Target-S3-Bucket/*"]
}
]
}
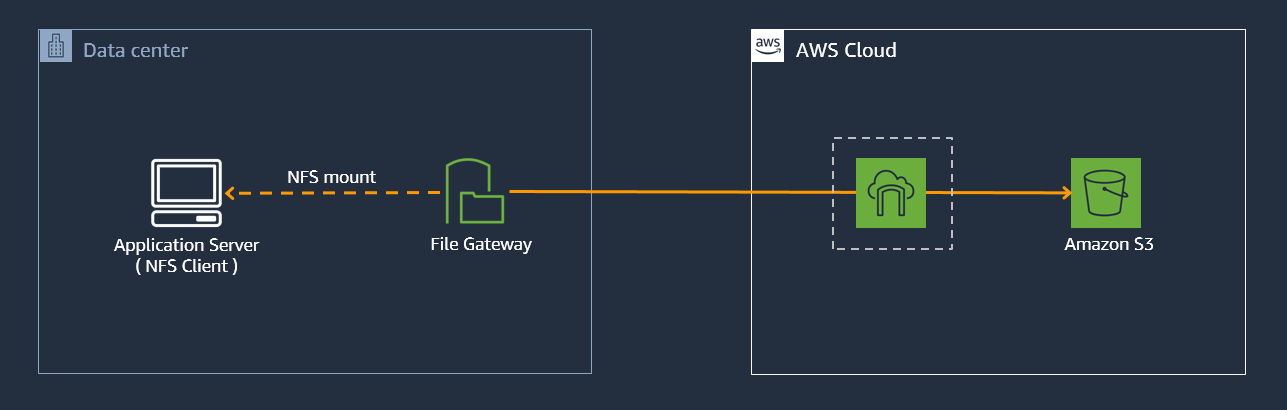
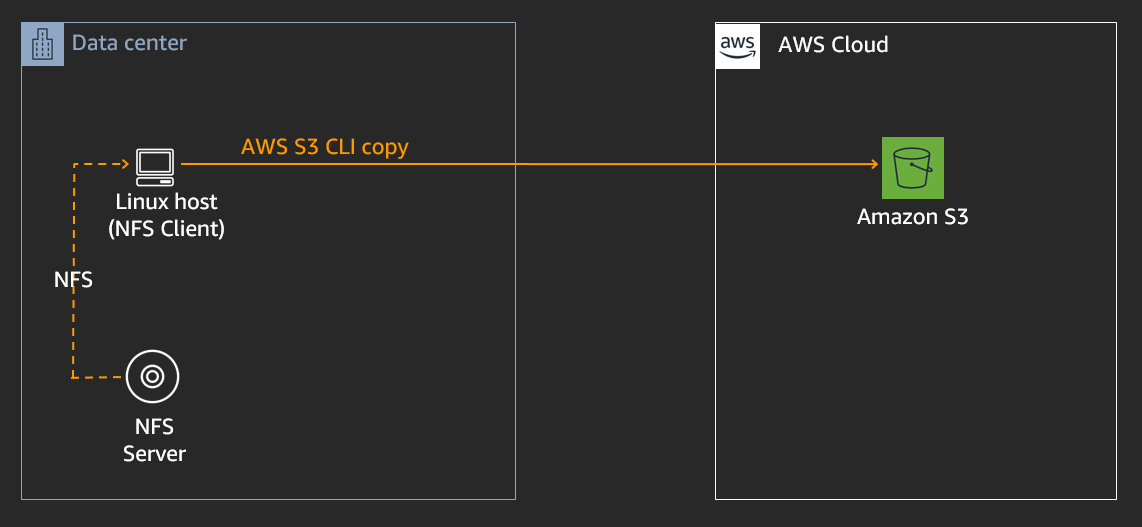 1. Navigate back to the SSH session you have running to your Linux EC2 instance (NFS client)
2. In the SSH session run the below commands to upate the copy script with your
values as per the instructions shown below
cd /scripts/ds-demo
vi copy_script.sh
- Press “**i**” to go into edit mode
- Update the **
1. Navigate back to the SSH session you have running to your Linux EC2 instance (NFS client)
2. In the SSH session run the below commands to upate the copy script with your
values as per the instructions shown below
cd /scripts/ds-demo
vi copy_script.sh
- Press “**i**” to go into edit mode
- Update the ****Note** the throughput values shown (i.e. x MB/s transfer rate) for the first 30 seconds, then switch back to your first SSH session window - Navigate back to the first SSH session and wait until the output states “**Data transfer to Amazon S3 bucket complete”** - From within your first SSH session run the following commands cat /scripts/ds-demo/time.log **Take note** of the time the script took to run (it is the time value shown next to the value for **real**)

**METHOD 2 - 10K SMALL FILE MIGRATION USING AWS DATASYNC** ----------------------------------------------------------
Now lets migrate the same 10,000 small files (hosted on the NFS server), this time using AWS DataSync.
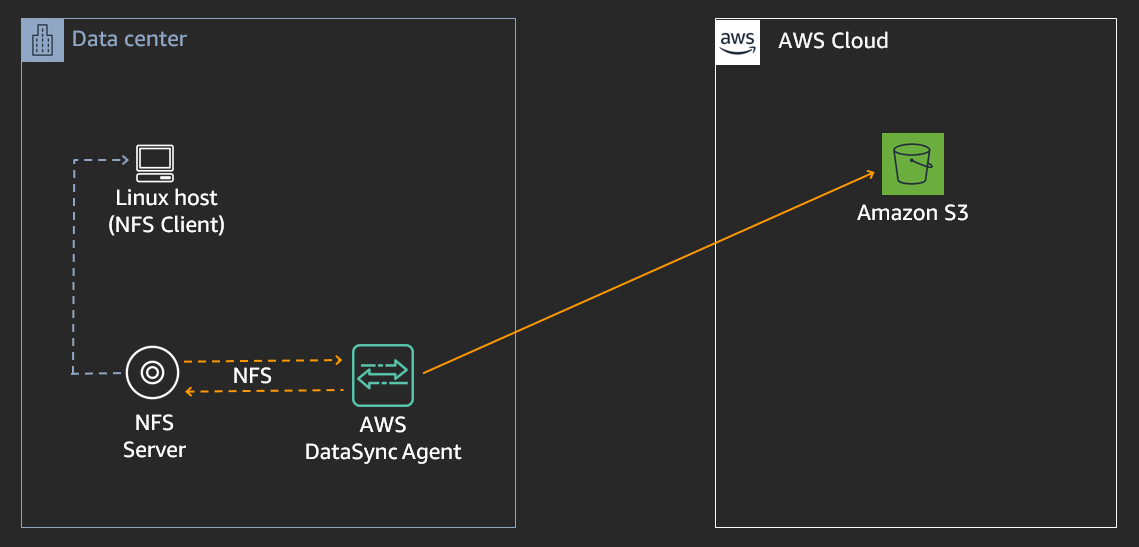
**DEPLOY AWS DATASYNC AGENT** ----------------------------- We are going to deploy the AWS DataSync agent within AWS as an EC2 instance in the absence of an on-premise environment (where you could deploy it as a VMware appliance). The AWS DataSync agent will then read directly from the NFS server (not the NFS client) and transfer the data to your **Target-S3-Bucket** 1. Using the Chrome icon on the Windows EC2 instance desktop, log into your AWS Account using Chrome 2. From the chrome session, in the AWS console, at the top of the screen, click **Services** and type & select **DataSync** - Select **Get Started** - In the Create agent page, under the **Amazon EC2** section click on the **Learn more** icon - Scroll down to the table that has a list of **AMI Names**, and click on the **Launch Instance** link corresponding to the **us-west-2** Oregon row - In the next page, select the box next to **m5.xlarge** - Select **Next: Configure Instance Details** - In the **Network** drop down select the VPC which has “**STG316**” in its name - In the **Subnet** drop down, select the one which has “**STG316**” in its name - Leave all other settings as default on the page - Click **Next: Add Storage** - Click **Next: Add Tags** - Select **Add Tag** - Enter the following values (case sensitive) - Key = **Name** - Value = **STG316-DataSync** - Click **Next: Configure Security Group** - Click on the “**Select an existing security group**” check box - Select the security group with the name of **STG316-FileGatewaySG** - Click **Review and Launch** - Click **Launch** - Select your **key pair** , accept the check box and click **Launch Instances** - From the AWS console, click **Services** and type & select **EC2** - From the left hand menu, select **Instances** - In the right hand pane, select the box next to “**STG316-DataSync**” - From the bottom window pane, select the **Description** tab, and take note of the **private IP** address into your workshop.txt file for **DataSync-Instance-Private-IP** - Ensure the “**Status Check**” column for this EC2 instance shows **“2/2 checks passed“** before proceeding to the next step. - From the AWS console, at the top of the screen, click **Services** and type & select **DataSync** - Select **Get Started** - Enter the following values on the page - **Service endpoint:** Select Public service endpoints in US West (Oregon) - **Activation key:** Enter the Private IP address you noted down in the previous step for **DataSync-Instance-Private-IP** - Select **Get Key** - You will get the following successful output after your agent has activated successfully - Select **Create Agent** to continue
 - When the create agent process is complete click on the **blue DataSync**
link at the top left of the screen to continue with the next step of
creating a task
- When the create agent process is complete click on the **blue DataSync**
link at the top left of the screen to continue with the next step of
creating a task

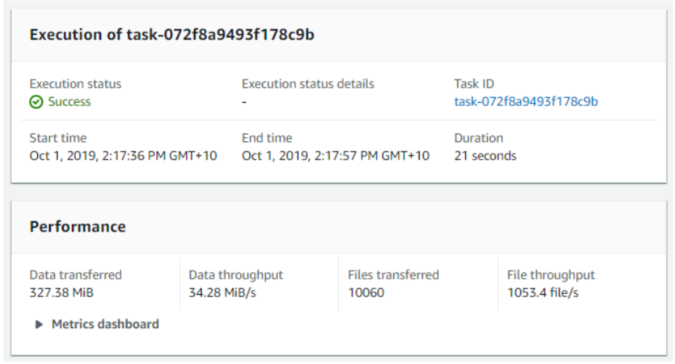
**TRANSFER DATA USING DATASYNC** --------------------------------- 1. Click on the **Create task** from the top right hand side of the window - Select **Create a new location** from the source locations options - **Location type:** Network File System (NFS) - **Agents:** select the agent you have just deployed - **NFS Server:** enter the value of your **File-Gateway-Instance-Private-IP** - **Mount path:** enter your **Source-S3-Bucket** name value - Click **Next** to continue 2. Select **Create a new location** from the Destination locations options - **Location type:** Amazon S3 bucket - **S3 bucket:** **Target-S3-Bucket** - **S3 storage class:** select Standard - **Folder:** Type“**datasync-copy**“ - **IAM role:**: click on the **Autogenerate** button - Click **Next** to continue 3. Provide a task name (*i.e. NFS-to-S3-transfer-10K-small-files*) - **Verify data:** Check integrity during transfer - **Copy file metadata:** Ensure the following items are all checked - Copy ownership - Copy permissions - Copy time stamps - Leave all other options as such as default & select **Next** - Click **Create task** 4. On the next screen wait until the **Task status** value is **Available** (refresh screen to get update) 5. Click on the **Start** button 6. Leave all options as they are (don’t override any) and click on **Start** 7. At the top of the screen click on the **See execution details** button to view the progress of the transfer 8. The task will go through a few phases, where it will first compare the files in the source location with what’s stored on the target before sending the new or updated files. In this lab there are approx 10,000 files to be transferred so the launching phase may take a moment or two before switching to the transferring state. - While it is going through these states, navigate through the performance, locations, options, filters and task logging tabs in the middle of the screen to verify the parameters you have configured and the view the outputs available 9. When the **Execution status** show a status of **Success**, your data transfer has completed. - Take note of the **Duration** time taken for the data transfer, and also of the **Data throughput** values, how do they compare with the values you achieved using the S3 copy script in the previous section?
**VERIFY DATA TRANSFERRED USING BOTH METHODS** ---------------------------------------------- Lets view the data copied across from the local NFS share to our target Amazon S3 bucket 1. From the AWS console, click **Services** at the top of the screen type & select **S3** - Click your **Target-S3-bucket** name - Check the box next to the folder labelled **s3-cli-copy** - Click on **Actions**→ **Get total size** - Note the total objects copied to your S3 bucket via the S3 copy script - Click **Cancel** when done viewing. - Check the box next to the folder labelled **datasync-copy** - Click on **Actions**→ **Get total size** - Note the total objects copied to your S3 bucket via DataSync - Click **Cancel** when done viewing. - Click on the folder name **datasync-copy** to go into the directory/prefix - Click on **Appdata** - Click on the box to the left of **saturn.gif** - From the right hand pop-up window, under the properties section click on **Metadata** - This will show you the metadata that DataSync added to object that it copied across to S3. In the next section we view the value of this metadata to help avoid re-factoring applications that access files based on user/group permissions. - Click **Cancel** to continue
**COMPARE METADATA: SCRIPT VS DATASYNC**
------------------------------------------------
Now let’s create a File Gateway NFS share and point it to the target Amazon S3 bucket that we transferred data to, so that we can easily visualise the data from the view of a NFS file share. Then we will compare the file metadata details that were copied across using the two different methods.
**Create NFS Share** 1. From the AWS console, at the top of the screen, click **Services** and type & select **Storage Gateway** 2. On the left hand pane of the AWS Storage Gateway console, select **File shares** 3. Select **Create file Share** from the top menu 4. Enter the name of your **Target-S3-bucket** in the **Amazon S3 bucket name** field. 5. Select **Network File System (NFS)** 6. Select the **File Gateway** you just deployed (STG316-filegateway) 7. Click **Next** 8. Leave all defaults and select **Next** 9. On the next page, click the **Edit** value next to **Allowed clients** - Remove the existing **0.0.0.0/0** value and replace it with **192.168.0.0/16** - Then click the **Close** button to the on the right of the screen for Allowed clients 10. Click the **Edit** value next to **Mount options** - Select “**No root squash**” for Squash level - Leave export as **read-write** - Then click the **Close** button to the on the right of the screen for Mount options 11. Scroll to the bottom of the page and click **Create file share** 12. You will be taken to the **File share** page. Click on the **refresh Icon** on the top right hand corner, until the status of the file share changes from **Creating** to **Available**, before proceeding to the next steps. 13. On the same File Share page, check the box next to the name of your **File share ID** 14. In the details pane below, copy the command for mounting **On Linux** in to your **workshop.txt** for the value of **Second-NFS-FileShare-mount-command**
**Mount NFS Share** 1. Navigate back to your SSH session and run the following command sudo su 2. Next, copy the NFS mount command you noted down in your workshop.txt for **Second-NFS-FileShare-mount-command**, and simply replace the **[MountPath]** value at the end with the value of **/nfs_target** and enter the entire command into the SSH session, and hit Enter - *i.e. mount -t nfs -o nolock,hard 192.168.10.12:/stg316-target-citizenj /nfs_target* 3. Run the below command to verify you have the NFS mount points of **/nfs_target** showing in the list df -h
**COMPARE TRANSFER METHODS: SCRIPT VS DATASYNC** Now let’s view the files that the S3 copy script & DataSync agent copied across from a file share point of view to see how the metadata translates to the stored files, and what attributes were preserved 1. From the AWS console, at the top of the screen, click **Services** and type & select **Storage Gateway** - From the left hand pane select **File shares** - Check the box next to the file share ID which shows your **Target-S3-Bucket** name in the S3 Bucket column - From the top menu select **Action**→ **Refresh Cache** then select **Start** 2. **View original data**- Run the below command in your SSH session to view the original data time stamp & permissions for the file **saturn.gif** located on /nfs_source ls -ltr /nfs_source/appdata
 3. **View S3 copy script data that was transferred** - Run the below
command to view the time-stamp, user/group & permission attributes for
the file **saturn.gif** copied via the S3 CLI copy script.
ls -ltr /nfs_target/s3-cli-copy/appdata
3. **View S3 copy script data that was transferred** - Run the below
command to view the time-stamp, user/group & permission attributes for
the file **saturn.gif** copied via the S3 CLI copy script.
ls -ltr /nfs_target/s3-cli-copy/appdata
 - Do the time-stamps, user/group & permission value differ from the original data?
4. **View DataSync copied data** - Run the below command to view the
timestamp, user/group & permission value for the
file **saturn.gif** copied via DataSync.
ls -ltr /nfs_target/datasync-copy/appdata
- Do the time-stamps, user/group & permission value differ from the original data?
4. **View DataSync copied data** - Run the below command to view the
timestamp, user/group & permission value for the
file **saturn.gif** copied via DataSync.
ls -ltr /nfs_target/datasync-copy/appdata
 - Do the time-stamps, user/group & permission value differ from the
original data? Were they preserved?
- Do the time-stamps, user/group & permission value differ from the
original data? Were they preserved?
**Note:** Notice how the Saturn.gif file that was copied across using DataSync retained the same timestamp & permissions (r-r-r & user9:appadmin) as the original source file, unlike the data copied across via the script.
**SUMMARY** ----------- In module 3, you obtained hands-on experience in deploying and configuring AWS DataSync to simplify, automate and accelerate the transfer of data, in this case 10,000 very small files to Amazon S3 compared to scripting it. AWS DataSync also copied across the metadata (so you could re-access the same objects again via File Gateway as files with their permissions & timestamps). AWS DataSync encompassed data transfer verification, and didn’t require any scripting knowledge or performance tuning to enable faster data transfers.
**END OF MODULE 3** ------------------- Click here to go to [module 4](/module4/README.md)