MODULE 4: AWS TRANSFER FOR SFTP
===============================
Copyright Amazon Web Services, Inc. and its affiliates. All rights reserved.This sample code is made available under the MIT-0 license. See the LICENSE file.
Errors or corrections? Contact akbariw@amazon.com.
-------------------------------------------------------------------------
**INTRODUCTION**
----------------
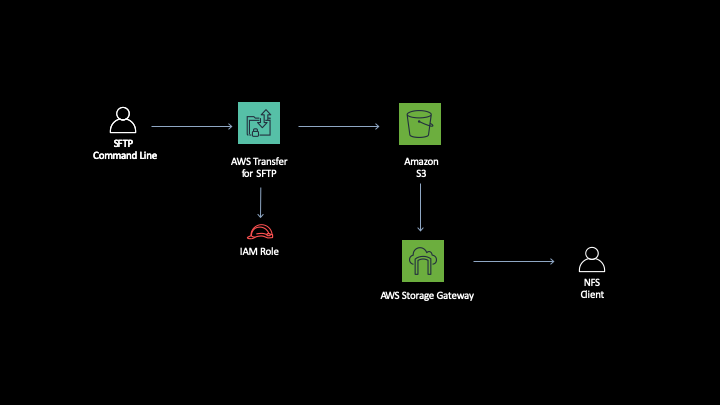
AWS Transfer for SFTP provides a highly available and scalable SFTP service which can be
used by users and applications as a very easy mechanism to move data both for
migration, integration or just ad-hoc use cases.
**OBJECTIVE**
----------------
This module will show how AWS
Transfer for SFTP can be setup to move data in to or out of Amazon S3 and we’ll
show how the same data can then be accessed through the Storage Gateway that you
setup in Module 2.
**SETUP MODULE**
----------------
We have a couple of pre-requisites that we need to ensure are in place. We will
be using the linux host for this module
Please connect to the Linux instance provided for this workshop
1. In your Remote Desktop session, click on Windows icon located at the bottom
left of the screen
2. Type CMD and hit Enter to open a new command prompt
3. You should have stored your \*.pem key file on the desktop as per the
previous instructions. Enter the below commands in the command prompt
cd c:\users\administrator\desktop
4. Next enter the below command to SSH into the Linux server, remember to
replace the two values shown in **\< \>** with your values
ssh -i .pem ec2-user@
i.e. ssh –i stg316-key.pem ec2-user\@192.168.10.102
5. If this is the first time you have connected to this instance, a security
alert dialog box that asks whether you trust the host to which you are
connecting.
- (Optional) Verify that the fingerprint in the security alert dialog box
matches the fingerprint that you previously obtained in (Optional) Get
the Instance Fingerprint
().
If these fingerprints don’t match, someone might be attempting a
“man-in-the-middle” attack. If they match, continue to the next step.
- Choose **Yes** when you are ready to proceed**.**
- A window opens and you are connected to your instance.
AWS Transfer for SFTP provides inbuilt user management for users to authenticate
via SSH key pairs. Lets setup an SSH key pair that we will use to test
authentication for our users. Run this command in your SSH terminal
cd ~
ssh-keygen -P "" -f myAWSTransferSSHKey
chmod 400 myAWSTransferSSHKey
AWS Transfer stores data in S3 buckets we will be working with the bucket that
we created earlier. Refer to your **Target-S3-Bucket** name in your workshop.txt
file:
1. From the AWS console, at the top of the screen, click **Services** and type & select **S3**
2. Find your bucket in the list (**Target-S3-Bucket**) and click on it
Add some user folders to your bucket for us to use later:
1. Click the **Create Folder** button
2. Provide the folder name **jess**
3. Click **Save**
4. Click the **Create Folder** button
5. Provide the folder name **charlie**
6. Click **Save**
At the end of this task you should now have:
• Created an SSH key pair
• Added some folders to your S3 bucket to use as your users home destinations
**SETUP IAM POLICY AND ROLES**
-------------------
AWS Transfer for SFTP will be working with objects in S3 on behalf of your SFTP
users. We need to create IAM roles that will define the permissions we want our
SFTP users to have. This role will later be mapped onto our SFTP users when we
create them *Note: the user will have access to all buckets that the attached
IAM role grants them access to*
1. From the AWS console, at the top of the screen, click **Services** and type & select **IAM**
2. Click on **Policies** & then **Create Policy**
- Click on the **JSON tab**
- Replace the contents with the below via copy and paste, and replace the **Target-S3-Bucket** value with your value
{
"Version": "2012-10-17",
"Statement": [
{
"Effect": "Allow",
"Action": "s3:*",
"Resource": ["arn:aws:s3:::Target-S3-Bucket", "arn:aws:s3:::Target-S3-Bucket/*"]
}
]
}
- Click review policy
- Provide the policy with a name such as **target-s3bucket-rw-policy**
- Click on create policy
3. From the left hand pane click on **Roles** and then click **Create Role**
4. We need to allow Transfer to assume the role we create. Under “Choose the
service that will use this role“ click on **Transfer**. (This creates a trust
relationship for the role)
5. Click **Next: Permissions**
We now need to decide what permissions we would like to give our SFTP user to
access S3. We will use the policy we created in the previous step to only allow read/write access to your target Amazon S3 bucket
6. In the search field enter the policy name you created earlier and select it (i.e. **target-s3bucket-rw-policy**)
7. Click **Next: Tags** and **Next: Review**
8. Provide a **Role Name** (e.g. myAWSTransferUserRole)
9. Click **Create Role**
> We now need to create a second role which will be used by AWS SFTP to send its logs to Cloud
Watch Logs.
1. From the AWS console, at the top of the screen, click **Services** and type & select **IAM**
2. Click on **Roles**
3. Click **Create Role**
4. We need to allow Transfer to assume the role we create. Under “Choose the
service that will use this role“ click on **Transfer** This creates a trust
relationship for the role
5. Click **Next: Permissions**
6. Filter the policies by entering AWSTransfer
7. Tick the box next to **AWSTransferLoggingAccess** This is an AWS Managed
policy that will allow access to CloudWatch Logs
8. Click **Next: Tags** and **Next: Review**
9. Provide a **Role Name** (e.g. myAWSTransferLogRole)
10. Click **Create Role**
At the end of this task you should now have:
• Created and IAM role with trust policy and S3 access
• Created a logging role
**CREATE AWS TRANSFER FOR SFTP INSTANCE**
-----------------------------------------
In order to enable SFTP for our users we need to create our AWS Transfer for
SFTP server
1. From the AWS console, at the top of the screen, click **Services** and type & select **AWS Transfer for SFTP**
2. Make sure your Region is set to: **us-west-2 Oregon**
3. Click **Create Server**
4. Select **Public** as we will be creating a public SFTP server
5. Select **Service Managed** to use the inbuilt user management capabilities
6. Under Logging Role select the logging role that you created in Task2. (e.g.
myAWSTransferLogRole)
7. Click **Create Server** to finish
8. Your server will be created and show as starting, When the server is ready
for use the status will change to Online
9. Click on the new server
10. Make a note of the endpoint address of your **server-id** for later (e.g.
s-1234567890123.server.transfer.ap-us-west-2.amazonaws.com) in your workshop
file as **Transfer-For-SFTP-Endpoint-IP-Address**
At the end of this task you should now have:
• Created your SFTP endopoint & noted down the name of your AWS Transfer for SFTP server endpoint
**CREATE SFTP USERS & TRANSFER DATA**
-------------------------------------
We now need to create SFTP users that will be allowed to log into the SFTP
service and access files in S3. When we create the user we have to attach an IAM
role that defines what data the user will be able to access in S3 (we defined
this role and policy in Step 2 - myAWSTransferUserRole
AWS Transfer is responsible for authenticating the user based on their SSH key
and then authorises them based on the attached IAM Role and policy
1. From the AWS console, at the top of the screen, click **Services** and type & select **AWS Transfer for SFTP**
2. Click on the SFTP server that you created in Task 3
3. Under Users Click on **Add User**
4. Use the username **jess**
5. Under **Access** chose the IAM access role that you created in the previous steps to provide
the access policy to your underlying Amazon S3 bucket (e.g. myAWSTransferUserRole)
6. Under **HomeDirectory** select your **Target-S3-Bucket**
7. Under **SSH public** keys you need to copy in the public part of your ssh
key that you created in the first part of this module
- In your SSH session run the below command
cat myAWSTransferSSHKey.pub
- Copy the output and paste it into the console
8. Click **Add**
Now that you have a SFTP server and an SFTP user, you can try logging in:
1. Run the following command substituting your username (from Step 4) and
endpoint (from Step 3)
sftp -i ./myAWSTransferSSHKey jess@s-xxxxx.server.transfer.us-west-2.amazonaws.com
> Note: you need to run this in the directory where your ssh key from step 1
> is stored
1. You are now in the SFTP shell and mapped to the S3 bucket. You can navigate
this S3 bucket using ls and cd \ operations, notice how the access
level to bucket data is dependent on the user’s mapped IAM role
2. You can attach the same IAM role to multiple users as required (or use
different ones for different access requirments) by repeating Step 4
3. Exit back to the linux host by tying the exit command
4. Create a couple of files in the local linux directory:
cd ~
touch file1.txt
touch file2.txt
5. Upload these new files:
- Run the following command substituting your username (from Step 4) and
endpoint (from Step 3)
sftp -i ./myAWSTransferSSHKey jess@s-xxxxx.server.transfer.us-west-2.amazonaws.com
- change directory to one of your user folders by running cd
directoryname (e.g. cd jess)
- Upload your files with the following command
put file1.txt ./
put file2.txt ./
6. Close the SFTP connection with the exit command
7. You can view the AWS Transfer logs in the Cloud Watch Logs Console
- Navigate back to the Transfer
console
- Click on the SFTP server that you created in Task 3
- Click on the View Logs button
- Click to open one of the log streams for your user to view transfer
activity
At the end of this task you should now have:
• Created one or more SFTP users
• Logged in using their mapped SSH key
• Checked you can only access the S3 data that you expected
**ACCESS YOUR DATA THROUGH FILE GATEWAY**
-----------------------------------------
We’re now going to show how the files you uploaded via SFTP are accessible
through alternative access mechanisms. In this case the Storage Gateway we
created in Module 2
1. From your SSH session run the following command to change into your NFS mount directory for the **Target-S3-Bucket**
cd /nfs_target
2. Check that your updated files from SFTP are not currently visible. This is
because the cache in the Storage Gateway has not been told about changes to
the backend S3 bucket
ls
3. Navigate to the Storage Gateway AWS console and select **File Shares** from the
left hand windows
- Select the file share the corresponds with your **Target-S3-Bucket**
- Click **Action** → **Refresh Cache**
- Click **Start**
- Wait a minute then continue to the next step
4. Have another look at the local file system mount and see if your new files
are available, by running the following commands in your SSH session, where you replace username with the username you created e.g. jess
cd /nfs_target
ls
cd username
ls
- you should see your new file1.txt and file2.txt files through the NFS
mount
**SUMMARY**
-----------
In module 4, you obtained hands-on experience in deploying & configuring AWS
Transfer for SFTP, and also transferring files using SFTP commands.
You also learned how to seamlessly access the data stored in Amazon S3
by AWS Transfer for SFTP service through the use of the AWS File Gateway.
**END OF MODULE 4**
-------------------
Click here to go to the [cleanup module](/cleanup/README.md)