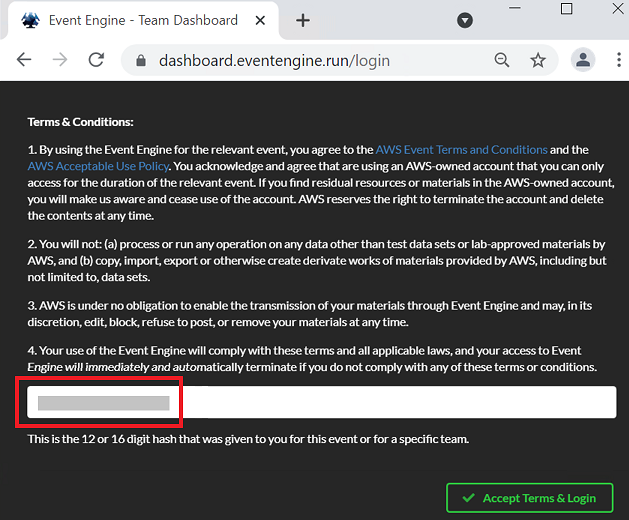
 - Once you have copied the Event Engine hash value, click on **Accept Terms & Login**
- Click on **Email One-Time Password**
- You will then be taken to the Event Engine Team dashboard
- Click on **AWS Console**
- **IMPORTANT:** Click on the **Copy login link**, and paste it into a notepad file on your local machine. If your Event Engine hash doesnt work during the lab, you can use this alternative login URL link to access your temporary AWS account.
- Now that you have taken note of the items you need to access your temporary account, lets start the workshop
- Click **Open AWS Console**
- Once you have copied the Event Engine hash value, click on **Accept Terms & Login**
- Click on **Email One-Time Password**
- You will then be taken to the Event Engine Team dashboard
- Click on **AWS Console**
- **IMPORTANT:** Click on the **Copy login link**, and paste it into a notepad file on your local machine. If your Event Engine hash doesnt work during the lab, you can use this alternative login URL link to access your temporary AWS account.
- Now that you have taken note of the items you need to access your temporary account, lets start the workshop
- Click **Open AWS Console**
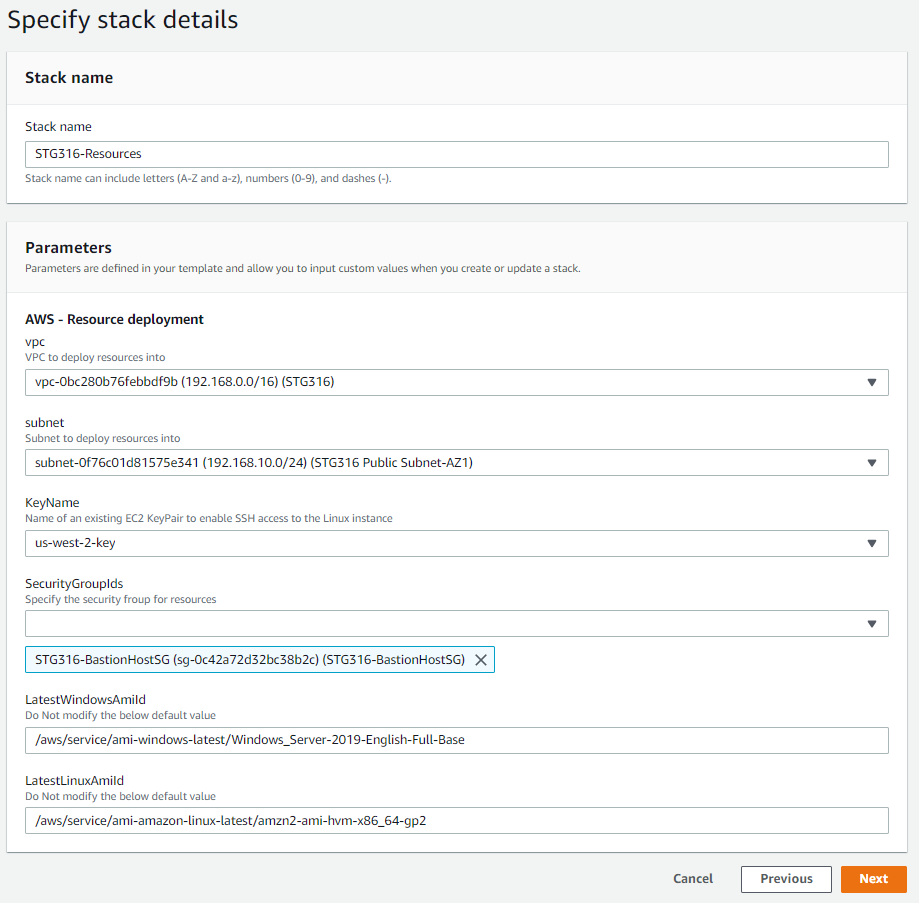 5. Scroll to the bottom of the next screen and click on **Next**
6. Scroll to the bottom of the next screen, check the **CloudFormation
acknowledgement** box and click on **Create stack**
- You will be taken to the CloudFormation stack status page
- Click on the **refresh** icon as
until the status value changes
to **CREATE_COMPLETE** (this may take a few minutes) as shown below,
you can then progress to the next steps
5. Scroll to the bottom of the next screen and click on **Next**
6. Scroll to the bottom of the next screen, check the **CloudFormation
acknowledgement** box and click on **Create stack**
- You will be taken to the CloudFormation stack status page
- Click on the **refresh** icon as
until the status value changes
to **CREATE_COMPLETE** (this may take a few minutes) as shown below,
you can then progress to the next steps
**CONNECT TO YOUR INSTANCE** ---------------------------- **Firstly let’s retrieve the Windows administrator password from AWS Secrets Manager** 1. From **your workstation** navigate to your AWS console session, from the top search bar in the AWS console, type and & select **Secrets Manager** 2. Click on the value shown under **Secret name** (i.e. AdminSecret-abczxy) 3. Scroll down the page and click on **Retrieve secret value** 4. Copy and paste the password value shown for **Secret key value** into a notepad file 5. Next let’s connect to your Windows Server EC2 instance 6. From the AWS console and top search bar, type and & select **EC2** 7. From the left hand menu, select **Instances** - In the right hand pane, select the box next to “**Workshop Windows instance 1**”, then right click and select **Connect** - Click on The RDP Client tab, then **Download Remote Desktop File** - Open the downloaded Remote Desktop File and select Connect at the prompt - Enter the credentials below and click on OK - username : Administrator - Password : the value you obtained from Secrets manager 7. You have now successfully logged into your Windows workshop instance.
**Note:** All remaining tasks for the workshop will be performed through the **Remote Desktop Session to the Windows EC2 Instance you just connected to in the previous steps**. ----------------
9. Open the Chrome browswer icon located on the desktop of the **Windows EC2 instance** and paste the **Event Engine URL** you noted down earlier (i.e. https://dashboard.eventengine.run/dashboard) - Then in the Event Engine page, enter the **Event Engine Hash** value (that you noted down earlier) in the field provided, and click on the **Accept terms & Login** button. This will now log you into your temporary AWS account within the Windows EC2 instance, which you will use for the remainder of the lab. - On the next Event Engine screen, click on **AWS Console** - Then click on **SSH Key**, next click **Download Key**, finally click **OK**. - It will then download a "ee-default-keypair.pem" SSH key file to your users downloads folder (the downloaded file will also be shown at the bottom of the Chrome screen for reference). Copy the "ee-default-keypair.pem" file onto the **Desktop** of your Windows workshop instance, as you will need it in that location for the workshop - Go back to your Event Engine screen and finally click on **Open Console**. You will now be logged into the AWS console. - From the AWS Console which you are now logged into, in the top services search bar, type & select **EC2** - From the top right hand drop-down ensure your region is **us-west-2 (Oregon)** - From the left hand menu, select **Instances** - In the right hand pane, select the box next to “**Workshop Linux instance 1**”. - From the bottom window, select the **Details** tab, and copy down the **private IP** address shown - Then open the **workshop.txt** that is located on the desktop of your Windows workshoop instances, and paste the value you copied for **private IP**, into the field for **Linux-Instance-Private-IP=** - You will use this **Linux-Instance-Private-IP** in the next module
**SUMMARY** ----------- In this module you deployed your Amazon EC2 compute instances and the SSH key that that you will use for the remainder of the workshop.
**END OF MODULE** -------------------
CLICK [here to go to the S3 FILE GATEWAY module](/filegateway/README.md) -------------------