S3 FILE GATEWAY (AWS STORAGE GATEWAY) MODULE - FILE DATA
=================================================================
Copyright Amazon Web Services, Inc. and its affiliates. All rights reserved.This sample code is made available under the MIT-0 license. See the LICENSE file.
Errors or corrections? Contact akbariw@amazon.com.
-------------------------------------------------------------------------------
**INTRODUCTION**
-------------------
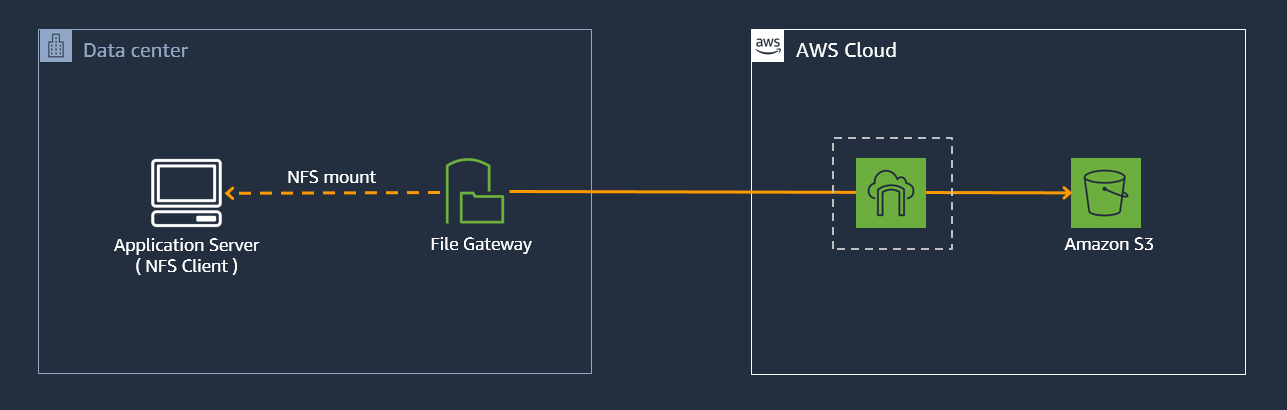
The AWS Storage Gateway service enables hybrid cloud storage access between an
on-premises environment and AWS. The AWS Storage Gateway in File mode, enables
you to store and retrieve objects in Amazon S3 using file protocols, such as NFS
and SMB. Objects written through file gateway can be directly accessed in your Amazon S3 bucket.
**OBJECTIVE**
-------------------
In this module you will perform the following tasks
- Create an Amazon S3 bucket, to back your File Gateway, file share
- Deploy an AWS Storage Gateway in File mode
- Create an NFS file share that is backed by your Amazon S3 bucket
- Mount the File Gateway, NFS share on a Linux host
- Transfer 10,000 small files from the local Linux host to the NFS share presented by the File Gateway
- Verify data transferred to Amazon S3
**Lab Diagram: Transferring data to Amazon S3 using File Gateway**
**CREATE S3 BUCKET - FILE GATEWAY**
---------------------------------------
**Note:** **Ensure that you are logged into your Windows RDP session** and to enter
all required details into the workshop.txt file located on the desktop, as
instructed.
This bucket will be used to back the AWS File Gateway that you will deploy
1. From the AWS console, click **Services** at the top of the screen and type &
select **S3**
2. From the AWS S3 console select **Create bucket**
3. Provide a unique bucket name for your **Source-S3-bucket**. Use the
following naming convention “stg316-source-**xyz**” were **xyz** is
combination your surname and first name (e.g. “**stg316-source-citizenj**”)
- Take note of your **Source-S3-bucket** name in your workshop.txt file
4. Select **US West (Oregon)** as the region
5. Select **ACLs Disabled**
6. Leave all other options as default
7. Ensure the “**Block all public access**” check box is enabled
8. Select **Create bucket** to complete this step
**DEPLOY S3 FILE GATEWAY INSTANCE**
---------------------------------
1. From the AWS console, at the top of the screen, click **Services** and type
& select **Storage Gateway**
2. Click the **Create gateway** button
- Enter a name for your Gateway (i.e. stg STG316-filegateway)
- Select **Amazon S3 File Gateway** as the Gateway type
- Select **Amazon EC2** from the Platform options, and Click on the **Launch Instance** Icon.
- On the next screen, select the following values
- Name = STG316-filegateway
- Instance type = **c5.2xlarge**
- Select a **key pair** that you want to use (an existing one that has been automatically created for this workshop, or one that you have created previously for this workshop),
- In the **Network settings** section, click Edit. Then enter the workshop VPC which has the label
of “**STG316**”
- In the **Subnet** value select the one that has a label of **STG316**
- Firewall = Click on the **Select an existing security group**
- Select the security group with the name
of **STG316-FileGatewaySG**
- Leave all other values as default
- In the **Configure Storage** window, click on **Advanced** button, and then peform the following:
- Click on **Add New Volume** (to add a second volume to the File
Gateway to use as your cache drive) with the following values
- Size : **200GB**
- Volume Type : **GP3 - General Purpose SSD (GP3)**
- IOPS : **7500**
- delete on termination : **YES**
- Click on **Launch Instance** from the right hand window pane
3. From the AWS console, click **Services** and type & select **EC2**
- From the left hand EC2 console menu, select **Instances**
- In the right hand pane, select the box next to
**STG316-filegateway**, ensure the **Status Check** column for
this EC2 instance shows “**2⁄2 checks passed**“ before proceeding to
the next step (this may take a few minutes)
- In the bottom window pane, select the **Details** tab, and take
note of the **private IPv4** address for the File Gateway instance
into your workshop.txt file for the value of
**File-Gateway-Instance-Private-IP=**.
**ACTIVATE FILE GATEWAY**
-------------------------
1. From the AWS console, at the top of the screen, click **Services** and type & select **Storage Gateway**
- Click the **Create gateway** button
- Enter the name for your gateway (i.e. STG316-FileGateway). Then select **Amazon S3 File Gateway** from the Gateway Options
- Select **Amazon EC2** from the Platform options, Scroll to the bottom and confirm you have "launched and deployed the ECw instance", then click on **Next**
- Select **Publically accessible** for endpoint type,
- Enter the **private IP** address of your File Gateway EC2 instance (value
of **File-Gateway-Instance-Private-IP**)
- Select **Next**
- On the next screen, Leave the time zone unchanged
- Enter a desired **Gateway name** (i.e. STG316-filegateway)
- Select **Activate gateway**
- On the next screen, from the “**Allocated to**” drop down, select “select
“**Cache**”
- Click on **Save and continue**. Then on the **Configure logging** page leave the default settings, and Click **Save and continue**
- Click **Finish**. This will take a few minutes, please wait until see a **Status** of **Running** for your File Gateway before you continue to the next step (you may need to refresh the screen).
**CREATE NFS SHARE**
--------------------
In the next steps you will create an NFS file share from your S3 File Gateway.
1. Following on from the previous steps, you should still be located in
the **AWS Storage Gateway console**.
2. If you are not on that screen, from the AWS console, at the
top of the screen, click **Services** and type & select **Storage Gateway**
3. Select **Create file Share** from the top menu
4. From the **Gateway** drop down, select the File Gateway instance you just deployed. Then enter the name of your **Source-S3-bucket** in the **Amazon S3 bucket
name** field. Leave the S3 PREFIX NAME field BLANK
5. Select your region (us-west-2). Leave the **File share name** that is already populated (or if its blank leave it). Select **Network File System (NFS)** for the **Access objects using** field
6. Leave all other settings as default
7. Click **Next**
8. On the next page, leave all the defaults and select **Next**
9. On the next page, click the **Edit** value next to **Allowed clients**
- In the **Access object** section, click on **Add client**.
- Then enter **192.168.0.0/16** in the Allowed clients field
10. From the **Mount options** section, select the following values
- Select “**No root squash**” for Squash level
- Leave export as **Read-write**
- Leave the default values for **File metadata defaults**. Click **Next**
11. Review your inputs and click **Create**
12. On the same File Share page, click on the name of your **File
share ID**
- In the details pane below, copy and paste the **Example command** for mounting **On Linux**
in to your **workshop.txt** as the value of
**First-NFS-FileShare-mount-command**\* you will use this command to mount the NFS share
**CONNECT TO THE LINUX HOST**
-------------------------
1. In your Remote Desktop session, click on Windows icon located at the bottom
left of the screen
2. Type CMD and hit Enter to open a new windows command prompt
3. Enter the below commands in the command prompt
cd c:\users\administrator\desktop
4. You should have your SSH key \*.pem key file located on the desktop (i.e. **ee-default-keypair.pem** or **stg316-key.pem**) as per the
previous instructions. Next you will SSH into the Linux server by entering the below command into your windows command prompt, where you need to
replace the two values shown in **\< \>** with your values
ssh -i .pem ec2-user@
i.e. ssh –i stg316-key.pem ec2-user\@192.168.10.102
5. If this is the first time you have connected to this instance, a security
alert dialog box that asks whether you trust the host to which you are
connecting.
- (Optional) Verify that the fingerprint in the security alert dialog box
matches the fingerprint that you previously obtained in (Optional) Get
the Instance Fingerprint
().
If these fingerprints don’t match, someone might be attempting a
“man-in-the-middle” attack. If they match, continue to the next step.
- Choose **Yes** when you are ready to proceed**.**
- A window opens and you are connected to your instance.
**MOUNT NFS SHARE**
-------------------
1. In the open Putty SSH session type the following command
sudo su
2. Next, copy the NFS mount command you noted down in your workshop.txt
for **First-NFS-FileShare-mount-command**, and simply replace
the **[MountPath]** value at the end of the command with the value
of “**/nfs_source”** and enter the entire command into the SSH session, and
hit Enter. it should look similar to the below command except with your values
mount -t nfs -o nolock,hard 192.168.10.12:/stg316-source-citizenj /nfs_source
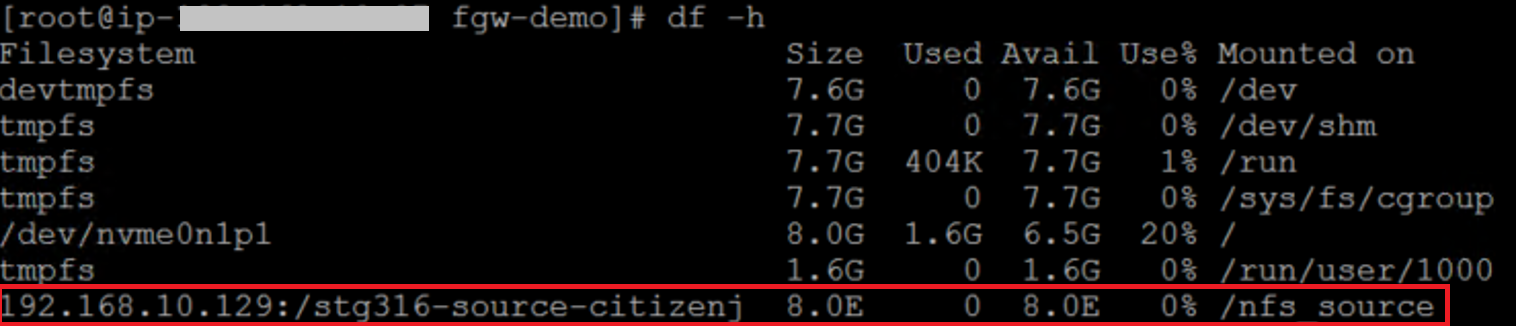
3. Run the below command to verify you have successfully mounted the NFS mount
point of /**nfs_source**
df -h
 **TRANSFER 10,000 SMALL FILES**
----------------------
Next we are going to copy 10,000 very small files from the local
folder **/workshop_data** to the file gateway NFS share you created & mounted
as **/nfs__source** , using a Linux copy script
1. First lets view the local data we are going to copy by running the following find command, which will return the number of files in the folder
commands
cd /workshop_data
ls -ltr
find . -type f | wc -l
2. Run the following commands to start the copy of 10,000 small files (this will take a short while, Wait until you get the data transfer completed message before proceeding)
cd /scripts/fgw-demo
time ./copy_files_to_nfs.sh
- How long did it take to copy 10,000 small files to the File Gateway's local cache?
- The output of the script will return a **real** value, which indicates how how long the copy operation to the file
gateway local cache took
3. Run the below commands to verify the 10,000 files were copied to the File
Gateway NFS share
cd /nfs_source
ls -ltr
find . -type f | wc -l
- How many files does it show that you copied?
2. Next we are going to change the permissions & ownership of a file which will
be a reference point in the AWS Datasync module, used to verify metadata being copied
across. Run the following commands:
cd /nfs_source/appdata
ls -ltr
chmod 444 saturn.gif
chown -R user9:appadmin saturn.gif
ls -ltr
3. Lastly, lets verify that the data from the local Linux server has been
copied through your File Gateway NFS share to your **Source-S3-Bucket**
- Return to your Chrome session and from the AWS console, at the top of
the screen, click **Services** type & select **S3**
- Select your **Source-S3-Bucket** name from the list
- Check the box next to **Name** to select all objects
- Click on **Actions** → **Calculate total size**
- Note: The results will be shown in the **Summary** box. It will show the total number of objects stored in your S3 bucket which were uploaded by the File Gateway in this module
- Click **Close** when done
**TRANSFER 10,000 SMALL FILES**
----------------------
Next we are going to copy 10,000 very small files from the local
folder **/workshop_data** to the file gateway NFS share you created & mounted
as **/nfs__source** , using a Linux copy script
1. First lets view the local data we are going to copy by running the following find command, which will return the number of files in the folder
commands
cd /workshop_data
ls -ltr
find . -type f | wc -l
2. Run the following commands to start the copy of 10,000 small files (this will take a short while, Wait until you get the data transfer completed message before proceeding)
cd /scripts/fgw-demo
time ./copy_files_to_nfs.sh
- How long did it take to copy 10,000 small files to the File Gateway's local cache?
- The output of the script will return a **real** value, which indicates how how long the copy operation to the file
gateway local cache took
3. Run the below commands to verify the 10,000 files were copied to the File
Gateway NFS share
cd /nfs_source
ls -ltr
find . -type f | wc -l
- How many files does it show that you copied?
2. Next we are going to change the permissions & ownership of a file which will
be a reference point in the AWS Datasync module, used to verify metadata being copied
across. Run the following commands:
cd /nfs_source/appdata
ls -ltr
chmod 444 saturn.gif
chown -R user9:appadmin saturn.gif
ls -ltr
3. Lastly, lets verify that the data from the local Linux server has been
copied through your File Gateway NFS share to your **Source-S3-Bucket**
- Return to your Chrome session and from the AWS console, at the top of
the screen, click **Services** type & select **S3**
- Select your **Source-S3-Bucket** name from the list
- Check the box next to **Name** to select all objects
- Click on **Actions** → **Calculate total size**
- Note: The results will be shown in the **Summary** box. It will show the total number of objects stored in your S3 bucket which were uploaded by the File Gateway in this module
- Click **Close** when done
**SUMMARY**
-----------
In this module you have obtained hands on experience on how simple and seamless
it is to leverage a file share presented from the AWS File Gateway as a file transfer mechanism to store data in Amazon S3 (in
this case 10,000 small files). You also gained insight into how the AWS File Gateway can enable
hybrid cloud file storage architectures, where you can access your hot data via
the local file gateway cache, where all your data is backed in an Amazon S3
bucket.
**END OF MODULE**
-------------------
CLICK [here to go to the AWS TRANSFER FOR SFTP module](/transfersftp/README.md)
-------------------