## re:Invent 2017 - SID402
# Module 1 - Monitoring Security Events in AWS
### Introduction
You have taken a lead security engineering role in helping IthaCorp improve the security posture in their AWS environment. As you work through the Security Enhancement Project, you implement a series of detective controls to improve visibility into various AWS activities.
In this module, your task is to set up automatic notifications for a number of security related events in AWS. The module walks you through how to use the AWS Management Console and AWS CloudFormation to create Amazon CloudWatch alarms that is triggered when an AWS API call is made that may be of interest for security professionals.
The module walks you through the process of creating alerts for one such event using AWS Console. Steps for the rest of the events have been automated in a CloudFormation template, which is provided to you. The module makes use of a number of AWS services namely AWS Identity and Access Management (IAM), AWS CloudTrail, AWS CloudWatch Alarms, AWS CloudFormation and others.
### Architecture Overview
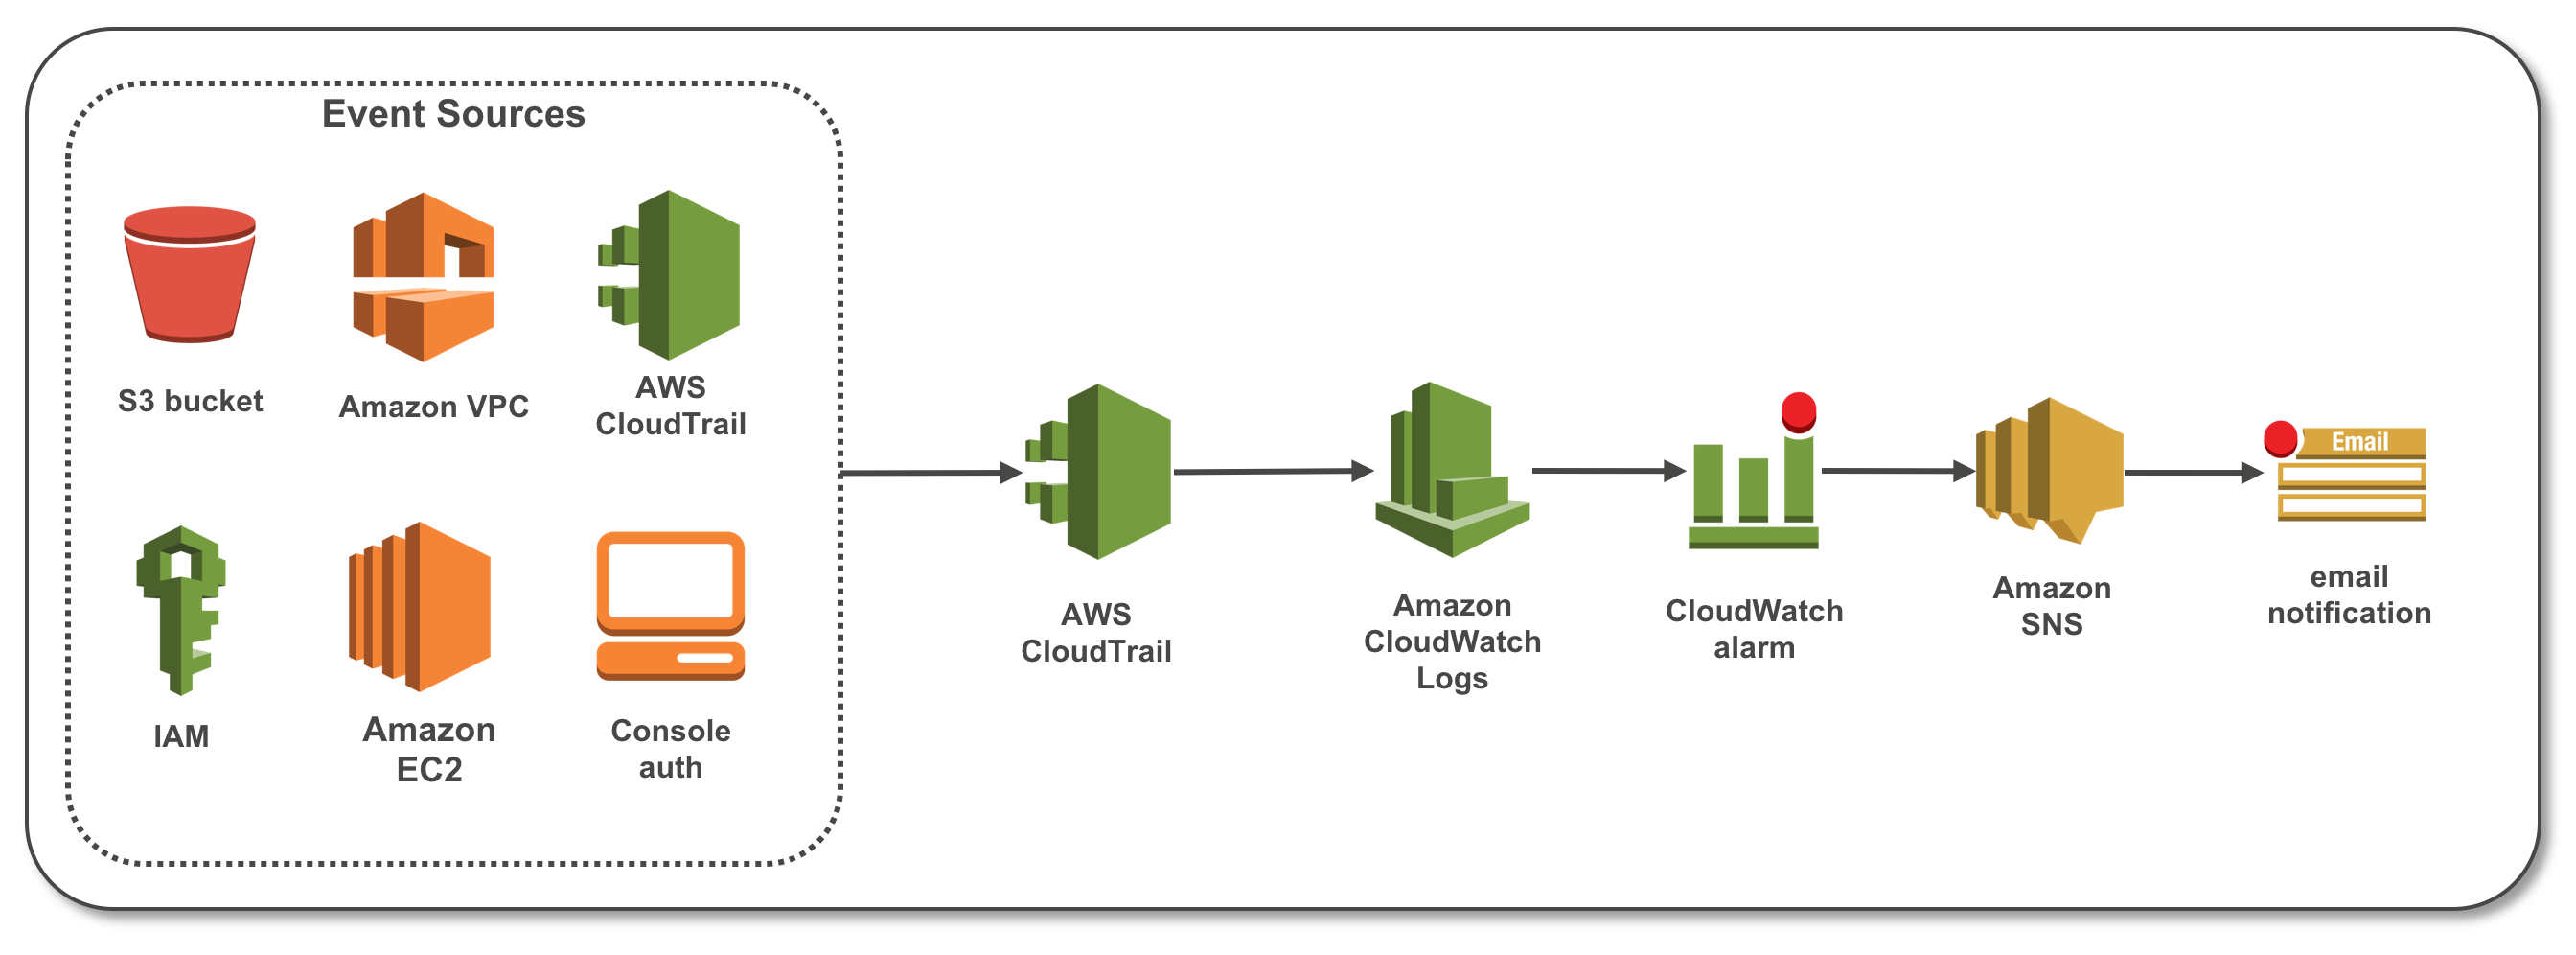
### Topics Covered
After completing this module, you should be able to automate notifications for any of the below use cases:
- Amazon S3 Bucket Activity
- Security Group Configuration Changes
- Network Access Control List (ACL) Changes
- Network Gateway Changes
- Amazon Virtual Private Cloud (VPC) Changes
- Amazon EC2 Instance Changes
- CloudTrail Changes
- Console Sign-In Failures
- Authorization Failures
- IAM Policy Changes
### Prerequisites
This module is targeted for IT security focused individuals who are interested in learning about automating security related events on AWS. You will need an AWS account with administrators access.
To successfully complete this module, you should be familiar with AWS services including Amazon EC2, S3, VPC etc. and have a basic understanding of security groups, Network Access Control List (NACL), IAM Policies etc. You should be comfortable logging into and using the AWS Management Console and have familiarity with AWS Identity and Access Management (IAM).
### 1. Choose a Region
**Tip** The AWS region name is always listed in the upper-right corner of the AWS Management Console, in the navigation bar.

Make a note of the AWS *region name*, for example, *Ireland (eu-west-1)*. For more information about regions, see: [AWS Regions and Endpoints](http://docs.aws.amazon.com/general/latest/gr/rande.html)
### 2. Complete Initial Environment Configuration
In this section, you will perform configuration in the console for CloudTrail logging, CloudWatch Logs and a CloudWatch Alarm.
___Complete all the steps below unless they are marked "optional". Use arrow to expand sections marked with "(expand for details)".___
2.1. Create a CloudTrail with the Console (expand for details)
- __2.1.0.__ ___IMPORTANT NOTE: YOU MAY BE TEMPTED TO USE A UNITED STATES REGION, PLEASE USE ONE OF THE REGIONS WE LIST ABOVE IN STEP 1!___
- __2.1.1.__ In the AWS Management Console, Under Management Tools, Select **CloudTrail**.
- __2.1.2.__ Click on **Trails** from the pane in left and click **Create trail** button.
- __2.1.3.__ In the **Trail name** box, type a name for your trail such as "myCloudTrail".
- __2.1.4.__ For **Apply trail to all regions?**, choose **Yes** to receive log files from all regions.
- __2.1.5.__ For **Read/Write events**, choose **All**.
- __2.1.6.__ For **Data Events**, do not select any buckets.
- __2.1.7.__ For **Create a new S3 bucket?**, choose **Yes** to create a new bucket.
- __2.1.8.__ In the **S3 bucket** field, type a name for the bucket you want to designate for log file storage such as **"myxxxxcloudtrailbucket"** substituting something unique for **xxxx**.
- __2.1.9.__ Click **Create**.
The new trail will appear on the **Trails** page, which shows your trails from all regions.
2.2. Create a Log Group (expand for details)
CloudTrail uses a CloudWatch Logs log group as a delivery endpoint for log events. We will create a new log group.
To specify a log group using the console:
- __2.2.1.__ In the AWS Management Console, Under Management Tools, Select **CloudTrail**.
- __2.2.2.__ Click on **Trails** from the pane in left. Choose the name of the trail that you have created "myCloudTrail". We'll configure this trail to deliver logs to the log group that we are going to create.
- __2.2.3.__ Expand **CloudWatch Logs** section and click **Configure**.
- __2.2.4.__ In the **New or existing log group** box, keep the DefaultLogGroup or type a log group name (For example myTestLogGroup) to organize CloudTrail events for you to review using CloudWatch Logs, and then choose **Continue**.
- __2.2.5.__ Expand **View Details** and look at the **Role Name** box. Expand **View Policy Document**. The default role policy contains the permissions required for creating a CloudWatch Logs log stream in a log group that you specify and for delivering CloudTrail events to that log stream.
- __2.2.6.__ Choose **Allow**. When you are finished with these steps in the console, the CloudTrail trail will be set up to use the log group and role you specified to send events to CloudWatch Logs. If the trail you configured to use CloudWatch Logs receives log files across regions, events from all regions will be sent to the CloudWatch Logs log group that you specified.
2.3. Create a Metric Filter (Let's do it manually - expand for details)
- __2.3.1.__ In the AWS Management Console, Under Management Tools, Select **CloudWatch**
- __2.3.2.__ In the navigation pane on left, click **Logs**.
- __2.3.3.__ In the list of log groups, select the radio button next to the log group that you created for CloudTrail log events.
- __2.3.4.__ Click **Create Metric Filter**.
- __2.3.5.__ On the **Define Logs Metric Filter** screen, type the following in text box **Filter Pattern**:
{ ($.eventSource = s3.amazonaws.com) && (($.eventName = PutBucketAcl) || ($.eventName = PutBucketPolicy) || ($.eventName = PutBucketCors) || ($.eventName = PutBucketLifecycle) || ($.eventName = PutBucketReplication) || ($.eventName = DeleteBucketPolicy) || ($.eventName = DeleteBucketCors) || ($.eventName = DeleteBucketLifecycle) || ($.eventName = DeleteBucketReplication)) }
**Note:** Review this filter pattern and take a note of this. Notice that a number of S3 bucket specific events are captured. Revisit this filter pattern when you are ready to test Amazon S3 bucket activity in steps provided below in this module. Steps are provided for testing one such events but you may want to test additional filters.
- __2.3.6.__ Click **Assign Metric**, and then on the Create Metric Filter and Assign a Metric screen, in the Filter Name box, delete existing text and enter **S3BucketActivity**
- __2.3.7.__ Under Metric Details, in the **Metric Namespace** box, delete existing text and enter **CloudTrailMetrics**.
- __2.3.8.__ In the **Metric Name** field, enter **S3BucketActivityEventCount**.
- __2.3.9.__ Click **Show advanced metric settings** , then click **Metric Value**, and then ensure that the value is **1**.
- __2.3.10.__ Click **Create Filter**.
2.4. Create an Alarm for the Metric Filter we just created (Let's do it manually - expand for details)
These steps are a continuation of the previous steps for creating a metric filter.
- __2.4.1.__ You will notice a summary of the filter that has been created with message similar to **Your filter S3BucketActivity has been created**. On the **Filters for Log_Group_Name** page, next to the **S3BucketActivity** filter name, click **Create Alarm**.
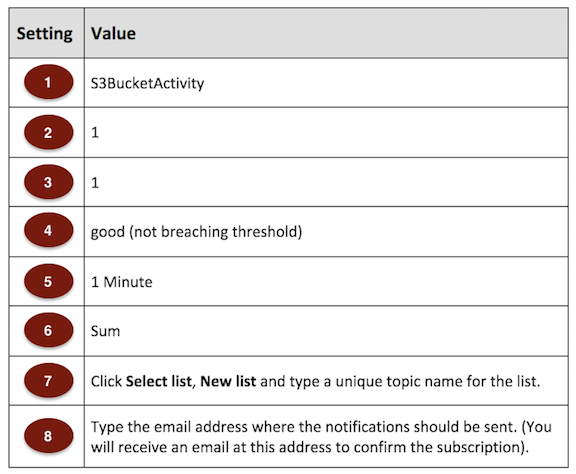
- __2.4.2.__ On the **Create Alarm** page, provide the following values
Name: **S3 Bucket Activity**
Whenever S3BucketActivityEventCount is **>=** 1 for **1** consecutive period(s).
- __2.4.3.__ For the **Period** value, select **1 Minute**.
- __2.4.4.__ In the **Treat missing data as:** box, Click **good (not breaching threshold)**.
- __2.4.5.__ In the **Actions** box, Click **New list** for **Send notification to:**, provide a topic name such as **NotifyMe** and provide your email address. Refer to diagrams below. **NOTE: Some companies filter subscription confirmation messages. We suggest you use a personal e-mail address.**
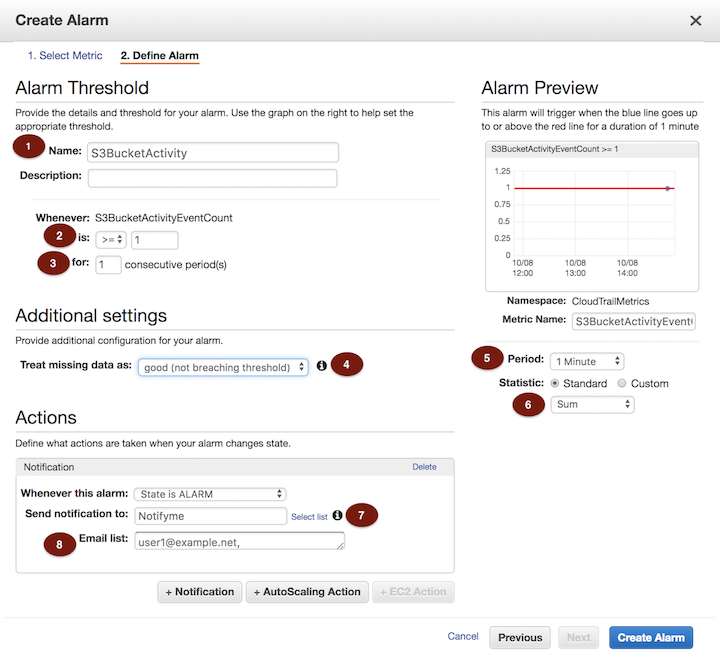
- __2.4.6.__ When you are done, click **Create Alarm**.
- __2.4.7.__ You will receive an email from **AWS Notification** at the email address provided in the **Email list**. Click on **Confirm subscription** link provided in the email. **NOTE: You must click on Confirm Subscription before you proceed further!**
- __2.4.8.__ Click on **View Alarm**.
### 3. Create Security Alarms Using AWS CloudFormation
In the previous steps you have learnt how to create a metric filter in CloudWatch and how to create an alarm for the metric via the AWS console. Creation of metric filters and corresponding alarms for the remaining security events described in the overview section has been automated for you using AWS CloudFormation template. Follow the steps below:
##### Launch the CloudFormation Stack in the preferred region:
___Hold the "Control" key while clicking and open the launch link in a new tab___
Region| Launch
------|-----
Ireland (eu-west-1) | [](https://console.aws.amazon.com/cloudformation/home?region=eu-west-1#/stacks/new?stackName=SID402-CWLforCloudTrailAPIActivity&templateURL=https://s3-us-west-2.amazonaws.com/sid402-artifacts/templates/CloudWatch_Alarms_for_CloudTrail_API_Activity.json)
London (eu-west-2) | [](https://console.aws.amazon.com/cloudformation/home?region=eu-west-2#/stacks/new?stackName=SID402-CWLforCloudTrailAPIActivity&templateURL=https://s3-us-west-2.amazonaws.com/sid402-artifacts/templates/CloudWatch_Alarms_for_CloudTrail_API_Activity.json)
Singapore (ap-southeast-1) | [](https://console.aws.amazon.com/cloudformation/home?region=ap-southeast-1#/stacks/new?stackName=SID402-CWLforCloudTrailAPIActivity&templateURL=https://s3-us-west-2.amazonaws.com/sid402-artifacts/templates/CloudWatch_Alarms_for_CloudTrail_API_Activity.json)
Sydney (ap-southeast-2) | [](https://console.aws.amazon.com/cloudformation/home?region=ap-southeast-2#/stacks/new?stackName=SID402-CWLforCloudTrailAPIActivity&templateURL=https://s3-us-west-2.amazonaws.com/sid402-artifacts/templates/CloudWatch_Alarms_for_CloudTrail_API_Activity.json)
Tokyo (ap-northeast-1) | [](https://console.aws.amazon.com/cloudformation/home?region=ap-northeast-1#/stacks/new?stackName=SID402-CWLforCloudTrailAPIActivity&templateURL=https://s3-us-west-2.amazonaws.com/sid402-artifacts/templates/CloudWatch_Alarms_for_CloudTrail_API_Activity.json)
Seoul (ap-northeast-2) | [](https://console.aws.amazon.com/cloudformation/home?region=ap-northeast-2#/stacks/new?stackName=SID402-CWLforCloudTrailAPIActivity&templateURL=https://s3-us-west-2.amazonaws.com/sid402-artifacts/templates/CloudWatch_Alarms_for_CloudTrail_API_Activity.json)
**Note:** Review the contents of the template to understand the metric filter and alarm creation via CloudFormation.
__3.1.__ On the Select Template screen, click **Next**.
__3.2.__ On the **Specify Details** page, provide the email address where you want to receive notifications, and the enter name of the log group name that you used when you configured CloudTrail log file delivery to CloudWatch Logs.
__3.3.__ Click **Next**.
__3.4.__ On the **Options** page, you can create tags or configure other advanced options. These are not required for this module.
__3.5.__ Click **Next**.
__3.6.__ Click **Create**. The stack will be created in a few minutes.
__3.7.__ If not already selected, select your stack by clicking on the check box to the left of your stack.
__3.8.__ Click on the **Events** tab and refresh periodically to monitor the creation of your stack.
__3.9.__ The CloudFormation template also creates a SNS topic for you to get update on other email address provided by you in previous steps. You will receive an email from **AWS Notification**, Click on **Confirm subscription** link provided in the email.
**_Note:_** _Before proceeding, make sure that you receive the SNS **AWS Notification** email confirmation and follow the **Confirm subscription** link provided in the email._
When AWS CloudFormation is finished creating the stack, the status will show CREATE_COMPLETE. This CloudFormation stack has created a number of security metric filters and related alarms for you. We'll test these events in the subsequent steps.
### 4. And that's it. We are all set and now the fun part!! Let's generate some events and see what happens
We'll create a number of security events in this section of the module. The resources such as a VPC, Subnets, Security Groups, EC2 Instance, IAM Policy etc. The module covers a number of different events. We are providing a CloudFormation script that creates some resources like networking components (VPC, Subnet, NACL,Security Group etc.), S3 bucket, IAM entities, EC2 instance etc. Manual Steps for a limited number of events are also provided in this section. Feel free to test remaining security events in the time left for the module.
**Note:** - It may take up to 15 minutes to receive the alarm in the CloudWatch console and email. You are advised to continue going through the steps below while waiting for an alarm to appear.
__4.1.__ Test Multiple Events with a CloudFormation Stack
___Launch the CloudFormation Stack in the same region you chose in step 3.___
___Hold the "Control" key while clicking and open the launch link in a new tab.___
Region| Launch
------|-----
Ireland (eu-west-1) | [](https://console.aws.amazon.com/cloudformation/home?region=eu-west-1#/stacks/new?stackName=SID402-AutomatingSecurityEvents&templateURL=https://s3-us-west-2.amazonaws.com/sid402-artifacts/templates/AutomatingSecurityEvents.json)
London (eu-west-2) | [](https://console.aws.amazon.com/cloudformation/home?region=eu-west-2#/stacks/new?stackName=SID402-AutomatingSecurityEvents&templateURL=https://s3-us-west-2.amazonaws.com/sid402-artifacts/templates/AutomatingSecurityEvents.json)
Singapore (ap-southeast-1) | [](https://console.aws.amazon.com/cloudformation/home?region=ap-southeast-1#/stacks/new?stackName=SID402-AutomatingSecurityEvents&templateURL=https://s3-us-west-2.amazonaws.com/sid402-artifacts/templates/AutomatingSecurityEvents.json)
Sydney (ap-southeast-2) | [](https://console.aws.amazon.com/cloudformation/home?region=ap-southeast-2#/stacks/new?stackName=SID402-AutomatingSecurityEvents&templateURL=https://s3-us-west-2.amazonaws.com/sid402-artifacts/templates/AutomatingSecurityEvents.json)
Tokyo (ap-northeast-1) | [](https://console.aws.amazon.com/cloudformation/home?region=ap-northeast-1#/stacks/new?stackName=SID402-AutomatingSecurityEvents&templateURL=https://s3-us-west-2.amazonaws.com/sid402-artifacts/templates/AutomatingSecurityEvents.json)
Seoul (ap-northeast-2) | [](https://console.aws.amazon.com/cloudformation/home?region=ap-northeast-2#/stacks/new?stackName=SID402-AutomatingSecurityEvents&templateURL=https://s3-us-west-2.amazonaws.com/sid402-artifacts/templates/AutomatingSecurityEvents.json)
- __4.1.1__ On the Select Template screen, click **Next**.
- __4.1.2__ Click Next.
- __4.1.3__ On the Options page, you can create tags or configure other advanced options. These are not required for this module.
- __4.1.4__ Click **Next**.
- __4.1.5__ Select **I acknowledge that AWS CloudFormation might create IAM resources.** and click **Create**. The stack will be created in a few minutes.
- __4.1.6__ If not already selected, select your stack by clicking on the check box to the left of your stack.
- __4.1.7__ Click on the Events tab and refresh periodically to monitor the creation of your stack.
#### 4.2. Test Amazon S3 bucket Activity
- __4.2.1__ In the AWS Management Console, under **Storage**, select **S3**.
- __4.2.2__ Select the bucket **securityautomationtestbucketxxxx** and click on **Permissions** tab.
- __4.2.3__ Under **Public access**, click the radio button **Everyone** and in the pop up box, select few permissions like **List Objects** or **Read bucket permission**. Do **not** allow **Write** permissions for **Everyone**.
- __4.2.4__ Click **Save**
- __4.2.5__ You will receive an Alarm **S3 bucket Activity** via email.
**Note:** - If you have not received email notification, navigate to AWS Console, Services, CloudWatch and click on **Alarms**. If this shows **Config Status** as **Pending confirmation** then that means you have not yet confirmed SNS subscription yet. Refer to your email and subscribe to notifications from this module.
- __4.2.6__ You can also view the status of Alarm via AWS CloudWatch console. Navigate to AWS Console, Services, Cloudwatch and click on **Alarms**. You can also see the history of an alarm from the **History** tab in the bottom pane.
#### 4.3. Test Security Group Configuration changes
- __4.3.1__ In the AWS Management Console, on the **Services** menu, click **EC2**.
- __4.3.2__ Click on **Security Groups** under **NETWORK & SECURITY** section from the left pane.
- __4.3.3__ Select **SID402-AutomatingSecurityEvents-InstanceSecurityGroup** from the list and click on **Inbound** tab on the bottom pane.
- __4.3.4__ click **Edit**.
- __4.3.5__ Click **Add Rule**. A new row is created.
- __4.3.6__ Select **Type** of rule from the list, specify a port range (for example 8080 or 49152-50000) and a CIDR range for new inbound rule. Set Source to 0.0.0.0/0 if you are not sure.
- __4.3.7__ Click **save**
- __4.3.8__ You will receive an Alarm **CloudTrailSecurityGroupChanges** via email.
- __4.3.9__ You can also view the status of Alarm via AWS CloudWatch console.
#### 4.4. Test EC2 Instance Changes
- __4.4.1__ In the AWS Management Console, on the **Services** menu, click **EC2**.
- __4.4.2__ Select SecurityTest EC2 instance by clicking on **Instances** In the navigation pane and click on **Actions** button at the top
- __4.4.3__ Click on **Instance State** and then **Stop**. A Pop-up window for confirmation appears, click **Yes, Stop**.
- __4.4.4__ You will receive an Alarm **CloudTrailEC2InstanceChanges** via email.
- __4.4.5__ You can also view the status of Alarm via AWS CloudWatch console.
#### 4.5. Test IAM Policy Changes
- __4.5.1__ In the AWS Management Console, on the **Services** menu, click **IAM**.
- __4.5.2__ Click on **Policies** on the left pane.
- __4.5.3__ Click **Create Policy**.
- __4.5.4__ **In the Service section**, click “Choose a Service” under the tab **Visual Editor** and select **EC2**.
- __4.5.5__ In the **Actions** section, click **Select actions**, check **All EC2 actions (ec2:\*)** and collapse the section by clicking **close**.
- __4.5.6__ In the **Resources section**, click to expand the section, click radio button **All resources** and click **close** to collapse the section.
- __4.5.7__ Click **Review Policy** and provide your policy a name such as **Allow_all_ec2** and click **Create Policy** button below.
- __4.5.8__ You will receive an Alarm **CloudTrailIAMPolicyChanges** via email.
- __4.5.9__ You can also view the status of Alarm via AWS CloudWatch console.
5. Optional Test Scenarios (expand for details)
The following test events are optional and should only be completed after you have completed all modules in this workshop.
#### 5.1. Test Network Access Control List (NACL) Changes
- __5.1.1.__ In the AWS Management Console, on the **Services** menu, click **VPC**.
- __5.1.2.__ Click on **Network ACLs** from the list of Amazon VPC resources. A list of Network ACLs appears.
- __5.1.3.__ Select a NACL which is associated with a Subnet, click on **Inbound Rules** or **Outbound Rules** tab and Click **Edit** from the bottom pane.
- __5.1.4.__ Click on **Add another rule** button and enter the following values in the bottom row and click **Save**.

- __5.1.5.__ You will receive an Alarm **CloudTrailNetworkAclChanges** via email.
- __5.1.6.__ You can also view the status of Alarm via AWS CloudWatch console.
#### 5.2. Test Network Gateway Changes
- __5.2.1.__ In the AWS Management Console, on the **Services** menu, click **VPC**.
- __5.2.2.__ Click on **Internet Gateways** from the list of Amazon VPC resources. A list of Internet Gateway appears.
- __5.2.3.__ Click on **Create Internet Gateway** button.
- __5.2.4.__ Provide a **Name Tag** such as myInternetGateway and click **Yes, Create**.
- __5.2.5.__ You will receive an Alarm **CloudTrailGatewayChanges** via email.
- __5.2.6.__ You can also view the status of Alarm via AWS CloudWatch console.
#### 5.3. Test Amazon Virtual Private Cloud (VPC) Changes
- __5.3.1.__ In the AWS Management Console, on the **Services** menu, click **VPC**.
- __5.3.2.__ Click on **Your VPCs** from the list of Amazon VPC resources. A list of VPC appears.
- __5.3.3.__ Select a VPC and click **Actions** and than click **Edit DNS Resolution**.
- __5.3.4.__ On **Edit DNS Resolution** confirmation message box, select **No** and click **Save**.
- __5.3.5.__ You will receive an Alarm **CloudTrailVpcChanges** via email.
- __5.3.6.__ You can also view the status of Alarm via AWS CloudWatch console.
#### 5.4. Test Console Sign-In Failures
- __5.4.1.__ Note down the AWS account number from the AWS Console. The number is displayed on the top right.

- __5.4.2.__ Open a new window in different browser or use a "New Incognito Window/New Private Window" feature of your browser.
- __5.4.3.__ Type the following in address bar with **AWS-account-ID-or-alias** replaced by the AWS account number noted above.
```
https://AWS-account-ID-or-alias.signin.aws.amazon.com/console
```
- __5.4.4.__ A new sign in page appears, Type a random **User Name** and **Password**.
- __5.4.5.__ Click **Sign in**. Repeat these steps for at least three times.
- __5.4.6.__ You will receive a sign in failure with the message:
````
Your authentication information is incorrect. Please try again
````
- __5.4.7.__ You will receive an Alarm **CloudTrailConsoleSignInFailures** via email.
- __5.4.8.__ You can also view the status of Alarm via AWS CloudWatch console.
#### 5.5. Test Authorization Failures
- __5.5.1.__ In the AWS Management Console, under **Storage** menu, select **S3**.
- __5.5.2.__ Select the bucket **securityautomationtestbucketxxxx** and upload a file into this bucket.
- __5.5.3.__ Click on the file you just uploaded and grap the URL from the Link.
- __5.5.4.__ Try opening the URL from an Incognito browser (Private browser). You should receive an authorization ofailure. You will receive an Alarm **CloudTrailAuthorizationFailures** via email.
- __5.5.5.__ You can also view the status of Alarm via AWS CloudWatch console.
#### 5.6. Test CloudTrail Changes
- __5.6.1.__ In the AWS Management Console, on the **Services** menu, click **CloudTrail**.
- __5.6.2.__ Click **Trails** on the left pane and select the trail (myCloudTrail) that you have created in this module.
- __5.6.3.__ Click on the pencil next to **Trail settings** to edit the behavior.
- __5.6.4.__ For **Apply trail to all regions**, select radio button **No** and click **save**.
- __5.6.5.__ You will receive an Alarm **CloudTrailChanges** via email.
- __5.6.6.__ You can also view the status of Alarm via AWS CloudWatch console.
### Conclusion
Congratulations! You have successfully created a Trail in AWS CloudTrail console, create a log group in CloudWatch console that receives logs from CloudTrail, created a number of metric filters and corresponding alarms for automated notifications. You have also learned how to automate the steps via AWS CloudFormation. You now know how to automate a number of Security related events in AWS such as:
- Amazon S3 Bucket Activity
- Security Group Configuration Changes
- Network Access Control List (ACL) Changes
- Network Gateway Changes
- Amazon Virtual Private Cloud (VPC) Changes
- Amazon EC2 Instance Changes
- CloudTrail Changes
- Console Sign-In Failures
- Authorization Failures
- IAM Policy Changes
### [Continue on to Module 2](https://github.com/awslabs/aws-security-odyssey/tree/master/SID402Workshop/2_ImplementSecWithIoT)
### Clean Up
___Complete clean up at the end of the Workshop___
### Additional Resources
- For more information about AWS CloudTrail, see
- For more information about Amazon CloudWatch, see
- For more information about AWS CloudFormation, see
- For more information about AWS Security - Network Security, refer to Whitepaper at