1. Choose on **Services** then select **Lambda** in the Compute section. 1. Choose **Create function**. 1. Click the **Author from scratch** button at the top of the blueprint list. 1. Enter **ListUnicornRides** in the **Name** field. 1. Select **wildrydes/WildRydesLambda** from the **Existing Role** dropdown. 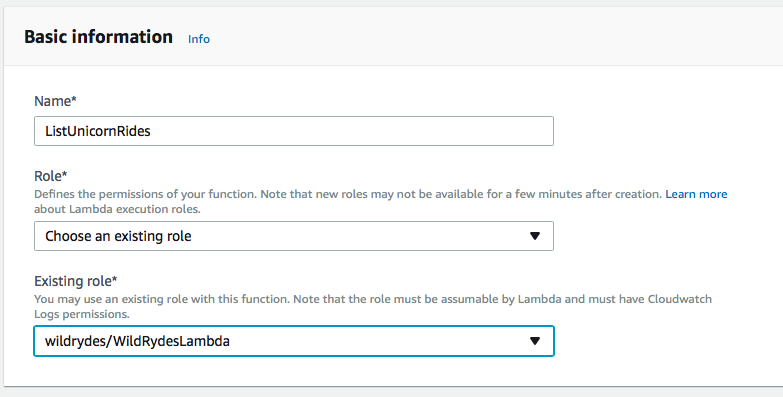 1. Click **Create function**. 1. Select **Node.js 6.10** for the **Runtime**. 1. Copy and paste the code from [listUnicornRides.js](./listUnicornRides.js?raw=1) into the code entry area. 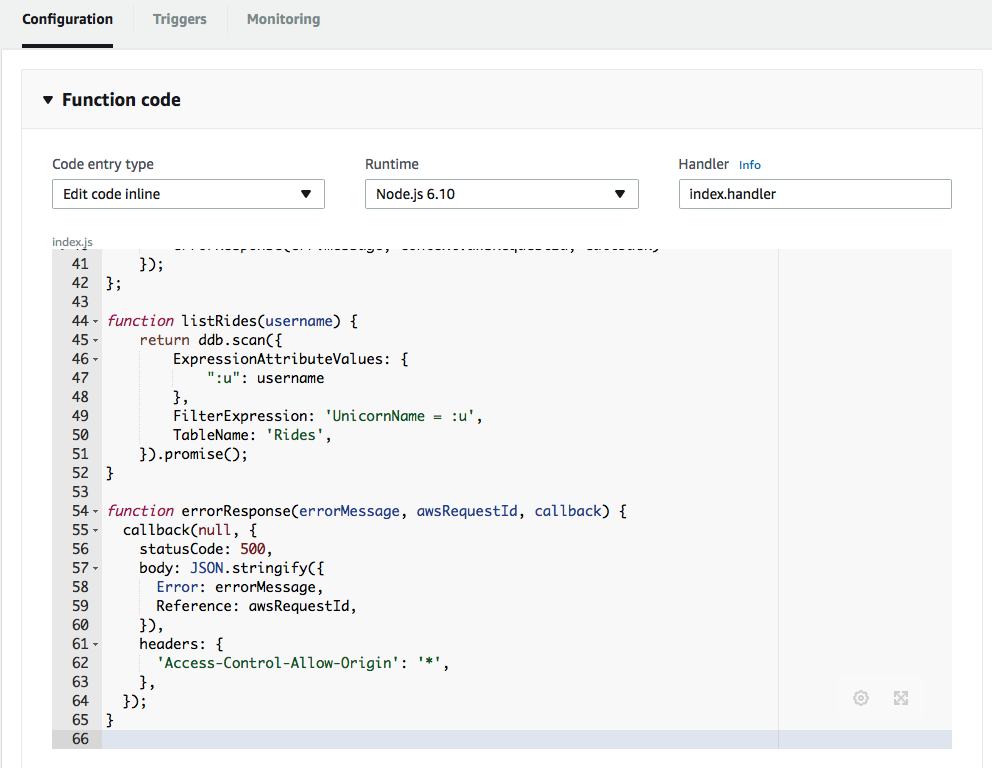 1. Leave the default of **index.handler** for the **Handler** field. 1. Click **Save** at the top of the page.
1. Choose on **Services** then select **Lambda** in the Compute section. 1. Choose **Create function**. 1. Click the **Author from scratch** button at the top of the blueprint list. 1. Enter **ListUnicornAuthorizer** in the **Name** field. 1. Select **wildrydes/WildRydesLambda** from the **Existing Role** dropdown. 1. Click **Create function**. 1. Change the **Code entry type** to **Upload a .ZIP file**. 1. Select **Node.js 6.10** for the **Runtime**. 1. Leave the default of **index.handler** for the **Handler** field. 1. Click the **Upload** button and select the [ListUnicornAuthorizer.zip](./ListUnicornAuthorizer.zip) file in the current module folder. 1. Expand the **Environment variables** section and declare a new variable called **USER_POOL_ID**. The value for the variable is the **Pool Id** for the WildRydes user pool, you can find the value in the Cognito console. 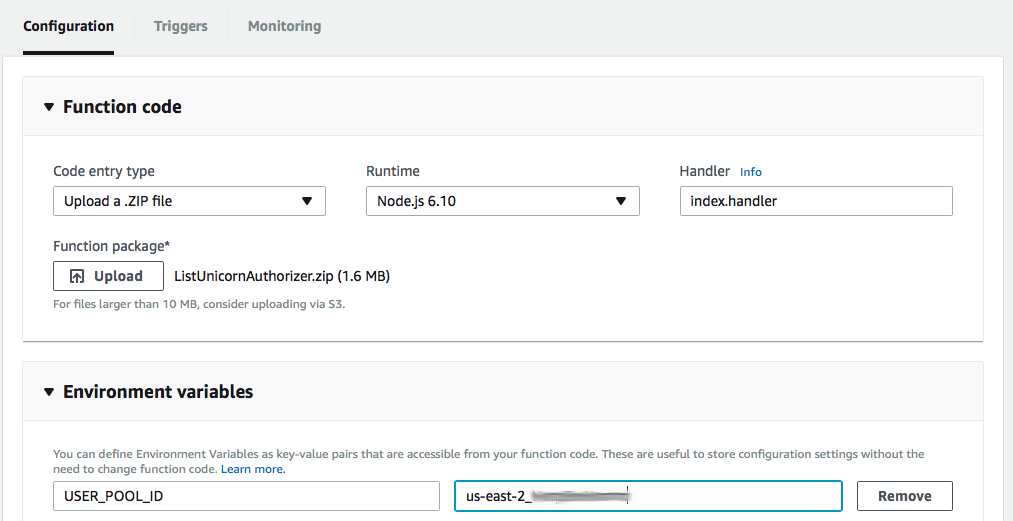 1. Click **Save** at the top of the page.
1. Open the **Services** menu and select **API Gateway** in the Application Services section. 1. Open the **WildRydes** API in the left menu and select the **Authorizers** page. 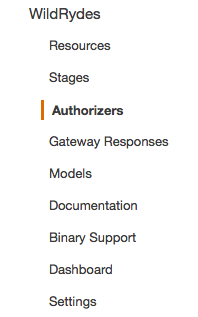 1. Click the button to **Create New Authorizer** at the top of the page. 1. Enter **ListUnicornAuthorizer** as the **Name** and **Lambda** as the **Type**. 1. Using the **Lambda Function** field, select your region and enter the **ListUnicornAuthorizer** Lambda function name. 1. Leave the **Lambda Execution Role** field blank. Configured this way, the API Gateway console automatically sets the permissions on the Lambda function to allow the invocation. The console will ask you to confirm this action as you save the new authorizer settings. 1. Select **Token** as the **Lambda Event Payload** and enter **Authorization** as the **Token Source**. 1. Leave the default values in the **Authorization Caching** settings and click **Create** 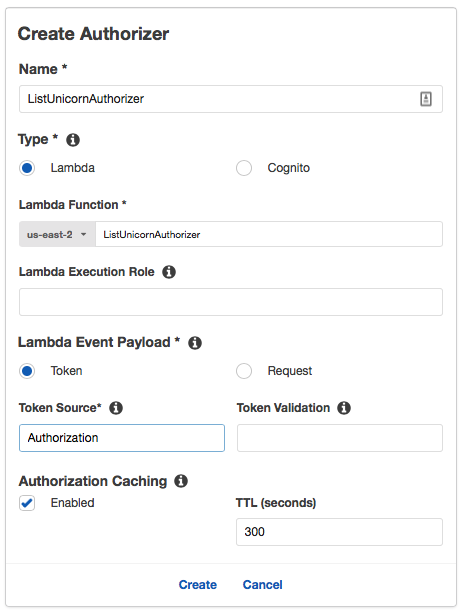 1. The API Gateway console asks you to confirm the new permissions on the Lambda function. Click **Grant & Create**.
1. Open the **Services** menu and select **API Gateway** in the Application Services section. 1. Open the **WildRydes** API and, from the **Resources** page, select the `/ride` resource. 1. Using the **Actions** dropdown menu in the **Resources** pane, select **Create Method**. 1. Configure the new method as a **GET** and confirm the settings with the small checkmark button next to the dropdown. 1. In the method integration settings screen, select **Lambda Function** as the **Integration Type**, check the **Use Lambda Proxy Integration** checkbox, then select your Lambda region and use **ListUnicornRides** (careful: NOT **ListUnicornAuthorizer**) as the function name.  1. Click **Save** and confirm the new permissions on the Lambda function by clicking **Ok** in the modal window. 1. In the **Method Execution** screen, open the **Method Request** pane. 1. Click on the pencil icon next to the **Authorization** settings to change the value and select the **ListUnicornAuthorizer** from the dropdown. 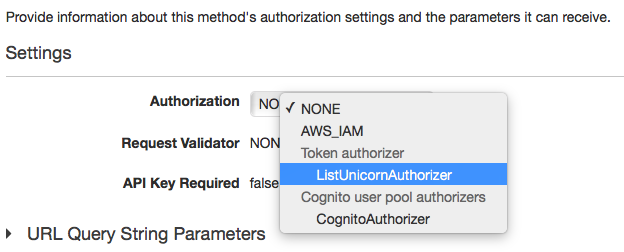 1. Click the checkmark icon next to the dropdown to save your changes. 1. Using the **Actions** dropdown in the **Resources** pane, select **Deploy API**. 1. In the deployment modal window, select the **prod** stage from the **Deployment stage** dropdown and then click **Deploy**.
1. In the AWS Management Console choose **Services** then select **S3** under Storage. 1. Choose **+ Create Bucket** 1. Provide a globally unique name for your bucket such as `unicornmanager-firstname-lastname`. 1. Select the Region you've chosen to use for this workshop from the dropdown. 1. Choose **Create** in the lower left of the dialog without selecting a bucket to copy settings from. 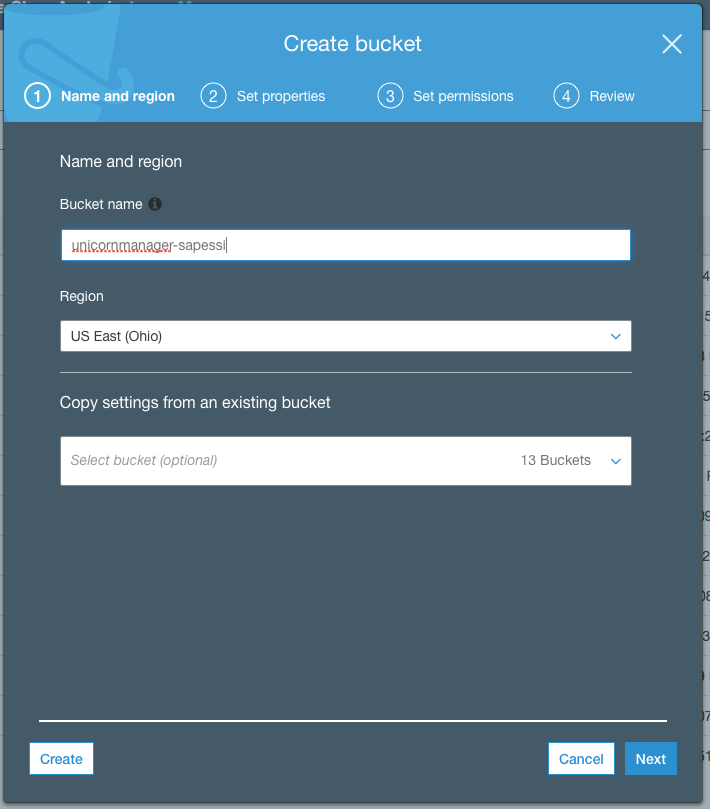 1. Open the bucket you just created. 1. Choose the **Permissions** tab, then click the **Bucket Policy** button. 1. Enter the following policy document into the bucket policy editor replacing `[YOUR_BUCKET_NAME]` with the name of the bucket you created in section 1: ```json { "Version": "2012-10-17", "Statement": [ { "Effect": "Allow", "Principal": "*", "Action": "s3:GetObject", "Resource": "arn:aws:s3:::[YOUR_BUCKET_NAME]/*" } ] } ``` 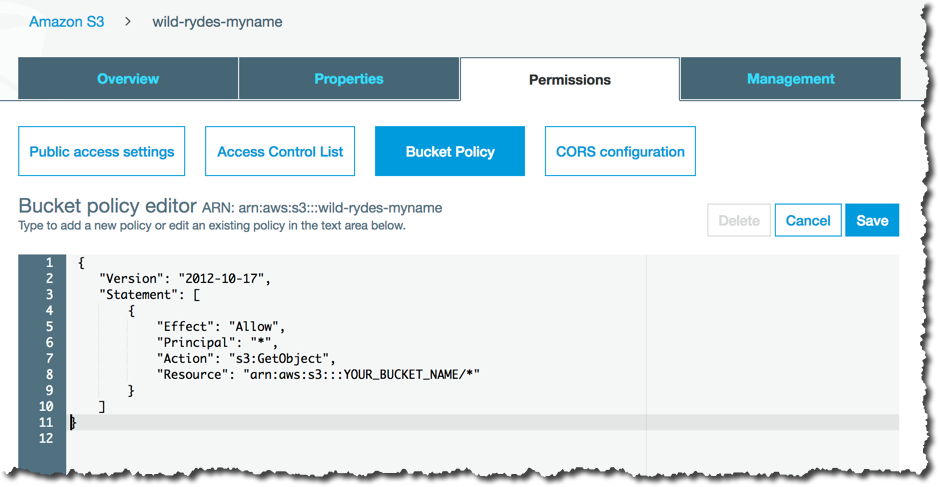 1. Choose **Save** to apply the new policy. You will see a warning indicating `This bucket has public access`. This is expected. 1. Next, choose the **Properties** tab. 1. Choose the **Static website hosting** card. 1. Select **Use this bucket to host a website** and enter `index.html` for the Index document. Leave the other fields blank. 1. Note the **Endpoint** URL at the top of the dialog before choosing **Save**. 1. Click **Save** to save your changes. 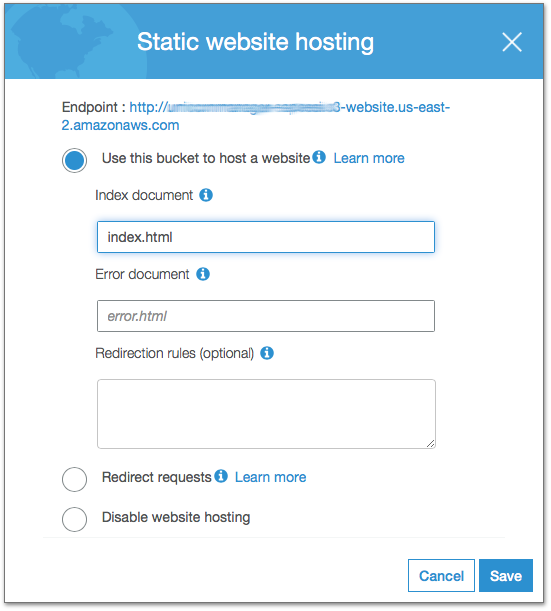 1. Next, open the **CloudFront** console under the **Networking & Content Delivery**. 1. In the **CloudFront Distributions** page, click **Create Distribution**. 1. For the delivery method, under **Web** section, click **Get Started**. 1. In the **Origin Domain Name** field, paste the URL for the S3 static website we just created and **/** as the origin path. **Do not select the bucket from dropdown list, paste the full website url including the http:// prefix. The origin type should be `custom`, not `s3`**. 1. In the **Viewer Protocol Policy** make sure that **Redirect HTTP to HTTPS** is selected. 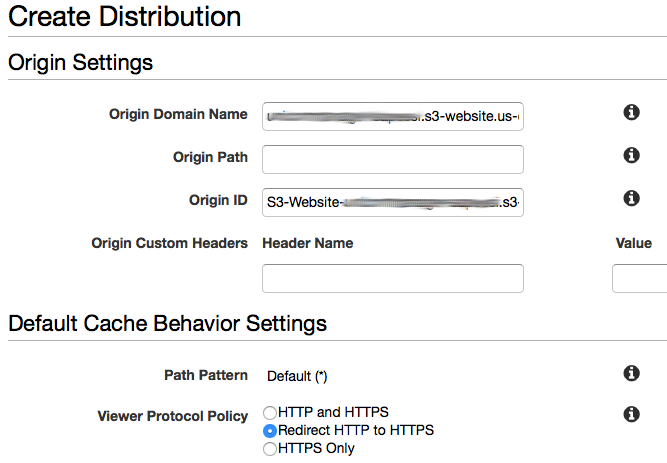 1. Under **Distribution Settings** for **Price Class**, select **Use Only US, Canada and Europe**. 1. Click **Create Distribution** at the bottom of the page. 1. Creating a global distribution can take some time. Let CloudFront do its work in the background and move on the next step. We will come back to get the distribution endpoint at a later step.
1. In the AWS Management Console choose **Services** then select **Cognito** under Mobile. 1. In the intro page, click **Manage your User Pools** an open the **WildRydes** pool. 1. Open the **App clients** from the **General settings** menu on the left. 1. Click **Add another app client**. 1. Enter **UnicornManager** as the **App client name** and uncheck the **Generate client secret** checkbox. 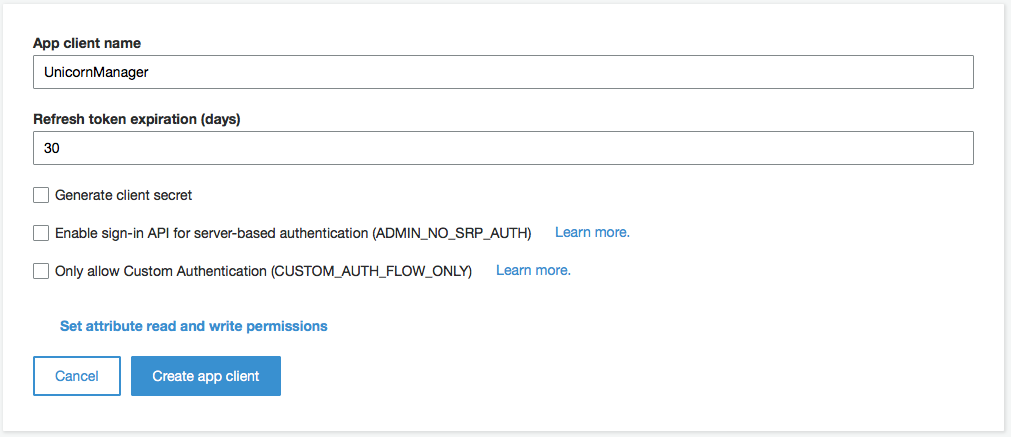 1. Click **Create app client**. 1. Open the **Domain name** configuration page. 1. Specify a unique custom domain name, for example **wildrydes-sapessi**. 1. Make sure that the domain name is available and then click **Save changes**.
1. Open the **Services** menu and select **Cognito** in the Mobile section. 1. In the main screen, select **Manage your User Pools**. 1. Open the **WildRydes** pool and select **Resource Servers** under **App integration**. 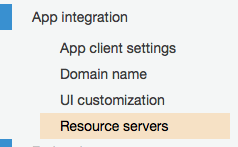 1. In the resource servers screen, click **Add a resource server**. 1. Specify **UnicornServer** as the **Name**. 1. Use **UnicornManager** as the **Identifier** for the custom resource server. 1. In the **Scopes** section, declare a new scope called **unicorn**. I've used "**Allow listing of rides for unicorns**" as the description. 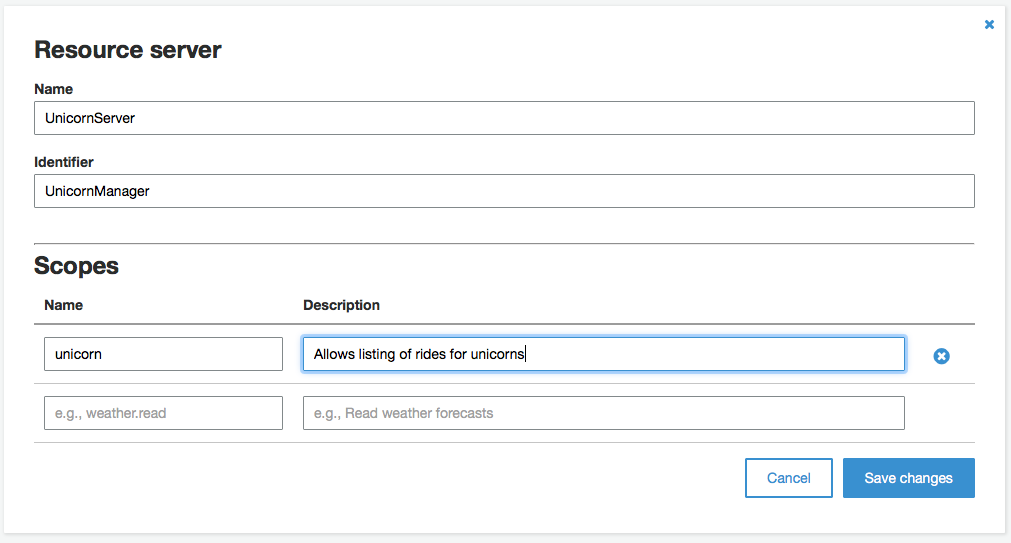 1. Click **Save changes** to create your new custom resource server.
1. In the AWS Management Console choose **Services** then select **Cognito** under Mobile. 1. In the intro page, click **Manage your User Pools** an open the **WildRydes** pool. 1. Open the **App clients settings** from the **App integration** menu on the left. This page lists both the app clients declared for your user pool. Make sure you make the following changes only to the **UnicornManager** client app. 1. Select **Cognito User Pool** as an identity provider for the app client. 1. Enable the **Implicit grant** OAuth flow and allow the **UnicornManager/unicorn** custom scope. 1. In the **Callback** and **Signout** URLs, specify the HTTPS CloudFront distribution endpoint adding **https://** at the beginning and **/** at the end: 1. You can find the distribution endpoint in the **CloudFront** console. 1. Select the distribution we created in step #5. 1. In the **General** tab, copy the value for **Domain name**. 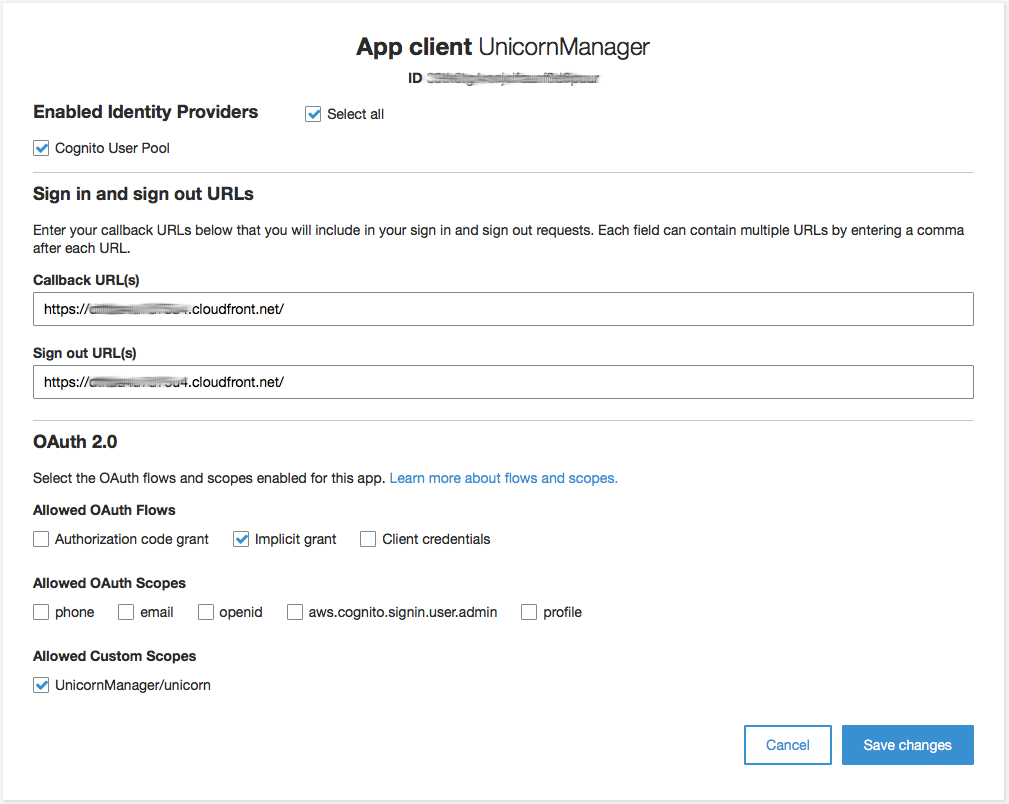 1. Click **Save changes**.
1. With a file manager, navigate to the folder where the lab content is located and open the **UnicornManager** directory from the **WebApplication/5_OAuth/** folder. 1. Open a terminal window and navigate to the folder where the material for this workshop is located. Navigate to the `WebApplication/5_OAuth/UnicornManager` folder. 1. Open the **js** folder. 1. Using your preferred text editor, open the **config.js** file. 1. From the Cognito User Pools console, copy the client app id for the **UnicornManager** application as the value of the **userPoolClientId** property. You can find the application id in the **App clients** menu of the Cognito console. 1. Change the value of the **region** property to the region you are using for this workshop. For example, I'm using **us-east-2**. 1. Still in the Cognito User Pools console, open the **Domain name** page and copy the custom prefix in the value for the **authDomainPrefix** property. In our sample, this was `wildrydes-sapessi`. 1. Finally, open the CloudFormation console and select the pre-requisites stack we created at the beginning of this lab. With the stack selected, use the bottom section of the window to open the **Outputs** tab. Copy the value of the **WildRydesApiInvokeUrl** output variable to the **invokeUrl** property - this value should look like this: `https://xxxxxxxxx.execute-api.xx-xxxxx-x.amazonaws.com/prod` 1. Next, we need to copy the files we just modified to the S3 bucket that hosts our static website. We created the bucket in step #5 of this lab and it should be called **unicornmanager-<username>**. You can use the AWS CLI or the management console with a compatible browser to upload the files. ##### AWS CLI 1. With a terminal, navigate to the **UnicornManager** directory in the lab material folder. 1. Run the following command: ``` aws s3 sync . s3://YOUR_BUCKET_NAME --region YOUR_BUCKET_REGION ``` ##### AWS Console 1. Open the **S3** console and select the Unicorn Manager bucket. 1. In the **Overview** tab, click the **Upload** button. 1. From a file browser window, select all of the files in the **UnicornManager** folder and drag them to S3's upload window.