# Prerequisites
### AWS Account
If you are participating in this workshop as part of an AWS event, pre-provisioned temporary accounts that are specifically initialized for this workshop might be provided by the organizers. To access your temporary account you will receive a **12-digit hash code** that can be used at the [AWS Event Engine Site](https://dashboard.eventengine.run). You will not need a username and password.
If you wish to participate in this workshop without a pre-provisioned temporary account, please see the [AWS Initialization and tear down](#aws-initialization-tear-down) section below.
### Browser
These workshops assume that you are using the [Cloud9 IDE environment](https://aws.amazon.com/cloud9/). We recommend you use the latest version of Chrome or Firefox to complete this workshop.
### Knowledge Of Python Programming Language
Basic python knowledge is sufficient to consume these workshops.
# Setup Workshop Environment
* Navigate to the Cloud9 service within your AWS console
* Open the Cloud9 IDE environment called **workshop-environment**. It takes about 30 seconds for the environment to start up.
* In the Cloud9 IDE environment you will find a folder called **data-protection** in the folder pane on the left side of the screen
* Right-click (on MacOS: control-click) the file named **environment-setup.sh** in the IDE and select **Run**
* This script takes about a minute to complete
* In the runner window below you should see **SUCCESS: installed python dependencies ** followed by a list of the installed packages
# AWS Initialization & tear down
**IMPORTANT!**
* This section is only relevant if you are **not** using a pre-provisioned account.
* The resources used in this workshop **will incur charges** in the AWS account used if not torn down according to the procedure outlined below
You can use a **personal account** or create a **new AWS account** to ensure you have the neccessary access. This should not be an AWS account from the company you work for. Please note that creating an AWS account takes time (credit card validation, etc.) and is not recommended when participating in the workshop during a time constrained event.
### Region Support
Since these workshops use the Cloud9 IDE, you can use run these workshops in the following regions where the AWS Cloud9
service is available :
* **N.Virginia** (us-east-1)
* **Ohio** (us-east-2)
* **Oregon** (us-west-2)
* **Ireland** (eu-west-1)
* **Singapore** (ap-southeast-1)
### Cloudformation templates for initial environment setup
Please download the [Data Protection Workshop cloudformation stack](cf-templates/template-workshops-setup.yaml) and launch it in your AWS account as this is required for all the workshops in this repository. To launch the stack you must go to the AWS Console and navigate to the CloudFormation service where you can choose **Create Stack** and upload the Cloudformation stack for the workshop. You provide a name for the stack and keep clicking **next** until you get to the point where it says:
```
I acknowledge that AWS CloudFormation might create IAM resources with custom names.
```
Acknowledge the above statement by clicking on the check box and then click on the **Create** button
The above stack creates an Cloud9 IDE environment called **workshop-environment**.
In addition a VPC with two subnets and an internet gateway is also created.
## ACM Private Certificate authority - Generating and using private certificate for a private domain
This workshop demonstrates how ACM Private Certificate authority(PCA) can be created and made operational. It then helps you learn
about how ACM PCA can be used to generate private certificates for a private domain so that the private domain can be accessed over
a HTTPS connection
## Let's look at some concepts and the architecture diagram:
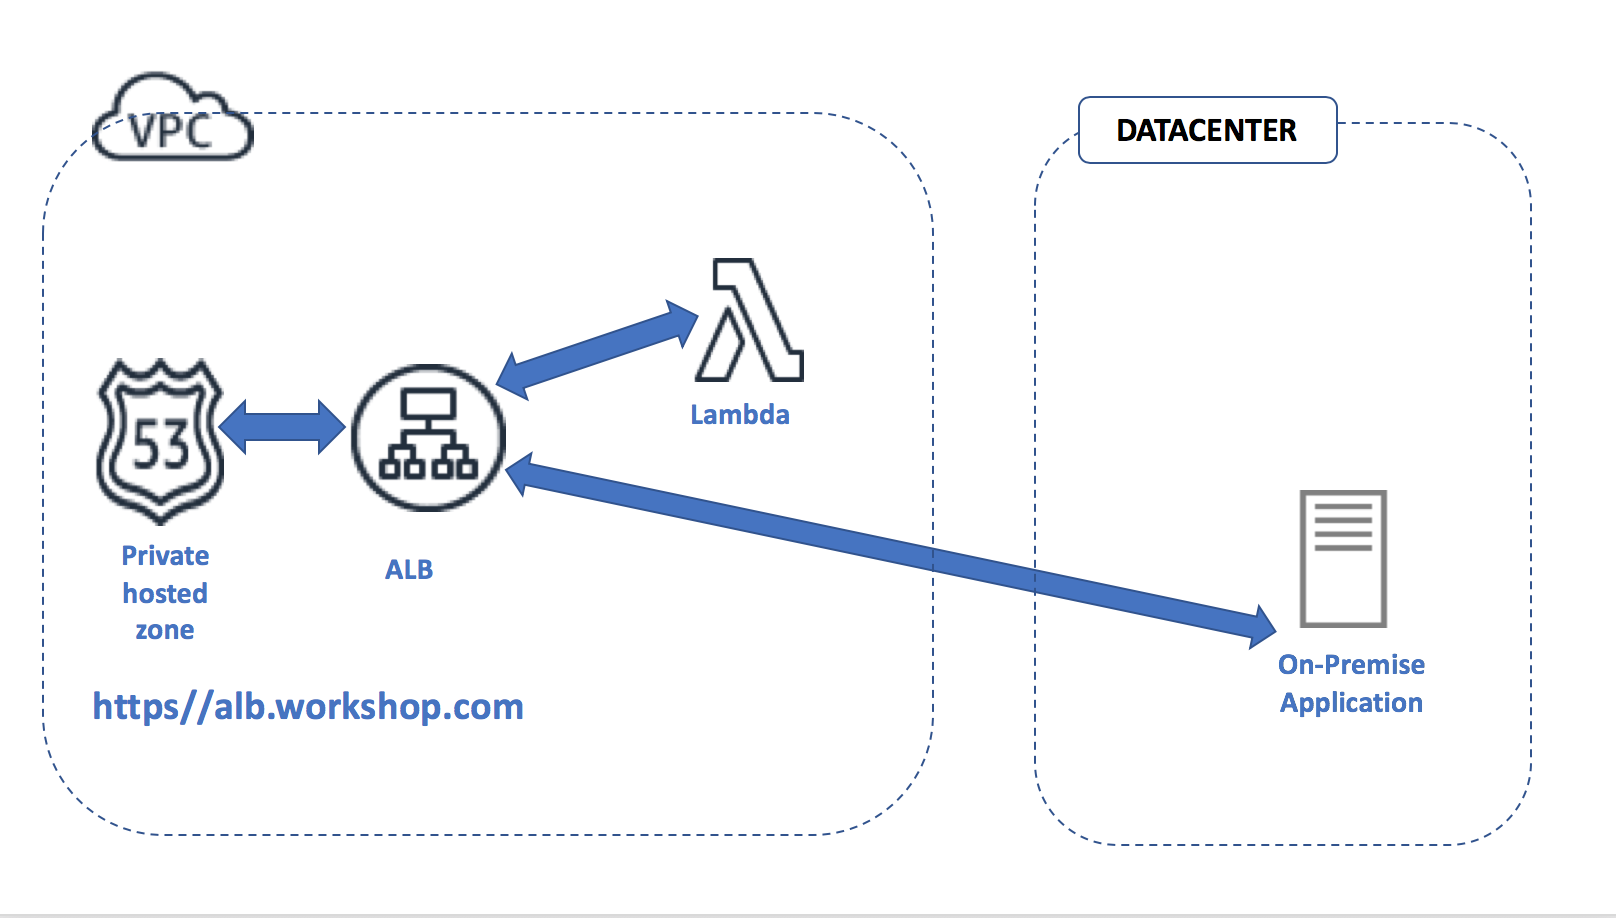
The on-premise application in a data-center is for illustration purposes only, we won't be deploying the on-premise application for this usecase. Only the lambda function behind the application load balancer will be deployed and called from the Cloud9 session inside the VPC.
## Let's do some private cert generaton for a private domain with AWS Certificate Manager(ACM) private certificate authority(PCA) :
Open the Cloud9 IDE environment called `workshop-environment` and follow the recipe below:
### 1. Run the module named `usecase-5-step-1.py`
This module takes about 30 seconds to complete and will create the ALB and register the lambda function as the target.
### 2. Run the module named `usecase-5-step-2.py`
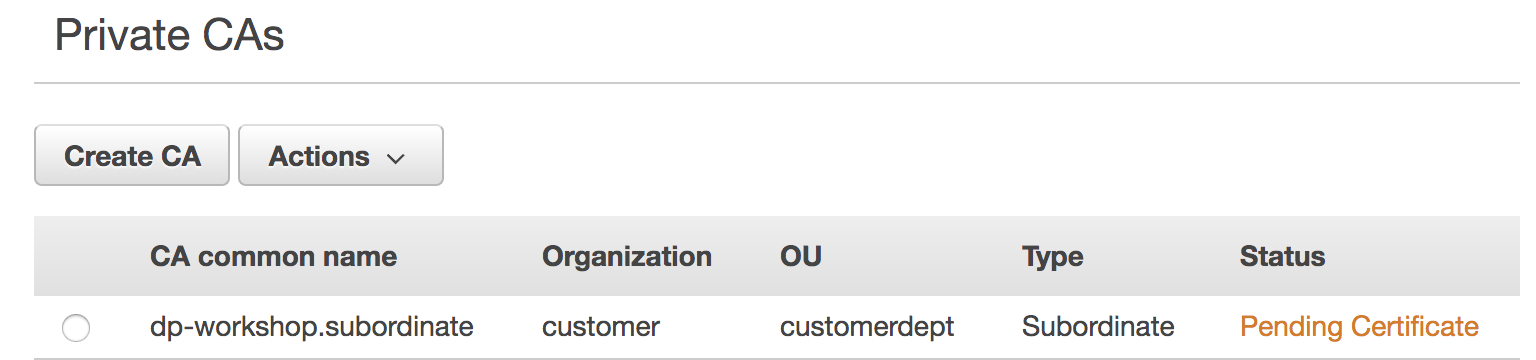
This module creates a ACM private certificate authority with the common name `dp-workshop.subordinate`
This private certificate authority will publish certificate revocation lists within a S3 bucket whose name starts with `dp-workshop-acm-pca-crl-bucket`.
You should see the following printed in the runner window pane:
```
Private CA has been created
Please generate the CSR and get it signed by your organizations's root cert
Success : The ARN of the subordinate private certificate authority is :
arn:aws:acm-pca:::certificate-authority/57943599-30d2-8723-1234-1cb4b7d81128
```
In the AWS console browse to the AWS Certificate Manager service(ACM). Under Private CA's you will see the private CA created and the status should show "Pending Certificate"
**Some questions to think about :**
* Why is the status of the private CA showing "Pending Certificate" ?
* Is the private certificate authority that's created a root CA or a subordinate CA ?
* What's the purpose of the S3 bucket storing certificate revocation lists ?
### 3. Run the module named `usecase-5-step-3.py`
This module creates a self signed root certificate with the common name `rootca-builder`.
You can see in the code that the private key associated with the self signed cert is stored in an encrypted S3 file named `root_ca_private_key` inside the bucket created in the previous step.
This is purely for demonstration purposes. In your organization you should store the private key in an HSM or a secure vault.
You should see the following printed in the runner window pane below:
```
Success - Self signed certificate file self-signed-cert.pem created
This self signed certificate will be used in the certificate chain of trust
```
**Some questions to think about :**
* In your organization would you use the root cert to sign subordinate CA's ?
* Why is it necessary to store the private keys of root certs in an HSM ?
* What would happen if the private key of the root cert gets compromised or stolen ?
### 4. Run the module named `usecase-5-step-4.py`
This module gets a Certificate signing request(CSR) for the private certifiate authority with common name `dp-workshop.subordinate` that was created in a previous step.
The certificate signing request is signed using the self signed certificate and it's private key that was created previously.
The signed cert is stored in a pem file called ***signed_subordinate_ca_cert.pem***
The private key lives within HSM's in the AWS Certificate Manager(ACM) service
You should see the following printed in the runner window pane:
```
Successfully created signed subordinate CA pem file signed_subordinate_ca_cert.pem
```
### 5. Run the module named `usecase-5-step-5.py`
This module imports the subordinate CA signed certificate ***signed_subordinate_ca_cert.pem*** and the certificate chain of trust into AWS Certificate Manager(ACM).
The certificate chain contains the self signed CA certificate that we created previously.
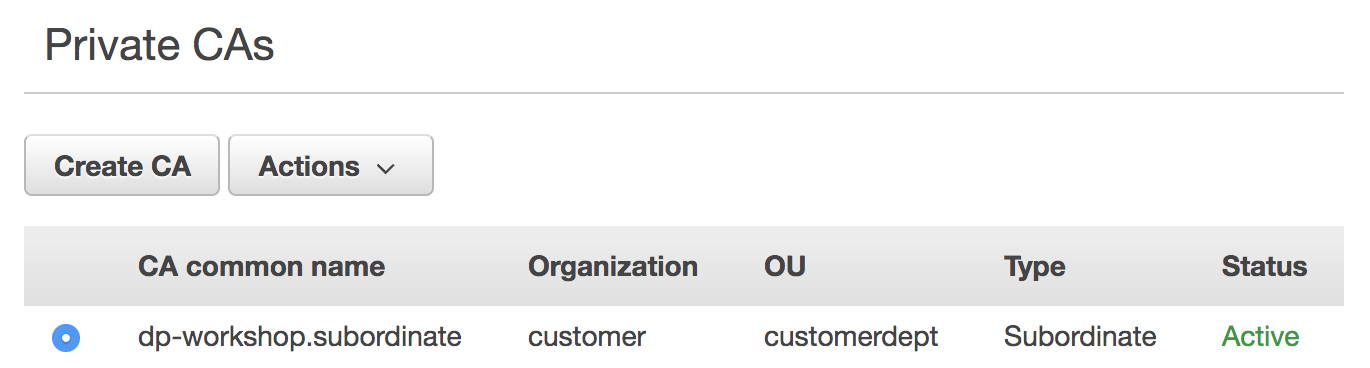
After this operation the subordinate privcate certificate authority(CA) changes status to **ACTIVE**.
Browse to the ACM service within the AWS console and you should see the status of the subordiate CA with common name `dp-workshop.subordinate` as **ACTIVE** as shown below.
We are at a point where the subordinate private certificate authority(PCA) can issue private certificates for any endpoint, device or server.
You should see the following printed in the runner window pane below:
```
Successfully imported signed cert and certificate chain into ACM
```
### 6. Run the module named `usecase-5-step-6.py`
This module takes about 1 minute to complete.
This module uses AWS Certificate Manager service(ACM) to generate a certificate for the private domain `alb.workshop.com`. You cannot access this domain from the public internet.
The certificate chain of trust required for trusting the private domain `alb.workshop.com` is created and written into the local file ***cert_chain.pem***.
An HTTPS listener is attached to the application load balancer and this listener is associated with the private certificate issued for the domain `alb.workshop.com`.
After these steps `alb.workshop.com` is ready to serve content.
You should see the following printed in the runner window pane below :
```
Successfully attached a HTTPS listener to the ALB
Successfully issued a private certificate for the private domain alb.workshop.com
```
### 7. Run the module named `usecase-5-step-7.py`
This module uses the requests library to do a HTTPS GET on the private domain `alb.workshop.com`
Since the request does not supply the certificate trust chain as a parameter the HTTPS connection is going to complain that the server certificate is not recognized. You will see the following printed in the runner window pane if you look through the printed log :
```
Peer's certificate issuer has been marked as not trusted by the user.
Certificate is not trusted - cannot validate server certificate
```
**Some questions to think about :**
* Why was the server certificate from alb.workshop.com not trusted?
* What potential automation you might need within your organization to use these private certificates at scale ?
### 8. Run the module named `usecase-5-step-8.py`
This module uses the requests library to do a HTTPS GET request to the private domain `alb.workshop.com`
Since the request has the chain of trust pem file as a parameter the private domain cert for `alb.workshop.com` is trusted and successfully authenticated. You should see the following printed in the runner window pane after the HTML returned by the lambda function:
```
Certificate is trusted and is valid
```
**Some questions to think about :**
* What happens if certificate verification is disabled in the HTTPS GET request to `alb.workshop.com`?
### 9. Run the module named `usecase-5-step-9-cleanup.py`
This is the step for cleaning up all the resources that were created for this use case.
This module cleans up all the local files, S3 buckets, target groups,listeners that was created in the python modules for this usecase.
Please make sure that you run this cleanup script. Otherwise you will continue accruing charges for the ACM private certificate authority that was created during this usecase
You should see the following printed in the runner window pane:
```
Everything cleaned up, you are all good !!
```
### Tear down Cloudformation stack
After you have completed the workshop, you need to tear down the stack by navigating to the CloudFormation service in the AWS console and selecting the stack name you chose when launching the stack. If you are doing this workshop as
part of a AWS marketing with a pre-provisioned account provided by AWS you don't have to do any teardown
Choose the **delete** action and wait for the process to complete. Note that it can take a few minutes for the stack to clean up its resources.
## License Summary
This sample code is made available under a modified MIT license. See the [LICENSE](LICENSE) file.