# IoT Analytics - Amazon Athena - Amazon DynamoDB

Repository of artifacts for the solution proposed on Blog Post **Writing results from an Athena query output to Amazon DynamoDB**.
The solution presents a reference architecture to analyze electricity data from smart meters, for maintenance purposes of a hypothetical Energy company, and for self-service analysis of customers, to understand how much electricity they consume.
## Prerequisites
To deploy and use this solution, you should have the following:
- An AWS account.
- An AWS Identity and Access Management (IAM) user, with enough privileges to access resources used in this solution and to run commands from AWS SAM CLI. To create the proper permissions for this user, verify how to control access to AWS resources using policies and the needed permission for AWS SAM CLI.
- An AWS Cloud9 environment, launched as an Amazon Linux 2 platform, which holds the needed tools used to deploy this solution: AWS CLI, AWS SAM CLI, Docker engine and Python 3. Follow the instructions to create an EC2 environment and open it to start working.
> :memo: **NOTE:**
> When creating the **EC2** environment, you can choose to connect to the instance using [AWS Systems Manager Session Manager](https://docs.aws.amazon.com/systems-manager/latest/userguide/session-manager.html).
> This approach offers two key benefits:
> - No requirement to open inbound ports for the instance.
> - Option to launch the instance into a public or private subnet.
>
> For more information, visit the page [Accessing no-ingress EC2 instances with AWS Systems Manager](https://docs.aws.amazon.com/cloud9/latest/user-guide/ec2-ssm.html)
- A basic understanding of ***bash***, ***Python*** programing and ***SQL*** statements.
## Deploy the solution
**NOTE**: the current versions of some needed tools deployed with the **AWS Cloud9** environment are outdated and won’t be able to fully address the installation process. You need the following versions of mentioned tools to work properly:
- **AWS CLI** version **2**
- **AWS SAM CLI** version **1.60.0** or above
To properly install the solution, do the following in this environment:
- Upgrade the **AWS CLI** version 1 to version 2. Follow the AWS CLI version 2 migration instructions to complete this task.
- Upgrade the **AWS SAM CLI** version installed by default. Follow the instructions for upgrading the **AWS SAM CLI**.
To deploy the ***AWS SAM-based*** solution, make sure you completed the previous prerequisites. Then follow these steps:
1. On the **AWS Cloud9** console, select the environment you created previously and choose ***Open IDE***.
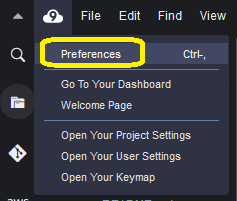
2. In the IDE window opened, click on the **AWS Cloud9** icon in the top menu bar and select ***Preferences***.
3. In the opened tab, choose ***AWS Settings*** at the left panel. In the section ***Credentials***, turn off the option ***AWS managed temporary credentials***.

4. Close the ***Preferences*** tab and, in the console panel, click on the **“+”** sign and choose ***New Terminal***.


5. In the opened terminal window, run the following **AWS CLI** command, to configure the credentials of the **IAM** user created for this installation, with the needed privileges:
```bash
aws configure
```
In the prompts showed during the configuration, fill them with these values:
- **AWS Access Key ID**: enter your **IAM** user access key
- **AWS Secret Access Key**: enter your **IAM** user secret access key
- **Default region name**: enter the same **AWS** Region of the **AWS Cloud9** environment used
- **Default output format**: press ***\***
7. Clone the solution artifacts from this ***GitHub*** repo:
```bash
git clone https://github.com/aws-samples/iot-analytics-athena-ddb.git
```
8. Move to the bash scripts directory:
```bash
cd ./iot-analytics-athena-ddb/scripts/bash
```
9. Run the following bash script, to deploy and setup the solution:
```bash
./deploy-solution.sh
```
The content of this script can be visualized in this link.
During the deployment process, this script will ask you to insert or confirm some configuration parameters. Fill them with these values:
- **Stack Name [sam-iot-analytics]**: press ***\***
- **AWS Region**: press ***\*** (the deployment will use the same **AWS** Region of the **AWS Cloud9** environment used)
- **Confirm changes before deploy [y/N]**: N
- **Allow SAM CLI IAM role creation [Y/n]**: Y
- **Disable rollback [y/N]**: N
- **Save arguments to configuration file [Y/n]**: Y
- **SAM configuration file [samconfig.toml]**: press ***\***
- **SAM configuration environment [default]**: press ***\***
When the deployment finishes, an AWS CloudFormation stack is created. Open this service in the AWS Management Console and select the stack named **sam-iot-analytics**. Then, select the ***Resources*** tab, like in the below example:

The above stack creates several resources used by this solution, which are described in the Blog Post.
## Usage
This **AWS SAM** application builds and deploy two AWS Lambda functions, needed to automate this ***IoT*** analytical solution:
1. One function called `fn-run-athena-query`, that runs an Amazon Athena query to summarize the electricity meter data uploaded to **S3** bucket `iot-analytic-bucket-{AWS Account ID}-{AWS Region}`. You can see the code for this function in this link. It is triggered by an Amazon EventBridge rule, named `RunAthenaQuerySchedule`, defined with type *“Event Schedule”*:

Notice this rule is disabled for simulation purposes, to test the solution. In a regular operation, this rule triggers the **Lambda function** to run every day at *03h30 UTC*, or *00h30 GMT-3*, in the local time zone tested:

This **Lambda function** has two ***Environment variables*** configured:
- One called `ev_athena_output_location`, which receives the value of the **S3** URI location of the bucket that receives the outputs of **Athena** queries.
- Another called `ev_date_run`, which receives the date of electricity metered data to process, in the format ***YYYY/MM/DD***. If the value received is *“0000/00/00”*, it means the **Lambda function** was triggered by **EventBridge** rule `RunAthenaQuerySchedule`, and the date processed will be the day before the triggering of this **Lambda function**.
You can verify the value of these variables in the ***Configuration*** tab for this function, at the **Lambda console**:

During the simulation, this **Lambda function** will generate files being stored in **S3** bucket `iot-athena-results-{AWS Account ID}-{AWS Region}`. To verify these files content, do the following:
- Open a new tab on the **S3** console, to verify the content of bucket `iot-athena-results-{AWS Account ID}-{AWS Region}`. Select the ***Objects*** tab. Confirm the creation of the prefix `electricity_by_period/`:

- Still in the **S3** console tab, select the prefix `electricity_by_period/` in the objects list and see its content. Verify there are several files in it, with extensions `.metadata` and `.csv`:

These *CSV* files contain the results of the **Athena** queries run by **Lambda function** `fn-run-athena-query`, invoked by the bash script `invoke-fn-run-athena-query-dates.sh`. These specific outputs were generated by queries returning consumed energy data by customer, grouped by hour, month and day-of-month.
- Download one of these *CSV* files and open it with an editor. An excerpt from its content will look like this one:
```
"customerid","sensorid_hour","total_kwh"
"10027610","51246501-2022-01-25T00","0.22"
"10027610","51246501-2022-01-25T01","0.22"
"10027610","51246501-2022-01-25T02","0.23"
"10027610","51246501-2022-01-25T03","0.23"
"10027610","51246501-2022-01-25T04","0.23"
...
```
In this case, it’s an output with data grouped by hour.
2. Another function called `fn-write-athena-output-to-ddb`, that will read the output of an **Athena** query - which is written to **S3** bucket `iot-athena-results-{AWS Account ID}-{AWS Region}`, as a *CSV* file - and will write each line of this file as an item into Amazon DynamoDB table `ElectricityMeteredByPeriod`. You can see the code for this function in this link.
## Getting statistics with PartiQL
Every time a new query output *CSV* file is generated in bucket `iot-athena-results-{AWS Account ID}-{AWS Region}`, the **Lambda function** `fn-write-athena-output-to-ddb` is triggered, writing the content of the query output *CSV* file to **DynamoDB** table `ElectricityMeteredByPeriod`.
In this table, you have consumed energy data by customer, grouped by hour, month and day-of-month. With this approach, aggregated data can be accessed by different queries as required, so users can see their readings by hour, day or month in a dashboard, having efficient queries instead of having to aggregate the data every time they access the dashboards.
As an example, we can run PartiQL queries to simulate statistics a customer or the Energy company can obtain from consumed energy in specific periods.
Let's run one query, as an example:
1. Go to the **DynamoDB** console.
2. In the left panel menu, select **PartiQL editor**.
3. In the editor, write the following query:
```sql
SELECT "CustomerID", "SensorID-Period", "kWh-Amount"
FROM "ElectricityMeteredByPeriod"
WHERE "CustomerID" = 10027610
AND "SensorID-Period" BETWEEN '51246501#2022-01-05T18' AND '51246501#2022-01-05T23'
```
The above query returns the hourly kWh consumed by customer with **ID** *10027610*, on *2022-01-05*, from **6h00 PM** until **11h00 PM**:
The obtained result should be similar to the below screenshot:
```
CustomerID SensorID-Period kWh-Amount
---------- ---------------------- ----------
10027610 51246501#2022-01-05T18 0.28
10027610 51246501#2022-01-05T19 0.29
10027610 51246501#2022-01-05T20 0.3
10027610 51246501#2022-01-05T21 0.3
10027610 51246501#2022-01-05T22 0.29
10027610 51246501#2022-01-05T23 0.27
```
Take a look in this link for additional examples of queries you can use to obtain such statistics.
## Cleaning up
To avoid unnecessary charges (storage and computing costs), move to the directory where the bash scripts were deployed (`/iot-analytics-athena-ddb/scripts/bash`).
Then, run this bash script:
```bash
./undeploy-solution.sh
```
The above script will run the following tasks:
- Disable server access logging on *“IoT Data Lake”* and *“Athena results”* buckets.
- Drop the database `iotanalyticsdb` at AWS Glue Data Catalog, together with the external tables.
- Delete all objects in the deployed **S3** buckets.
- Undeploy **AWS SAM** application `sam-iot-analytics`.
The content of this script can be visualized in this link.
During this process, this script will ask you to insert or confirm some configuration parameters. Fill them with these values:
- **Are you sure you want to delete the stack sam-iot-analytics in the region \? [y/N]**: Y
- **Are you sure you want to delete the folder sam-iot-analytics in S3 which contains the artifacts? [y/N]**: Y
After removing **AWS SAM** application `sam-iot-analytics`, delete the **AWS Cloud9** environment created to deploy this solution. Follow the instructions on page Deleting an environment in AWS Cloud9, to do so.
## Recommendations
The sample *IoT* and customer information data used to test this solution doesn't contain sensitive data.
However, you can find scenarios where you need to identify and treat private data, mainly related with *Personally Identifiable Information* (***PII***).
In such scenarios, you should consider configuring additional security features on the services used in this solution, to avoid sensitive data exposure:
- To verify if there is sensitive data being sent to the Data Lake **S3** bucket, activate [Amazon Macie](https://aws.amazon.com/macie/) in the account running this solution. It uses machine learning (*ML*) and pattern matching to discover and protect your sensitive data.
- Regarding **Amazon DynamoDB**, all data is encrypted at rest and in transit, by default. However, if you want to protect your data before sending it to **DynamoDB**, you can use client-side encryption. For more information, visit the public documentation for [Amazon DynamoDB Encryption Client](https://docs.aws.amazon.com/dynamodb-encryption-client/latest/devguide/what-is-ddb-encrypt.html).
- To prevent data loss at **Amazon DynamoDB** table and avoid the need to reload it with Data Lake content, you can enable continuous backups using point-in-time recovery. For details on how to setup this feature, see [Point-in-time recovery for DynamoDB](https://docs.aws.amazon.com/amazondynamodb/latest/developerguide/PointInTimeRecovery.html).
## Security
See [CONTRIBUTING](CONTRIBUTING.md#security-issue-notifications) for more information.
## License
This library is licensed under the MIT-0 License. See the LICENSE file.