# Migration Effort Estimator User Guide
## Overview:
In migration projects a significant time is spent in analysing and predicting how to accurately estimate the project migration efforts.
The framework developed helps to simplifying this problem by:
- Understanding Projects Complexities(simple, simple-medium, medium, meedium-complex, complex) - both file level complexities as well as summary level.
- Map complexitird to efforts required to complete the project.
It takes client's scripts to be migrated as input and gives output in form of file level complexities info, estimation summary info and visualisations which helps business to estimate the efforts required to project efficiently.
## Visual 1: Overall project complexity

## Visual 2: Estimator Dashboard
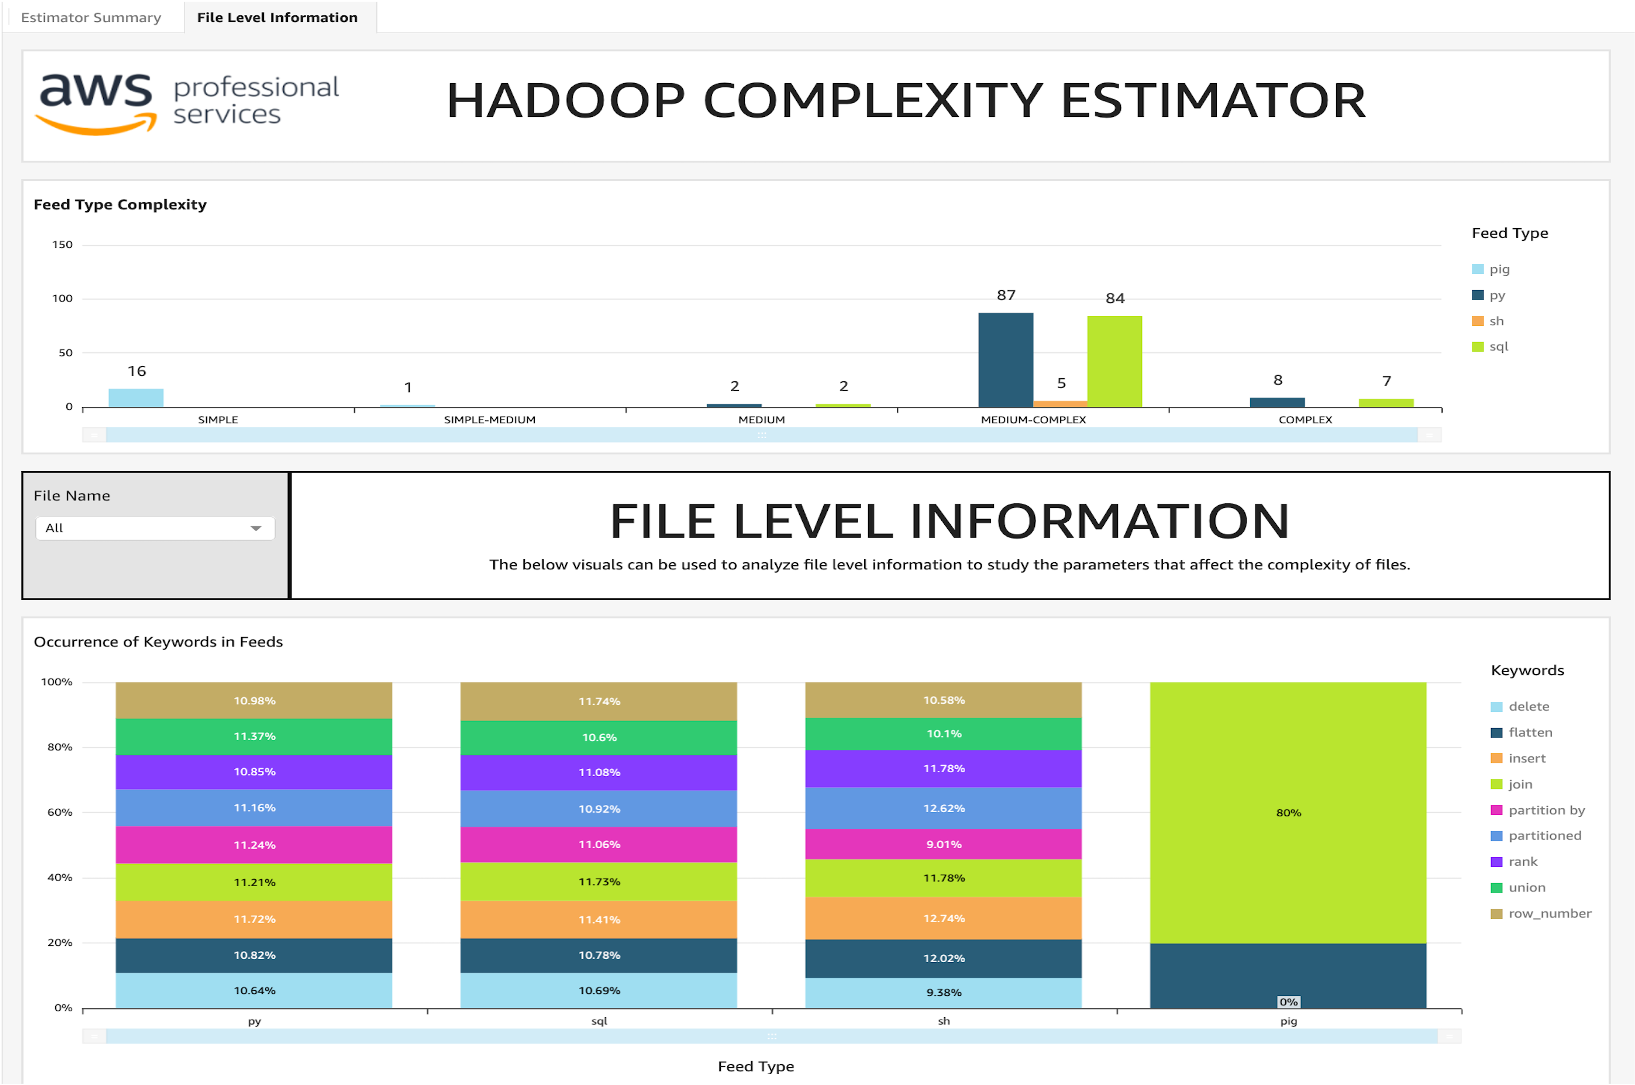
## Visual 3: Estimator Dashboard

## For Detailed Deployment Instructions and Runbook
Folder Level info
1. `Input Folder` : It has appconfig.json, estimator_template.xlsx. You will be placing compressed migration scripts folder here.
2. `Outputs folder` : AOnce the script is run, it will have all migration files arranged according to Script type.
3. `Excel folder` : It will have have two file generated one each for file level and summary level info
4. `Log Folder` : Will have execution logs
Step by Step instruction to run the code
1. Bundle your scripts to be migrated in form of a zip file and place it in `input` folder of the framework
2. Use `appconfig.json` file inside input folder to define keywords to be considered for calculating complexity of the file.
Note: There is already set of keywords defined. You can add or delete according to your use case.
3. Use config sheet of `estimator_template.xlsx` inside input folder to define effort hours for each complexity
Note: There is already effort hours defined. Please edit according to your use case.
4. Install Requirements
Run
```
pip3 install -r requirements.txt
```
5. Run the estimator.py with arguments
```
python3 estimator.py --input 'input/' --output 'outputs/' --config 'input/appconfig.json' [--bucket ''] [--topic '']
```
Note: Arguments `input`, `output` and `config` are required; `bucket` and `topic` are optional arguments, if mentioned will upload your Excels generated to mentioned S3 bucket and send notification to Topic mentioned.
## Optional QuickSight Setup
You can create a Amazon QuickSight Dashboard using the `analysis_definition.json` file.
1. Create the datasets from S3 in QuickSight for both Summary file and File level information.
2. Edit the `analysis_definition.json` file by replacing variables:
- `$AwsAccountId`: Your AWS accountID ,
- `$region`: Region where QuickSight Analysis has to be created (like 'us-east-1'),
- `$namespace`: Namespace where QuickSight User is present (default is 'default'),
- `$username` : Username of QuickSight User which needs permission to the analysis,
- `$SummaryDatasetID`: DatasetID of summary file created above,
- `$FileLevelInfoDatasetID`: DatasetID of file level information created above.
3. Create analysis using the below CLI command:
```
aws quicksight create-analysis --generate-cli-skeleton > analysis_definition.json
```
4. Make required changes to analysis based on custom requirements and then publish it as dashboard.
## Security
See [CONTRIBUTING](CONTRIBUTING.md#security-issue-notifications) for more information.
## License
This project is licensed under the MIT-0 License.