Please ensure you are **using the improved AWS WAF console and API experience** for this workshop.
## Website Scanning Environment and Tools In order to test your AWS WAF ruleset, this lab has been configured with two scanning capabilities; a Red Team Host where you can invoke manual scanning and an automated scanner which runs from outside your lab environment. The scanner performs 10 basic tests designed to help simulate and mitigate common web attack vectors. 1. Canary GET - Should not be blocked 2. Canary POST - Should not be blocked 3. SQL Injection (SQLi) in Query String 4. SQL Injection (SQLi) in Cookie 5. Cross Site Scripting (XSS) in Query String 6. Cross Site Scripting (XSS) in Body 7. Inclusion in Modules 8. Cross Site Request Forgery (CSRF) Token Missing 9. Cross Site Request Forgery (CSRF) Token Invalid 10. Path Traversal ??? info "Workshop Architecture"  !!! info "Note about Tests" _These basic tests are designed to provide common examples you can use to test AWS WAF functionality. You should perform thorough analysis and testing when implementing rules into your production environments._ ### Website Scanning Environment and Tools - Manual Scanning Once you have started a Session Manager connection to your Red Team Host, the scanner script can be invoked by typing the following command: ```` runscanner ````  The scanner script will run each of the tests above and report back the following information: - __Request__: The HTTP request command used. - __Test Name__: The name of the test from list above. - __Result__: The HTTP status code returned. The logic in the scanner script color codes the response as follows: - __Green__: 403 - Forbidden (_Except for canary GET and POST tests._) - __Red__: 200 - OK - __Blue__: 404 - Not Found - __Yellow__: 500 - Internal Server Error !!! info "About Scanner Tests and Colors" The color coding of the tests is provided to help to quickly assess the behavior of your WAF rules against their intended behavior. The goal is to achieve green color responses for all the tests. The purpose of the canary GET and POST requests are to ensure you have not unintentionally blocked legitimate traffic to your test site. These two tests should always return a _200 - OK_ response. What are the results of running the scanner script? Were the simulated malicious requests blocked? As you can see by running the script there are several vulnerabilities that need to be addressed. In the remediate phase you will configure an AWS WAF Web ACL to block these requests. When AWS WAF blocks a web request based on the conditions that you specify, it returns HTTP status code 403 (Forbidden). For a full view of the request and response information, you can paste the **Request** command directly into the console and add the --debug argument. !!! info "Note about Testing Tool" The scanner script uses an open source HTTP client called httpie. HTTPie—aitch-tee-tee-pie—is a command line HTTP client with an intuitive UI, JSON support, syntax highlighting, wget-like downloads, plugins, and more. ### Website Scanning Environment and Tools - Automated Scanning For an AWS sponsored event, in addition to the manual scanning, automated scanning is also performed against your lab website. The automated tests are similar to the manual tests but the results are posted to a centralized scanning results dashboard along with the other workshop participants. If the dashboard is available for your event, the url can be located in the **CloudFormation Stack Outputs** under the **WAFDashboard** key. You can identify the scanning results for your site using the UniqueId found in the CloudFormation outputs. 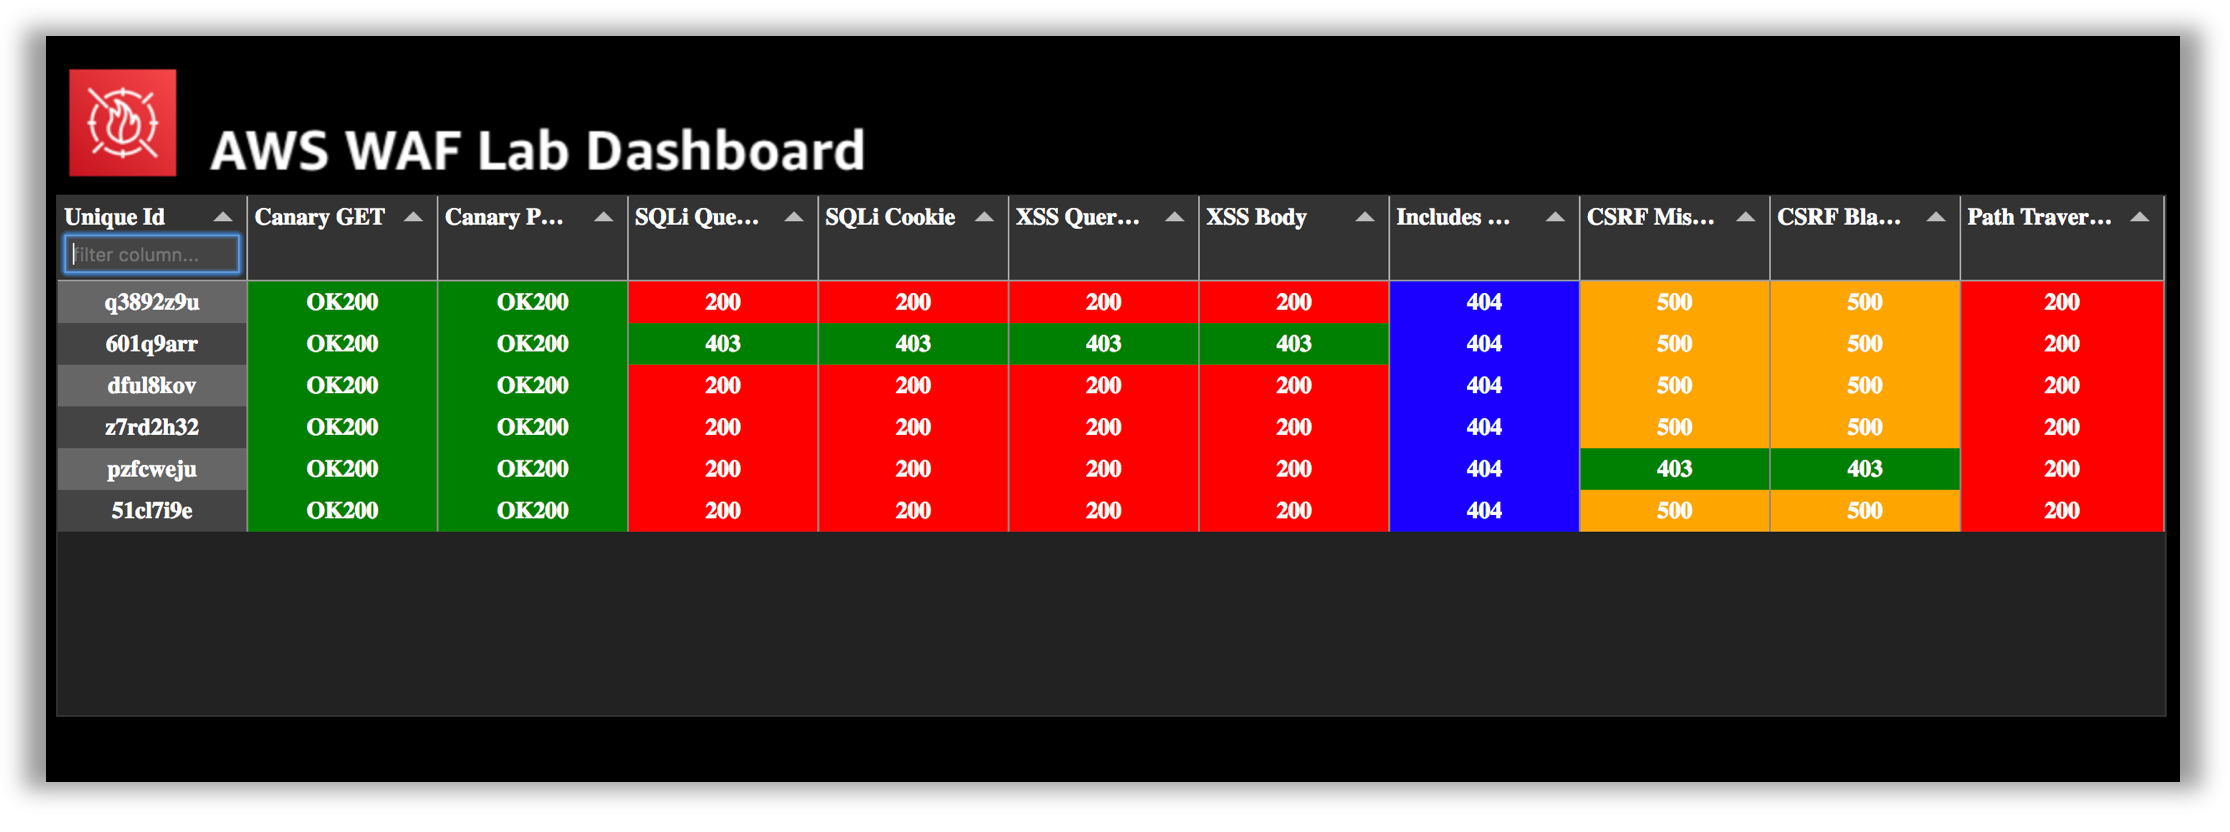 --- You can now proceed to the [Remediate Phase](remediate.md).