\n",
" \n",
" \n",
" \n",
" | \n",
" BUY NOW\n",
" | \n",
" \n",
" \n",
"\n",
"```\n"
]
},
{
"cell_type": "code",
"execution_count": null,
"metadata": {},
"outputs": [],
"source": [
"with open('pinpoint-templates/abandoned-cart-email-template.txt', 'r') as text_file:\n",
" text_template = text_file.read()\n",
" \n",
"print('Text Template:')\n",
"print(text_template)"
]
},
{
"cell_type": "markdown",
"metadata": {},
"source": [
"### Create Abandoned Cart Email Template\n",
"\n",
"Now we can create an email template in Pinpoint for our abandoned cart use-case."
]
},
{
"cell_type": "code",
"execution_count": null,
"metadata": {},
"outputs": [],
"source": [
"response = pinpoint.create_email_template(\n",
" EmailTemplateRequest={\n",
" 'Subject': 'Retail Demo Store - Motivation to Complete Your Order',\n",
" 'TemplateDescription': 'Abandoned cart email template',\n",
" 'HtmlPart': html_template,\n",
" 'TextPart': text_template,\n",
" 'DefaultSubstitutions': json.dumps({\n",
" 'User.UserAttributes.FirstName': 'there'\n",
" }) \n",
" },\n",
" TemplateName='RetailDemoStore-AbandonedCart'\n",
")\n",
"\n",
"abandoned_cart_template_arn = response['CreateTemplateMessageBody']['Arn']\n",
"print('Abandoned cart email template ARN: ' + abandoned_cart_template_arn)"
]
},
{
"cell_type": "markdown",
"metadata": {},
"source": [
"### Load Recommendations Email Templates\n",
"\n",
"Next we'll create an email template that includes recommendations from the Amazon Personalize recommender that we created in the [Personalization workshop](../1-Personalization/Lab-3-Create-recommenders-and-custom-solutions.ipynb). If you haven't completed the personalization workshop, please do so now and come back to this workshop when complete.\n",
"\n",
"As with the welcome email template, let's load and then view snippets of the HTML and text formats for our template. Complete template is available at [pinpoint-templates/recommendations-email-template.html](pinpoint-templates/recommendations-email-template.html)"
]
},
{
"cell_type": "code",
"execution_count": null,
"metadata": {},
"outputs": [],
"source": [
"with open('pinpoint-templates/recommendations-email-template.html', 'r') as html_file:\n",
" html_template = html_file.read()"
]
},
{
"cell_type": "markdown",
"metadata": {},
"source": [
" ``` html\n",
" // Excerpt from pinpoint-templates/recommendations-email-template.html\n",
"\n",
" \n",
" \n",
" \n",
" Hi, {{User.UserAttributes.FirstName}}. Greetings from the Retail Demo Store!\n",
" Here are a few products inspired by your shopping trends \n",
" \n",
" | \n",
" \n",
" \n",
" \n",
" \n",
" \n",
" \n",
" \n",
" ![\"{{Recommendations.Name.[0]}}\"](\"{{Recommendations.ImageURL.[0]}}\") \n",
" \n",
" \n",
" \n",
" | \n",
" \n",
" {{Recommendations.Name.[0]}}\n",
" {{Recommendations.Description.[0]}} \n",
" {{Recommendations.Price.[0]}} \n",
" Buy Now! \n",
" | \n",
" \n",
"```"
]
},
{
"cell_type": "markdown",
"metadata": {},
"source": [
"Notice the use of several new mustache template tags in this template. For example, `{{Recommendations.Name.[0]}}` resolves to the product name of the first product recommended by Personalize. The product name came from our Lambda function which was called by Pinpoint through our Personalize campaign hook. \n",
"\n",
"Next load the text version of our template."
]
},
{
"cell_type": "code",
"execution_count": null,
"metadata": {},
"outputs": [],
"source": [
"with open('pinpoint-templates/recommendations-email-template.txt', 'r') as text_file:\n",
" text_template = text_file.read()\n",
" \n",
"print('Text Template:')\n",
"print(text_template)"
]
},
{
"attachments": {},
"cell_type": "markdown",
"metadata": {},
"source": [
"### Create Recommendations Email Template\n",
"Finally, create the email template."
]
},
{
"cell_type": "code",
"execution_count": null,
"metadata": {},
"outputs": [],
"source": [
"response = pinpoint.create_email_template(\n",
" EmailTemplateRequest={\n",
" 'Subject': 'Retail Demo Store - Products Just for You',\n",
" 'TemplateDescription': 'Personalized recommendations email template',\n",
" 'HtmlPart': html_template,\n",
" 'TextPart': text_template,\n",
" 'DefaultSubstitutions': json.dumps({\n",
" 'User.UserAttributes.FirstName': 'there'\n",
" })\n",
" },\n",
" TemplateName='RetailDemoStore-Recommendations'\n",
")\n",
"\n",
"recommendations_template_arn = response['CreateTemplateMessageBody']['Arn']\n",
"print('Recommendation email template ARN: ' + recommendations_template_arn)"
]
},
{
"cell_type": "markdown",
"metadata": {},
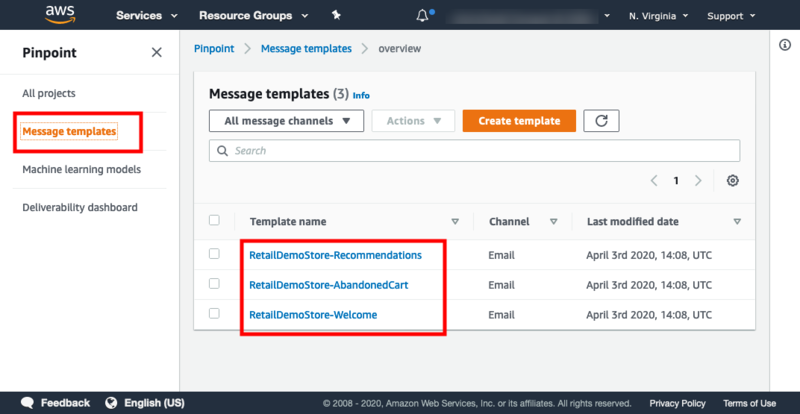
"source": [
"### Verify Email Templates\n",
"\n",
"If you open a web browser window/tab and browse to the Pinpoint service in the AWS console for the AWS account we're working with, you should see the message templates we just created.\n",
"\n",
""
]
},
{
"cell_type": "markdown",
"metadata": {},
"source": [
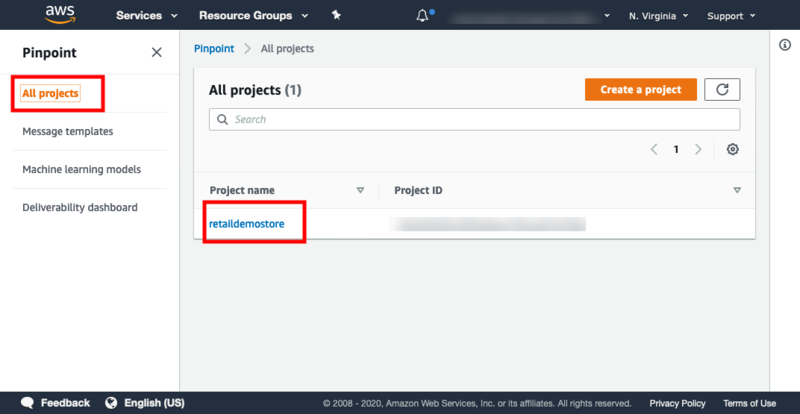
"## Enable Pinpoint Email Channel\n",
"\n",
"Before we can setup Segments and Campaigns to send emails, we have to enable the email channel in Pinpoint and verify sending and receiving email addresses.\n",
"\n",
"> We'll be using the Pinpoint email channel in sandbox mode. This means that Pinpoint will only send emails from and to addresses that have been verified in the Pinpoint console.\n",
"\n",
"In the Pinpoint console, click on \"All Projects\" and then the \"retaildemostore\" project.\n",
"\n",
""
]
},
{
"cell_type": "markdown",
"metadata": {},
"source": [
"### Email Settings\n",
"\n",
"From the \"retaildemostore\" project page, expand \"Settings\" in the left navigation and then click \"Email\". You will see that email has not yet been enabled as a channel. Click the \"Edit\" button to enable Pinpoint to send emails and to verify some email addresses.\n",
"\n",
"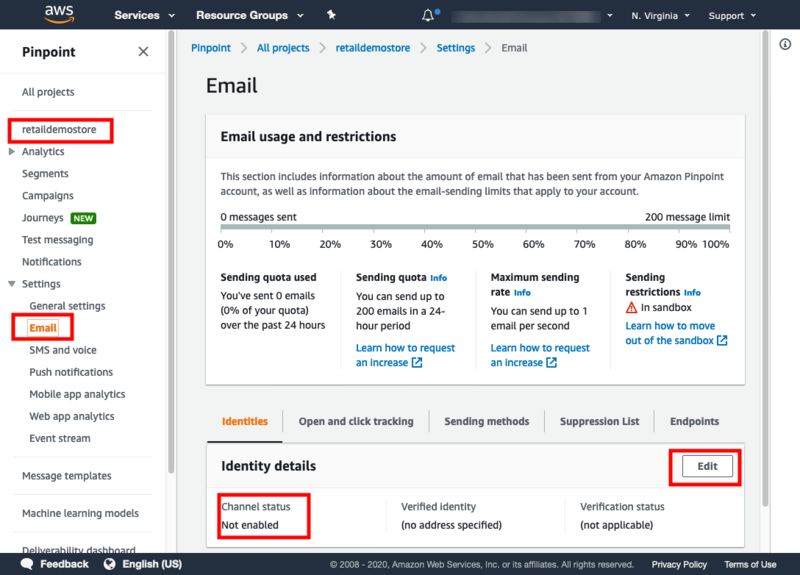"
]
},
{
"cell_type": "markdown",
"metadata": {},
"source": [
"### Verify Some Email Addresses\n",
"\n",
"On the \"Edit email\" page, check the box to enable the email channel and enter a valid email address that you have the ability to check throughout the rest of this workshop.\n",
"\n",
"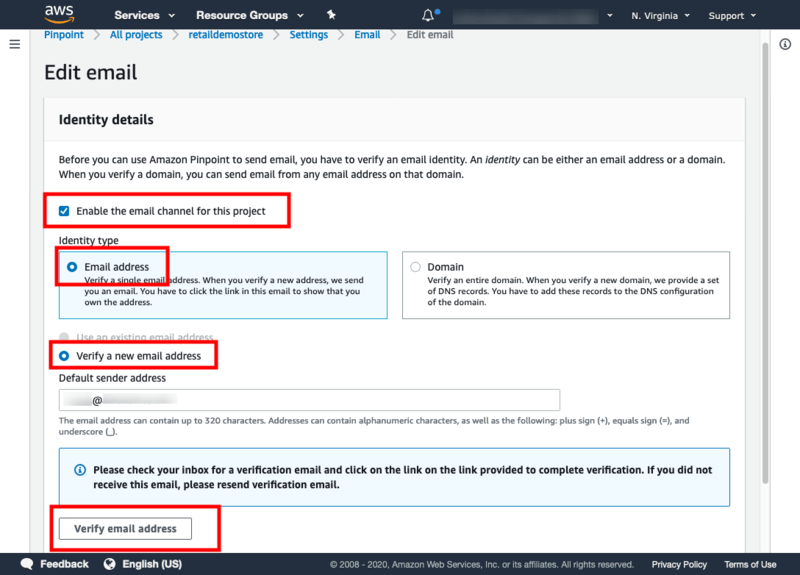"
]
},
{
"cell_type": "markdown",
"metadata": {},
"source": [
"### Verify Additional Email Addresses\n",
"\n",
"So that we can send an email to more than one endpoint in this workshop, verify a couple more variations of your email address.\n",
"\n",
"Assuming your **valid** email address is `joe@example.com`, add a few more variations using `+` notation such as...\n",
"\n",
"- `joe+1@example.com`\n",
"- `joe+2@example.com`\n",
"- `joe+3@example.com`\n",
"\n",
"Just enter a variation, click the \"Verify email address\" button, and repeat until you've added a few more. Write down or commit to memory the variations you created--we'll need them later.\n",
"\n",
"By adding these variations, we're able to create separate Retail Demo Store accounts for each email address and therefore separate endpoints in Pinpoint that we can target. Note that emails sent to the these variations should still be delivered to your same inbox."
]
},
{
"cell_type": "markdown",
"metadata": {},
"source": [
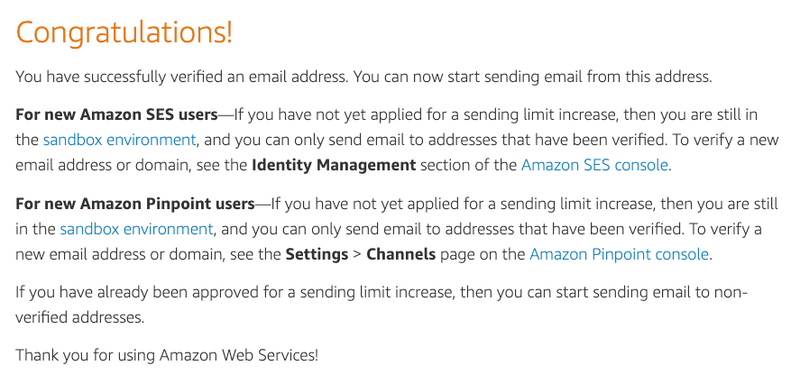
"### Check Your Inbox & Click Verification Links\n",
"\n",
"Pinpoint should have sent verification emails to all of the email addresses you added above. Sign in to your email client and check your inbox for the verification emails. Once you receive the emails (it can take a few minutes), click on the verification link in **each email**. If after several minutes you don't receive the verification email or you want to use a different address, repeat the verification process above.\n",
"\n",
"> Your email address(es) must be verified before we can setup Campaigns in Pinpoint.\n",
"\n",
"After you click the verify link in the email sent to each variation of your email address, you should see a success page like the following.\n",
"\n",
""
]
},
{
"cell_type": "markdown",
"metadata": {},
"source": [
"## Let's Go Shopping - Create Retail Demo Store User Accounts & Pinpoint Endpoints\n",
"\n",
"Next let's create a few new user accounts in the Retail Demo Store Web UI using the email address(es) that we just verified. Based on the source code snippets we saw earlier, we know that the Retail Demo Store will create endpoints in Pinpoint for new accounts.\n",
"\n",
"\n",
"IMPORTANT: each Retail Demo Store account must be created in an entirely separate web browser session in order for them to be created as separate endpoints in Pinpoint. Signing out and attempting to create a new account in the same browser will NOT work. The easiest way to do this successfully is to use Google Chrome and open new Incognito windows for each new account. Alternatively, you could use multiple browser types (i.e. Chrome, Firefox, Safari, IE) and/or separate devices to create accounts such as a mobile phone or tablet.\n",
" \n",
"\n",
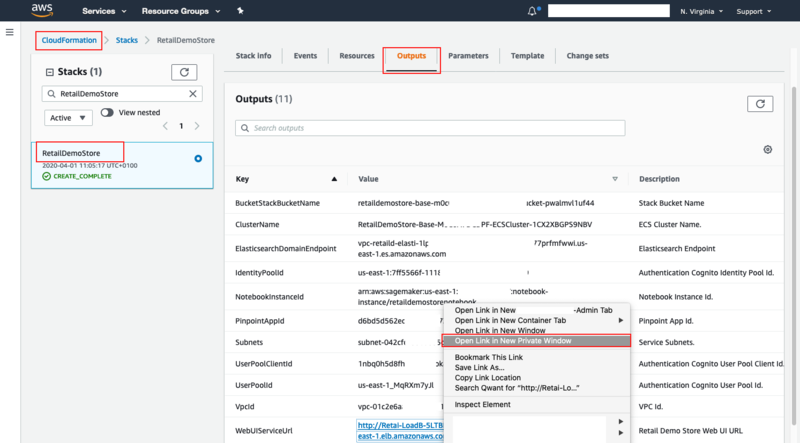
"1. Open the Retail Demo Store Web UI in an new Incognito window. If you don't already have the Web UI open or need the URL, you can find it in the \"Outputs\" tab for the Retail Demo Store CloudFormation stack in your AWS account. Look for the \"WebURL\" output field, right click on the link, and select \"Open Link in Incognito Window\" (Chrome only).\n",
"\n",
"\n",
"\n",
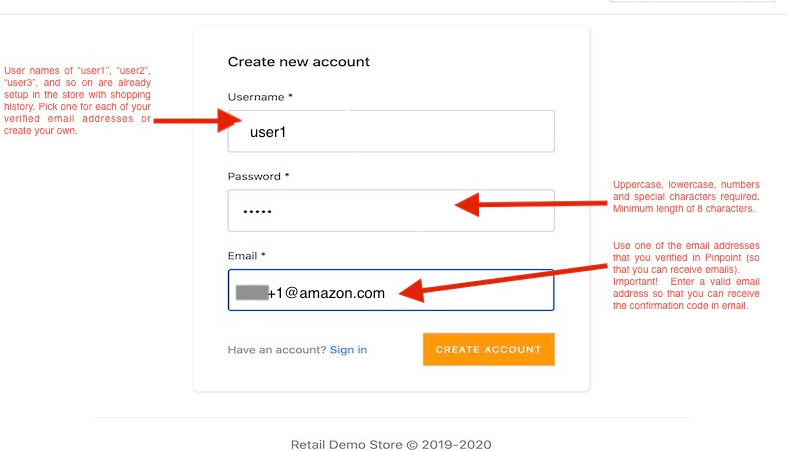
"2. Click the \"Sign In\" button in the top navigation (right side) and then click on the \"Create account\" link in the \"Sign in\" form.\n",
"\n",
"\n",
"\n",
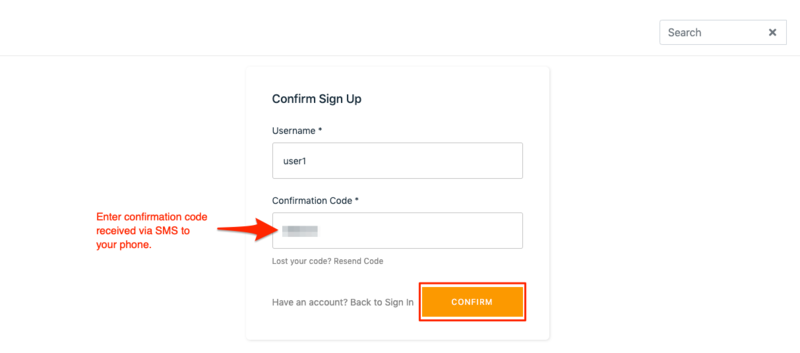
"3. A few seconds after creating your account you should receive an email with a six digit confirmation code. Enter this code on the confirmation page.\n",
"\n",
"\n",
"\n",
"4. Once confirmed you can sign in to your account with your user name and password. At this point you should have a endpoint in Pinpoint for this user.\n",
"\n",
"5. Close your Incognito window(s).\n",
"\n",
"6. Open a new Incognito window and **repeat the process for SOME (but not all) of your remaining email address variations** you verified in Pinpoint above. **As a reminder, it's important that you create each Retail Demo Store account in a separate/new Incognito window, browser application, or device. Otherwise, your accounts will overwrite the same endpoint in Pinpoint.**\n",
"\n",
"\n",
"Be sure to hold back one or two of your verified email addresses until after we create a welcome email campaign below so the sign up events fall within the time window of the campaign.\n",
" "
]
},
{
"cell_type": "markdown",
"metadata": {},
"source": [
"### Shopping Behavior\n",
"\n",
"With your Retail Demo Store accounts created, perform some activities with some of your accounts. \n",
"\n",
"- For one of your users add some items to the shopping cart but do not checkout to simulate an abandoned cart scenario. \n",
"- For another user, add some items to the cart and complete an order or two so that revenue events are sent all the way through to Pinpoint. \n",
"- Also be sure to view a few products by clicking through to the product detail view. Select products that would indicate an affinity for a product type (e.g. shoes or electronics) so you can see how product recommendations are tailored in the product recommendations email."
]
},
{
"cell_type": "markdown",
"metadata": {},
"source": [
"## Create Pinpoint Segments\n",
"\n",
"With our Recommender and message templates in place and a few test users created in the Retail Demo Store, let's turn to creating Segments in Pinpoint. After our Segments are created, we'll create some Campaigns.\n",
"\n",
"1. Start by browsing to the Amazon Pinpoint service page in the AWS account where the Retail Demo Store was deployed. Click on \"All Projects\" and you should see the \"retaildemostore\" project. Click on the \"retaildemostore\" project and then \"Segments\" in the left navigation. Click on the \"Create a segment\" button.\n",
"\n",
"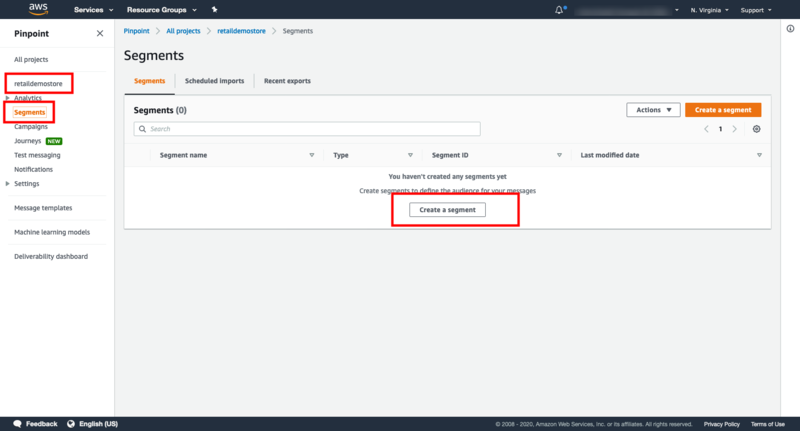"
]
},
{
"cell_type": "markdown",
"metadata": {},
"source": [
"2. Then click on the \"Create segment\" button. We will be building a dynamic segment based on the endpoints that were automatically created when we created our Retail Demo Store user accounts. We'll include all endpoints that have an email address by adding a filter by channel type with a value of `EMAIL`. Name your segment \"AllEmailUsers\" and scroll down and click the \"Create segment\" button at the bottom of the page.\n",
"\n",
"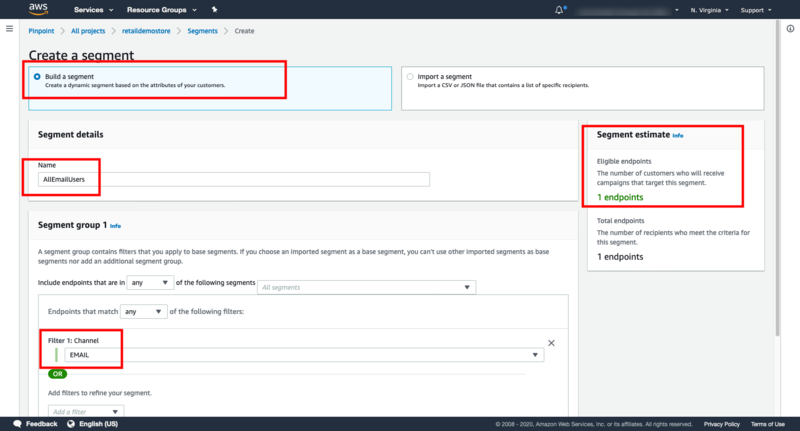"
]
},
{
"cell_type": "markdown",
"metadata": {},
"source": [
"3. Create another segment that is based on the \"AllEmailUsers\" segment you just created but has an additional filter on the `HasShoppingCart` user attribute and has a value of `true`. This represents all users that have a shopping cart and will be used for our abandoned cart campaign. If you don't see this endpoint attribute or don't see `true` as an option, switch to another browser tab/window and add items to the shopping cart for one of your test users.\n",
"\n",
"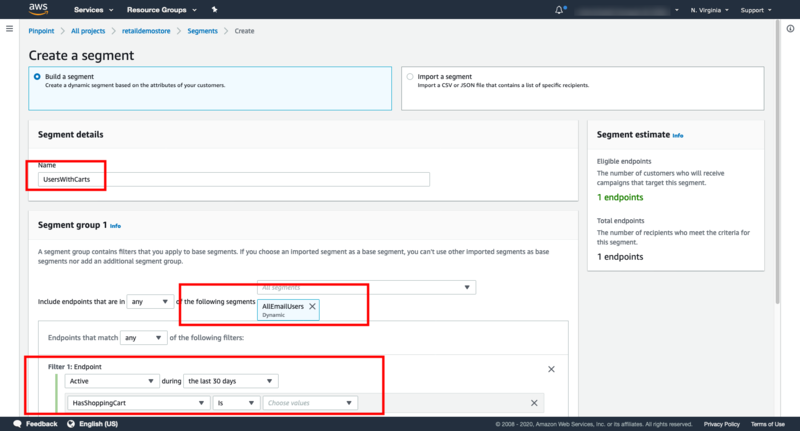"
]
},
{
"cell_type": "markdown",
"metadata": {},
"source": [
"## Create Campaigns\n",
"\n",
"With our segments created for all users and for users with shopping carts, let's create campaigns for our welcome email, product recommendations, and abandoned cart use-cases."
]
},
{
"cell_type": "markdown",
"metadata": {},
"source": [
"### Welcome Email Campaign\n",
"\n",
"Let's start with with the welcome email campaign. For the \"retaildemostore\" project in Pinpoint, click \"Campaigns\" in the left navigation and then the \"Create a campaign\" button.\n",
"\n",
"1. For Step 1, give your campaign a name such as \"WelcomeEmail\", select \"Standard campaign\" as the campaign type, and \"Email\" as the channel. Click \"Next\" to continue.\n",
"\n",
"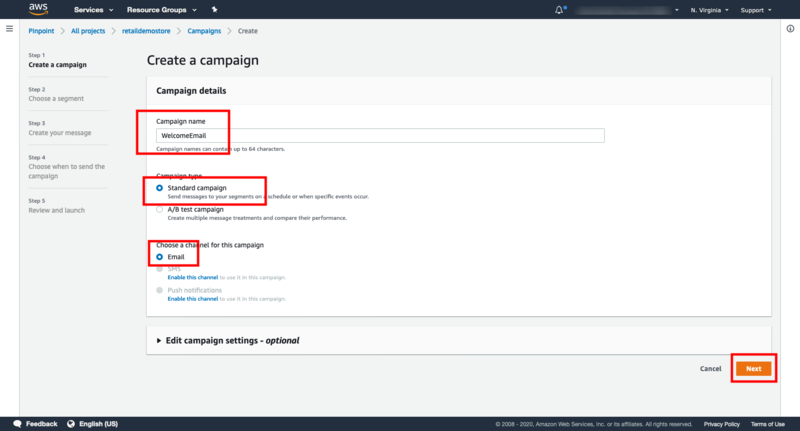\n",
"\n",
"2. For Step 2, we will be using our \"AllEmailUsers\" dynamic segment. Click \"Next\" to continue.\n",
"\n",
"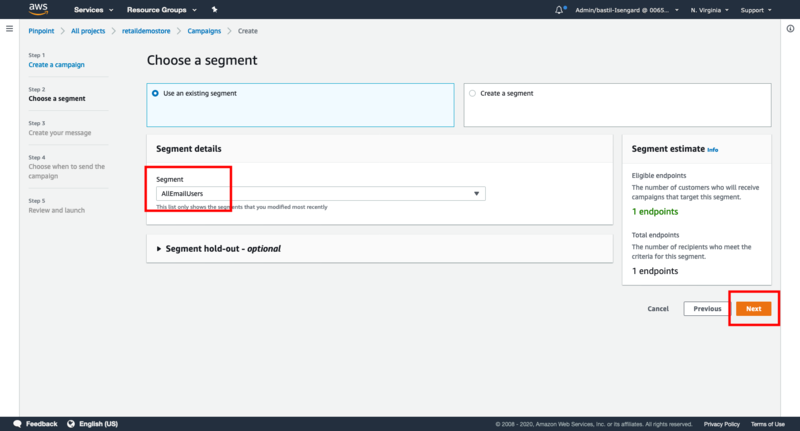\n",
"\n",
"3. For Step 3, choose the \"RetailDemoStore-Welcome\" email template, scroll to the bottom of the page, and click \"Next\".\n",
"\n",
"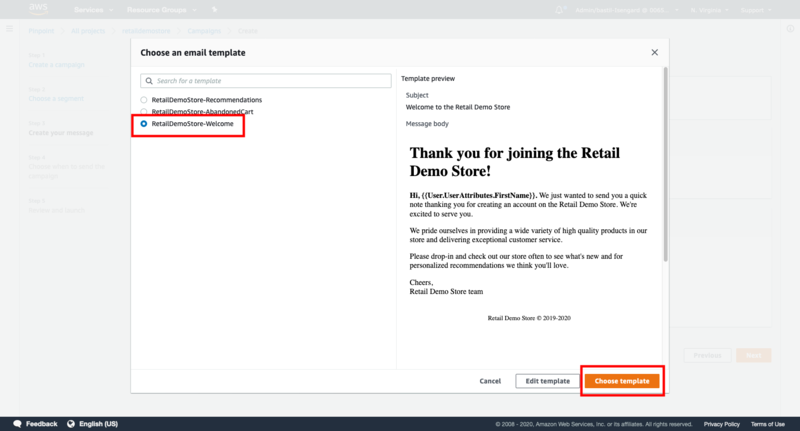\n",
"\n",
"4. For Step 4, we want the campaign to be sent when the `UserSignedUp` event occurs. Set the campaign start date to be today's date so that it begins immediately and the end date to be a few days into the future. **Be sure to adjust to your current time zone.**\n",
"\n",
"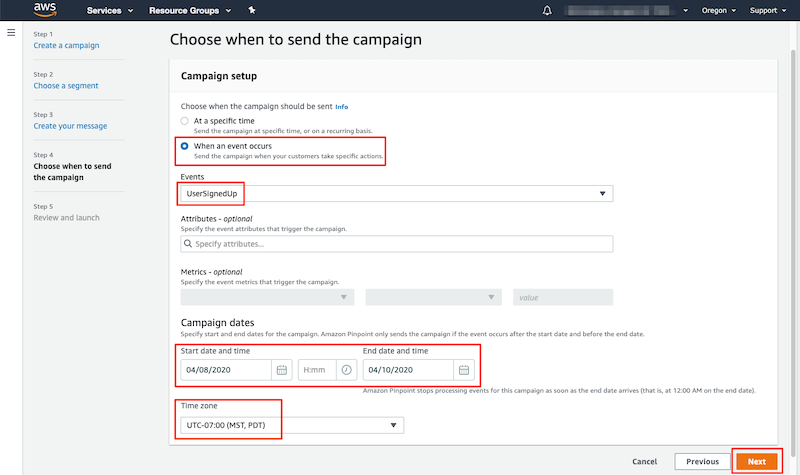\n",
"\n",
"5. Scroll to the bottom of the page, click \"Next\".\n",
"\n",
"6. Click \"Launch campaign\" to launch your campaign."
]
},
{
"cell_type": "markdown",
"metadata": {},
"source": [
"\n",
"Given that the welcome campaign is activated based on sign up events that occur between the campaign start and end times, to test this campaign you must wait until after the camapign starts and then use one of your remaining verified email addresses to create a new Retail Demo Store account.\n",
" "
]
},
{
"cell_type": "markdown",
"metadata": {},
"source": [
"### Abandoned Cart Campaign\n",
"\n",
"To create an abandoned cart campaign, repeat the steps you followed for the Welcome campaign above but this time select the `UsersWithCarts` segment, the `RetailDemoStore-AbandonedCart` email template, and the `_session.stop` event. This will trigger the abandoned cart email to be sent when users end their session while still having a shopping cart. Launch the campaign, wait for the campaign to start, and then close out some browser sessions for user(s) with items still in their cart. This can take some trial and error and waiting given the how browsers and devices trigger end of session events."
]
},
{
"cell_type": "markdown",
"metadata": {},
"source": [
"### Product Recommendations Campaign\n",
"\n",
"Finally, we will create a product recommendations campaign that targets the `AllEmailUsers` segment and uses the `RetailDemoStore-Recommendations` message template. This time, however, rather than trigger the campaign based on an event, we'll send the campaign immediately. As previously discussed, we will use a campaign hook to retrieve and enrich the product recommendations for each endpoint. You define the campaign's _CampaignHook_ settings by using the [Campaign](https://docs.aws.amazon.com/pinpoint/latest/apireference/apps-application-id-campaigns-campaign-id.html) resource in the Amazon Pinpoint API. \n"
]
},
{
"cell_type": "markdown",
"metadata": {},
"source": [
"Before creating the campaign through the API, we will need to retrieve the AllEmailUsers segment and the email channel _from_ address."
]
},
{
"cell_type": "code",
"execution_count": null,
"metadata": {},
"outputs": [],
"source": [
"pinpoint_segment_name = 'AllEmailUsers'\n",
"pinpoint_segment_id = None\n",
"\n",
"get_segments_response = pinpoint.get_segments(ApplicationId=pinpoint_app_id)\n",
"if get_segments_response['SegmentsResponse'].get('Item'):\n",
" for segment in get_segments_response['SegmentsResponse']['Item']:\n",
" if segment['Name'] == pinpoint_segment_name:\n",
" pinpoint_segment_id = segment['Id']\n",
" break\n",
"\n",
"assert pinpoint_segment_id is not None, 'AllEmailsUsers segment does not exist'\n",
"\n",
"print('Pinpoint Segment ID: ' + pinpoint_segment_id)"
]
},
{
"cell_type": "code",
"execution_count": null,
"metadata": {},
"outputs": [],
"source": [
"email_channel_from_address = None\n",
"\n",
"get_email_channel_response = pinpoint.get_email_channel(ApplicationId=pinpoint_app_id)\n",
"if get_email_channel_response['EmailChannelResponse']:\n",
" email_channel_from_address = get_email_channel_response['EmailChannelResponse']['FromAddress']\n",
"\n",
"assert email_channel_from_address is not None, 'Email Channel does not exist'\n",
"\n",
"print('Pinpoint Email Channel From Address: ' + email_channel_from_address)"
]
},
{
"cell_type": "markdown",
"metadata": {},
"source": [
"We can now create the Amazon Pinpoint campaign with the _CampaignHook_ pointing to our Lambda function."
]
},
{
"cell_type": "code",
"execution_count": null,
"metadata": {},
"outputs": [],
"source": [
"pinpoint.create_campaign(\n",
" ApplicationId=pinpoint_app_id,\n",
" WriteCampaignRequest= {\n",
" 'Hook': {\n",
" 'LambdaFunctionName': lambda_function_arn,\n",
" 'Mode': 'FILTER'\n",
" },\n",
" 'MessageConfiguration': {\n",
" 'EmailMessage': {\n",
" 'FromAddress': email_channel_from_address\n",
" }\n",
" },\n",
" 'Name': 'Product Recommendations Campaign',\n",
" 'Schedule': {\n",
" 'StartTime': 'IMMEDIATE'\n",
" },\n",
" 'SegmentId': pinpoint_segment_id,\n",
" 'TemplateConfiguration': {\n",
" 'EmailTemplate': {\n",
" 'Name': 'RetailDemoStore-Recommendations'\n",
" }\n",
" }\n",
" }\n",
")"
]
},
{
"cell_type": "markdown",
"metadata": {},
"source": [
"## Two-Way SMS with Pinpoint\n",
"\n",
"With Pinpoint, you can set up two-way messaging with customers. In the following sections, we set up a two-way messaging system for the customers using Amazon Pinpoint. In this case, we will send the customers (a) A one time offer code to get an extra 20% off and (b) A personalized recommendation in the form of SMS once they have confirmed their subscription.\n",
"\n",
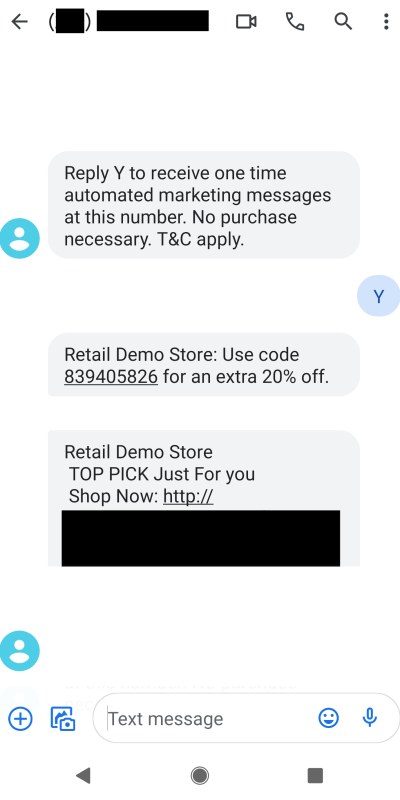
"When the customer enters their phone number using a web-based form in Retail Demo Store, Amazon Pinpoint verifies their number. After that Amazon Pinpoint sends a confirmation message to the customers asking them to confirm their subscription. Once the customer replies with \"Y\", Amazon Pinpoint opts them in to receiving your messages. Retail Demo Store already has a [Lambda function](https://github.com/aws-samples/retail-demo-store/blob/master/src/aws-lambda/pinpoint-sms-alerts/pinpoint-sms-alerts.py) that takes care of updating the SMS endpoint for the user. It also records the event that will trigger our campaign which will send the personalized recommendation SMS to the users. \n",
"\n",
"The snapshot below shows how the SMS communication would look like once you complete the workshop.\n",
"\n",
""
]
},
{
"cell_type": "markdown",
"metadata": {},
"source": [
"### Create Personalized SMS Template\n",
"\n",
"With Amazon Pinpoint we can create SMS templates that can be used to send to groups of our users based on criteria. We'll create a SMS template for the following use-case then step through how we target and send SMS messages to the right users at the appropriate time.\n",
"\n",
"* **Personalized Recommendations SMS** - Send a one time SMS to the user that includes recommendations from the recommeder we just created. This message will be sent to the user only when the user enters their phone number in the text alerts section and replies with \"Y\" to the confirmation message that they receive, thus opting in to receive one time message from Pinpoint.\n",
"\n",
"Here we will create SMS template that includes recommendations from the Amazon Personalize product recommendation recommender that we created in the Personalization workshop. If you haven't completed the personalization workshop, please do so now and come back to this workshop when complete. The body of the SMS message is passed in as text while creating the sms template as shown below."
]
},
{
"cell_type": "code",
"execution_count": null,
"metadata": {},
"outputs": [],
"source": [
"response = pinpoint.create_sms_template(\n",
" SMSTemplateRequest={\n",
" 'Body': 'Retail Demo Store \\n TOP PICK Just For you \\n Shop Now: {{Recommendations.URL.[0]}}',\n",
" 'TemplateDescription': 'Personalized recommendations SMS template',\n",
" 'DefaultSubstitutions': json.dumps({\n",
" 'User.UserAttributes.FirstName': 'there'\n",
" })\n",
" },\n",
" TemplateName='RetailDemoStore-SMSRecommendations'\n",
" )"
]
},
{
"cell_type": "markdown",
"metadata": {},
"source": [
"Notice the use of mustache template tags in this template. For example, {{Recommendations.Name.[0]}} resolves to the product name of the first product recommended by Personalize. The product name will came from our Lambda function that will be called by Pinpoint through a campaign hook. It is similar to the recommendations email template. We pass in only the first recommended product to the user in the SMS message."
]
},
{
"cell_type": "markdown",
"metadata": {},
"source": [
"### Verify SMS Template\n",
"If you open a web browser window/tab and browse to the Pinpoint service in the AWS console for the AWS account we're working with, you should see the message template we just created along with the email templates. Navigate to AWS Console - > Pinpoint -> Message Templates.\n"
]
},
{
"cell_type": "markdown",
"metadata": {},
"source": [
"## Enable Pinpoint SMS Channel & Obtain Dedicated Long Code or Phone Number\n",
"\n",
"Before we can setup Segments and Campaigns to send SMS, we have to enable the SMS channel in Pinpoint, obtain a dedicated phone number or long code and enable Two-Way SMS for the long code.\n",
"\n",
"In these instructions we show how to request a dedicated phone number.\n",
"\n",
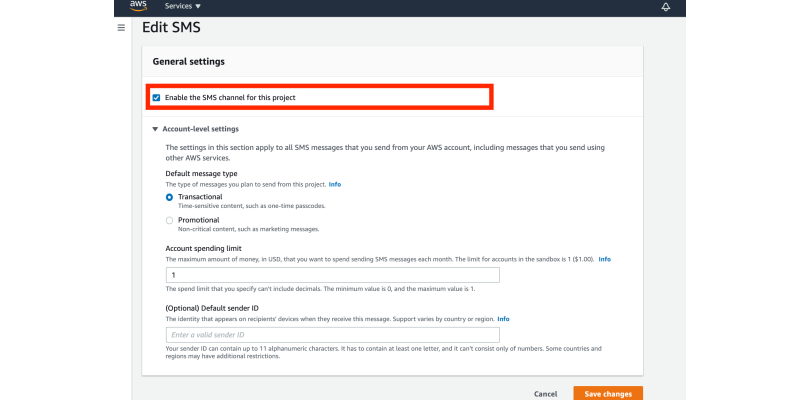
"Step 1: Enable the SMS channel\n",
"\n",
" 1. In the Pinpoint console, click on \"All Projects\" and then the \"retaildemostore\" project. \n",
" 2. In the navigation pane, under Settings, choose **SMS and voice** (or **SMS** if the region only supports SMS).\n",
" 3. Next to SMS settings, choose Edit.\n",
" 4. Under General settings, choose Enable the SMS channel for this project, and then choose Save changes.\n",
"\n",
"\n",
"\n",
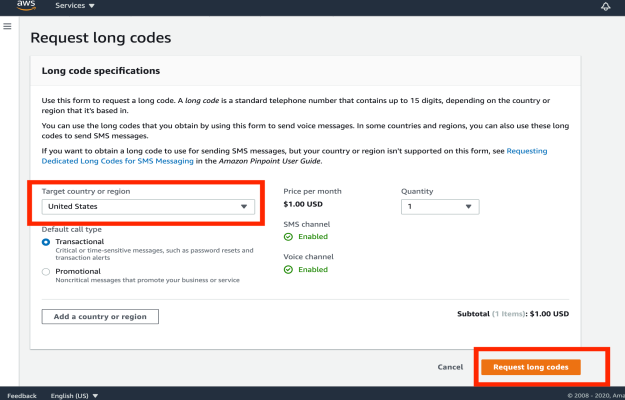
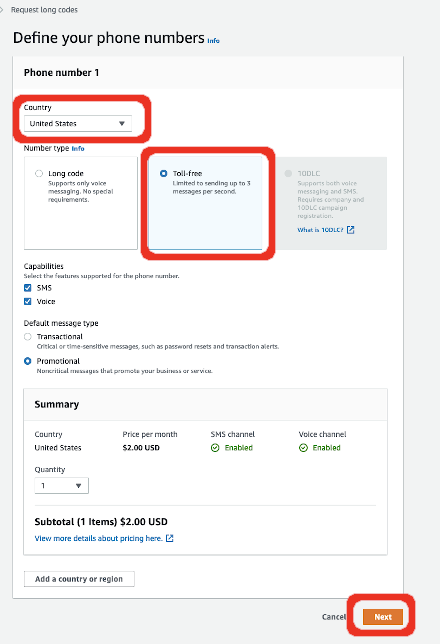
"Step 2: Follow the steps below to request a dedicated phone number for Pinpoint\n",
"\n",
" 1. In the navigation pane, under Settings, choose **SMS and voice**.\n",
" 2. Next to Number settings, choose **Request Phone Number**.\n",
" 3. Under \"define your phone numbers\", do the following:\n",
" 3.1 For Target country or region, choose United States or Canada.\n",
" 3.2 If you chose United States, for \"Number type\" choose \"Toll-free\" so that you can send SMS messages.\n",
" 3.3 For Default call type, choose Transactional.\n",
" 3.4 For Quantity, choose 1.\n",
" 3.5 Choose Next.\n",
" 3.6 Choose Request.\n",
"\n",
"\n",
"\n",
"\n",
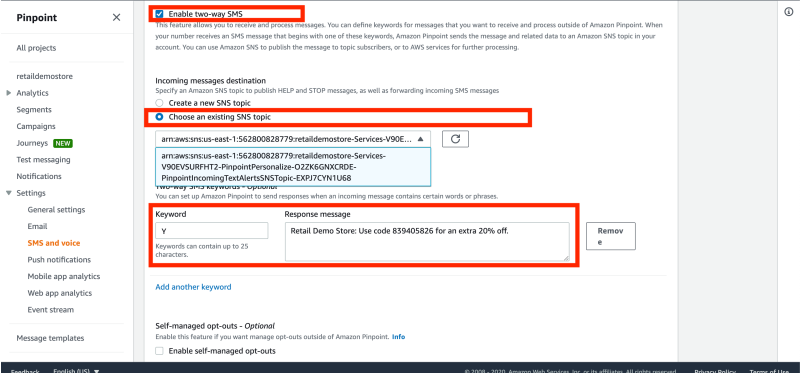
"Step 3: Enable Two way SMS for the obtained phone number.\n",
"\n",
"Once we have a dedicated phone number, we can set up two-way SMS. Enabling two-way SMS makes it possible for your customers to respond to the SMS messages that you send them. In this solution, you use two-way SMS to give your customers a way to confirm that they want to subscribe to your SMS program.\n",
"\n",
"1. On the SMS and voice settings page, under Number settings, choose the phone number that you received in the previous section.\n",
"2. Under **Two-Way SMS**, choose Enable two-way SMS.\n",
"3. Under **Incoming message destination**, choose **Choose an existing SNS topic**. From the drop down menu, choose the SNS topic that has name `PinpointIncomingTextAlertsSNSTopic` in its ARN.\n",
"4. Under Two-way SMS keywords, for Keyword, enter the word that customers send you to confirm their subscriptions. In this case, enter **Y** as the keyword.\n",
"5. Under Response Message, enter `Retail Demo Store: Use code 839405826 for an extra 20% off.` (Since we want to send the offer code to the user once they confirm their subscription by replying with \"Y\" to the confirmation message.)\n",
"\n",
"\n",
"\n",
"Step 4: Edit the long code / phone number SSM Parameter\n",
"\n",
"Once you have obtained the phone number and enabled two way SMS for it, we will update the phone number in the \"long code\" parameter value in SSM parameters. \n",
"\n",
"1. You can set it via AWS Console->Systems Manager->Parameters. Find the parameter named \"retaildemostore-pinpoint-sms-longcode\" and click on edit, then enter the value for the long code you obtained by following the steps above (including the country code as in `+11234567890`). \n",
"2. OR Enter the value of phone number in the `Value` parameter below:"
]
},
{
"cell_type": "code",
"execution_count": null,
"metadata": {},
"outputs": [],
"source": [
"pinpoint_sms_long_code = input(\"Enter the value of 10 digit long code including the country code. For example: +1XXXXXXXXXX\")\n",
"response = ssm.put_parameter(\n",
" Name=\"retaildemostore-pinpoint-sms-longcode\",\n",
" Description='Retail Demo Store Pinpoint SMS Long code for two way SMS',\n",
" Value=pinpoint_sms_long_code,\n",
" Type='String',\n",
" Overwrite=True\n",
")"
]
},
{
"cell_type": "markdown",
"metadata": {},
"source": [
""
]
},
{
"cell_type": "markdown",
"metadata": {},
"source": [
"## Create Retail Demo Store User Accounts & Amazon Pinpoint SMS Endpoints\n",
"Next, refer to the previous section of this workshop to create a new user account if you haven't done so already. Once you have signed in as a Retail Demo Store user, the text alerts section is shown near the footer of the app as shown in the figure below. \n",
"\n",
" \n",
"\n",
"* Enter your phone number along with the \"+\" and country code (without any spaces). Eg. \"+1XXXXXXXXXX\"\n",
"* This will send a confirmation SMS message to the phone number entered above, asking the user to confirm if they want to receive a one time SMS from Retail Demo Store. \n",
"* Reply with a Y in order to opt in for receiving messages. If you reply with anything apart from Y, the SMS endpoint will be created, but it will not be opted in i.e. the segment and campaigns that we create in the next steps, will not send messages to the user unless they have opted in for the messages.\n",
"* Once you reply with Y, the endpoint is opted in to receive messages from Pinpoint. Retail Demo Store already has a [Lambda function](https://github.com/aws-samples/retail-demo-store/blob/master/src/aws-lambda/pinpoint-sms-alerts/pinpoint-sms-alerts.py) that takes care of updating the SMS endpoint for the user. It also records the event `UserVerifiedSMS` that triggers our campaign which will send the personalized recommendation SMS to the users.\n",
"* One user can have only 1 registered SMS endpoint even if they enter multiple phone numbers. The number you entered the last will be taken as the final one.\n",
"* If you wish to create multiple endpoints, sign in using different users separate browsers or Incognito/Private windows and enter different phone numbers for every user. Refer the create Retail Demo Store user accounts section described above in this workshop for more details on how to create multiple user accounts."
]
},
{
"cell_type": "markdown",
"metadata": {},
"source": [
"## Create Pinpoint Segment for SMS Users\n",
"With the SMS recommendation template in place and one or more endpoints created, let's turn to creating a Segment for all users who have opted in for SMS in Pinpoint. After our Segment is created, we'll create a Campaign.\n",
"\n",
"1. Start by browsing to the Amazon Pinpoint service page in the AWS account where the Retail Demo Store was deployed. Click on \"All Projects\" and you should see the \"retaildemostore\" project. Click on the \"retaildemostore\" project and then \"Segments\" in the left navigation. Click on the \"Create a segment\" button.\n",
"\n",
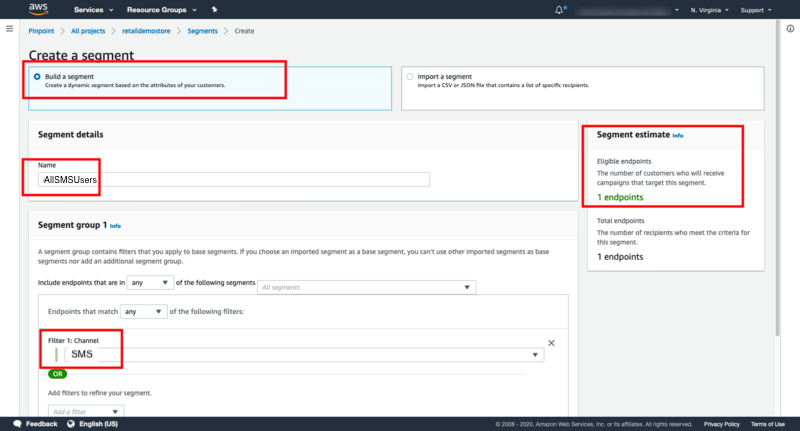
"2. Then click on the \"Create segment\" button. We will be building a dynamic segment based on the endpoints that were automatically created when we created our Retail Demo Store user accounts. We'll include all endpoints that have opted in for SMS by adding a filter by channel type with a value of SMS. Name your segment \"AllSMSUsers\" and scroll down and click the \"Create segment\" button at the bottom of the page.\n",
"\n",
"\n"
]
},
{
"cell_type": "markdown",
"metadata": {},
"source": [
"## Create Campaign for SMS Users\n",
"With our segment created for all users who have opted in for SMS, let's create campaigns for our one time recommendations SMS use case.\n",
"\n",
"### SMS Alerts Campaign\n",
"To create a campaign, we'll follow the same approach as we did with the email product recommendations campaign and create it through the API.\n",
"\n",
"**Given that the SMSAlerts campaign is activated based on event that occur between the campaign start and end times, to test this campaign you must wait until after the camapign starts and then use one of your remaining verified email addresses to create a new Retail Demo Store account.**"
]
},
{
"cell_type": "markdown",
"metadata": {},
"source": [
"First, we will retrieve the segment id for the SMS users segment."
]
},
{
"cell_type": "code",
"execution_count": null,
"metadata": {},
"outputs": [],
"source": [
"pinpoint_sms_segment_name = 'AllSMSUsers'\n",
"pinpoint_sms_segment_id = None\n",
"\n",
"get_segments_response = pinpoint.get_segments(ApplicationId=pinpoint_app_id)\n",
"if get_segments_response['SegmentsResponse'].get('Item'):\n",
" for segment in get_segments_response['SegmentsResponse']['Item']:\n",
" if segment['Name'] == pinpoint_sms_segment_name:\n",
" pinpoint_sms_segment_id = segment['Id']\n",
" break\n",
"\n",
"assert pinpoint_sms_segment_id is not None, 'AllSMSUsers segment does not exist'\n",
"\n",
"print('Pinpoint Segment ID: ' + pinpoint_sms_segment_id)"
]
},
{
"cell_type": "markdown",
"metadata": {},
"source": [
"Now we can create the SMS campaign. The start time of the campaign has to be at least 15 minutes from now. "
]
},
{
"cell_type": "code",
"execution_count": null,
"metadata": {},
"outputs": [],
"source": [
"campaign_start_time = datetime.utcnow() + timedelta(minutes=16)\n",
"campaign_end_time = campaign_start_time + timedelta(days=3)\n",
"\n",
"pinpoint.create_campaign(\n",
" ApplicationId=pinpoint_app_id,\n",
" WriteCampaignRequest= {\n",
" 'Hook': {\n",
" 'LambdaFunctionName': lambda_function_arn,\n",
" 'Mode': 'FILTER'\n",
" },\n",
" 'MessageConfiguration': {\n",
" 'SMSMessage': {\n",
" 'MessageType': 'PROMOTIONAL'\n",
" }\n",
" },\n",
" 'Name': 'SMSAlerts',\n",
" 'Schedule': {\n",
" 'StartTime': campaign_start_time.isoformat(),\n",
" 'EndTime': campaign_end_time.isoformat(),\n",
" \"Timezone\": \"UTC\",\n",
" 'EventFilter': {\n",
" \"Dimensions\": {\n",
" \"Attributes\": {},\n",
" 'EventType': {\n",
" 'DimensionType': 'INCLUSIVE', \n",
" 'Values': ['UserVerifiedSMS']\n",
" }\n",
" },\n",
" \"FilterType\": \"ENDPOINT\"\n",
" },\n",
" \"Frequency\": \"EVENT\"\n",
" },\n",
" 'SegmentId': pinpoint_sms_segment_id,\n",
" 'TemplateConfiguration': {\n",
" 'SMSTemplate': {\n",
" 'Name': 'RetailDemoStore-SMSRecommendations'\n",
" }\n",
" }\n",
" }\n",
")"
]
},
{
"cell_type": "markdown",
"metadata": {},
"source": [
"## Bonus - Pinpoint Journeys\n",
"\n",
"With Amazon Pinpoint journeys, you can create custom experiences for your customers using an easy to use, drag-and-drop interface. When you build a journey, you choose the activities that you want to add to the journey. These activities can perform a variety of different actions, like sending an email to journey participants, waiting a defined period of time, or splitting users based on a certain action, such as when they open or click a link in an email.\n",
"\n",
"Using the segments and message templates you've already created, experiment with creating a journey that guides users through a messaging experience. For example, start a journey by sending all users the Recommendations message template. Then add a pause/wait step followed by a Multivariate Split that directs users down separate paths whether they've completed an order (hint: create a `Purchase` segment), opened the Recommendations email, or done nothing. Perhaps users who completed an order might receive a message asking them to refer a friend to the Retail Demo Store and users who just opened the email might be sent a message with a coupon to motivate them to get shopping (you'll need to create a new message templates for these)."
]
},
{
"cell_type": "markdown",
"metadata": {},
"source": [
"## Workshop Complete\n",
"\n",
"Congratulations! You have completed the Retail Demo Store Pinpoint Workshop.\n",
"\n",
"### Cleanup\n",
"\n",
"If you launched the Retail Demo Store in your personal AWS account **AND** you're done with all workshops & your evaluation of the Retail Demo Store, you can remove all provisioned AWS resources and data by deleting the CloudFormation stack you used to deploy the Retail Demo Store. Although deleting the CloudFormation stack will delete the entire \"retaildemostore\" project in Pinpoint, including all endpoint data, it will not delete resources we created directly in this workshop (i.e. outside of the \"retaildemostore\" Pinpoint project). The following cleanup steps will remove the resources we created outside the \"retaildemostore\" Pinpoint project.\n",
"\n",
"> If you are participating in an AWS managed event such as a workshop and using an AWS provided temporary account, you can skip the following cleanup steps unless otherwise instructed."
]
},
{
"cell_type": "markdown",
"metadata": {},
"source": [
"#### Delete Campaigns ####\n",
"For the \"retaildemostore\" project in Pinpoint, click \"Campaigns\" in the left navigation.\n",
"Select all the campaigns you created and click the Actions button followed by Delete, and then confirm the Delete."
]
},
{
"cell_type": "markdown",
"metadata": {},
"source": [
"#### Delete Email Message Templates"
]
},
{
"cell_type": "code",
"execution_count": null,
"metadata": {},
"outputs": [],
"source": [
"response = pinpoint.delete_email_template(TemplateName='RetailDemoStore-Welcome')\n",
"print(json.dumps(response, indent=2))"
]
},
{
"cell_type": "code",
"execution_count": null,
"metadata": {},
"outputs": [],
"source": [
"response = pinpoint.delete_email_template(TemplateName='RetailDemoStore-AbandonedCart')\n",
"print(json.dumps(response, indent=2))"
]
},
{
"cell_type": "code",
"execution_count": null,
"metadata": {},
"outputs": [],
"source": [
"response = pinpoint.delete_email_template(TemplateName='RetailDemoStore-Recommendations')\n",
"print(json.dumps(response, indent=2))"
]
},
{
"cell_type": "code",
"execution_count": null,
"metadata": {},
"outputs": [],
"source": [
"response = pinpoint.delete_email_template(TemplateName='RetailDemoStore-SMSRecommendations')\n",
"print(json.dumps(response, indent=2))"
]
},
{
"cell_type": "markdown",
"metadata": {},
"source": [
"Other resources allocated for the Retail Demo Store will be deleted when the CloudFormation stack is deleted.\n",
"\n",
"End of workshop"
]
}
],
"metadata": {
"kernelspec": {
"display_name": "conda_python3",
"language": "python",
"name": "conda_python3"
},
"language_info": {
"codemirror_mode": {
"name": "ipython",
"version": 3
},
"file_extension": ".py",
"mimetype": "text/x-python",
"name": "python",
"nbconvert_exporter": "python",
"pygments_lexer": "ipython3",
"version": "3.6.13"
}
},
"nbformat": 4,
"nbformat_minor": 4
}
| |