# Serverless Audio Indexing
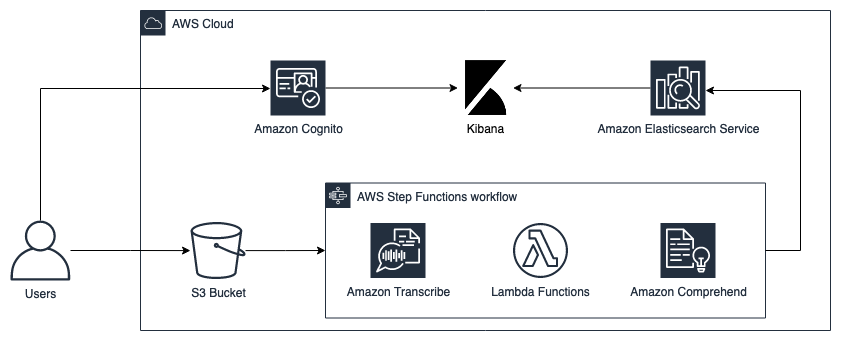
This repository contains the code supporting the blog post "Indexing Audio with Amazon Transcribe, Amazon Comprehend and ElasticSearch". It shows a simple AWS architecture of how automatically index audio files uploaded on a S3 bucket. The solution leverages AWS Step Functions, AWS Lambda Amazon, Transcribe, Amazon Comprehend and Amazon ElasticSearch. The code on this repository supports the blog post [Indexing Audios with Amazon Transcribe, Amazon Comprehend and ElasticSearch](https://aws.amazon.com/pt/blogs/aws-brasil/indexando-audios-com-amazon-transcribe-amazon-comprehend-e-elasticsearch/)
## Architecture
The following architecture was built to index audio files ingested on S3 bucket.
 ## Workflow Overview
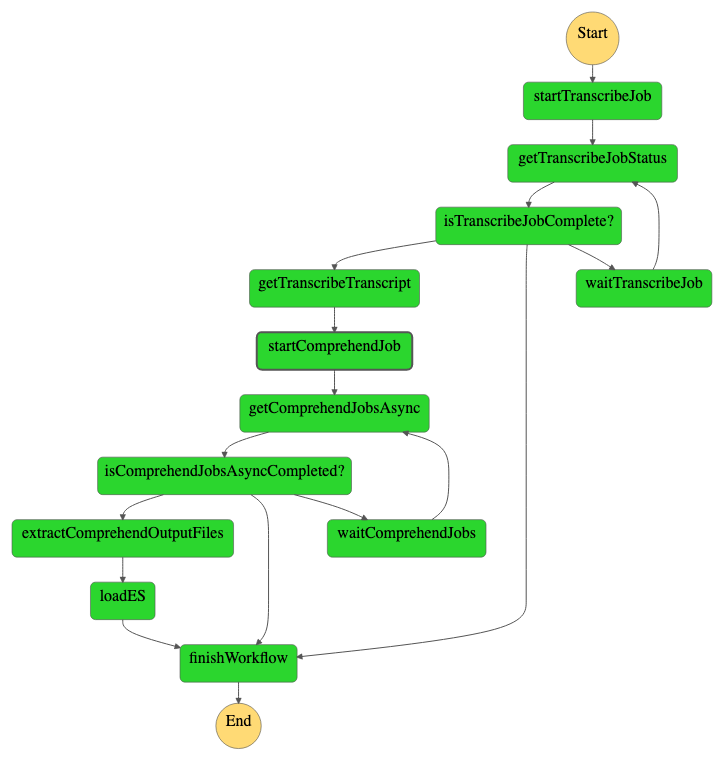
The solution step function workflow has the following macro activities:
1. Start the transcribe job: starts an asynchronous transcribe job using the audio uploaded on the S3 bucket;
2. Get Transcribe Job Status: get the the previous step job status and checks if has finished or failed;
3. Start Comprehend Job: starts an asynchronous Compherend job using the transcription file generated on the step 1. The jobs analyze Sentiment and entities of the file;
4. Get Comprehend Job Status: get the the previous step job status and checks if has finished or failed;
5. Load to ES: load the documents generated by comprehend into the ElasticSearch cluster.
## Setup
### Prerequisites
1. Configure the AWS Credentials in your environment. Refer to [Configuration and credential file settings](https://docs.aws.amazon.com/cli/latest/userguide/cli-configure-files.html);
2. Download and install AWS CLI. Refer to [Installing the AWS CLI](https://docs.aws.amazon.com/cli/latest/userguide/cli-chap-install.html);
3. Download and install AWS SAM CLI. Refer to [Installing the AWS SAM CLI](https://docs.aws.amazon.com/serverless-application-model/latest/developerguide/serverless-sam-cli-install.html);
4. Download and install Docker. Refer to [Docker](https://www.docker.com/products/docker-desktop).
### Deploy
Run the commands below to deploy the architecutre. It creates a CloudFormation stack with all components and a working workflow.
```
sam build --use-container && sam deploy --guided
```
To launch the stack, the following parameters are required:
Parameter name |Description |AllowedPattern/Values |
:----------:|:---------------------------------------------------------------:|:----------------------------------------------------------------------:|
ElasticsearchDomainName |Name used on the domain of the Elasticsearch cluster | [a-z][a-z0-9]* |
SourceAudioLanguage |Source Language of the audio files | Supported Values:
## Workflow Overview
The solution step function workflow has the following macro activities:
1. Start the transcribe job: starts an asynchronous transcribe job using the audio uploaded on the S3 bucket;
2. Get Transcribe Job Status: get the the previous step job status and checks if has finished or failed;
3. Start Comprehend Job: starts an asynchronous Compherend job using the transcription file generated on the step 1. The jobs analyze Sentiment and entities of the file;
4. Get Comprehend Job Status: get the the previous step job status and checks if has finished or failed;
5. Load to ES: load the documents generated by comprehend into the ElasticSearch cluster.
## Setup
### Prerequisites
1. Configure the AWS Credentials in your environment. Refer to [Configuration and credential file settings](https://docs.aws.amazon.com/cli/latest/userguide/cli-configure-files.html);
2. Download and install AWS CLI. Refer to [Installing the AWS CLI](https://docs.aws.amazon.com/cli/latest/userguide/cli-chap-install.html);
3. Download and install AWS SAM CLI. Refer to [Installing the AWS SAM CLI](https://docs.aws.amazon.com/serverless-application-model/latest/developerguide/serverless-sam-cli-install.html);
4. Download and install Docker. Refer to [Docker](https://www.docker.com/products/docker-desktop).
### Deploy
Run the commands below to deploy the architecutre. It creates a CloudFormation stack with all components and a working workflow.
```
sam build --use-container && sam deploy --guided
```
To launch the stack, the following parameters are required:
Parameter name |Description |AllowedPattern/Values |
:----------:|:---------------------------------------------------------------:|:----------------------------------------------------------------------:|
ElasticsearchDomainName |Name used on the domain of the Elasticsearch cluster | [a-z][a-z0-9]* |
SourceAudioLanguage |Source Language of the audio files | Supported Values:
‘de-DE’ German
‘de-CH’ Swiss German
‘en-AU’ Australian English
‘en-GB’ British English
‘en-IN’ Indian English
‘en-IE’ Irish English
‘en-AB’: Scottish English
‘en-US’: US English
‘en-WL’ Welsh English
‘es-ES’ Spanish
‘es-US’ US Spanish
‘it-IT’ Italian
‘pt-PT’ Portuguese
‘pt-BR’ Brazilian Portuguese
‘fr-FR’ French
‘fr-CA’ Canadian French
‘ja-JP’ Japanese
‘ko-KR’ Korean
‘hi-IN’ Hindi
‘ar-SA’ Arabic
‘zh-CN’ Chinese (simplified) |
### Running the workflow
After the launch of the stack, the following outputs will be generated: `RawBucket`, `UserPoolId`, `UserPoolArn`, `IdentityPoolId`, `RawBucket`, `MainBucket`, `TranscribeS3Bucket` and `StepFunction`. To start the workflow, it's necessary to upload a `.mp3` or `.mp4` file on the `RawBucket`, doing so, the workflow will be started.
We can track the execution of the workflow on the `StepFunction` resource:
 ## Clean up (Optional)
If you don't want to continue using the application, take the following steps to clean up its resources and avoid further charges;
1. Sign in to the AWS Management Console and open the Amazon S3 console at [https://console.aws.amazon.com/s3](https://console.aws.amazon.com/s3);
2. In the **Bucket name** list, select the option that has *RawS3Bucket* on the name and then choose **Empty**;
3. On the **Empty bucket** page, confirm that you want to empty the bucket by entering the bucket name into the text field, and then choose **Empty**;
4. Repeat the process for the bucket that contains *MainS3Bucket* and *TranscribeS3Bucket* on the name
5. Open the AWS CloudFormation console at [https://console.aws.amazon.com/cloudformation](https://console.aws.amazon.com/cloudformation);
6. On the **Stacks** page in the CloudFormation console, select the stack you deployed during the Deploy setup;
7. In the stack details pane, choose **Delete**.
## Security
See [CONTRIBUTING](CONTRIBUTING.md#security-issue-notifications) for more information.
## License
This library is licensed under the MIT-0 License. See the LICENSE file.
## Clean up (Optional)
If you don't want to continue using the application, take the following steps to clean up its resources and avoid further charges;
1. Sign in to the AWS Management Console and open the Amazon S3 console at [https://console.aws.amazon.com/s3](https://console.aws.amazon.com/s3);
2. In the **Bucket name** list, select the option that has *RawS3Bucket* on the name and then choose **Empty**;
3. On the **Empty bucket** page, confirm that you want to empty the bucket by entering the bucket name into the text field, and then choose **Empty**;
4. Repeat the process for the bucket that contains *MainS3Bucket* and *TranscribeS3Bucket* on the name
5. Open the AWS CloudFormation console at [https://console.aws.amazon.com/cloudformation](https://console.aws.amazon.com/cloudformation);
6. On the **Stacks** page in the CloudFormation console, select the stack you deployed during the Deploy setup;
7. In the stack details pane, choose **Delete**.
## Security
See [CONTRIBUTING](CONTRIBUTING.md#security-issue-notifications) for more information.
## License
This library is licensed under the MIT-0 License. See the LICENSE file.