
## THE INSTRUCTIONS IN THIS LAB HAVE BEEN DEPRECATED - PLEASE VISIT https://serverless-game-analytics.workshop.aws/en FOR THE MOST UPDATED LAB EXPERIENCE.
## Cognito User Pool Authentication Lab
This lab will guide you through adding authentication to a Unity game using Cognito User Pools and the AWS SDK for .NET. This will involve configuring a user pool and adding code to the Unity game client to integrate the Cognito service with the game.
## Agenda
* [Overview](#Overview)
* [Task 1: Setting up Prerequisites and Permissions](#Task1)
* [Task 2: Create a Cognito User Pool](#Task2)
* [Task 3: Create a Sample Game in Unity](#Task3)
* [Task 4: Add User Sign-Up Functionality](#Task4)
* [Task 5: Add User Sign-In Functionality](#Task5)
* [Task 6: Testing the Game](#Task6)
* [Clean Up](#cleanup)
* [Appendix - Additional Reading](#additionalreading)
[[Top](#Top)]
## Overview
### Amazon Cognito
Amazon Cognito is a service that provides authentication, authorization, and user management for your web and mobile games. Players can sign-up and sign-in directly with a username and password, or through third party identity providers like Facebook, Amazon, or Google. There are two main components of Amazon Cognito:
##### User Pools
A user pool is a user directory that provides sign-up and sign-in options for your app users. Users in a user pool have an associated directory profile.
##### Identity Pools
An Identity pool enables you to grant temporary AWS credentials to access AWS services to players. Identity pools support anonymous guest users.
### Unity
Unity is a cross-platform game engine developed by Unity Technologies that is used to create the core game that will be the basis of this lab. Unity uses a C++ runtime and C# for scripting, so to be able to add AWS functionality to the game the AWS SDK for .NET is included as a package in Unity.
### Getting Started
This lab will focus specifically on creating an Amazon Cognito user pool to authenticate users for a Unity Game. It will walk through the process of building out a user pool and then will highlight how the AWS SDK for .NET is used in Unity to provide user sign-up and sign-in functionality.
[[Top](#Top)]
## Task 1: Setting up Prerequisites and Permissions
### Prerequisites
For the purposes of this lab, you will be using the AWS Management Console as well as Unity. You will need to have:
* An **AWS account** with an appropriate level of permissions to use the services needed for this lab (S3, Kinesis, Glue, Athena, QuickSight). Follow the link to create and activate a new AWS account if you do not have one already: https://aws.amazon.com/premiumsupport/knowledge-center/create-and-activate-aws-account/
* **Unity 2019.1.0** - Download Unity and Unity Hub from this link: https://unity3d.com/get-unity/download/archive
* AWS Command Line Interface (CLI) - https://aws.amazon.com/cli/
If you already have these prerequisites installed and credentials configured, you can skip to [[Task2](#Task2)]
### Setting up Permissions
First, you will need to create an IAM user with the appropriate permissions needed to do the lab if you do not have one already. AWS Identity and Access Management (IAM) enables you to manage access to AWS services and resources securely. Using IAM, you can create and manage AWS users and groups, and use permissions to allow and deny their access to AWS resources. It is highly recommended that you do not use the default root user of your AWS account and instead provision your own IAM user for security purposes.
1. Sign into your AWS account and go to the IAM landing page by clicking **Services > IAM**.
2. Click **Users** on the left-hand navigation pane and then select **Add user**.
3. Give your user a user name and make sure to enable **Programmatic access** so that you can download an access key and secret access key. Also enable **AWS Management Console access** so that you can give your user the ability to sign-in to the AWS Management console.

4. Select **Next: Permissions** and choose **Attach existing policies directly**. Choose the AdministratorAccess policy to add to your user.
Here, you are adding full administrator access for simplicity of lab purposes. However, it is best practices that with IAM you assign fine-grained permissions to AWS services and to your resources.

5. Select **Next: Tags**, **Next: Review** and finally **Create user**.
6. Make sure you **Download .csv** to download and save your access key ID and secret access key for use later.
7. Sign into the AWS Management Console with the IAM credentials you just created.
### Installing the AWS CLI
Now that you have created a user, you can install the AWS CLI. You are doing this to configure AWS credentials easily to your local machine to be able to complete the lab.
1. Installing the AWS CLI - https://aws.amazon.com/cli/
2. Configure AWS credentials by opening a terminal and running:
`aws configure`
* It will prompt you for your access key ID, your secret access key ID, a region name, and an output format.
* Enter the access key and secret access key that you downloaded in the last step.
* Choose a region name. You can choose whatever region you want to work in, as long as that region supports all the services that this lab needs. This lab uses us-west-2 by default, so choose that if you'd like.
* For the output format, just leave that default by pressing enter on your keyboard.
You are done setting up the prerequisites needed for this lab.
[[Top](#Top)]
## Task 2: Create a Cognito User Pool
In order to add authentication to your Unity game, you first need to create a user pool in Cognito.
1. Sign into the AWS Management Console and on the Services menu, click **Cognito**.
2. Choose **Manage User Pools**.

3. Click **Create a user pool**.
4. Add a name for your user pool. For this example, _AWSUserPool_ will be used as the name.
5. Select **Step through settings** to get a better understanding of the customizations and features Cognito offers.

6. This will take you to the _attributes_ page where you can begin to customize your user pool.
* You can define how you want your users to sign-in. For now, leave it as default, which allows your users to sign-in with a username and password. Optionally, you can allow your users to sign-in with an email or phone number as well.
* There are also different _attributes_ that you can require during the sign-up process. These are fields that are required when signing up for a user account. Leave the default email attribute selected. You can also add custom attributes.
7. Leave these fields as default and select **Next step**.
8. The next page lets you customize password policies. Make sure to:
* **Unselect** Require numbers
* **Unselect** Require special character
* **Unselect** Require uppercase letters
* **Unselect** Require lowercase letters
* You can require a certain complexity for your passwords by requiring numbers, special characters, uppercase letters, and lowercase letters. These are all enabled by default. In production, it is security best practice to require a complex password for your users. However, for the purpose of this lab, you will unselect all of these requirements to make the sign-up process more simplistic.

9. Select **Next step**.
10. Review the other customizations you can make on this page, leave them as default, and select **Next step**.
* This page shows other features you can enable, like _Multi-Factor Authentication_ to add an extra layer of security when your users sign-in. You also have to provide a role to allow Amazon Cognito to send SMS messages to users on your behalf. This is called an IAM role, which is our _Identity and Access Management_ service that helps define access and management permissions for your AWS users and resources.
11. On the next page, under the part that says “Do you want to customize your email verification messages?”, change **Verification type** from Code to Link.
* This will allow your users to verify their email in a convenient way by clicking a link during the sign-up process.

12. Click **Next step**.
13. Click **Add tag** and enter the following configurations:
* **Tag Key:** Name
* **Tag Value:** Cognito User Pool for AWS Serverless Unity Game
* You can add tags to your AWS resources, which will help you identify them easily, keep your resources organized, and can help better understand billing costs.

14. Click **Next step**.
15. Under “Do you want to remember your user’s devices?” leave the default **“No”** selected for now, and click **Next step**.
* This is a feature that helps enable device tracking and remembering. It can provide insight into the usage of your app’s users and reduce the friction associated with Multi-Factor Authentication.
16. Click **Next step**.
17. On this page, select **Add an app client** and configure:
* **App client name:** AppClient
* **Unselect** Generate client secret
18. Click **Create app client**. Your configurations should look like the following:
* Within Cognito, an app is an entity within a user pool that has permission to call unauthenticated APIs, such as APIs to register, sign in, and handle forgotten passwords. This does not require an authenticated user. To call these APIs, an app client ID is necessary.

19. Click **Next step**.
* On this page you can create customized workflows using AWS Lambda functions to create triggers. For example, you can define authentication challenges, like completing a CAPTCHA.
20. Accept the defaults and click **Next step**.
21. Review your configurations for your Cognito user pool. Click **Create pool**.
22. Now, you will be at a page where you can view and edit the general settings of the user pool you just created. On the left-hand navigation panel under **App Integration**, select **Domain name**.

23. Add a unique prefix to your Amazon Cognito domain to be able to use the user pool within your mobile game.
24. Click **Check availability** to make sure your domain name is unique.
25. Select **Save changes**.
26. There is some information you will need to reference later when you are adding Cognito functionality to your Unity game. On the left-hand navigation panel, click **General Settings**.
27. At the top of the page, you will see your **Pool Id**. Save this in a notepad for later.
28. On the left-hand navigation panel under **App integration**, select **App client settings**. You will see your **App client ID**. Save this in a notepad for later as well.
Congratulations! You have created your Amazon Cognito user pool successfully. Now, it is time to integrate it into your Unity game.
[[Top](#Top)]
## Task 3: Create a Sample Game in Unity
You have officially created a Cognito User Pool, which serves as a user directory to provide sign-up and sign-in functionality for your video game. Now, it is time to create a sample project in Unity that you will begin adding authentication functionality to.
1. **Click** the 3D Beginner Complete Project from the following link: https://learn.unity.com/project/john-lemon-s-haunted-jaunt-3d-beginner

* You will use a sample game that has been built already for you in Unity. You will take this core game and add functionality to it using AWS as you progress through this lab. The baseline of this game is built using the free John Lemon’s Haunted Jaunt assets from the Unity Asset store at the link in step 1. You can run through the tutorial yourself if you wish, which takes around 5 and a half hours, or you can simply download the completed sample project. For this tutorial, it is assumed that you download the completed sample project.
2. When you click the link above, it should open up the Unity Asset Store. Click **Add to My Assets** and sign into your Unity account if necessary.

3. You should see a drop down at the top of the screen that says _"Added to My Assets"_. On this same drop down, click **Open in Unity**. This will open Unity Hub.

4. On the left navigation panel in the Unity Hub, click **Learn**. This will open up a page where you can find sample projects to download. You should see the John Lemon's Haunted Jaunt: 3D Beginner project downloaded. **Click** this to open the project in Unity.

5. **Download** the Unity package in this GitHub repository called _CognitoAuthentication.unitypackage_. **Import** this package into your Unity game by choosing Assets > Import Package > Custom Package...
* This game has already been built for you. Browse the different assets folders – take a look at the Scripts, Prefabs, Animation folders and more to see what gives the game its functionality.
6. Click on the **Scenes** folder under Assets. Open the scene titled **CognitoTestScene**. This is the scene that has a sample sign-up and sign-in UI. You will build functionality into this scene.
7. You need to fix the build settings for this project before getting started. Under File > Build Settings, click **Add Open Scenes**. It should add the CognitoTestScene under index 0.
8. Next, in the **Scenes** folder open the scene titled **SampleScene**. This is the scene where you can play the actual game - try playing if you want! The goal is to escape the haunted house while avoiding enemies.
9. Under File > Build Settings, click **Add Open Scenes** again. It should add the SampleScene under index 1. Your final configurations should look like this:

10. **Do not click** Build or Build and Run, simply exit out of the Build Settings window.

11. Browse to the **Plugins** folder in Assets. In this example, you will use the **AWS SDK for .NET** to be able to use AWS services in your game. Here, you can see the different plugins that have been included in this Unity project that are necessary to be able to include Cognito in your game.
* **Note:** There are other ways that you can incorporate the use of AWS into your game depending on your use case. The AWS SDK for .NET is a valid option for doing so. It is recommended that you use this SDK instead of using the AWS Mobile SDKs for iOS, Android, and Unity because these are currently outdated. Instead, use the main AWS SDK for the language that you are programming your game in. Since Unity uses C#, you will use the AWS SDK for .NET which supports C#.
* Also, when creating your own Unity game, you must make sure to follow these steps to change settings to be able to add .NET SDK assemblies to Unity as plugins.
* Navigate to Edit -> Project Settings -> Player -> Other Settings
* Change Scripting Runtime Version to .NET 4.x Equivalent
* Change the Scripting Backend to Mono
* Change the API Compatibility Level to .NET Standard 2.0
* These steps are not necessary now to be able to do this lab since the Unity game has been provided for you, but are necessary when developing your own game that uses the .NET SDK.

[[Top](#Top)]
## Task 4: Add User Sign-Up Functionality
Once you have your Unity sample game open and explored around a bit, it is time to begin coding some AWS functionality into the game. You will first add user sign-up functionality to your game.
1. Navigate to the **Scripts** folder in Assets and open up the **Cognito.cs** script to be edited in Visual Studio.
* This is the script that has been created to allow player sign-up and sign-in functionality for your game. You will need to write some code to make your script function correctly. Let’s walk through this together.
* The first part of this script (lines 1-10) references different namespaces that are needed to help create the functionality that you want to include in your game. This references the plugins from the AWS SDK for .NET that you looked at earlier in the Plugins directory in the Assets folder.
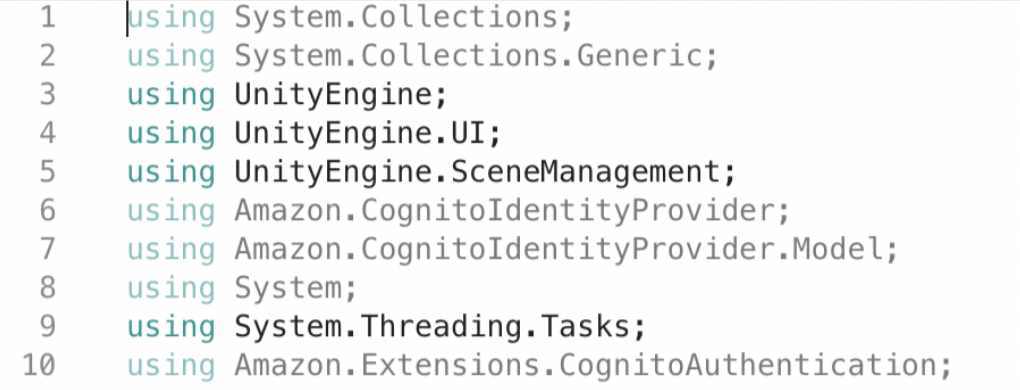
* For example, you can see **using Amazon.CognitoIdentityProvider** (line 6) which allows you to use the Amazon Cognito User Pools API. This will allow you to do things like create a user pool to manage directories and users, as well as authenticate users to obtain tokens related to the user identity and access policies.
* Next, you need to declare variables that are necessary to be used in the script. Most of the variables are already defined for you.

* UI elements are declared (lines 15-20). It is necessary to create and reference sign-up and sign-in buttons, as well as input text fields so that your players can type their username and password when signing up or signing in. These game objects have already been created and placed in a scene for you. You can find these as child objects of the Canvas game object in the Unity hierarchy window.
2. Now you need to start filling in some information. Add your **User Pool ID** and **App Client ID** that you created when you set up your Cognito user pool to lines 22 and 23. You should have these values saved in a notepad from earlier in the lab.
3. Also define the **Region** you created your user pool in. This lab has been done in US East 1 for reference. Your variables should look similar to this:

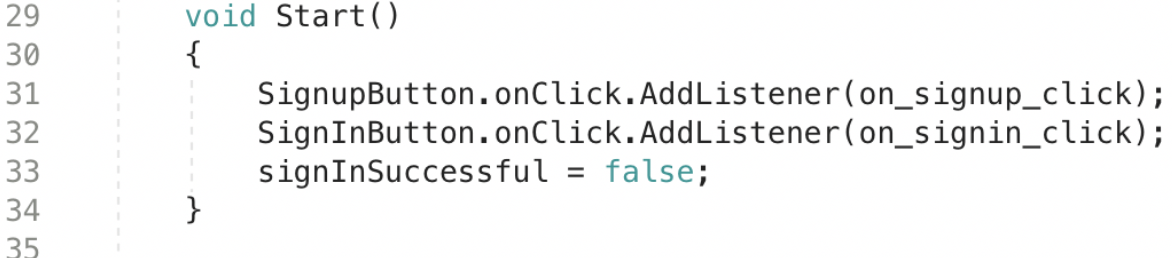
* Line 26 is a Boolean variable **signInSuccessful** that has been created to store whether or not the user has signed in successfully or not. Let’s move on to the next part of the script:

* The start method runs on game start. Two listeners have been added to our sign-up and sign in buttons that will execute methods when the buttons have been clicked. We are also initializing the **signInSuccessful** variable to false at the start.
* When the sign-up button is clicked, the **on_signup_click()** function is executed which triggers the S**ignUpMethodAsync()** method, which is blank right now! Let’s write some code to add functionality to this method so that you can actually sign up a user to your Cognito user pool.
4. Scroll down to **line 57**. This is where the **SignUpMethodAsync()** should start.
5. First, declare variables. When you created your Cognito user pool, you required your user to fill out three fields when signing up for an account. These are **username**, **password**, and **email**. You will need a field for each of these. Declare these variables at the top of your function:
```
string userName = UsernameField.text;
string password = PasswordField.text;
string email = EmailField.text;
```
* This takes the inputs of the text fields and assigns them to variables.
6. Then, you need to create an **AmazonCognitoIdentityProviderClient**. Add the following line of code to your method:
```
AmazonCognitoIdentityProviderClient provider = new AmazonCognitoIdentityProviderClient(new Amazon.Runtime.AnonymousAWSCredentials(), Region);
```
* Here you are creating and initializing an Amazon Cognito Identity Provider Client so that you can begin making calls to the Cognito API to sign-up users. This statement constructs a provider client using AWS credentials and the region endpoint in the constructor.
7. Next, you need to create a **SignUpRequest** to sign up a user to your Cognito user pool.
```
SignUpRequest signUpRequest = new SignUpRequest()
{
ClientId = AppClientID,
Username = userName,
Password = password
};
```
* The SignUpRequest needs to know your Cognito App Client ID as well as the username and password that the player typed in when trying to sign-up.
8. Next, create a list of **attributes** and add it to the **signUpRequest** you just created.
```
List attributes = new List()
{
new AttributeType(){Name = "email", Value = email}
};
signUpRequest.UserAttributes = attributes;
```
* When you created your user pool, email was selected to be a required attribute when a player creates an account. You can also define other attributes that you might want required as well. These can be built-in attributes that AWS offers already, like phone number and address, or even your own custom attributes. You need to add the email attribute to the **signUpRequest** you created, otherwise your code will not work since you specifically required email as an attribute.
9. Now you just need to actually submit your request to sign the player up! Do this in a try-catch block:
```
try
{
SignUpResponse request = await provider.SignUpAsync(signUpRequest);
Debug.Log("Sign up worked");
}
catch (Exception e)
{
Debug.Log("Exception: " + e);
return;
}
```
* Here, you have a try-catch block where you try to submit the request to sign up your player to your Cognito user pool. If the request is successful, it prints a message to the console saying the sign up worked. If the request fails, you catch the exception and print the error message to the console to help with debugging.
10. **Verify** that your final code looks like this:

Congratulations! You have added sign-up functionality with Cognito to your Unity game.
[[Top](#Top)]
## Task 5: Add User Sign-In Functionality
Once you are done adding user sign-up functionality, you can begin adding user sign-in functionality to your game.
1. In the same **Cognito.cs** script, you will notice if you look at the **Start()** method again, there is also a listener on the sign-in button. This triggers an **on_signin_click()** method that calls to an asynchronous **SignInUser()** function. This function is also blank – time to start coding!
2. Go to the beginning of the **SignInUser()** function.
3. It is time to declare some variables again. You need to get the username and password that a player types into the textbox in order to authenticate the user during the sign-in process. Code the following **username** and **password** variables at the beginning of the function:
```
string userName = UsernameField.text;
string password = PasswordField.text;
```
4. You also need to create the **Cognito Identity Provider Client** again.
```
AmazonCognitoIdentityProviderClient provider = new AmazonCognitoIdentityProviderClient(new Amazon.Runtime.AnonymousAWSCredentials(), Region);
```
5. Now, you need to create a **user pool** variable that is a representation of your Cognito user pool. You also need a **user** variable that is a representation of the user that is trying to sign-in.
```
CognitoUserPool userPool = new CognitoUserPool(PoolID, AppClientID, provider);
CognitoUser user = new CognitoUser(userName, AppClientID, userPool, provider);
```
6. Once this is done, you need to authenticate your user by validating the username and password
```
InitiateSrpAuthRequest authRequest = new InitiateSrpAuthRequest()
{
Password = password
};
```
* This is done through the **Secure Remote Password (SRP)** protocol, which helps to simplify the authentication process of Amazon Cognito user pools. It is a secure password-based authentication and key-exchange protocol that solves the challenge of authenticating clients to servers securely.
7. Now, you can call another function **StartWithSrpAuthAsync()** which will authenticate the user and return an **AuthFlowResponse** object. This has an **AuthenticationResult** property that contains the user’s session tokens if the authentication is successful.
```
try
{
AuthFlowResponse authResponse = await user.StartWithSrpAuthAsync(authRequest).ConfigureAwait(false);
GetUserRequest getUserRequest = new GetUserRequest();
getUserRequest.AccessToken = authResponse.AuthenticationResult.AccessToken;
Debug.Log("User Access Token: " + getUserRequest.AccessToken);
signInSuccessful = true;
}
catch(Exception e)
{
Debug.Log("Exception: " + e);
return;
}
```
* Here, you are taking the returned token and logging it in the console to see that the authentication is successful. You also change the Boolean variable signInSuccessful to true.
* For the purposes of this lab, the game logic is more simplistic – if you look at the update method, you are constantly checking the Boolean variable. When this variable is true after successful authentication of the user, then load the game scene to allow the user to start playing the game.
* In practice, the returned token can be used to incorporate player-related features in the game, like allowing the player access to their game inventory for example.
8. **Verify** that your final code looks like this:

Congratulations! You have added sign-in functionality with Cognito to your Unity game.
[[Top](#Top)]
## Task 6: Testing the Game
Now that you are finished adding both sign-up and sign-in functionality to your game, you can test this functionality to ensure that it works!
1. Save your final Cognito.cs script.
2. Navigate to the **Scenes** folder in Assets.
3. Open the **CognitoTestScene**.
4. **Play** the unity game.
5. Enter a test username, test password, and your real email into the text fields. Make sure to put in your real email since you will need a verification link to confirm the user. Also, make sure your password is 6 characters or longer.
6. Hit the **sign-up** button. You should see in the console that the sign up worked.

7. To verify that the sign-up process worked, go back to your browser with the **AWS Management Console** open.
8. Go to **Services** and then select **Cognito**.
9. Select **Manage User Pools**
10. Under **General settings**, select **Users and groups**
11. You should see a user signed up. You can also view additional information about the user. Right now, you should see that the account status is _UNCONFIRMED_. This is because the email has not been verified yet.

12. Check your email. You should get an email with a verification link. Click the link to **verify** your email.
13. A browser window should open that says:

14. Go back to the **AWS Management Console** and refresh the page. Your user should be confirmed now!

15. Go back to Unity and hit the **sign-in** button to sign-in with the credentials you just used to create your user.
16. The sign-in should be successful. You should see the access token has been returned in the console. It is a JWT token that should look similar to this:
```
User Access Token: eyJraWQiOiIydU5JSHNvTkttYlhwdzNTTkFvbnV5empqZjJnVytxTm9KYndFZ2hRUjFZPSIsImFsZyI6IlJTMjU2In0.eyJzdWIiOiJiOGE2YjNhYS1kMjgyLTQzY2EtYmY1Ni1jYmY5ZjdhZDliOTUiLCJldmVudF9pZCI6IjVkMzExN2Q1LTJiOWItNGMwMi1iZDAxLWQ2ZmU1OTdmNWE1YyIsInRva2VuX3VzZSI6ImFjY2VzcyIsInNjb3BlIjoiYXdzLmNvZ25pdG8uc2lnbmluLnVzZXIuYWRtaW4iLCJhdXRoX3RpbWUiOjE1NjQ2ODcxNzgsImlzcyI6Imh0dHBzOlwvXC9jb2duaXRvLWlkcC51cy1lYXN0LTEuYW1hem9uYXdzLmNvbVwvdXMtZWFzdC0xX2J6RVp5RHZwQSIsImV4cCI6MTU2NDY5MDc3OCwiaWF0IjoxNTY0Njg3MTc4LCJqdGkiOiI4MjgyOTk0MC1mMjNjLTQxZGQtYjVlYi1mZjgxZjYwZWI4YzUiLCJjbGllbnRfaWQiOiIyNGtmMmNnZGRtYm45a2g3OG9wbG9mMTAwOSIsInVzZXJuYW1lIjoidGVzdFVzZXIifQ.PgREPvj4l6T6KeFYNlqKdd41CVhELcURXE_NhZ-WOfrtiMKqt9q_SWQ5hR_CK-MAtxz-nBJ_CoghmLcuImsIRMhyGI8NSbBUJhzakg-S5eyzV3PTxeO2Z9g76KFwZ-0ufwuhbJZKl02-CN23sVnJaFJApSR5ZlOGClSIKlqPHFTzHUA6IVCZWpasLzpIfzCMioO1Oe6l-tXR3p0OSRMH0FndIxUXP1zu1OkhM9VAboGbw7vD2dfydNkVdaDLfMmgnCG5x02A0TcZYtSFdYSmjtTG__UymWWuKqYNZd1hZPjNtIc-D24ec59hIFSTR-y6aOBO96nWSObB_Pema2AEpA
```
17. You can decode this JWT token using https://jwt.io/. Copy the JWT User Access Token that is returned in the console and open this link in a web browser
18. Paste the JWT token you copied into the encoded section of this website. It should return decoded information like the header, payload, and signature. It will look similar to this:

19. After successful authentication of your user, the game should load the next scene where you are now able to play.
Congratulations! You have now tested that the sign-up and sign-in functionality you added to your Unity game works successfully. Now you can play the game! The objective is to escape the haunted house while avoiding enemies like gargoyles and ghosts. Good luck!
[[Top](#Top)]
## Clean Up
Now that you have successfully created an Amazon Cognito user pool, added user sign-up and sign-in functionality to your Unity game, and tested it to ensure that it works, you can clean up your environment by spinning down AWS resources. This helps to ensure you are not charged for any resources that you may accidentally leave running.
1. Make sure to delete your Amazon Cognito user pool. Navigate to your user pool by selecting **Services**, then choosing **Cognito**.
2. Choose **Manage User Pools** and select the user pool you have created.
3. At the top right in general settings, you will see a **Delete pool** button. Press this to delete your user pool.
[[Top](#Top)]
## Appendix - Additional Reading
What is Amazon Cognito?
https://docs.aws.amazon.com/cognito/latest/developerguide/what-is-amazon-cognito.html
AWS SDK for .NET Developer Guide
https://docs.aws.amazon.com/sdk-for-net/v3/developer-guide/welcome.html
Amazon Game Tech blog
https://aws.amazon.com/blogs/gametech/
How to integrate the AWS .NET SDK for games using C#
https://aws.amazon.com/blogs/gametech/how-to-integrate-the-aws-net-sdk-for-games-using-csharp/