[TOC]
## Lab2 匹配和对战服务
### 0. 开发部署说明
**Workshop 中的业务代码仅做 Serverless 开发部署流程的功能性演示,非业务开发最佳实践,实际业务开发需综合考虑性能、可扩展性、可靠性、成本、安全**
在本实验中我们将开发 **Websocket** 服务以实现游戏内的匹配和对战。
在 Lab1 中我们通过 SAM 开发了 Serverless 的 HTTP 玩家创建/删除服务,在 HTML5 页面创建玩家后,可以在开发者工具页面看到客户端自动去连了一个 WSS 地址,但是因为我们并没有配置 WSS 地址所以连接 close
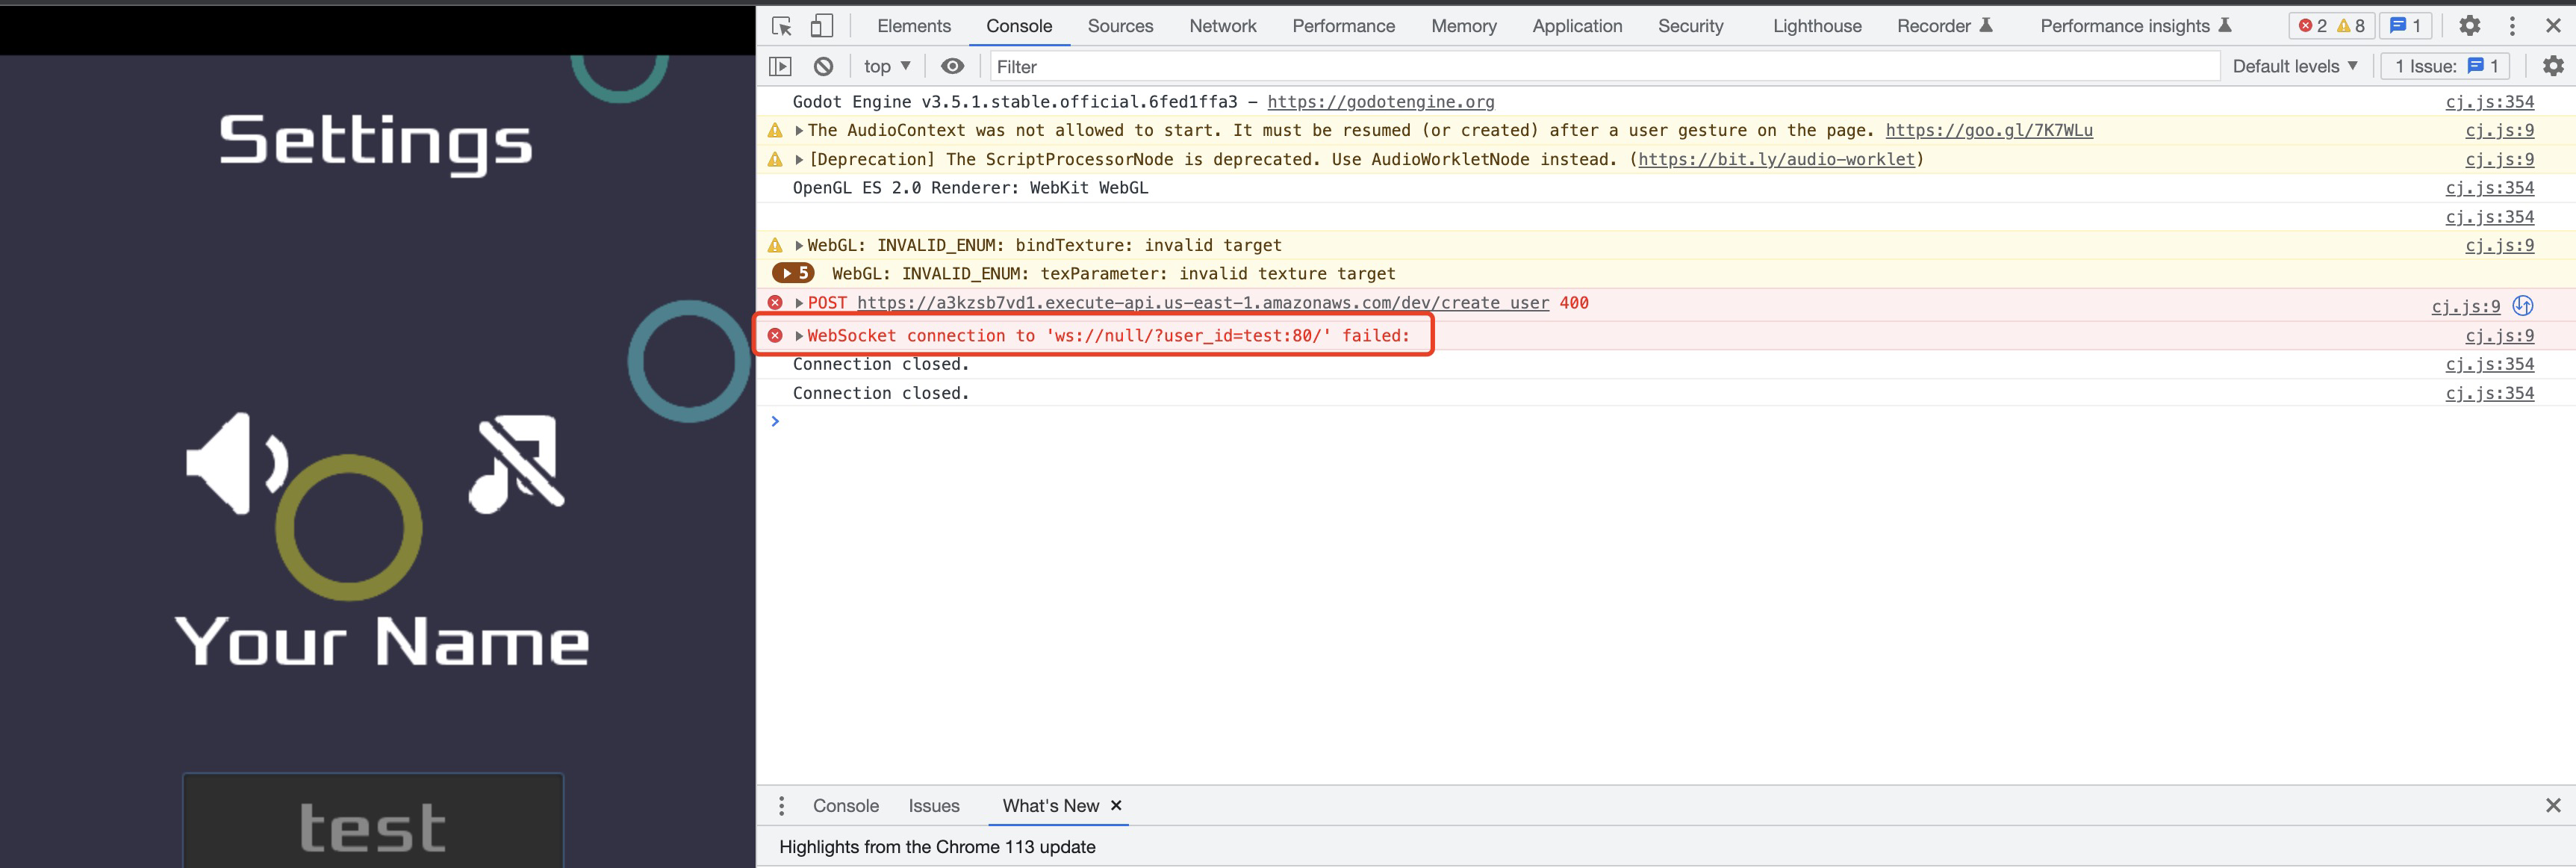 我们将在本实验中实现 Websocket 服务以提供给客户端连接
### 1. 通过 SAM template 创建一个 Websocket Hello world
#### 1.1 创建 SAM template Lambda function 资源
编辑 Lab1 的 `template.yaml`文件,添加如下内容
* 将 Role 资源改为自己创建的
```yaml
......
Resources:
###--- HTTP Service ---###
......
###--- Websocket Service ---###
MainServerFunction:
Type: AWS::Serverless::Function
Properties:
Description: 'Handle all connections'
CodeUri: main-server/
Handler: main.main_handler
Runtime: python3.9
Architectures:
- arm64
Role: "arn:aws:iam::1234567890:role/Workshop-Lambda-Role" # 修改为你自己创建的 role ARN
```
* 这里只创建了一个独立的 Lambda function 资源,没有像 Lab1 HTTP 服务那样配置 Events 触发
* 后续我们会采用另一种资源定义方法,让这个 Lambda function 被其他资源引用
#### 1.2 创建 Lambda 的代码
在 template.yaml 相同目录下创建代码目录 `main-server` ,名称对应于 template.yaml 里配置的 `Resources.MainServerFunction.Properties.CodeUri`
在 `~/Serverless-GameServer-Workshop/main-server` 目录下创建 main.py 文件,并且在 main.py 文件 中添加 main_handler 方法,名称对应于 template.yaml 里配置的 `Resources.MainServerFunction.Properties.Handler`
~/Serverless-GameServer-Workshop/main-server/main.py
```python
import json
import random
import string
def main_handler(event, context):
try:
print(event) # 通过打印event,可以在CloudWatch Log看到event的结构
# 获取routeKey
route_key = event.get('requestContext', {}).get('routeKey')
# 获取connectionId,针对每个 WebSocket 连接,API Gateway 会分配一个 connectionId
# connectionId 用于客户端和服务端之间的数据通信
connection_id = event.get('requestContext', {}).get('connectionId')
event_body = event.get('body')
event_body = json.loads(event_body if event_body is not None else '{}')
if route_key is None or connection_id is None:
return {'statusCode': 400, 'body': 'routeKey or connectionId is None'}
# Handle on connect
if route_key == '$connect':
# 如果连接时没有 user_id 参数,则生成一个随机的guest user id
tmp_guest_user_id = ''.join(random.choices(string.ascii_uppercase+string.digits, k=12))
user_id = event.get('queryStringParameters', {'user_id': tmp_guest_user_id}).get('user_id')
print(f"connect user_id: {user_id}, connection_id: {connection_id}") # 打印user_id 和 connection_id,可以在CloudWatch Log看到user_id
return {'statusCode': 200}
# Handle on disconnect
elif route_key == '$disconnect':
print(f"disconnect connection_id: {connection_id}") # 打印 connection_id,可以在CloudWatch Log看到 connection_id
return {'statusCode': 200}
else:
print("routeKey '%s' not registered" % event_body["action"])
return {'statusCode': 400}
except Exception as err:
print(err)
return {'statusCode': 500}
```
#### 1.3 使用 SAM 创建 APIGateway 资源将 Lambda function 暴露
编辑 `template.yaml`文件,添加如下内容
```yaml
......
Resources:
###--- HTTP Service ---###
......
###--- Websocket Service ---###
# MainServer Websocket 服务的 APIGateway
MainEntry:
Type: AWS::ApiGatewayV2::Api
Properties:
Name: Workshop-MainEntry
ProtocolType: WEBSOCKET
RouteSelectionExpression: "$request.body.action"
# APIGateway 的 stage
Stage:
Type: AWS::ApiGatewayV2::Stage
Properties:
StageName: dev
Description: "dev env"
ApiId: !Ref MainEntry
MainServerFunction:
......
# APIGateway 的 Integration 资源,用于连接 Lambda 和 Websocket APIGateway 的 route
MainServerIntegration:
Type: AWS::ApiGatewayV2::Integration
Properties:
ApiId: !Ref MainEntry
IntegrationType: AWS_PROXY
IntegrationUri: !Join
- ''
- - 'arn:'
- !Ref AWS::Partition
- ':apigateway:'
- !Ref AWS::Region
- ':lambda:path/2015-03-31/functions/'
- !GetAtt MainServerFunction.Arn
- '/invocations'
# 默认的 APIGateway route
DefaultRoute:
Type: AWS::ApiGatewayV2::Route
Properties:
ApiId: !Ref MainEntry
RouteKey: "$default"
AuthorizationType: NONE
OperationName: DefaultRoute
Target: !Join
- '/'
- - 'integrations'
- !Ref MainServerIntegration
# Websocket client 连接时的 route
ConnectRoute:
Type: AWS::ApiGatewayV2::Route
Properties:
ApiId: !Ref MainEntry
RouteKey: "$connect"
AuthorizationType: NONE
OperationName: ConnectRoute
Target: !Join
- '/'
- - 'integrations'
- !Ref MainServerIntegration
# Websocket client 连接时的 route
DisconnectRoute:
Type: AWS::ApiGatewayV2::Route
Properties:
ApiId: !Ref MainEntry
RouteKey: "$disconnect"
AuthorizationType: NONE
OperationName: DisconnectRoute
Target: !Join
- '/'
- - 'integrations'
- !Ref MainServerIntegration
```
执行 sam sync 同步资源到云上
```shell
sam sync --stack-name Serverless-GameServer-Workshop
```
#### 1.1.4 检查资源创建结果
分别在控制台查看 SAM 创建的 APIGateway 和 Lambda
**APIGateway**


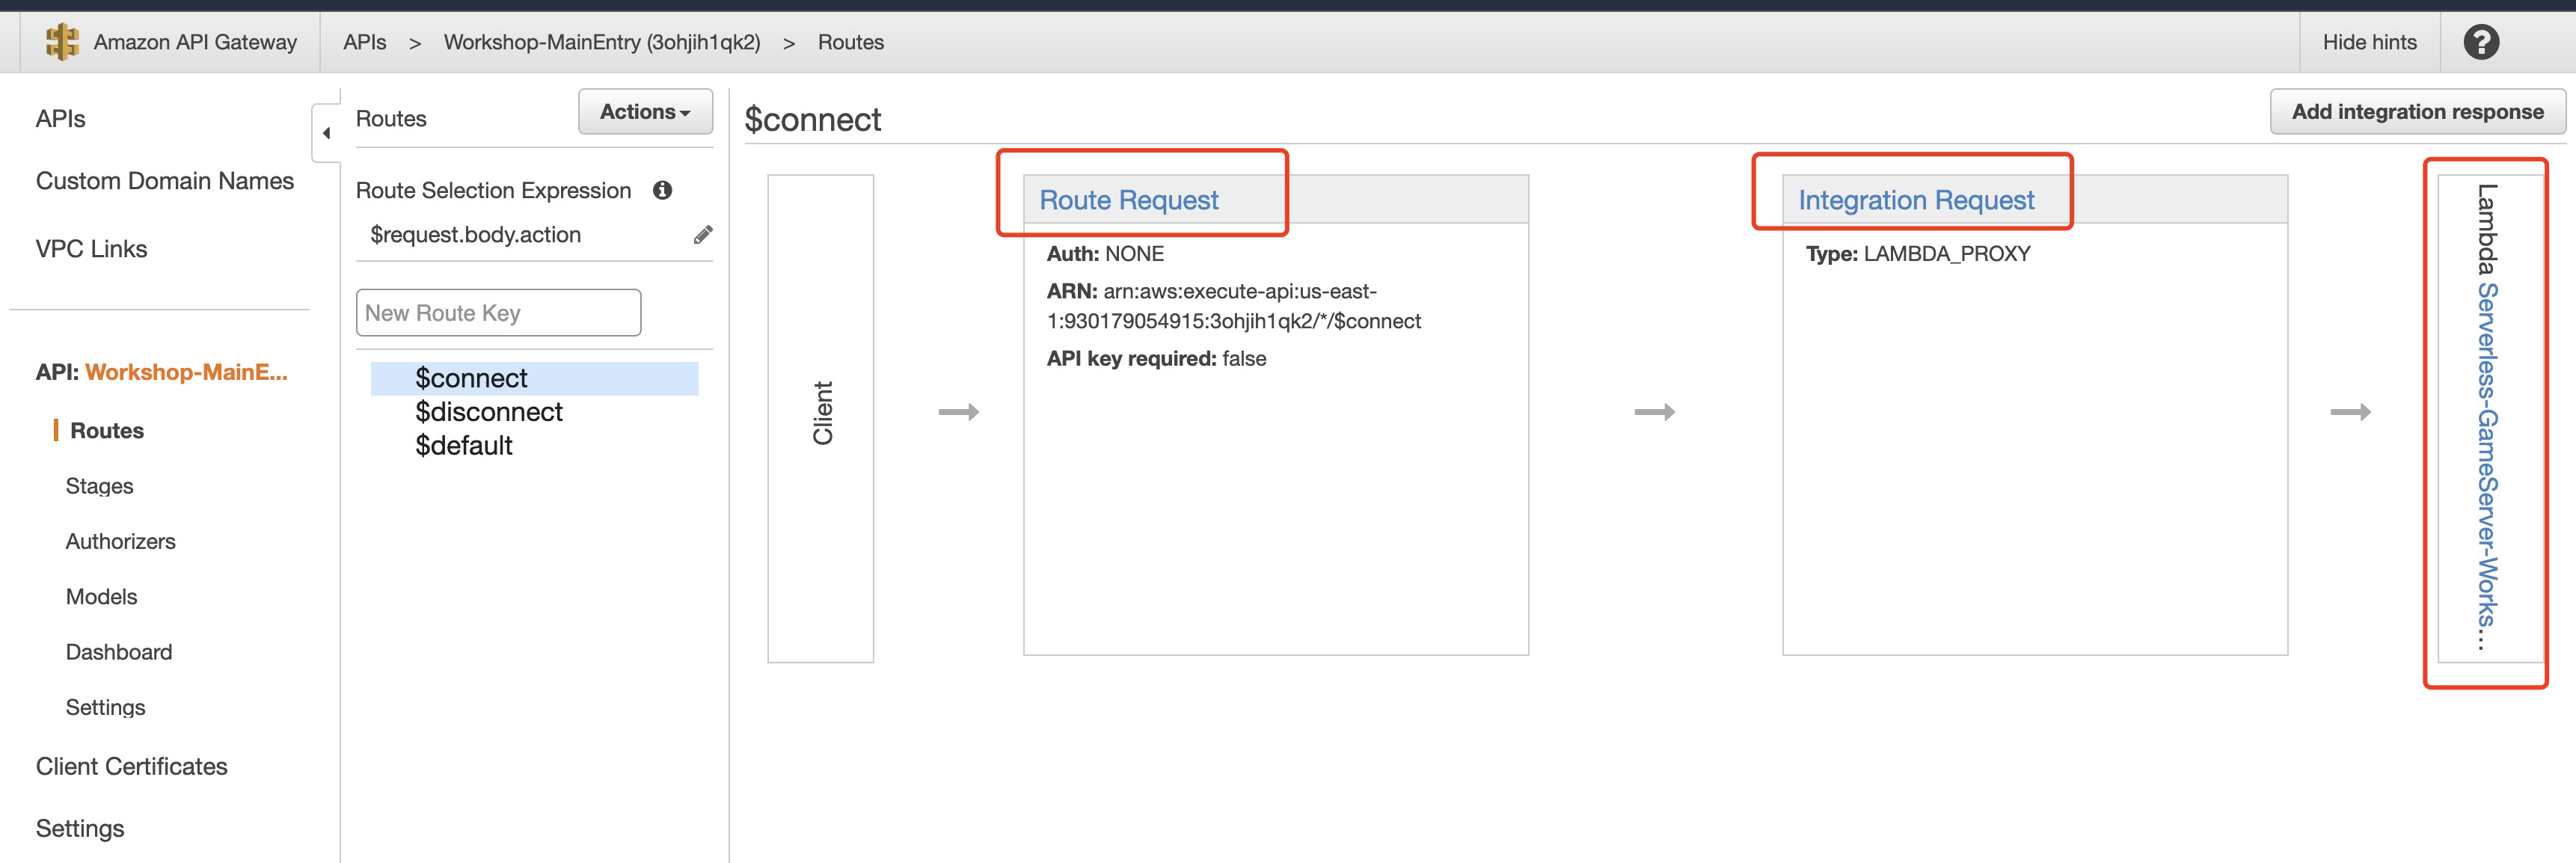
* 通过 APIGateway Integration 将客户端请求转发给 Lambda
**Lambda**
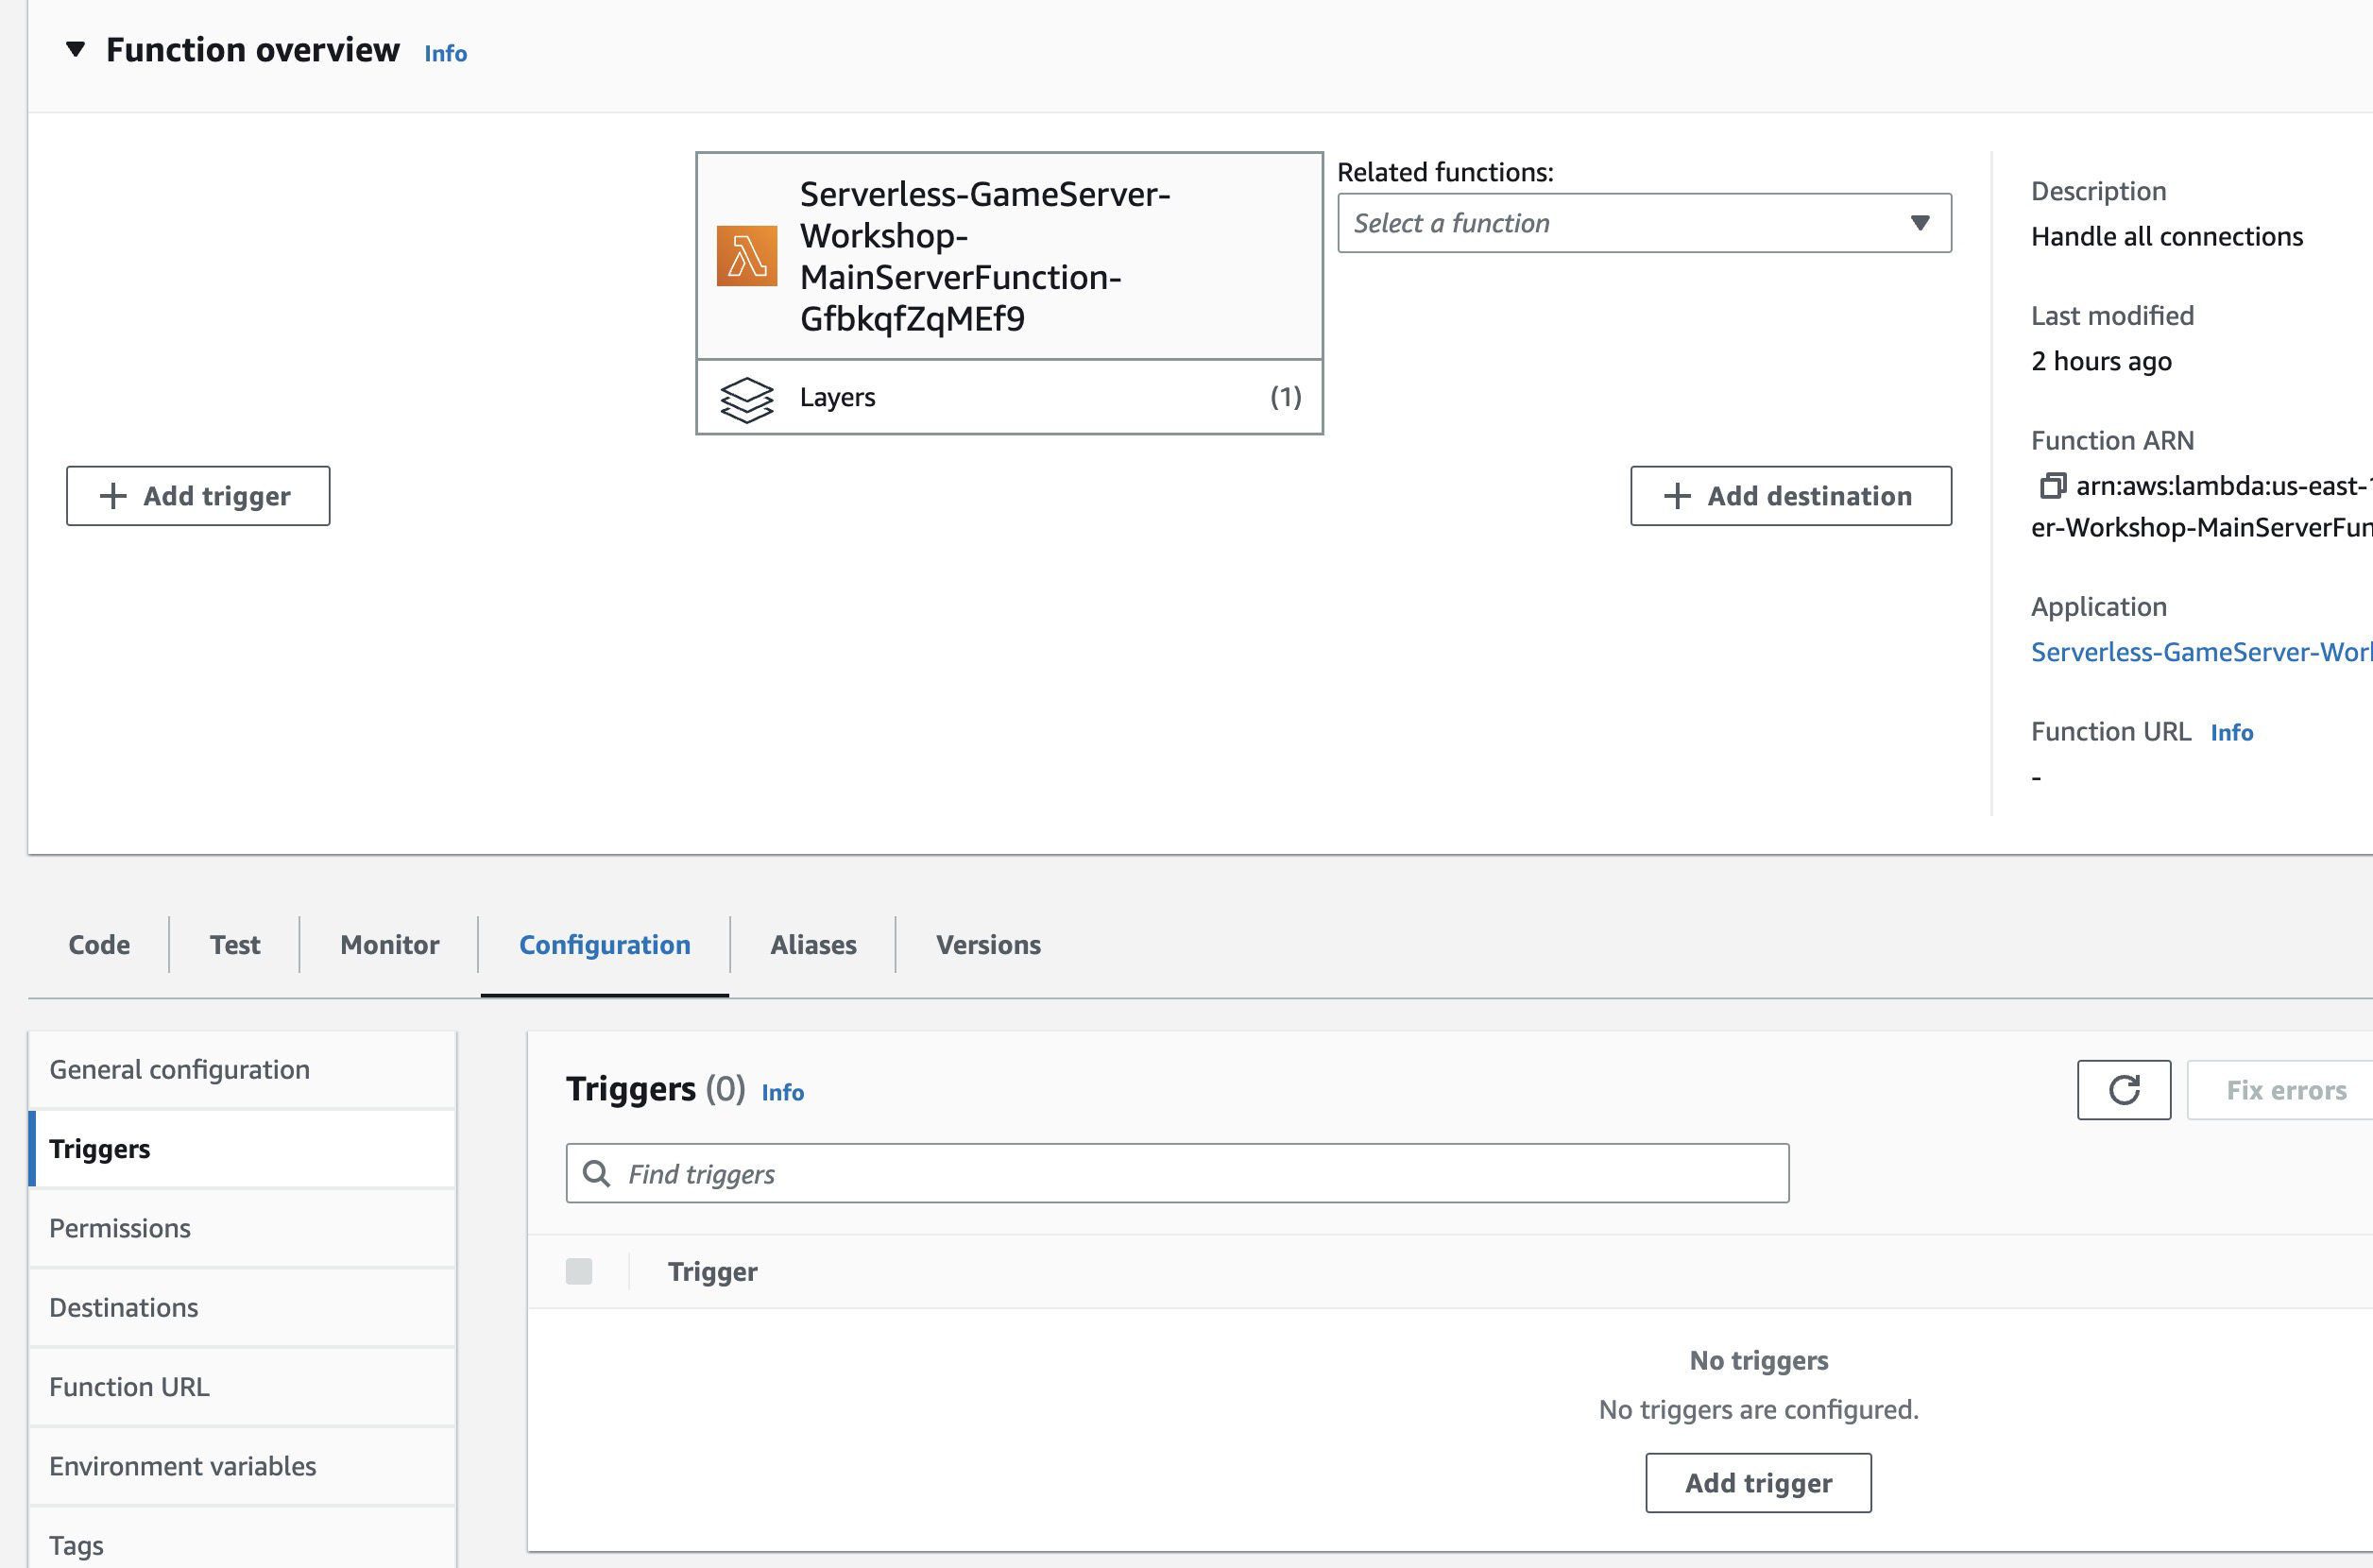
* 可以看到**没有在 Lambda 资源里配置 Events 属性,控制台上看到的 Lambda trigger 为空**
* 这个 Lambda 是通过 APIGateway 的 Integration 来将 APIGateway 和它连接起来
#### 1.5 用 wscat 测试 Websocket 服务
参考[《Use wscat to connect to a WebSocket API and send messages to it》](https://docs.aws.amazon.com/apigateway/latest/developerguide/apigateway-how-to-call-websocket-api-wscat.html)安装 wscat
通过 wscat 命令连接 APIGateway
```shell
~: wscat -c wss://aabbcc.execute-api.us-east-1.amazonaws.com/dev
error: Unexpected server response: 403
> %
```
* 客户端连接 APIGateway 返回 403
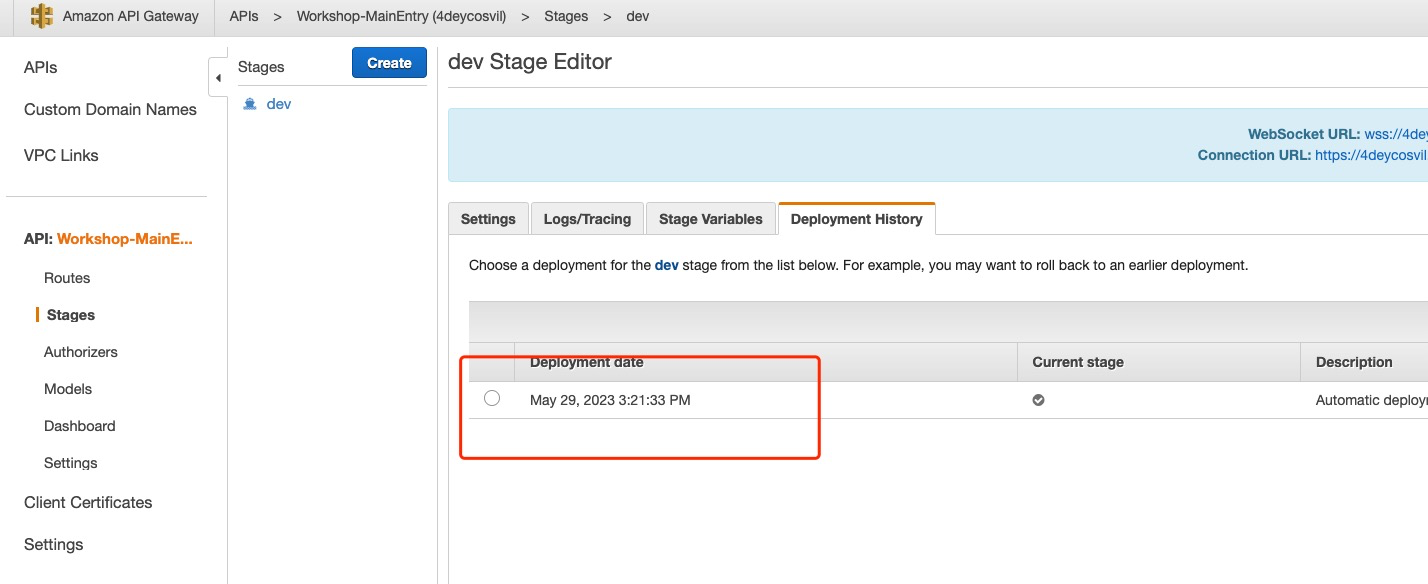
查看 APIGateway Deployment

* Deployment 为空,APIGateway 尚未部署
#### 1.6 部署 APIGateway 并再次测试 Websocket 服务
编辑`template.yaml`,给`Resources.Stage.Properties`添加AutoDeploy属性
```yaml
Resources:
......
# APIGateway 的 stage
Stage:
Type: AWS::ApiGatewayV2::Stage
Properties:
StageName: dev
Description: "dev env"
ApiId: !Ref MainEntry
AutoDeploy: true
```
* 给 Stage 添加 AutoDeploy 属性后,Stage 的任何变更都会自动 Deploy,访问 Stage 的 URL 即可访问到最新的 APIGateway + Lambda
执行 sam sync 同步资源到云上
```shell
sam sync --stack-name Serverless-GameServer-Workshop
```
查看资源创建结果
通过 wscat 命令连接 APIGateway
```shell
~: wscat -c wss://aabbcc.execute-api.us-east-1.amazonaws.com/dev
error: Unexpected server response: 500
> %
```
* 客户端连接 APIGateway 返回 500
#### 1.7 开启 APIGateway Execution Log 排查问题
##### 1.7.1 启用 APIGateway Execution Logs
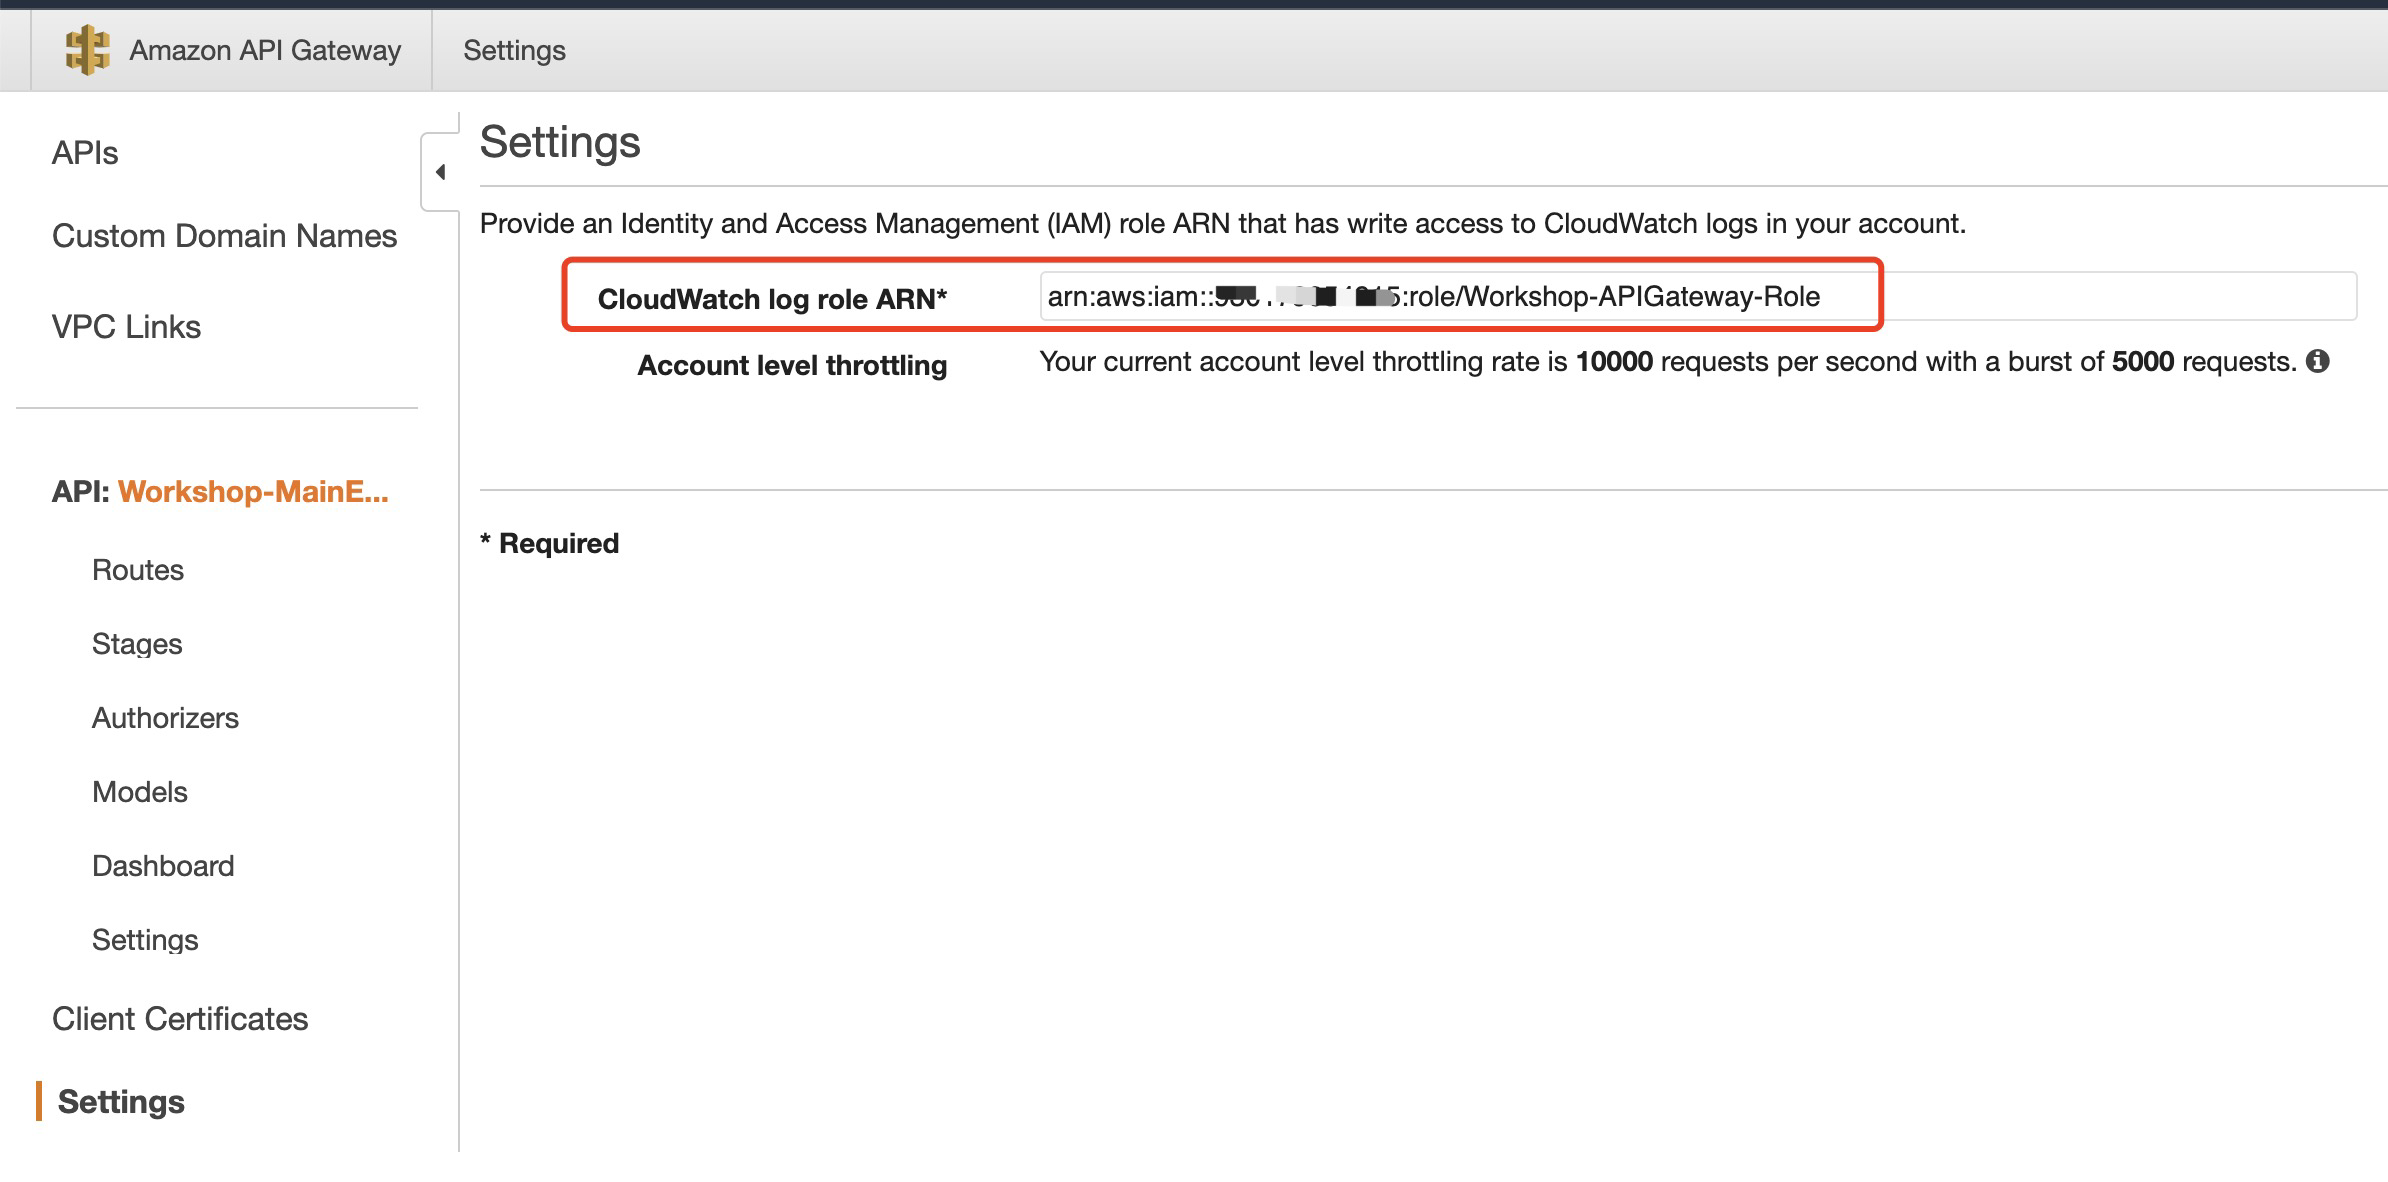
在 console 启用 APIGateway 的执行日志
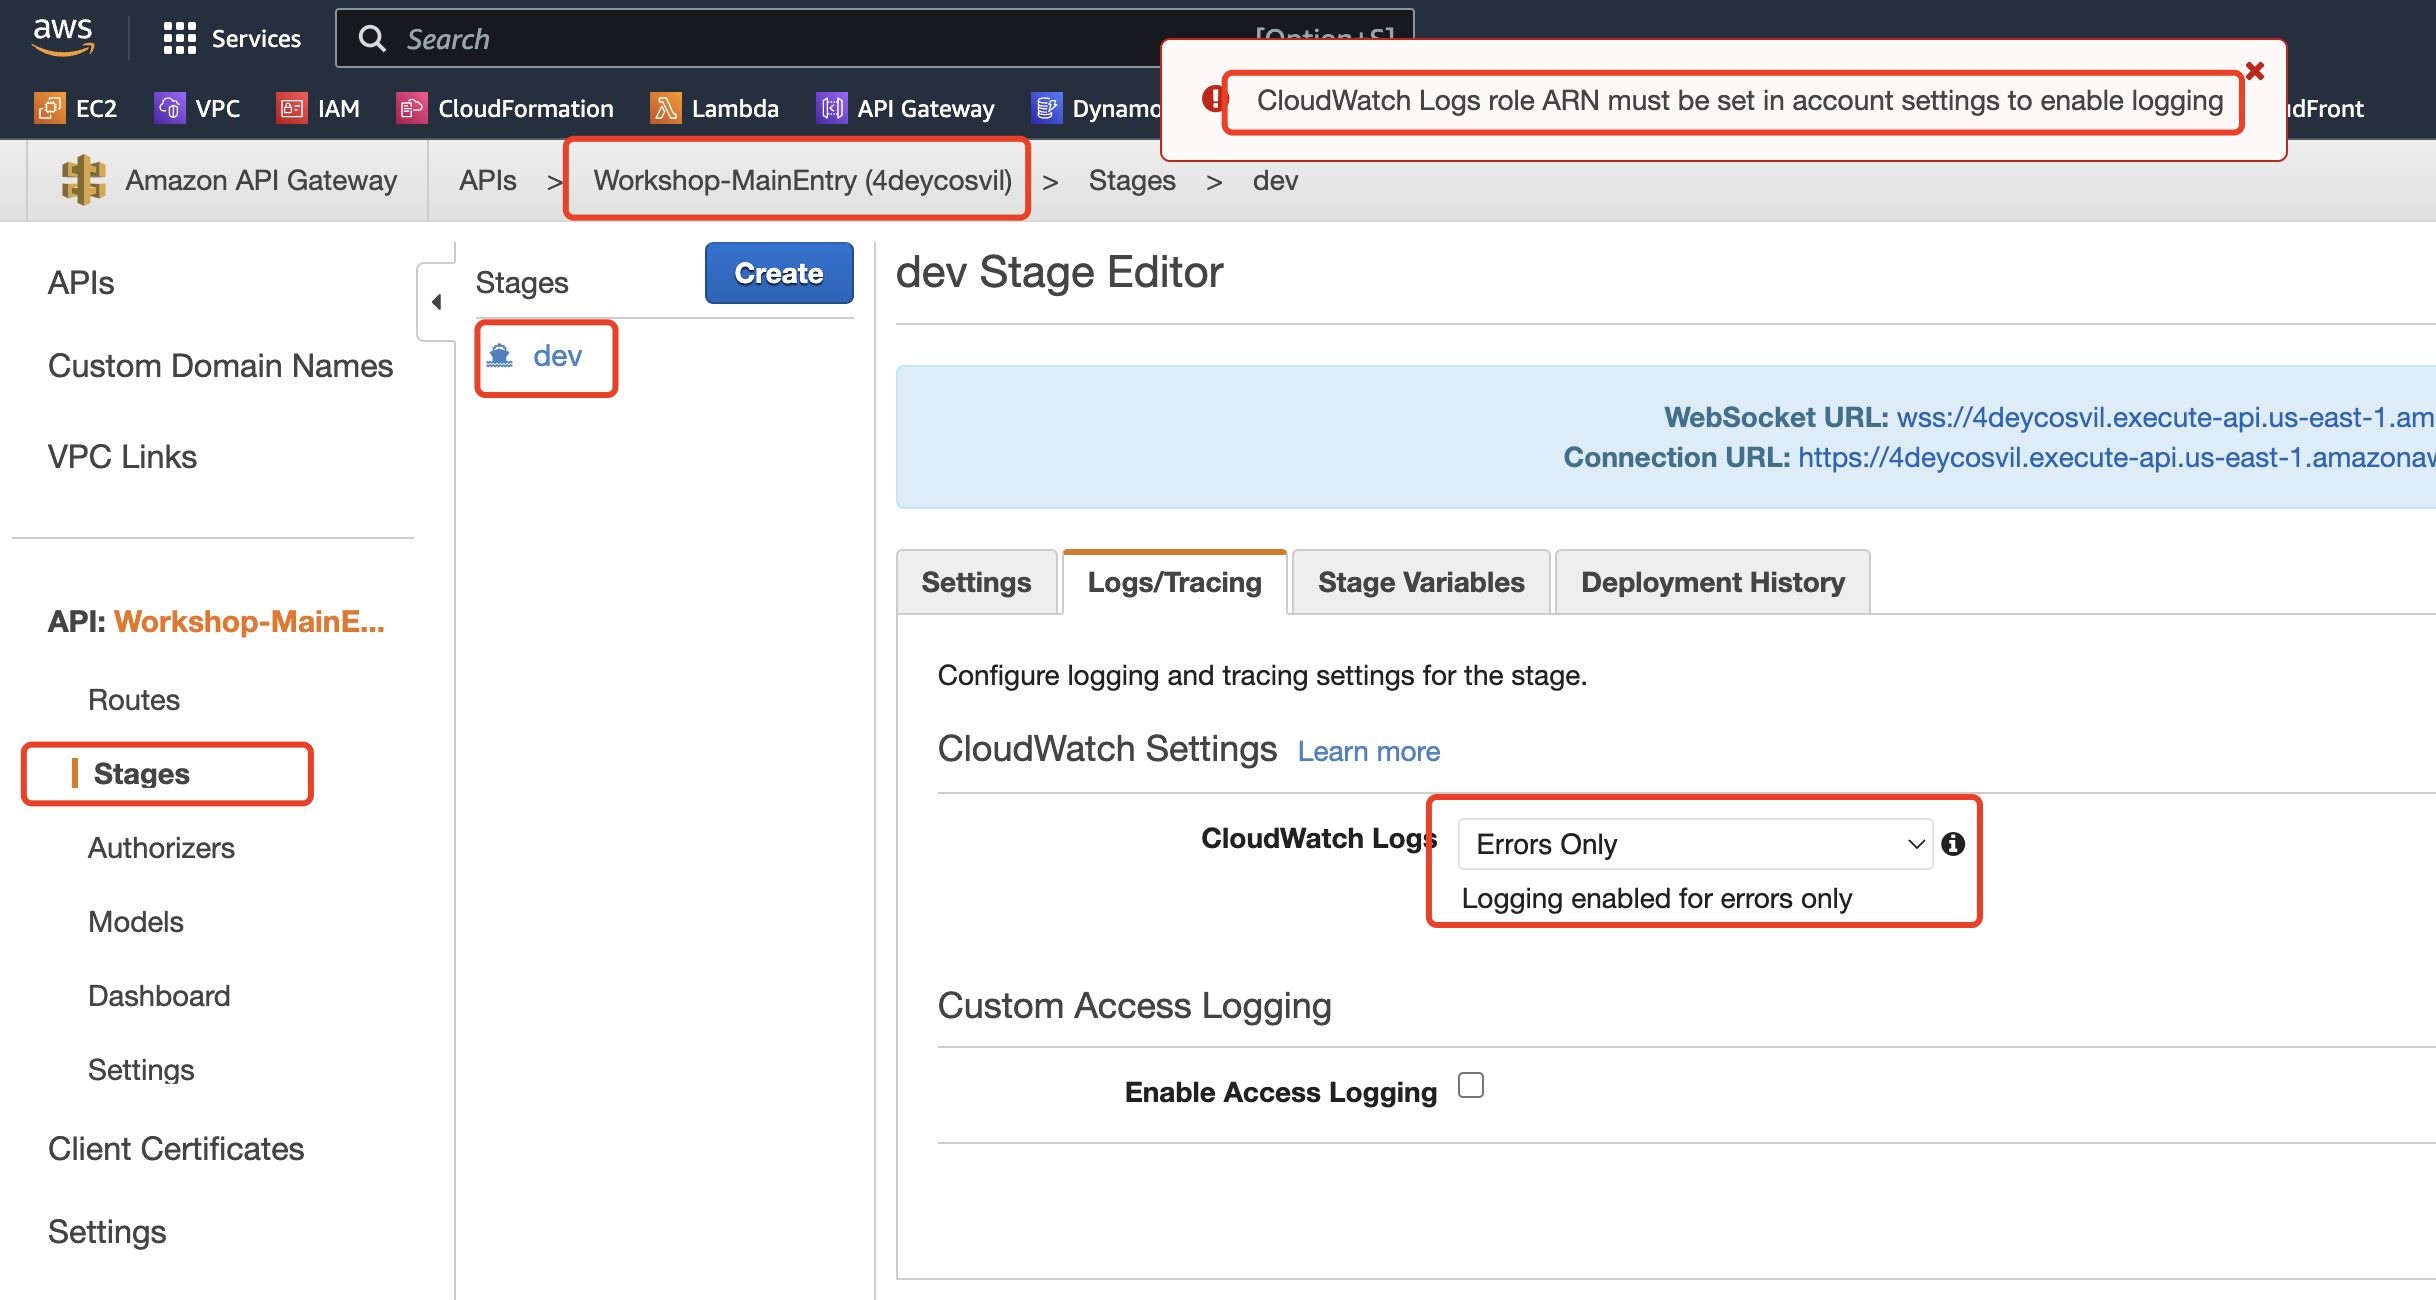
* 启用 APIGateway 执行日志之前,要先配置一个 role 让 APIGateway 有权限向 CloudWatch Log 写入日志
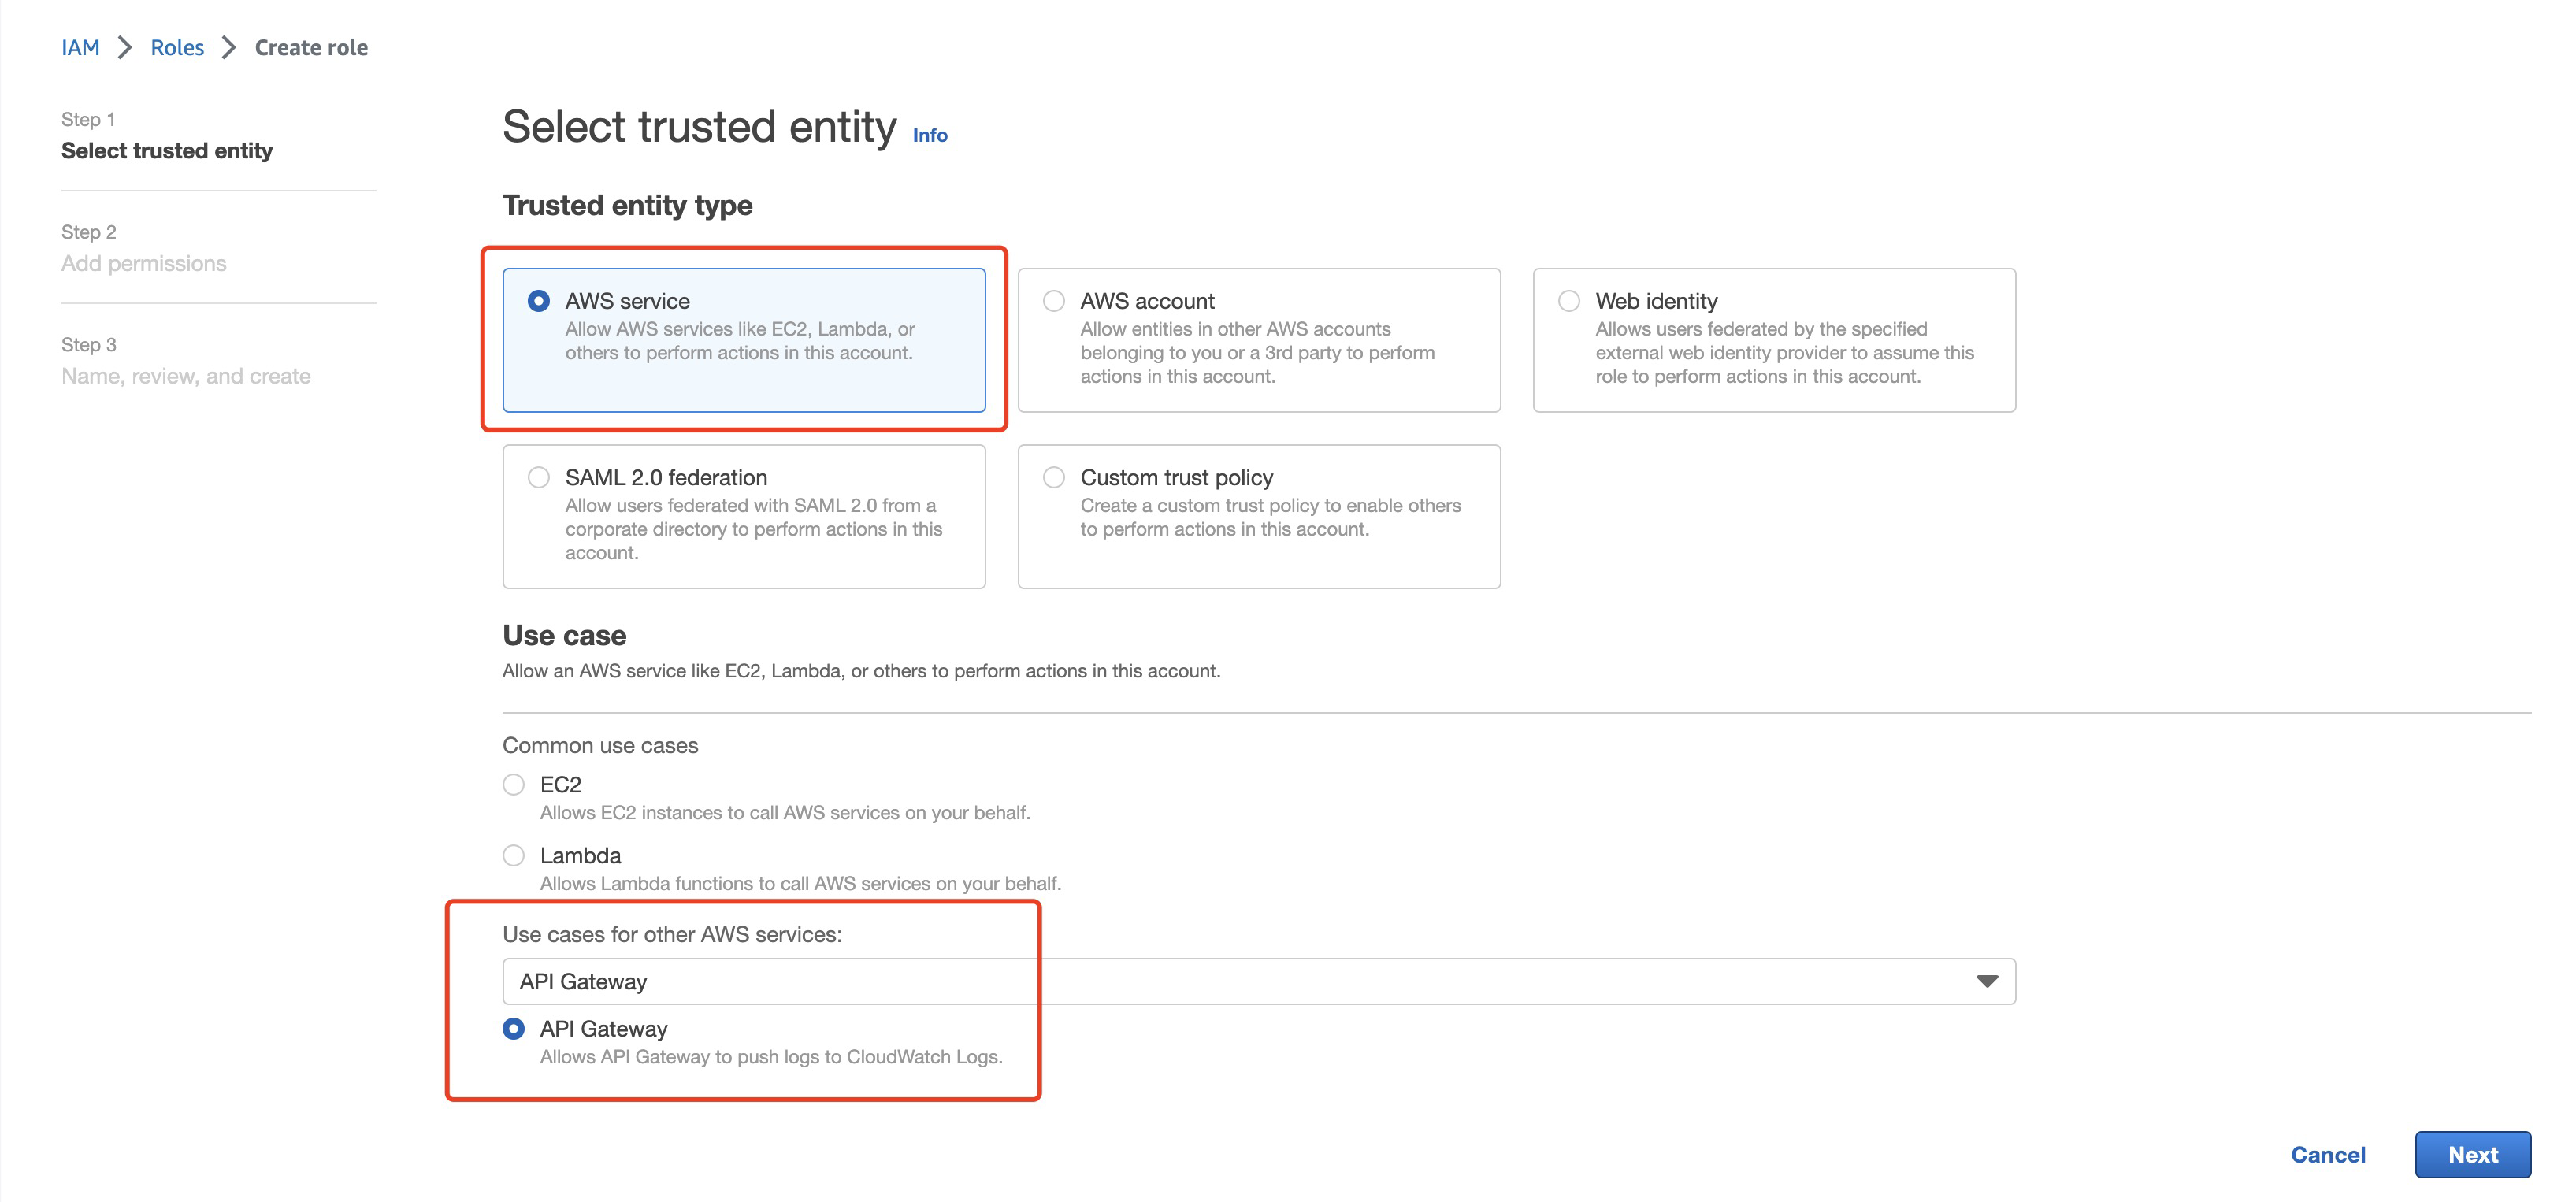
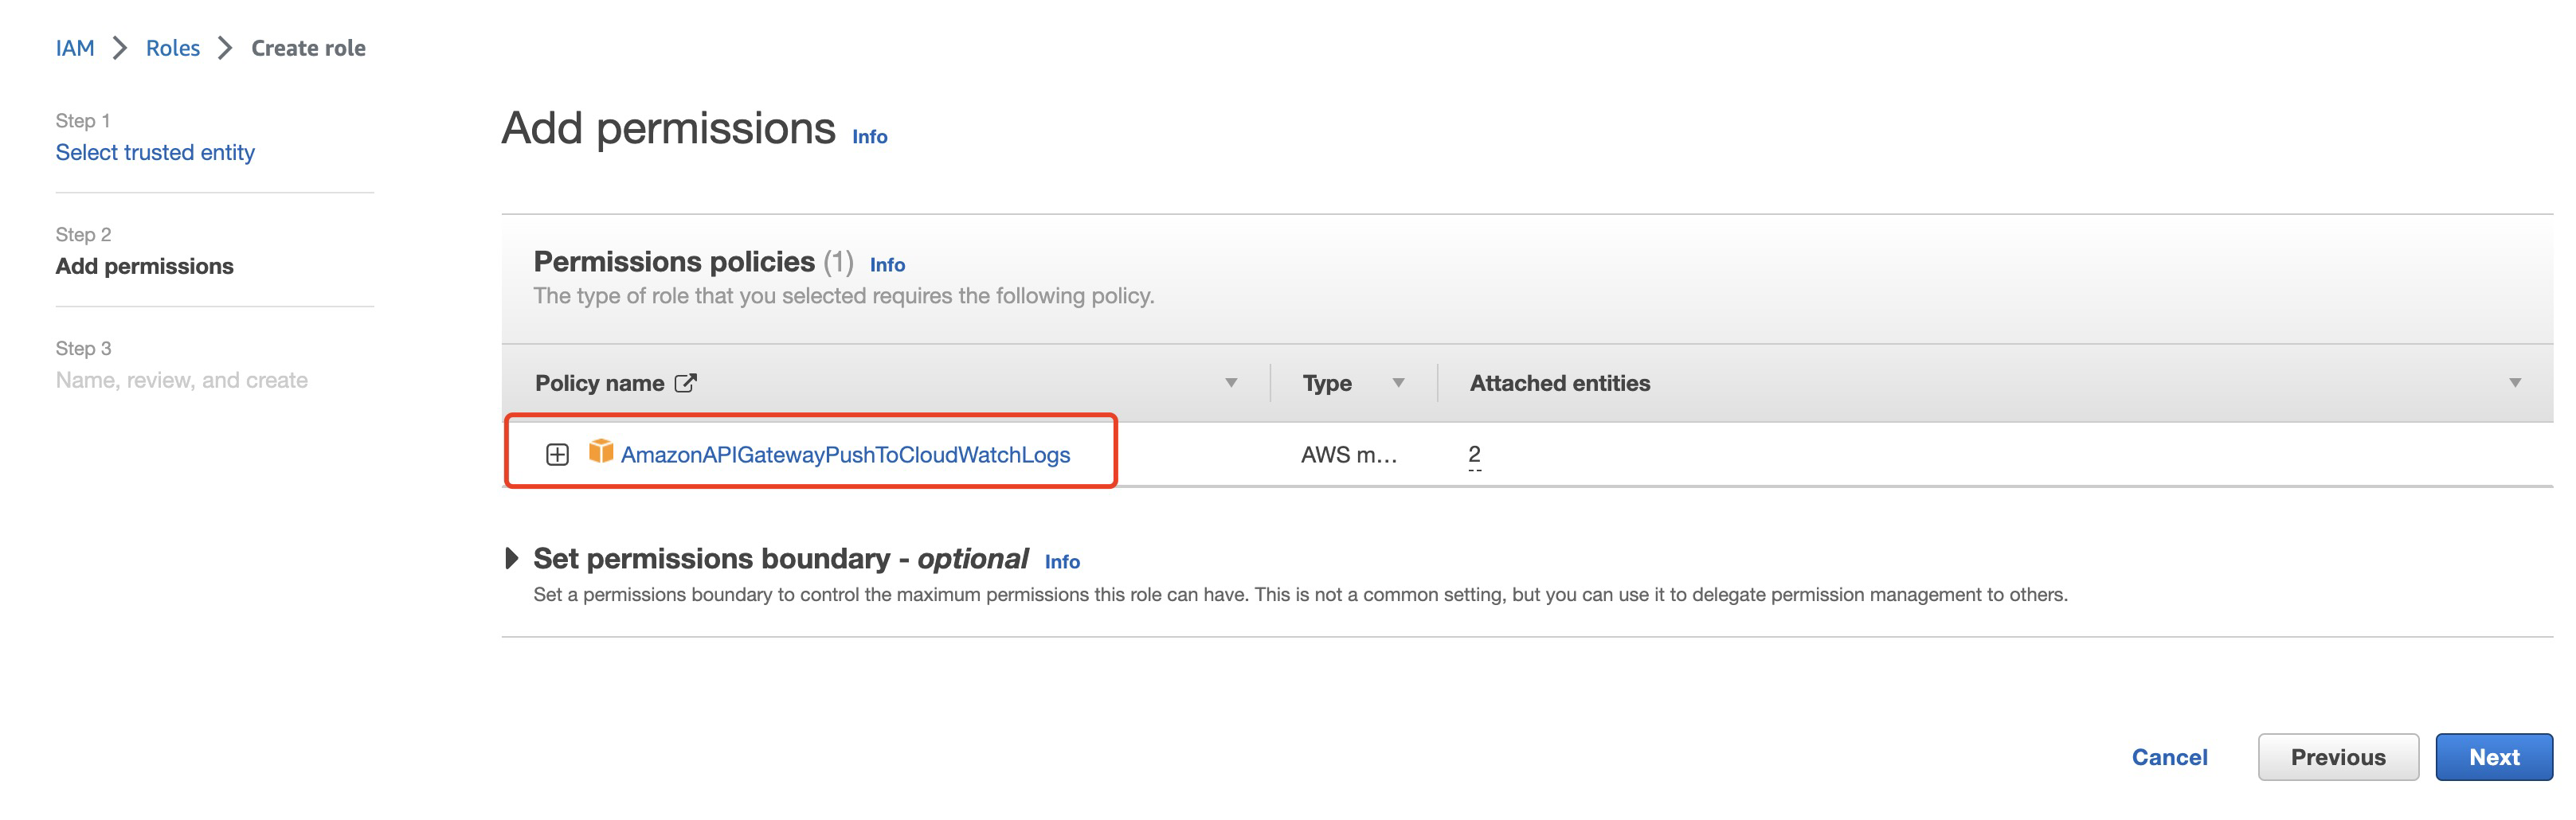
##### 1.7.2 创建 role 并赋给 APIGateway
**创建 role**

**将 role 赋值给 APIGateway**
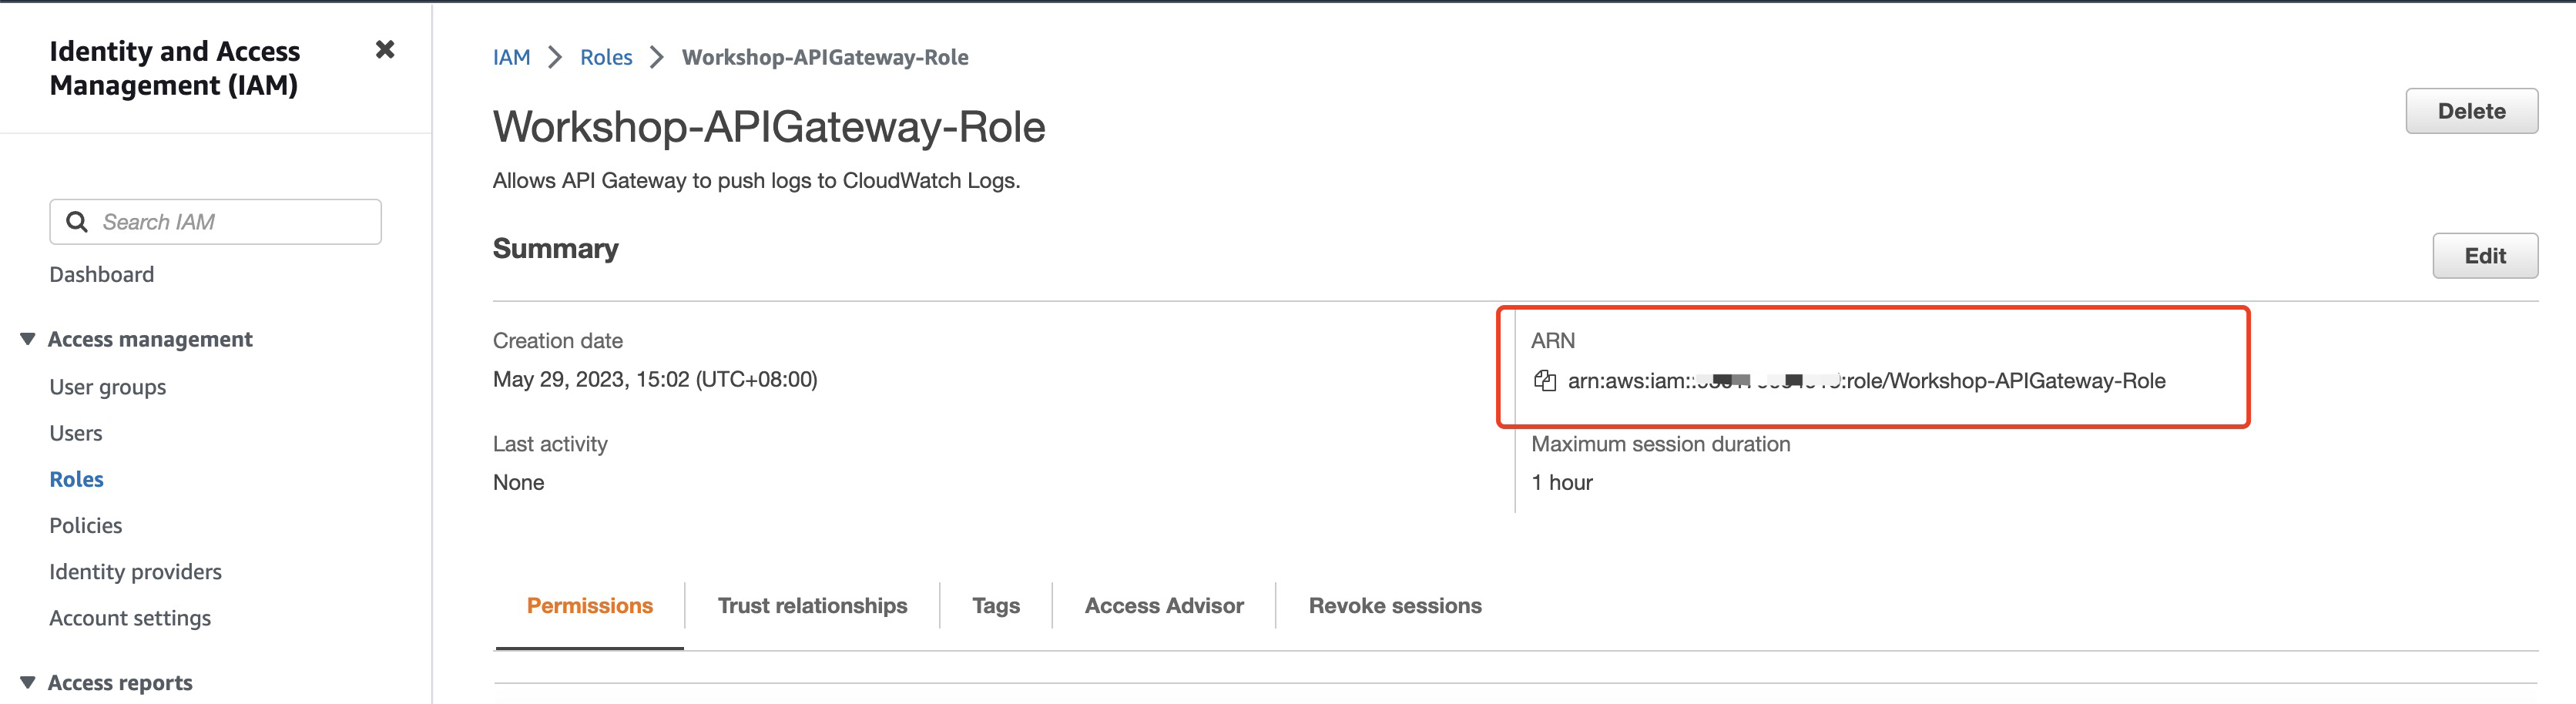
复制刚刚创建 role 的 ARN 配置到 APIGateway,Save
##### 1.7.3 启用 APIGateway Execution Log

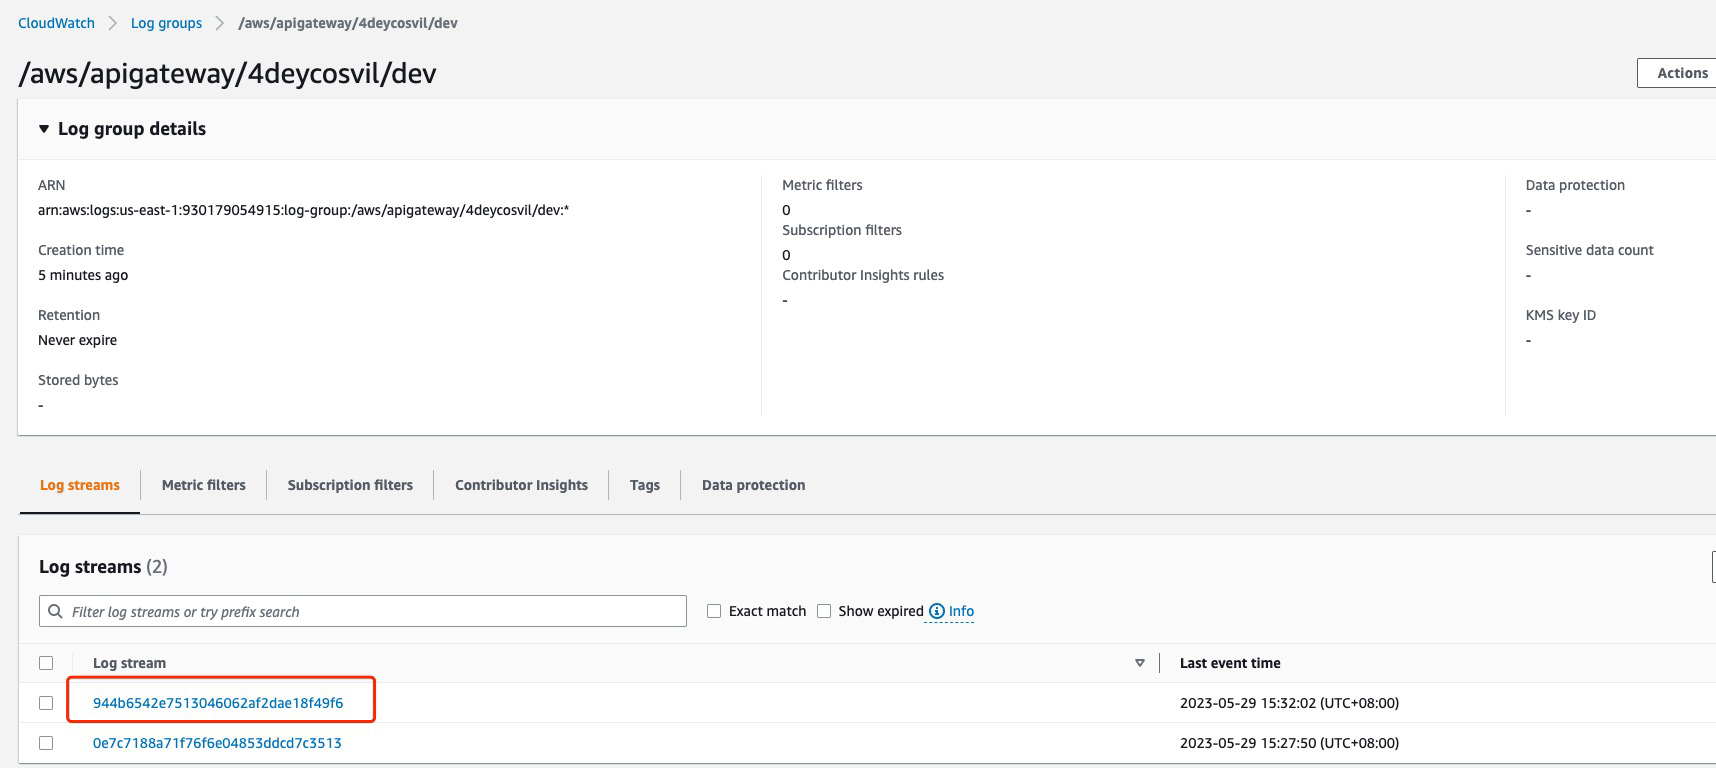
##### 1.7.4 重新访问 Websocket 查看日志
```
~: wscat -c wss://aabbcc.execute-api.us-east-1.amazonaws.com/dev
error: Unexpected server response: 500
> %
```
**第一次查看日志可能会有 2min 延迟**

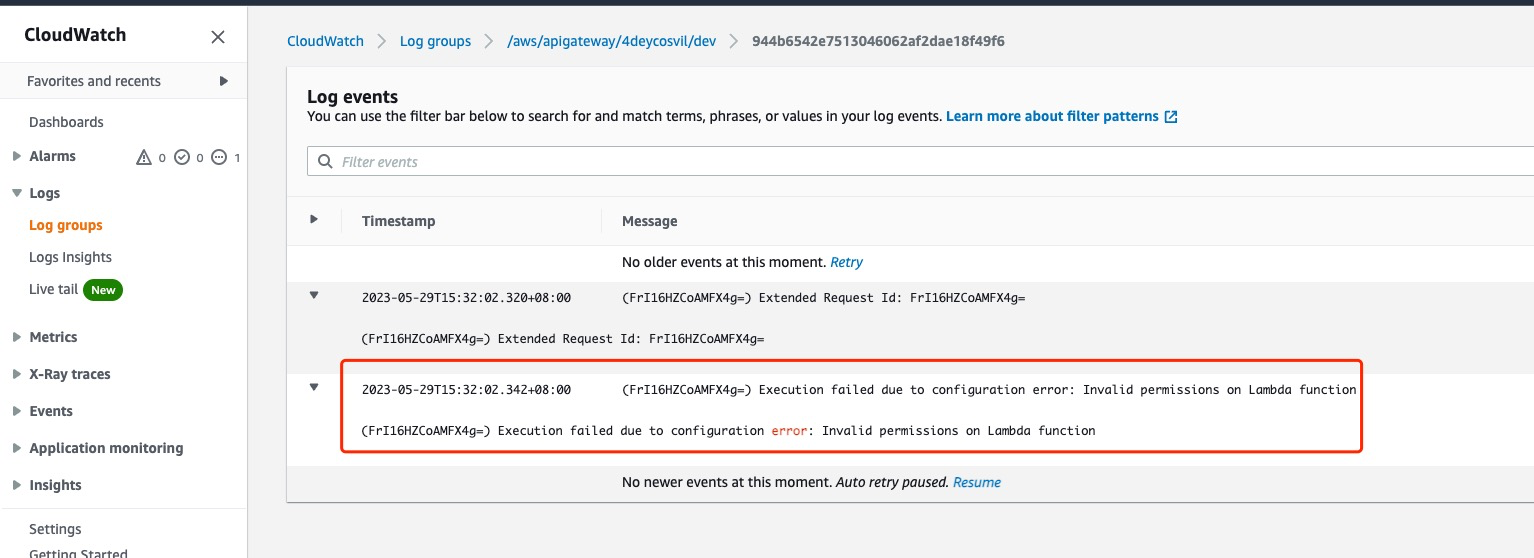
* **发现是 APIGateway 调用 Lambda 的时候没有权限**
#### 1.8 为 Lambda 配置 Resource-based policy
对比 Lab1 创建的 Lambda 和 Lab2 创建的 Lambda 两者 Permission 的配置
**Lab1**
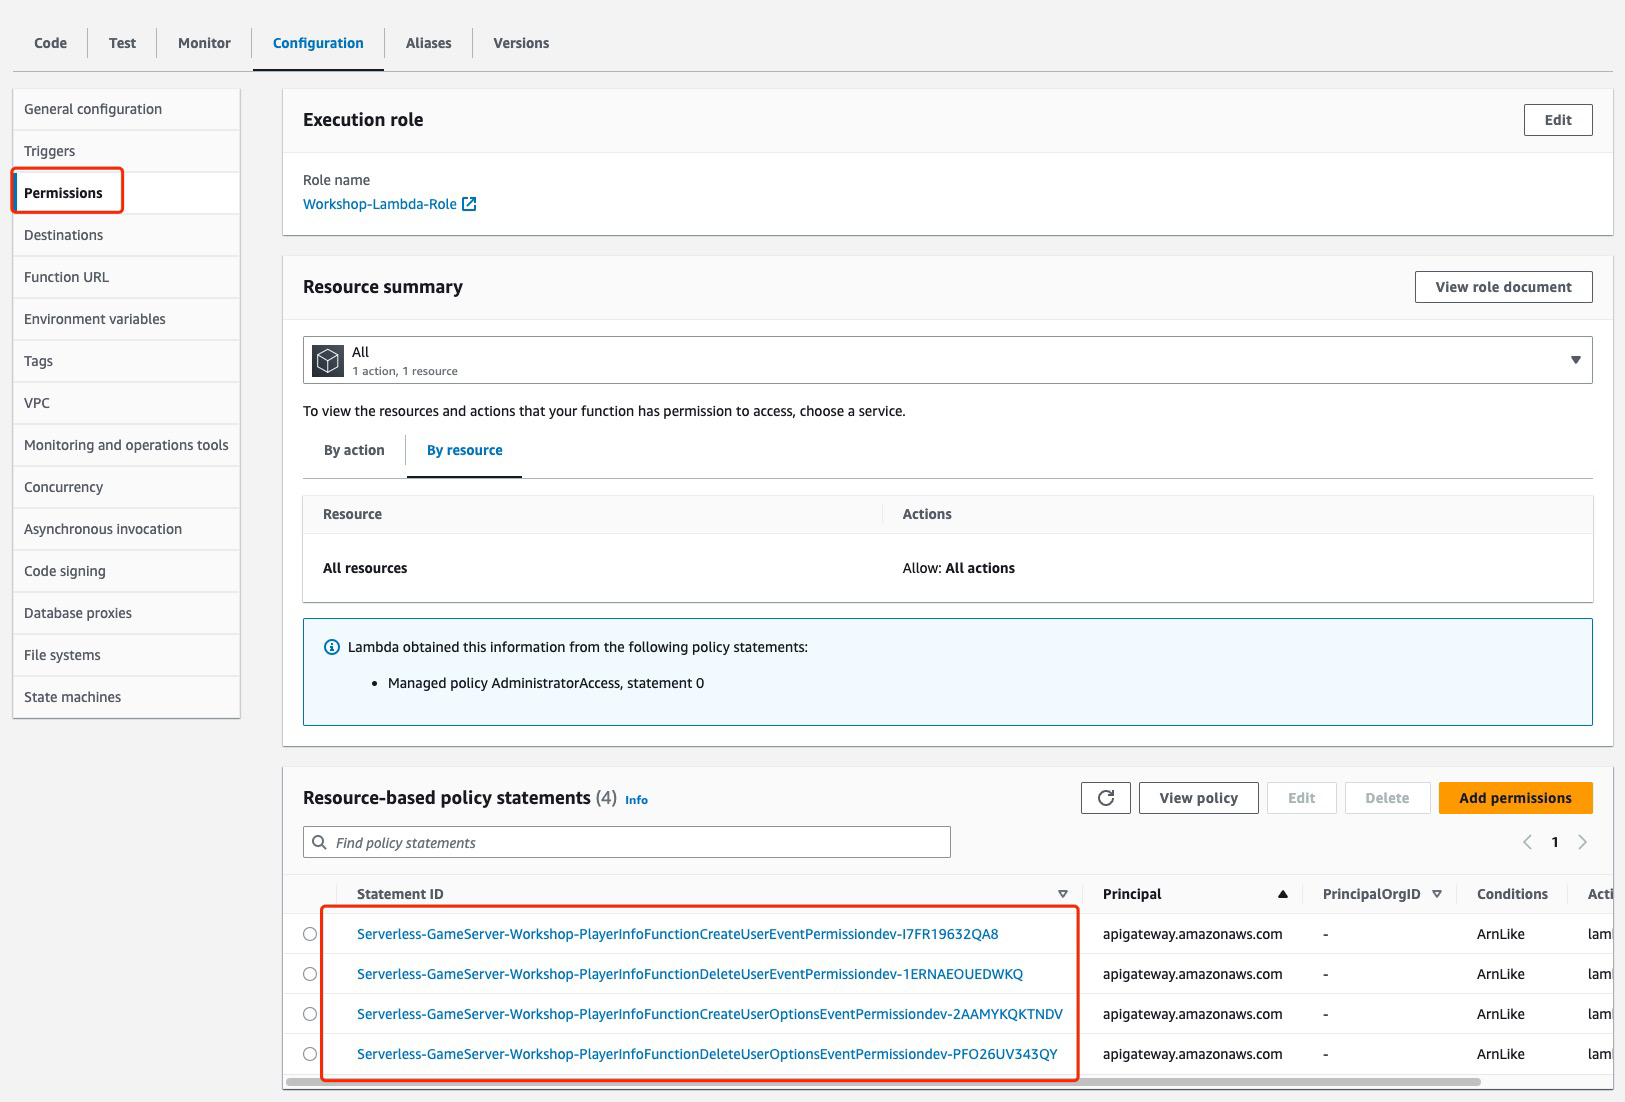
**Lab2**
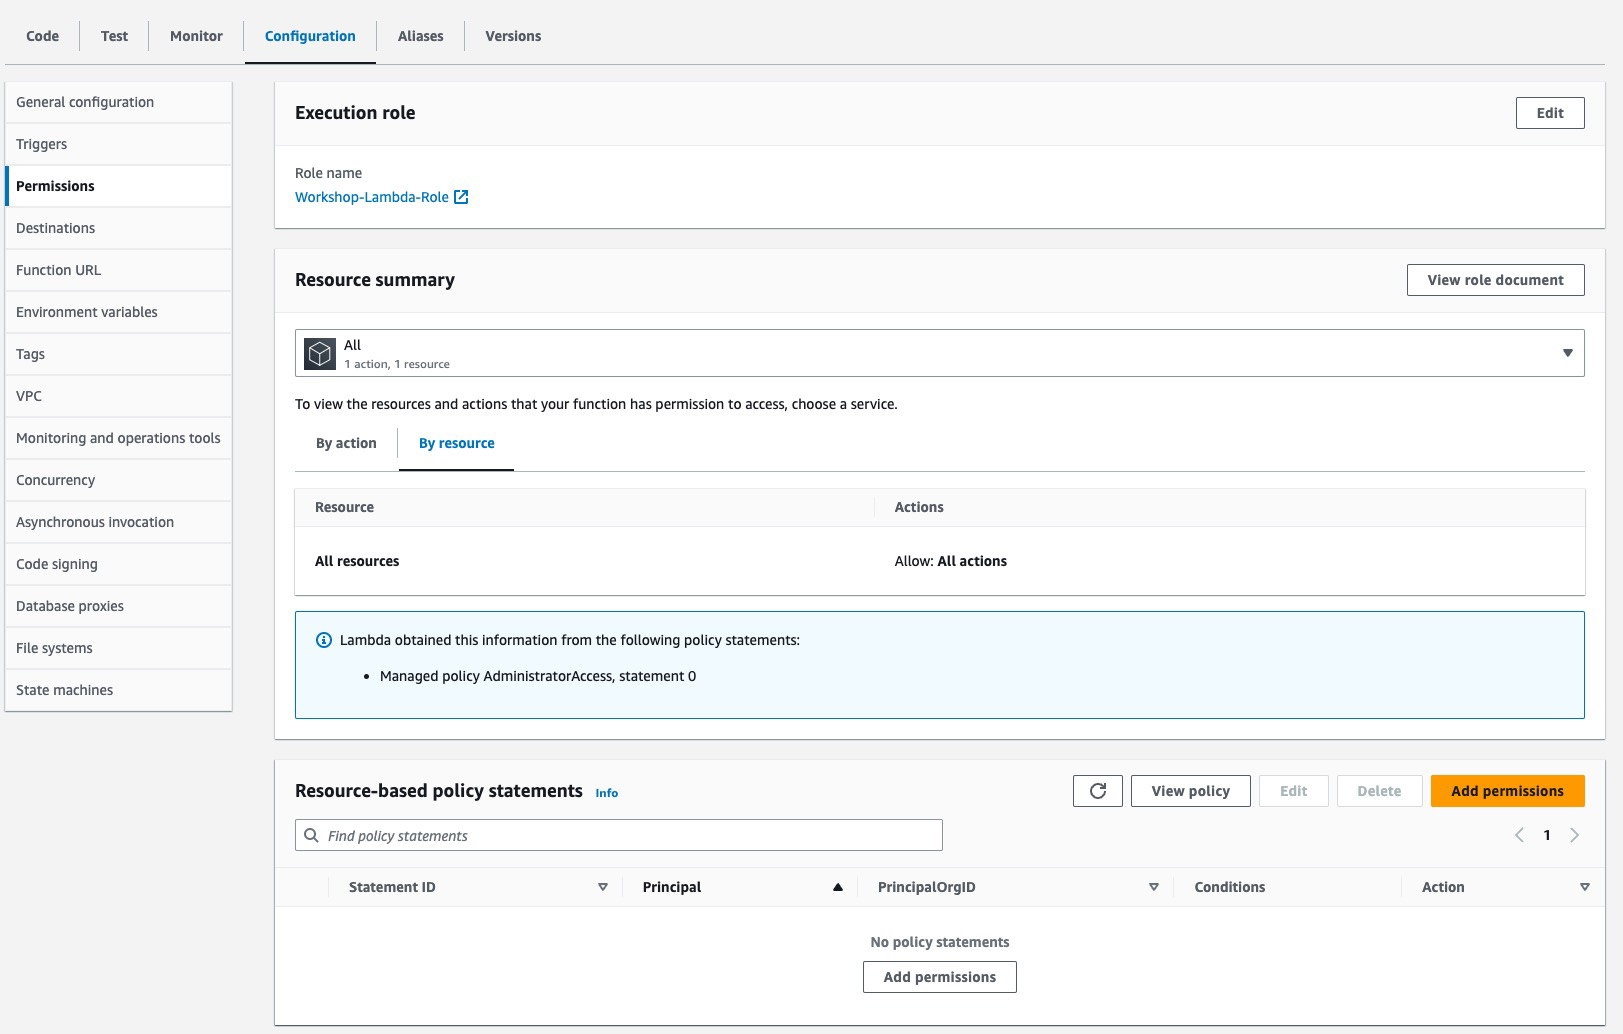
* 因为 Lab1 的 Lambda 配置了 Event trigger,所以自动创建了 resource-based policy
* Lab2 的 Lambda 是一个独立的资源没有配置 Event trigger,所以没有 resource-based policy,导致 APIGateway 没有权限去调用它
编辑`template.yaml`,添加 Lambda 的 Permission
```yaml
......
Resources:
###--- HTTP Service ---###
......
###--- Websocket Service ---###
......
# APIGateway 调用 Lambda 的 resource-based policy
MainServerPermission:
Type: AWS::Lambda::Permission
DependsOn:
- MainEntry
Properties:
Action: lambda:InvokeFunction
FunctionName: !Ref MainServerFunction
Principal: apigateway.amazonaws.com
```
执行 sam sync 同步资源到云上
```shell
sam sync --stack-name Serverless-GameServer-Workshop
```
查看资源创建结果

#### 1.8 测试 Websocket Hello World
通过 wscat 命令连接 APIGateway
```shell
~: wscat -c wss://aabbcc.execute-api.us-east-1.amazonaws.com/dev
Connected (press CTRL+C to quit)
> %
~:
```
查看 Websocket Lambda 日志(注意 log group 不是之前 PlayerInfo 的 log group)

* 在 wss URL 里没有加上 user_id 的 query string,服务端自动创建了一个 user_id
通过 wscat 命令连接 APIGateway
```shell
~: wscat -c "wss://aabbcc.execute-api.us-east-1.amazonaws.com/dev?user_id=testuser"
Connected (press CTRL+C to quit)
> %
~:
```

至此 Websocket Hello World 服务部署完成
### 2. 使用 Dynamodb 管理 Websocket 连接
在本节我们会使用 Dynamodb 来存储 connection_id 和 user_id 的对应关系:
1. 客户端和服务端通过 connection_id 进行数据传输
2. 客户端通过在请求中加入 user_id 来标识自己其它玩家
3. 服务端通过 connection_id 和 user_id 的对应关系来对不同玩家传输数据
#### 2.1 创建 Dynamodb table 用于存储 connection_id 和 user_id 对应关系
编辑`template.yaml`,如 Lab1 添加 Dynamodb 资源
```yaml
......
Resources:
###--- HTTP Service ---###
......
###--- Websocket Service ---###
......
# Dynamodb 用于存储 connection_id 和 user_id 对应关系
MainServerTable:
Type: AWS::DynamoDB::Table
Properties:
AttributeDefinitions:
- AttributeName: "connection_id"
AttributeType: "S"
KeySchema:
- AttributeName: "connection_id"
KeyType: "HASH"
ProvisionedThroughput:
ReadCapacityUnits: 5
WriteCapacityUnits: 5
SSESpecification:
SSEEnabled: True
TableName: "main_server"
```
编辑`~/Serverless-GameServer-Workshop/main-server/main.py`,修改 handler 代码
```python
......
import boto3
# main_server 为表名对应于 template.yaml 中的 Resources -> MainServerTable -> Properties -> TableName
main_server_table = boto3.resource('dynamodb').Table("main_server")
def main_handler(event, context):
try:
....
if route_key == '$connect':
# 如果连接时没有 user_id 参数,则生成一个随机的guest user id
tmp_guest_user_id = ''.join(random.choices(string.ascii_uppercase+string.digits, k=12))
user_id = event.get('queryStringParameters', {'user_id': tmp_guest_user_id}).get('user_id')
main_server_table.put_item(Item={'user_id': user_id, 'connection_id': connection_id})
print(f"connect user_id: {user_id}, connection_id: {connection_id}") # 打印user_id 和 connection_id,可以在CloudWatch Log看到user_id
return {'statusCode': 200}
# Handle on disconnect
elif route_key == '$disconnect':
main_server_table.delete_item(Key={'connection_id': connection_id})
print(f"disconnect connection_id: {connection_id}") # 打印 connection_id,可以在CloudWatch Log看到 connection_id
return {'statusCode': 200}
else:
print("routeKey '%s' not registered" % event_body["action"])
return {'statusCode': 400}
except Exception as err:
print(err)
return {'statusCode': 500}
```
* 在客户端连到 Websocket server 时,将 APIGateway 分配的 connection_id 和 user_id 对应关系存入 Dynamodb
* 在客户端断开连接时,删除 connection_id 对应数据
执行 sam sync 同步资源到云上
```shell
sam sync --stack-name Serverless-GameServer-Workshop
```
#### 2.2 测试代码运行结果
通过 wscat 命令连接 APIGateway
````shell
~: wscat -c "wss://aabbcc.execute-api.us-east-1.amazonaws.com/dev?user_id=testuser"
Connected (press CTRL+C to quit)
````
查看 Dynamodb 里的数据
```shell
aws dynamodb scan --table-name main_server --no-cli-pager
{
"Items": [
{
"connection_id": {
"S": "FrTaecIHoAMCFGA="
},
"user_id": {
"S": "testuser"
}
}
],
"Count": 1,
"ScannedCount": 1,
"ConsumedCapacity": null
}
```
断开连接后再查看 Dynamodb 里的数据
```shell
aws dynamodb scan --table-name main_server --no-cli-pager
{
"Items": [],
"Count": 0,
"ScannedCount": 0,
"ConsumedCapacity": null
}
```
### 3. 匹配服务开发
#### 3.1 开发匹配服务框架
本 Workshop 游戏的玩法为 1v1 对战,匹配策略为 FIFO(先进先出队列):
1. 玩家 A 选择开始匹配:
1. 如果此时没有任何玩家在等待匹配,则玩家 A 创建一个新的房间等待匹配
2. 如果此时已有玩家 Z 在等待匹配,则玩家 A 加入玩家 Z 的房间,匹配成功
2. 玩家 A 在等待匹配期间可以退出房间,此时空房间会被销毁
使用 SAM template 创建以下资源来实现匹配功能:
* 1 个 Lambda function(RoomMgrFunction),用于处理进入、退出、销毁房间的逻辑(**本 Workshop 演示为目的,只开发 joinroom 逻辑**)
* 3 个 APIGateway route(joinroom, exitroom, destroyroom),用于接收客户端进入、退出、销毁房间的请求
* 1 个 APIGateway integration,用于连接 route 和 Lambda
* 1 个 Lambda 执行的 Permission,用于让 APIGateway 有权限调用 Lambda
* 1 个 Dynamodb table,用于存储游戏内数据
编辑`template.yaml`
* Role:修改为你自己创建的 role ARN
```yaml
......
Resources:
###--- HTTP Service ---###
......
###--- Websocket Service ---###
......
# 用于处理匹配房间逻辑
RoomMgrFunction:
Type: AWS::Serverless::Function
Properties:
Description: 'Battle room service'
CodeUri: room-manager/
Handler: main.main_handler
Runtime: python3.9
Architectures:
- arm64
Role: "arn:aws:iam::123456789:role/Workshop-Lambda-Role"
# 用于连接 APIGateway 和 Lambda
RoomMgrIntegration:
Type: AWS::ApiGatewayV2::Integration
Properties:
ApiId: !Ref MainEntry
IntegrationType: AWS_PROXY
IntegrationUri: !Join
- ''
- - 'arn:'
- !Ref AWS::Partition
- ':apigateway:'
- !Ref AWS::Region
- ':lambda:path/2015-03-31/functions/'
- !GetAtt RoomMgrFunction.Arn
- '/invocations'
JoinRoomRoute:
Type: AWS::ApiGatewayV2::Route
Properties:
ApiId: !Ref MainEntry
RouteKey: "joinroom"
AuthorizationType: NONE
OperationName: JoinRoomRoute
Target: !Join
- '/'
- - 'integrations'
- !Ref RoomMgrIntegration
ExitRoomRoute:
Type: AWS::ApiGatewayV2::Route
Properties:
ApiId: !Ref MainEntry
RouteKey: "exitroom"
AuthorizationType: NONE
OperationName: ExitRoomRoute
Target: !Join
- '/'
- - 'integrations'
- !Ref RoomMgrIntegration
DestroyRoomRoute:
Type: AWS::ApiGatewayV2::Route
Properties:
ApiId: !Ref MainEntry
RouteKey: "destroyroom"
AuthorizationType: NONE
OperationName: DestroyRoomRoute
Target: !Join
- '/'
- - 'integrations'
- !Ref RoomMgrIntegration
# 用于允许 APIGateway 调用 Lambda
RoomMgrPermission:
Type: AWS::Lambda::Permission
DependsOn:
- MainEntry
Properties:
Action: lambda:InvokeFunction
FunctionName: !Ref RoomMgrFunction
Principal: apigateway.amazonaws.com
# 存储游戏内通用的资源数据
CommonResourceTable:
Type: AWS::DynamoDB::Table
Properties:
AttributeDefinitions:
- AttributeName: "resource_name"
AttributeType: "S"
KeySchema:
- AttributeName: "resource_name"
KeyType: "HASH"
ProvisionedThroughput:
ReadCapacityUnits: 5
WriteCapacityUnits: 5
SSESpecification:
SSEEnabled: True
TableName: "common_resources"
```
在 template.yaml 相同目录下创建代码目录 `room-manager` ,名称对应于 template.yaml 里配置的 `Resources.RoomMgrFunction.Properties.CodeUri`
在 `~/Serverless-GameServer-Workshop/room-manager` 目录下创建 main.py 文件,并且在 main.py 文件 中添加 main_handler 方法,名称对应于 template.yaml 里配置的 `Resources.RoomMgrFunction.Properties.Handler`
~/Serverless-GameServer-Workshop/room-manager/main.py
```python
import json
def main_handler(event, context):
try:
# Validate request parameters
route_key = event.get('requestContext', {}).get('routeKey')
connection_id = event.get('requestContext', {}).get('connectionId')
event_body = event.get('body')
event_body = json.loads(event_body if event_body is not None else '{}')
if route_key is None or connection_id is None:
return {'statusCode': 400}
if route_key == 'joinroom':
print('test joinroom')
return {'statusCode': 200}
if route_key == 'exitroom':
print('test exitroom')
return {'statusCode': 200}
if route_key == 'destroyroom':
print('test destroyroom')
return {'statusCode': 200}
except Exception as err:
print(err)
return {'statusCode': 500}
```
执行 sam sync 同步资源到云上
```shell
sam sync --stack-name Serverless-GameServer-Workshop
```
#### 3.2 测试匹配服务框架
使用 wscat 测试注册的 route_key
```shell
wscat -c "wss://aabbcc.execute-api.us-east-1.amazonaws.com/dev?user_id=testuser"
Connected (press CTRL+C to quit)
> {"action":"joinroom"}
> {"action":"exitroom"}
```
查看日志

#### 3.3 开发 joinroom 逻辑
编辑 `~/Serverless-GameServer-Workshop/room-manager/main.py`
添加一些辅助函数用于逻辑开发:
* 需要修改 endpoint_url 为创建的 APIGateway url
```python
......
import boto3
main_server_table = boto3.resource('dynamodb').Table('main_server')
common_resources_table = boto3.resource('dynamodb').Table('common_resources')
# 通过 connection_id 获取 user_id
def getUserIDFromConnID(connection_id):
item_response = main_server_table.get_item(Key={'connection_id': connection_id})
if 'Item' in item_response:
user_id = item_response['Item']['user_id']
else:
user_id = None
return user_id
# 通过 user_id 获取 connection_id
# 这里做了遍历,生产环境中应该使用索引
def getConnIDFromUserID(user_id):
connection_ids = []
scan_response = main_server_table.scan(ProjectionExpression='connection_id')
connection_ids = [item['connection_id'] for item in scan_response['Items']]
for connection_id in connection_ids:
if getUserIDFromConnID(connection_id) == user_id:
return connection_id
print(f"Cannot get connection_id, user_id={user_id}")
return -1
# 通过 APIGatewayManagementAPI 发送消息给客户端
# WSS_SERVER 为 API Gateway 的域名
def server_response(connection_id, message):
apig_management_client = boto3.client('apigatewaymanagementapi',endpoint_url="https://aabbcc.execute-api.us-east-1.amazonaws.com/dev")
send_response = apig_management_client.post_to_connection(Data=message, ConnectionId=connection_id)
# 创建新房间
def createRoom(user_id):
room_name = "%s_ROOM" % user_id
# 初始化房间信息
players_in_room = [user_id]
# 记录当前可加入的房间以及房间内的玩家
common_resources_table.put_item(Item={'resource_name': 'available_rooms', 'room_names': [room_name]})
common_resources_table.put_item(Item={'resource_name': room_name, 'players_in_room': players_in_room})
# 添加一个索引,记录玩家所在的房间
player_room_key = "%s_in_room" % user_id
common_resources_table.put_item(Item={'resource_name': player_room_key, 'room_name': room_name})
print("User created room. user_id=%s, room_name=%s." % (user_id, room_name))
return room_name
# 加入其他玩家的房间
def joinOthersRoom(user_id, room_name):
# 更新房间信息
item_response = common_resources_table.get_item(Key={'resource_name': room_name})
players_in_room = item_response['Item']['players_in_room']
peer_player_id = players_in_room[0]
players_in_room.append(user_id)
common_resources_table.put_item(Item={'resource_name': room_name, 'players_in_room': players_in_room})
# 添加一个索引,记录玩家所在的房间
player_room_key = "%s_in_room" % user_id
common_resources_table.put_item(Item={'resource_name': player_room_key, 'room_name': room_name})
print("User joined other's room. user_id=%s, room_name=%s." % (user_id, room_name))
return peer_player_id
```
修改 joinroom 这个 route 的逻辑
```python
......
def main_handler(event, context):
try:
......
if route_key == 'joinroom':
user_id = getUserIDFromConnID(connection_id)
# 当有新玩家加入时,先检查是否有空余房间,如果有则加入,如果没有则创建新房间
item_response = common_resources_table.get_item(Key={'resource_name': 'available_rooms'})
room_name = "" # 房间名
peer_player_id = "" # 对手的玩家ID
if 'Item' in item_response:
room_names = item_response['Item']['room_names']
# 如果没有空余房间,则创建新房间
if len(room_names) == 0:
room_name = createRoom(user_id)
else:
room_name = room_names.pop()
peer_player_id = joinOthersRoom(user_id, room_name)
# 匹配完成,更新可用房间列表
common_resources_table.put_item(Item={'resource_name': 'available_rooms', 'room_names': room_names})
# 如果没有空余房间,则创建新房间
else:
room_name = createRoom(user_id)
# 加入房间后,返回 json 数据给客户端处理
message = '{"action":"joinroom", "data":"%s"}' % room_name
server_response(connection_id, message)
# 如果匹配完成,则 peer_player_id 不为空,需要通知双方对手
if peer_player_id != "":
message = '{"action":"peer_player_id", "data":"%s"}' % peer_player_id
server_response(connection_id, message)
peer_connection_id = getConnIDFromUserID(peer_player_id)
message = '{"action":"peer_player_id", "data":"%s"}' % user_id
server_response(peer_connection_id, message)
return {'statusCode': 200}
if route_key == 'exitroom':
......
```
执行 sam sync 同步资源到云上
```shell
sam sync --stack-name Serverless-GameServer-Workshop
```
#### 3.4 测试 joinroom 逻辑
wscat 测试代码逻辑
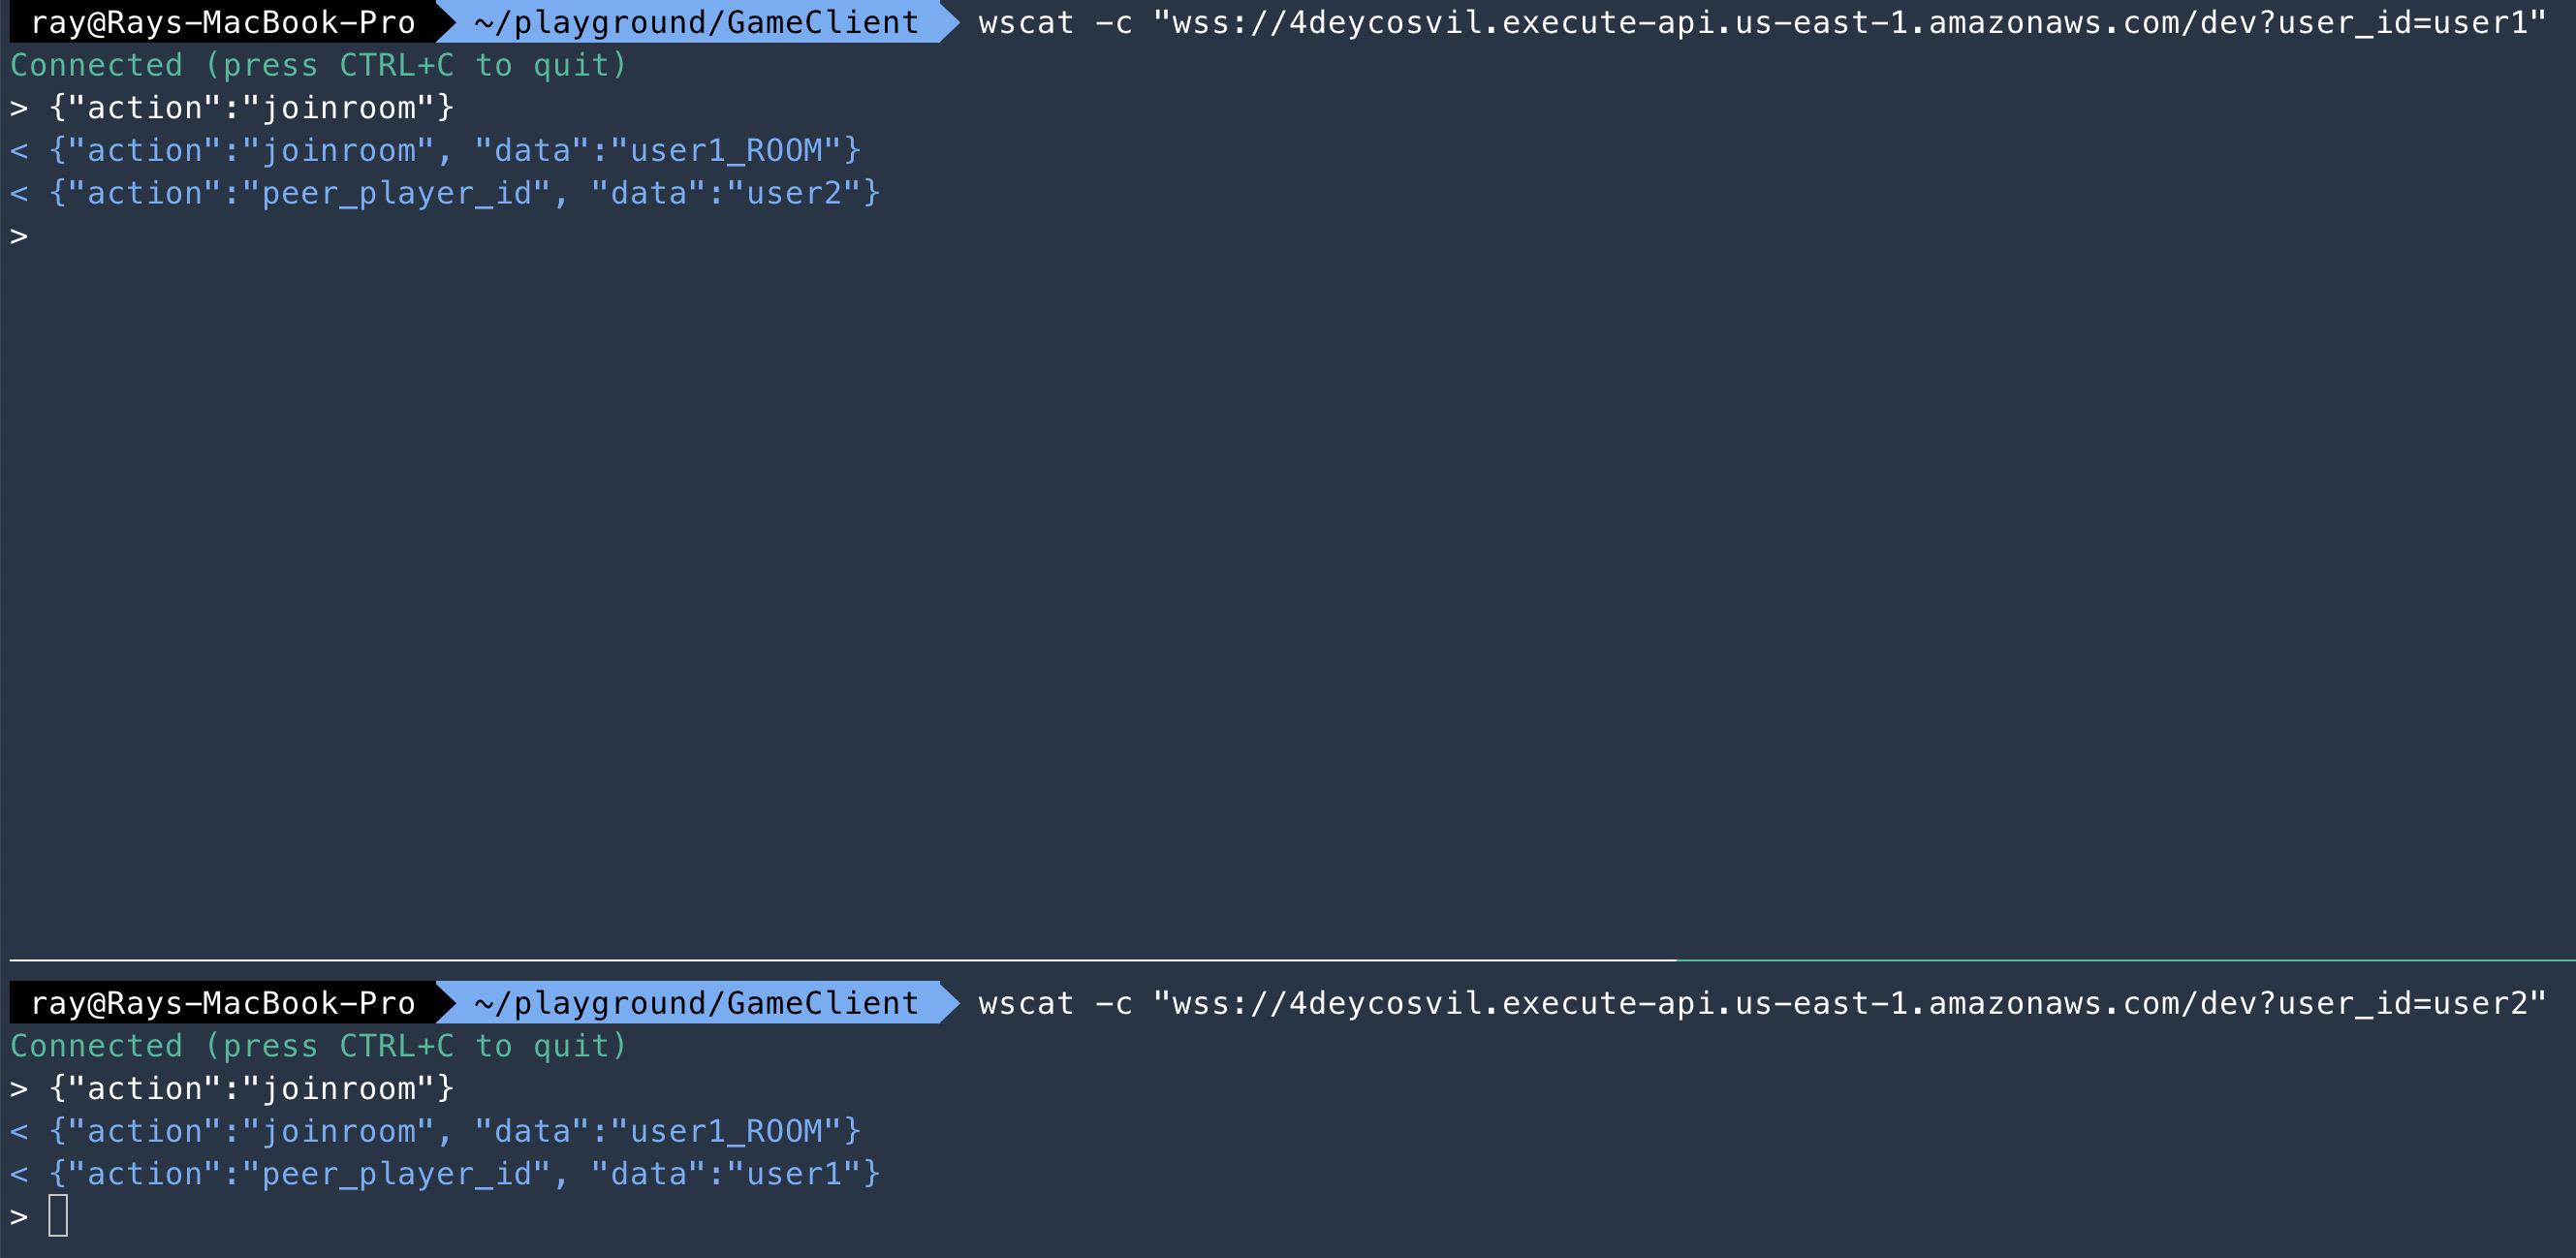
查看 Lambda 日志

**joinroom 逻辑开发部署完成**
### 4. 战斗逻辑开发
#### 4.1 开发战斗服务框架
本 Workshop 游戏的玩法为 1v1 对战,战斗逻辑为:
1. 玩家 A 攒够一定分数后可以向玩家 B 进行攻击(由服务端进行转发),被攻击的玩家无法进行操作
2. 先死亡的玩家向服务端同步分数
3. 两个玩家都死亡后,服务端进行战斗结算
本节我们将开发战斗相关逻辑,使用 SAM template 创建以下资源来实现战斗功能:
* 1 个 Lambda function(BattleMgrFunction),用于进行战斗逻辑处理
* 3 个 APIGateway route(attack, die, syncscore),用于接收客户端攻击、死亡、同步分数的请求
* 攻击:客户端 A 发送攻击请求并携带被攻击玩家 user_id,服务端接收到请求后向被攻击玩家发送数据,被攻击玩家客户端做相应展示
* 死亡:客户端 A 向服务端发送死亡请求,客户端处理数据后通知客户端 B
* 同步分数:客户端 A 和 B 每次分数变化时通知服务端自己当前分数
* 1 个 APIGateway integration,用于连接 route 和 Lambda
* 1 个 Lambda 执行的 Permission,用于让 APIGateway 有权限调用 Lambda
编辑`template.yaml`
* Role:修改为你自己创建的 role ARN
```yaml
......
Resources:
###--- HTTP Service ---###
......
###--- Websocket Service ---###
......
# 用于处理战斗逻辑
BattleMgrFunction:
Type: AWS::Serverless::Function
Properties:
Description: 'Battle'
CodeUri: battle-manager/
Handler: main.main_handler
Runtime: python3.9
Architectures:
- arm64
Role: "arn:aws:iam::123456789:role/Workshop-Lambda-Role"
# 用于连接 APIGateway 和 Lambda
BattleMgrIntegration:
Type: AWS::ApiGatewayV2::Integration
Properties:
ApiId: !Ref MainEntry
IntegrationType: AWS_PROXY
IntegrationUri: !Join
- ''
- - 'arn:'
- !Ref AWS::Partition
- ':apigateway:'
- !Ref AWS::Region
- ':lambda:path/2015-03-31/functions/'
- !GetAtt BattleMgrFunction.Arn
- '/invocations'
AttackRoute:
Type: AWS::ApiGatewayV2::Route
Properties:
ApiId: !Ref MainEntry
RouteKey: "attack"
AuthorizationType: NONE
OperationName: AttackRoute
Target: !Join
- '/'
- - 'integrations'
- !Ref BattleMgrIntegration
DieRoute:
Type: AWS::ApiGatewayV2::Route
Properties:
ApiId: !Ref MainEntry
RouteKey: "die"
AuthorizationType: NONE
OperationName: DieRoute
Target: !Join
- '/'
- - 'integrations'
- !Ref BattleMgrIntegration
SyncScoreRoute:
Type: AWS::ApiGatewayV2::Route
Properties:
ApiId: !Ref MainEntry
RouteKey: "syncscore"
AuthorizationType: NONE
OperationName: SyncScoreRoute
Target: !Join
- '/'
- - 'integrations'
- !Ref BattleMgrIntegration
# 用于允许 APIGateway 调用 Lambda
BattleMgrPermission:
Type: AWS::Lambda::Permission
DependsOn:
- MainEntry
Properties:
Action: lambda:InvokeFunction
FunctionName: !Ref BattleMgrFunction
Principal: apigateway.amazonaws.com
```
在 template.yaml 相同目录下创建代码目录 `battle-manager` ,名称对应于 template.yaml 里配置的 `Resources.BattleMgrFunction.Properties.CodeUri`
在 `~/Serverless-GameServer-Workshop/battle-manager` 目录下创建 main.py 文件,并且在 main.py 文件 中添加 main_handler 方法,名称对应于 template.yaml 里配置的 `Resources.BattleMgrFunction.Properties.Handler`
~/Serverless-GameServer-Workshop/battle-manager/main.py
```python
import json
def main_handler(event, context):
try:
# Validate request parameters
route_key = event.get('requestContext', {}).get('routeKey')
connection_id = event.get('requestContext', {}).get('connectionId')
event_body = event.get('body')
event_body = json.loads(event_body if event_body is not None else '{}')
if route_key is None or connection_id is None:
return {'statusCode': 400}
if route_key == 'attack':
print('test attack')
return {'statusCode': 200}
if route_key == 'die':
print('test die')
return {'statusCode': 200}
if route_key == 'syncscore':
print('test syncscore')
return {'statusCode': 200}
except Exception as err:
print(err)
return {'statusCode': 500}
```
执行 sam sync 同步资源到云上
```shell
sam sync --stack-name Serverless-GameServer-Workshop
```
#### 4.2 测试战斗服务框架
同 3.2 节,略
#### 4.3 开发战斗逻辑
##### 4.3.1 辅助函数
编辑 `~/Serverless-GameServer-Workshop/battle-manager/main.py`
添加一些辅助函数用于逻辑开发:
* 需要修改 endpoint_url 为创建的 APIGateway url
```python
...
import boto3
main_server_table = boto3.resource('dynamodb').Table('main_server')
common_resources_table = boto3.resource('dynamodb').Table('common_resources')
# 通过 user_id 获取 connection_id
# 这里做了遍历,生产环境中应该使用索引
def getConnIDFromUserID(user_id):
connection_ids = []
scan_response = main_server_table.scan(ProjectionExpression='connection_id')
connection_ids = [item['connection_id'] for item in scan_response['Items']]
for connection_id in connection_ids:
if getUserIDFromConnID(connection_id) == user_id:
return connection_id
logger.error("Cannot get connection_id, user_id=%s" % (user_id))
return -1
def server_response(connection_id, message):
apig_management_client = boto3.client('apigatewaymanagementapi',endpoint_url="https://aabbcc.execute-api.us-east-1.amazonaws.com/dev")
send_response = apig_management_client.post_to_connection(Data=message, ConnectionId=connection_id)
# 通过 connection_id 获取 user_id
def getUserIDFromConnID(connection_id):
item_response = main_server_table.get_item(Key={'connection_id': connection_id})
if 'Item' in item_response:
user_id = item_response['Item']['user_id']
else:
user_id = None
return user_id
# 通过 user_id 获取 room_name
def getRoomNameFromUserId(user_id):
player_room_key = "%s_in_room" % user_id
item_response = common_resources_table.get_item(Key={'resource_name': player_room_key})
if 'Item' in item_response:
room_name = item_response['Item']['room_name']
else:
room_name = None
return room_name
# 通过 user_id, room_name 获取对手的 user_id
def getPeerPlayerIDFromRoom(user_id, room_name):
item_response = common_resources_table.get_item(Key={'resource_name': room_name})
players_in_room = item_response['Item']['players_in_room']
for player_id in players_in_room:
if player_id != user_id:
return player_id
# 获取对局信息
def battleMgrPrecheck(connection_id):
user_id = getUserIDFromConnID(connection_id)
room_name = getRoomNameFromUserId(user_id)
peer_player_id = getPeerPlayerIDFromRoom(user_id, room_name)
return (user_id, room_name, peer_player_id)
# 对局结算
def battle_settlement(battle_players, room_name):
user_id_1 = battle_players[0]
user_id_2 = battle_players[1]
in_battle_score_1 = int(common_resources_table.get_item(Key={'resource_name': "%s_in_battle_score" % user_id_1})['Item']['score'])
in_battle_score_2 = int(common_resources_table.get_item(Key={'resource_name': "%s_in_battle_score" % user_id_2})['Item']['score'])
winner_id = None
if in_battle_score_1 > in_battle_score_2:
winner_id = user_id_1
elif in_battle_score_1 < in_battle_score_2:
winner_id = user_id_2
message = '{"action":"battle_settlement", "data":"UNKNOW"}'
for user_id in battle_players:
in_battle_score = int(common_resources_table.get_item(Key={'resource_name': "%s_in_battle_score" % user_id})['Item']['score'])
connection_id = getConnIDFromUserID(user_id)
if winner_id == None:
message = '{"action":"battle_settlement", "data":"DRAW"}'
print("Battle DRAW, user_id=%s, score=%d" % (user_id, in_battle_score))
elif user_id == winner_id:
message = '{"action":"battle_settlement", "data":"WIN"}'
print("Battle WIN, user_id=%s, score=%d" % (user_id, in_battle_score))
else:
message = '{"action":"battle_settlement", "data":"LOSE"}'
print("Battle LOSE, user_id=%s, score=%d" % (user_id, in_battle_score))
server_response(connection_id, message)
clear_battle_data(battle_players, room_name)
# 清除对局数据
def clear_battle_data(battle_players, room_name):
for user_id in battle_players:
common_resources_table.delete_item(Key={'resource_name': "%s_in_battle_score" % user_id})
common_resources_table.delete_item(Key={'resource_name': "%s_in_battle_die" % user_id})
with common_resources_table.batch_writer() as batch:
item_response = common_resources_table.get_item(Key={'resource_name': room_name})
players_in_room = item_response['Item']['players_in_room']
for user_id in players_in_room:
batch.delete_item(Key={"resource_name":"%s_in_room" % user_id})
batch.delete_item(Key={"resource_name":room_name})
print("All battle data cleared. room_name=%s, user_id=%s" % (room_name, battle_players))
```
##### 4.3.2 syncscore
编辑 `~/Serverless-GameServer-Workshop/battle-manager/main.py`,扩展 syncscore 功能
```python
......
def main_handler(event, context):
try:
......
if route_key == 'attack':
......
if route_key == 'die':
......
if route_key == 'syncscore':
score = event_body["score"]
user_id, room_name, peer_player_id = battleMgrPrecheck(connection_id)
in_battle_score = "%s_in_battle_score" % user_id
common_resources_table.put_item(Item={'resource_name': in_battle_score, 'score': score})
peer_connection_id = getConnIDFromUserID(peer_player_id)
message = '{"action":"player_syncscore", "data":%d}' % score
server_response(peer_connection_id, message)
print("[handle_syncscore]. user_id=%s, room_name=%s, current_score=%d." % (user_id, room_name, score))
return {'statusCode': 200}
except Exception as err:
print(err)
return {'statusCode': 500}
```
##### 4.3.3 attack
编辑 `~/Serverless-GameServer-Workshop/battle-manager/main.py`,扩展 attack 功能
```python
......
def main_handler(event, context):
try:
......
if route_key == 'attack':
# 根据 connection_id 获取 对局信息
user_id, room_name, peer_player_id = battleMgrPrecheck(connection_id)
# 获取对手的 connection_id
connection_id = getConnIDFromUserID(peer_player_id)
# 向对手发送攻击消息
message = '{"action":"attacked", "data":"FREEZE"}'
server_response(connection_id, message)
print("[handle_attack] Player be attacked. attacker_id=%s, victim_id=%s, room_name=%s." % (user_id, peer_player_id, room_name))
return {'statusCode': 200}
if route_key == 'die':
......
if route_key == 'syncscore':
......
except Exception as err:
print(err)
return {'statusCode': 500}
```
##### 4.3.4 die
编辑 `~/Serverless-GameServer-Workshop/battle-manager/main.py`,扩展 die 功能
```python
......
def main_handler(event, context):
try:
......
if route_key == 'attack':
......
if route_key == 'die':
user_id, room_name, peer_player_id = battleMgrPrecheck(connection_id)
in_battle_die = "%s_in_battle_die" % user_id
common_resources_table.put_item(Item={'resource_name': in_battle_die, 'die': 1})
peer_connection_id = getConnIDFromUserID(peer_player_id)
item_response = common_resources_table.get_item(Key={'resource_name': "%s_in_battle_die" % peer_player_id})
if 'Item' not in item_response:
peer_connection_id = getConnIDFromUserID(peer_player_id)
message = '{"action":"player_died", "data":"%s"}' % user_id
server_response(peer_connection_id, message)
print("[handle_die] Player died. died_user_id=%s, room_name=%s." % (user_id, room_name))
return {'statusCode': 200}
else:
message = '{"action":"player_died", "data":"all"}'
server_response(peer_connection_id, message)
print("[handle_die] Player all died, start battle settlement.")
battle_settlement([user_id, peer_player_id], room_name)
return {'statusCode': 200}
if route_key == 'syncscore':
......
except Exception as err:
print(err)
return {'statusCode': 500}
```
执行 sam sync 同步资源到云上
```shell
sam sync --stack-name Serverless-GameServer-Workshop
```
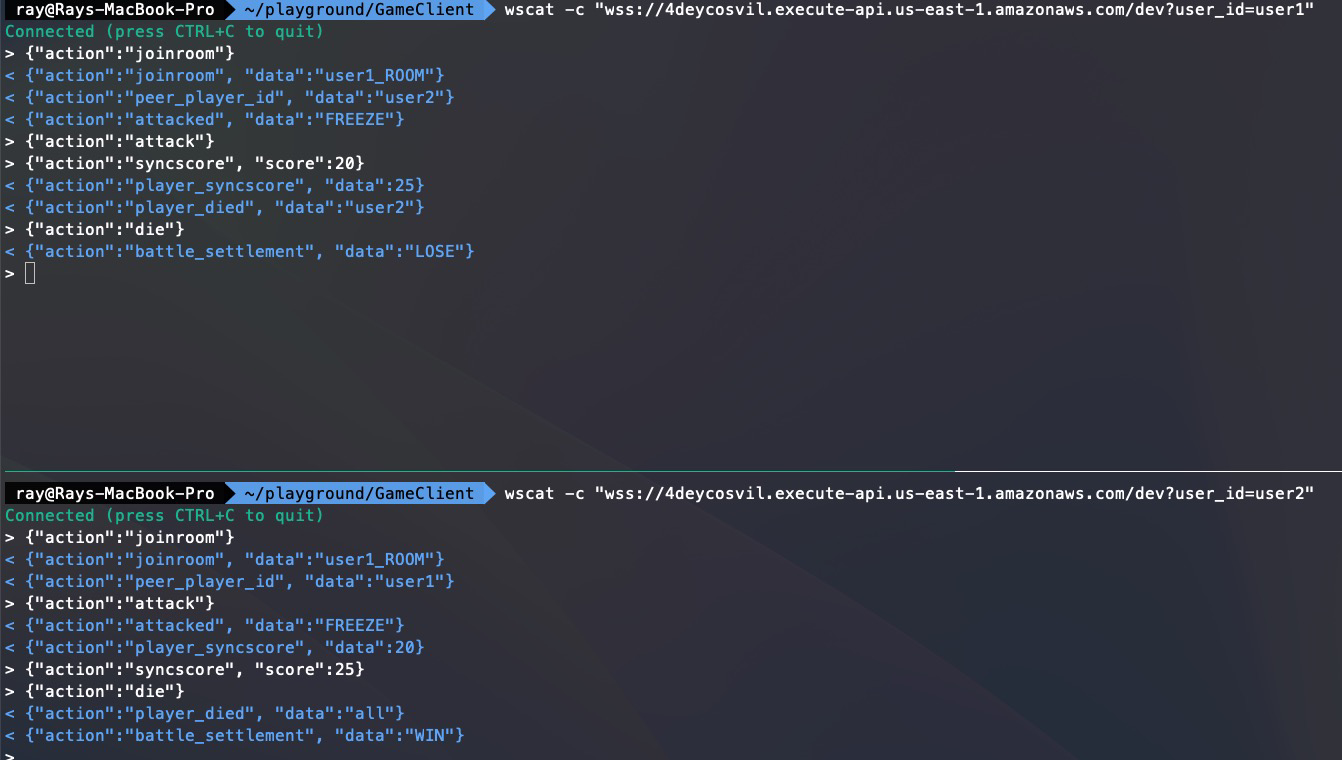
#### 4.4 测试战斗逻辑
我们将在本实验中实现 Websocket 服务以提供给客户端连接
### 1. 通过 SAM template 创建一个 Websocket Hello world
#### 1.1 创建 SAM template Lambda function 资源
编辑 Lab1 的 `template.yaml`文件,添加如下内容
* 将 Role 资源改为自己创建的
```yaml
......
Resources:
###--- HTTP Service ---###
......
###--- Websocket Service ---###
MainServerFunction:
Type: AWS::Serverless::Function
Properties:
Description: 'Handle all connections'
CodeUri: main-server/
Handler: main.main_handler
Runtime: python3.9
Architectures:
- arm64
Role: "arn:aws:iam::1234567890:role/Workshop-Lambda-Role" # 修改为你自己创建的 role ARN
```
* 这里只创建了一个独立的 Lambda function 资源,没有像 Lab1 HTTP 服务那样配置 Events 触发
* 后续我们会采用另一种资源定义方法,让这个 Lambda function 被其他资源引用
#### 1.2 创建 Lambda 的代码
在 template.yaml 相同目录下创建代码目录 `main-server` ,名称对应于 template.yaml 里配置的 `Resources.MainServerFunction.Properties.CodeUri`
在 `~/Serverless-GameServer-Workshop/main-server` 目录下创建 main.py 文件,并且在 main.py 文件 中添加 main_handler 方法,名称对应于 template.yaml 里配置的 `Resources.MainServerFunction.Properties.Handler`
~/Serverless-GameServer-Workshop/main-server/main.py
```python
import json
import random
import string
def main_handler(event, context):
try:
print(event) # 通过打印event,可以在CloudWatch Log看到event的结构
# 获取routeKey
route_key = event.get('requestContext', {}).get('routeKey')
# 获取connectionId,针对每个 WebSocket 连接,API Gateway 会分配一个 connectionId
# connectionId 用于客户端和服务端之间的数据通信
connection_id = event.get('requestContext', {}).get('connectionId')
event_body = event.get('body')
event_body = json.loads(event_body if event_body is not None else '{}')
if route_key is None or connection_id is None:
return {'statusCode': 400, 'body': 'routeKey or connectionId is None'}
# Handle on connect
if route_key == '$connect':
# 如果连接时没有 user_id 参数,则生成一个随机的guest user id
tmp_guest_user_id = ''.join(random.choices(string.ascii_uppercase+string.digits, k=12))
user_id = event.get('queryStringParameters', {'user_id': tmp_guest_user_id}).get('user_id')
print(f"connect user_id: {user_id}, connection_id: {connection_id}") # 打印user_id 和 connection_id,可以在CloudWatch Log看到user_id
return {'statusCode': 200}
# Handle on disconnect
elif route_key == '$disconnect':
print(f"disconnect connection_id: {connection_id}") # 打印 connection_id,可以在CloudWatch Log看到 connection_id
return {'statusCode': 200}
else:
print("routeKey '%s' not registered" % event_body["action"])
return {'statusCode': 400}
except Exception as err:
print(err)
return {'statusCode': 500}
```
#### 1.3 使用 SAM 创建 APIGateway 资源将 Lambda function 暴露
编辑 `template.yaml`文件,添加如下内容
```yaml
......
Resources:
###--- HTTP Service ---###
......
###--- Websocket Service ---###
# MainServer Websocket 服务的 APIGateway
MainEntry:
Type: AWS::ApiGatewayV2::Api
Properties:
Name: Workshop-MainEntry
ProtocolType: WEBSOCKET
RouteSelectionExpression: "$request.body.action"
# APIGateway 的 stage
Stage:
Type: AWS::ApiGatewayV2::Stage
Properties:
StageName: dev
Description: "dev env"
ApiId: !Ref MainEntry
MainServerFunction:
......
# APIGateway 的 Integration 资源,用于连接 Lambda 和 Websocket APIGateway 的 route
MainServerIntegration:
Type: AWS::ApiGatewayV2::Integration
Properties:
ApiId: !Ref MainEntry
IntegrationType: AWS_PROXY
IntegrationUri: !Join
- ''
- - 'arn:'
- !Ref AWS::Partition
- ':apigateway:'
- !Ref AWS::Region
- ':lambda:path/2015-03-31/functions/'
- !GetAtt MainServerFunction.Arn
- '/invocations'
# 默认的 APIGateway route
DefaultRoute:
Type: AWS::ApiGatewayV2::Route
Properties:
ApiId: !Ref MainEntry
RouteKey: "$default"
AuthorizationType: NONE
OperationName: DefaultRoute
Target: !Join
- '/'
- - 'integrations'
- !Ref MainServerIntegration
# Websocket client 连接时的 route
ConnectRoute:
Type: AWS::ApiGatewayV2::Route
Properties:
ApiId: !Ref MainEntry
RouteKey: "$connect"
AuthorizationType: NONE
OperationName: ConnectRoute
Target: !Join
- '/'
- - 'integrations'
- !Ref MainServerIntegration
# Websocket client 连接时的 route
DisconnectRoute:
Type: AWS::ApiGatewayV2::Route
Properties:
ApiId: !Ref MainEntry
RouteKey: "$disconnect"
AuthorizationType: NONE
OperationName: DisconnectRoute
Target: !Join
- '/'
- - 'integrations'
- !Ref MainServerIntegration
```
执行 sam sync 同步资源到云上
```shell
sam sync --stack-name Serverless-GameServer-Workshop
```
#### 1.1.4 检查资源创建结果
分别在控制台查看 SAM 创建的 APIGateway 和 Lambda
**APIGateway**


* 通过 APIGateway Integration 将客户端请求转发给 Lambda
**Lambda**

* 可以看到**没有在 Lambda 资源里配置 Events 属性,控制台上看到的 Lambda trigger 为空**
* 这个 Lambda 是通过 APIGateway 的 Integration 来将 APIGateway 和它连接起来
#### 1.5 用 wscat 测试 Websocket 服务
参考[《Use wscat to connect to a WebSocket API and send messages to it》](https://docs.aws.amazon.com/apigateway/latest/developerguide/apigateway-how-to-call-websocket-api-wscat.html)安装 wscat
通过 wscat 命令连接 APIGateway
```shell
~: wscat -c wss://aabbcc.execute-api.us-east-1.amazonaws.com/dev
error: Unexpected server response: 403
> %
```
* 客户端连接 APIGateway 返回 403
查看 APIGateway Deployment

* Deployment 为空,APIGateway 尚未部署
#### 1.6 部署 APIGateway 并再次测试 Websocket 服务
编辑`template.yaml`,给`Resources.Stage.Properties`添加AutoDeploy属性
```yaml
Resources:
......
# APIGateway 的 stage
Stage:
Type: AWS::ApiGatewayV2::Stage
Properties:
StageName: dev
Description: "dev env"
ApiId: !Ref MainEntry
AutoDeploy: true
```
* 给 Stage 添加 AutoDeploy 属性后,Stage 的任何变更都会自动 Deploy,访问 Stage 的 URL 即可访问到最新的 APIGateway + Lambda
执行 sam sync 同步资源到云上
```shell
sam sync --stack-name Serverless-GameServer-Workshop
```
查看资源创建结果

通过 wscat 命令连接 APIGateway
```shell
~: wscat -c wss://aabbcc.execute-api.us-east-1.amazonaws.com/dev
error: Unexpected server response: 500
> %
```
* 客户端连接 APIGateway 返回 500
#### 1.7 开启 APIGateway Execution Log 排查问题
##### 1.7.1 启用 APIGateway Execution Logs
在 console 启用 APIGateway 的执行日志

* 启用 APIGateway 执行日志之前,要先配置一个 role 让 APIGateway 有权限向 CloudWatch Log 写入日志
##### 1.7.2 创建 role 并赋给 APIGateway
**创建 role**


**将 role 赋值给 APIGateway**

复制刚刚创建 role 的 ARN 配置到 APIGateway,Save

##### 1.7.3 启用 APIGateway Execution Log

##### 1.7.4 重新访问 Websocket 查看日志
```
~: wscat -c wss://aabbcc.execute-api.us-east-1.amazonaws.com/dev
error: Unexpected server response: 500
> %
```
**第一次查看日志可能会有 2min 延迟**


* **发现是 APIGateway 调用 Lambda 的时候没有权限**
#### 1.8 为 Lambda 配置 Resource-based policy
对比 Lab1 创建的 Lambda 和 Lab2 创建的 Lambda 两者 Permission 的配置
**Lab1**

**Lab2**

* 因为 Lab1 的 Lambda 配置了 Event trigger,所以自动创建了 resource-based policy
* Lab2 的 Lambda 是一个独立的资源没有配置 Event trigger,所以没有 resource-based policy,导致 APIGateway 没有权限去调用它
编辑`template.yaml`,添加 Lambda 的 Permission
```yaml
......
Resources:
###--- HTTP Service ---###
......
###--- Websocket Service ---###
......
# APIGateway 调用 Lambda 的 resource-based policy
MainServerPermission:
Type: AWS::Lambda::Permission
DependsOn:
- MainEntry
Properties:
Action: lambda:InvokeFunction
FunctionName: !Ref MainServerFunction
Principal: apigateway.amazonaws.com
```
执行 sam sync 同步资源到云上
```shell
sam sync --stack-name Serverless-GameServer-Workshop
```
查看资源创建结果

#### 1.8 测试 Websocket Hello World
通过 wscat 命令连接 APIGateway
```shell
~: wscat -c wss://aabbcc.execute-api.us-east-1.amazonaws.com/dev
Connected (press CTRL+C to quit)
> %
~:
```
查看 Websocket Lambda 日志(注意 log group 不是之前 PlayerInfo 的 log group)

* 在 wss URL 里没有加上 user_id 的 query string,服务端自动创建了一个 user_id
通过 wscat 命令连接 APIGateway
```shell
~: wscat -c "wss://aabbcc.execute-api.us-east-1.amazonaws.com/dev?user_id=testuser"
Connected (press CTRL+C to quit)
> %
~:
```

至此 Websocket Hello World 服务部署完成
### 2. 使用 Dynamodb 管理 Websocket 连接
在本节我们会使用 Dynamodb 来存储 connection_id 和 user_id 的对应关系:
1. 客户端和服务端通过 connection_id 进行数据传输
2. 客户端通过在请求中加入 user_id 来标识自己其它玩家
3. 服务端通过 connection_id 和 user_id 的对应关系来对不同玩家传输数据
#### 2.1 创建 Dynamodb table 用于存储 connection_id 和 user_id 对应关系
编辑`template.yaml`,如 Lab1 添加 Dynamodb 资源
```yaml
......
Resources:
###--- HTTP Service ---###
......
###--- Websocket Service ---###
......
# Dynamodb 用于存储 connection_id 和 user_id 对应关系
MainServerTable:
Type: AWS::DynamoDB::Table
Properties:
AttributeDefinitions:
- AttributeName: "connection_id"
AttributeType: "S"
KeySchema:
- AttributeName: "connection_id"
KeyType: "HASH"
ProvisionedThroughput:
ReadCapacityUnits: 5
WriteCapacityUnits: 5
SSESpecification:
SSEEnabled: True
TableName: "main_server"
```
编辑`~/Serverless-GameServer-Workshop/main-server/main.py`,修改 handler 代码
```python
......
import boto3
# main_server 为表名对应于 template.yaml 中的 Resources -> MainServerTable -> Properties -> TableName
main_server_table = boto3.resource('dynamodb').Table("main_server")
def main_handler(event, context):
try:
....
if route_key == '$connect':
# 如果连接时没有 user_id 参数,则生成一个随机的guest user id
tmp_guest_user_id = ''.join(random.choices(string.ascii_uppercase+string.digits, k=12))
user_id = event.get('queryStringParameters', {'user_id': tmp_guest_user_id}).get('user_id')
main_server_table.put_item(Item={'user_id': user_id, 'connection_id': connection_id})
print(f"connect user_id: {user_id}, connection_id: {connection_id}") # 打印user_id 和 connection_id,可以在CloudWatch Log看到user_id
return {'statusCode': 200}
# Handle on disconnect
elif route_key == '$disconnect':
main_server_table.delete_item(Key={'connection_id': connection_id})
print(f"disconnect connection_id: {connection_id}") # 打印 connection_id,可以在CloudWatch Log看到 connection_id
return {'statusCode': 200}
else:
print("routeKey '%s' not registered" % event_body["action"])
return {'statusCode': 400}
except Exception as err:
print(err)
return {'statusCode': 500}
```
* 在客户端连到 Websocket server 时,将 APIGateway 分配的 connection_id 和 user_id 对应关系存入 Dynamodb
* 在客户端断开连接时,删除 connection_id 对应数据
执行 sam sync 同步资源到云上
```shell
sam sync --stack-name Serverless-GameServer-Workshop
```
#### 2.2 测试代码运行结果
通过 wscat 命令连接 APIGateway
````shell
~: wscat -c "wss://aabbcc.execute-api.us-east-1.amazonaws.com/dev?user_id=testuser"
Connected (press CTRL+C to quit)
````
查看 Dynamodb 里的数据
```shell
aws dynamodb scan --table-name main_server --no-cli-pager
{
"Items": [
{
"connection_id": {
"S": "FrTaecIHoAMCFGA="
},
"user_id": {
"S": "testuser"
}
}
],
"Count": 1,
"ScannedCount": 1,
"ConsumedCapacity": null
}
```
断开连接后再查看 Dynamodb 里的数据
```shell
aws dynamodb scan --table-name main_server --no-cli-pager
{
"Items": [],
"Count": 0,
"ScannedCount": 0,
"ConsumedCapacity": null
}
```
### 3. 匹配服务开发
#### 3.1 开发匹配服务框架
本 Workshop 游戏的玩法为 1v1 对战,匹配策略为 FIFO(先进先出队列):
1. 玩家 A 选择开始匹配:
1. 如果此时没有任何玩家在等待匹配,则玩家 A 创建一个新的房间等待匹配
2. 如果此时已有玩家 Z 在等待匹配,则玩家 A 加入玩家 Z 的房间,匹配成功
2. 玩家 A 在等待匹配期间可以退出房间,此时空房间会被销毁
使用 SAM template 创建以下资源来实现匹配功能:
* 1 个 Lambda function(RoomMgrFunction),用于处理进入、退出、销毁房间的逻辑(**本 Workshop 演示为目的,只开发 joinroom 逻辑**)
* 3 个 APIGateway route(joinroom, exitroom, destroyroom),用于接收客户端进入、退出、销毁房间的请求
* 1 个 APIGateway integration,用于连接 route 和 Lambda
* 1 个 Lambda 执行的 Permission,用于让 APIGateway 有权限调用 Lambda
* 1 个 Dynamodb table,用于存储游戏内数据
编辑`template.yaml`
* Role:修改为你自己创建的 role ARN
```yaml
......
Resources:
###--- HTTP Service ---###
......
###--- Websocket Service ---###
......
# 用于处理匹配房间逻辑
RoomMgrFunction:
Type: AWS::Serverless::Function
Properties:
Description: 'Battle room service'
CodeUri: room-manager/
Handler: main.main_handler
Runtime: python3.9
Architectures:
- arm64
Role: "arn:aws:iam::123456789:role/Workshop-Lambda-Role"
# 用于连接 APIGateway 和 Lambda
RoomMgrIntegration:
Type: AWS::ApiGatewayV2::Integration
Properties:
ApiId: !Ref MainEntry
IntegrationType: AWS_PROXY
IntegrationUri: !Join
- ''
- - 'arn:'
- !Ref AWS::Partition
- ':apigateway:'
- !Ref AWS::Region
- ':lambda:path/2015-03-31/functions/'
- !GetAtt RoomMgrFunction.Arn
- '/invocations'
JoinRoomRoute:
Type: AWS::ApiGatewayV2::Route
Properties:
ApiId: !Ref MainEntry
RouteKey: "joinroom"
AuthorizationType: NONE
OperationName: JoinRoomRoute
Target: !Join
- '/'
- - 'integrations'
- !Ref RoomMgrIntegration
ExitRoomRoute:
Type: AWS::ApiGatewayV2::Route
Properties:
ApiId: !Ref MainEntry
RouteKey: "exitroom"
AuthorizationType: NONE
OperationName: ExitRoomRoute
Target: !Join
- '/'
- - 'integrations'
- !Ref RoomMgrIntegration
DestroyRoomRoute:
Type: AWS::ApiGatewayV2::Route
Properties:
ApiId: !Ref MainEntry
RouteKey: "destroyroom"
AuthorizationType: NONE
OperationName: DestroyRoomRoute
Target: !Join
- '/'
- - 'integrations'
- !Ref RoomMgrIntegration
# 用于允许 APIGateway 调用 Lambda
RoomMgrPermission:
Type: AWS::Lambda::Permission
DependsOn:
- MainEntry
Properties:
Action: lambda:InvokeFunction
FunctionName: !Ref RoomMgrFunction
Principal: apigateway.amazonaws.com
# 存储游戏内通用的资源数据
CommonResourceTable:
Type: AWS::DynamoDB::Table
Properties:
AttributeDefinitions:
- AttributeName: "resource_name"
AttributeType: "S"
KeySchema:
- AttributeName: "resource_name"
KeyType: "HASH"
ProvisionedThroughput:
ReadCapacityUnits: 5
WriteCapacityUnits: 5
SSESpecification:
SSEEnabled: True
TableName: "common_resources"
```
在 template.yaml 相同目录下创建代码目录 `room-manager` ,名称对应于 template.yaml 里配置的 `Resources.RoomMgrFunction.Properties.CodeUri`
在 `~/Serverless-GameServer-Workshop/room-manager` 目录下创建 main.py 文件,并且在 main.py 文件 中添加 main_handler 方法,名称对应于 template.yaml 里配置的 `Resources.RoomMgrFunction.Properties.Handler`
~/Serverless-GameServer-Workshop/room-manager/main.py
```python
import json
def main_handler(event, context):
try:
# Validate request parameters
route_key = event.get('requestContext', {}).get('routeKey')
connection_id = event.get('requestContext', {}).get('connectionId')
event_body = event.get('body')
event_body = json.loads(event_body if event_body is not None else '{}')
if route_key is None or connection_id is None:
return {'statusCode': 400}
if route_key == 'joinroom':
print('test joinroom')
return {'statusCode': 200}
if route_key == 'exitroom':
print('test exitroom')
return {'statusCode': 200}
if route_key == 'destroyroom':
print('test destroyroom')
return {'statusCode': 200}
except Exception as err:
print(err)
return {'statusCode': 500}
```
执行 sam sync 同步资源到云上
```shell
sam sync --stack-name Serverless-GameServer-Workshop
```
#### 3.2 测试匹配服务框架
使用 wscat 测试注册的 route_key
```shell
wscat -c "wss://aabbcc.execute-api.us-east-1.amazonaws.com/dev?user_id=testuser"
Connected (press CTRL+C to quit)
> {"action":"joinroom"}
> {"action":"exitroom"}
```
查看日志

#### 3.3 开发 joinroom 逻辑
编辑 `~/Serverless-GameServer-Workshop/room-manager/main.py`
添加一些辅助函数用于逻辑开发:
* 需要修改 endpoint_url 为创建的 APIGateway url
```python
......
import boto3
main_server_table = boto3.resource('dynamodb').Table('main_server')
common_resources_table = boto3.resource('dynamodb').Table('common_resources')
# 通过 connection_id 获取 user_id
def getUserIDFromConnID(connection_id):
item_response = main_server_table.get_item(Key={'connection_id': connection_id})
if 'Item' in item_response:
user_id = item_response['Item']['user_id']
else:
user_id = None
return user_id
# 通过 user_id 获取 connection_id
# 这里做了遍历,生产环境中应该使用索引
def getConnIDFromUserID(user_id):
connection_ids = []
scan_response = main_server_table.scan(ProjectionExpression='connection_id')
connection_ids = [item['connection_id'] for item in scan_response['Items']]
for connection_id in connection_ids:
if getUserIDFromConnID(connection_id) == user_id:
return connection_id
print(f"Cannot get connection_id, user_id={user_id}")
return -1
# 通过 APIGatewayManagementAPI 发送消息给客户端
# WSS_SERVER 为 API Gateway 的域名
def server_response(connection_id, message):
apig_management_client = boto3.client('apigatewaymanagementapi',endpoint_url="https://aabbcc.execute-api.us-east-1.amazonaws.com/dev")
send_response = apig_management_client.post_to_connection(Data=message, ConnectionId=connection_id)
# 创建新房间
def createRoom(user_id):
room_name = "%s_ROOM" % user_id
# 初始化房间信息
players_in_room = [user_id]
# 记录当前可加入的房间以及房间内的玩家
common_resources_table.put_item(Item={'resource_name': 'available_rooms', 'room_names': [room_name]})
common_resources_table.put_item(Item={'resource_name': room_name, 'players_in_room': players_in_room})
# 添加一个索引,记录玩家所在的房间
player_room_key = "%s_in_room" % user_id
common_resources_table.put_item(Item={'resource_name': player_room_key, 'room_name': room_name})
print("User created room. user_id=%s, room_name=%s." % (user_id, room_name))
return room_name
# 加入其他玩家的房间
def joinOthersRoom(user_id, room_name):
# 更新房间信息
item_response = common_resources_table.get_item(Key={'resource_name': room_name})
players_in_room = item_response['Item']['players_in_room']
peer_player_id = players_in_room[0]
players_in_room.append(user_id)
common_resources_table.put_item(Item={'resource_name': room_name, 'players_in_room': players_in_room})
# 添加一个索引,记录玩家所在的房间
player_room_key = "%s_in_room" % user_id
common_resources_table.put_item(Item={'resource_name': player_room_key, 'room_name': room_name})
print("User joined other's room. user_id=%s, room_name=%s." % (user_id, room_name))
return peer_player_id
```
修改 joinroom 这个 route 的逻辑
```python
......
def main_handler(event, context):
try:
......
if route_key == 'joinroom':
user_id = getUserIDFromConnID(connection_id)
# 当有新玩家加入时,先检查是否有空余房间,如果有则加入,如果没有则创建新房间
item_response = common_resources_table.get_item(Key={'resource_name': 'available_rooms'})
room_name = "" # 房间名
peer_player_id = "" # 对手的玩家ID
if 'Item' in item_response:
room_names = item_response['Item']['room_names']
# 如果没有空余房间,则创建新房间
if len(room_names) == 0:
room_name = createRoom(user_id)
else:
room_name = room_names.pop()
peer_player_id = joinOthersRoom(user_id, room_name)
# 匹配完成,更新可用房间列表
common_resources_table.put_item(Item={'resource_name': 'available_rooms', 'room_names': room_names})
# 如果没有空余房间,则创建新房间
else:
room_name = createRoom(user_id)
# 加入房间后,返回 json 数据给客户端处理
message = '{"action":"joinroom", "data":"%s"}' % room_name
server_response(connection_id, message)
# 如果匹配完成,则 peer_player_id 不为空,需要通知双方对手
if peer_player_id != "":
message = '{"action":"peer_player_id", "data":"%s"}' % peer_player_id
server_response(connection_id, message)
peer_connection_id = getConnIDFromUserID(peer_player_id)
message = '{"action":"peer_player_id", "data":"%s"}' % user_id
server_response(peer_connection_id, message)
return {'statusCode': 200}
if route_key == 'exitroom':
......
```
执行 sam sync 同步资源到云上
```shell
sam sync --stack-name Serverless-GameServer-Workshop
```
#### 3.4 测试 joinroom 逻辑
wscat 测试代码逻辑

查看 Lambda 日志

**joinroom 逻辑开发部署完成**
### 4. 战斗逻辑开发
#### 4.1 开发战斗服务框架
本 Workshop 游戏的玩法为 1v1 对战,战斗逻辑为:
1. 玩家 A 攒够一定分数后可以向玩家 B 进行攻击(由服务端进行转发),被攻击的玩家无法进行操作
2. 先死亡的玩家向服务端同步分数
3. 两个玩家都死亡后,服务端进行战斗结算
本节我们将开发战斗相关逻辑,使用 SAM template 创建以下资源来实现战斗功能:
* 1 个 Lambda function(BattleMgrFunction),用于进行战斗逻辑处理
* 3 个 APIGateway route(attack, die, syncscore),用于接收客户端攻击、死亡、同步分数的请求
* 攻击:客户端 A 发送攻击请求并携带被攻击玩家 user_id,服务端接收到请求后向被攻击玩家发送数据,被攻击玩家客户端做相应展示
* 死亡:客户端 A 向服务端发送死亡请求,客户端处理数据后通知客户端 B
* 同步分数:客户端 A 和 B 每次分数变化时通知服务端自己当前分数
* 1 个 APIGateway integration,用于连接 route 和 Lambda
* 1 个 Lambda 执行的 Permission,用于让 APIGateway 有权限调用 Lambda
编辑`template.yaml`
* Role:修改为你自己创建的 role ARN
```yaml
......
Resources:
###--- HTTP Service ---###
......
###--- Websocket Service ---###
......
# 用于处理战斗逻辑
BattleMgrFunction:
Type: AWS::Serverless::Function
Properties:
Description: 'Battle'
CodeUri: battle-manager/
Handler: main.main_handler
Runtime: python3.9
Architectures:
- arm64
Role: "arn:aws:iam::123456789:role/Workshop-Lambda-Role"
# 用于连接 APIGateway 和 Lambda
BattleMgrIntegration:
Type: AWS::ApiGatewayV2::Integration
Properties:
ApiId: !Ref MainEntry
IntegrationType: AWS_PROXY
IntegrationUri: !Join
- ''
- - 'arn:'
- !Ref AWS::Partition
- ':apigateway:'
- !Ref AWS::Region
- ':lambda:path/2015-03-31/functions/'
- !GetAtt BattleMgrFunction.Arn
- '/invocations'
AttackRoute:
Type: AWS::ApiGatewayV2::Route
Properties:
ApiId: !Ref MainEntry
RouteKey: "attack"
AuthorizationType: NONE
OperationName: AttackRoute
Target: !Join
- '/'
- - 'integrations'
- !Ref BattleMgrIntegration
DieRoute:
Type: AWS::ApiGatewayV2::Route
Properties:
ApiId: !Ref MainEntry
RouteKey: "die"
AuthorizationType: NONE
OperationName: DieRoute
Target: !Join
- '/'
- - 'integrations'
- !Ref BattleMgrIntegration
SyncScoreRoute:
Type: AWS::ApiGatewayV2::Route
Properties:
ApiId: !Ref MainEntry
RouteKey: "syncscore"
AuthorizationType: NONE
OperationName: SyncScoreRoute
Target: !Join
- '/'
- - 'integrations'
- !Ref BattleMgrIntegration
# 用于允许 APIGateway 调用 Lambda
BattleMgrPermission:
Type: AWS::Lambda::Permission
DependsOn:
- MainEntry
Properties:
Action: lambda:InvokeFunction
FunctionName: !Ref BattleMgrFunction
Principal: apigateway.amazonaws.com
```
在 template.yaml 相同目录下创建代码目录 `battle-manager` ,名称对应于 template.yaml 里配置的 `Resources.BattleMgrFunction.Properties.CodeUri`
在 `~/Serverless-GameServer-Workshop/battle-manager` 目录下创建 main.py 文件,并且在 main.py 文件 中添加 main_handler 方法,名称对应于 template.yaml 里配置的 `Resources.BattleMgrFunction.Properties.Handler`
~/Serverless-GameServer-Workshop/battle-manager/main.py
```python
import json
def main_handler(event, context):
try:
# Validate request parameters
route_key = event.get('requestContext', {}).get('routeKey')
connection_id = event.get('requestContext', {}).get('connectionId')
event_body = event.get('body')
event_body = json.loads(event_body if event_body is not None else '{}')
if route_key is None or connection_id is None:
return {'statusCode': 400}
if route_key == 'attack':
print('test attack')
return {'statusCode': 200}
if route_key == 'die':
print('test die')
return {'statusCode': 200}
if route_key == 'syncscore':
print('test syncscore')
return {'statusCode': 200}
except Exception as err:
print(err)
return {'statusCode': 500}
```
执行 sam sync 同步资源到云上
```shell
sam sync --stack-name Serverless-GameServer-Workshop
```
#### 4.2 测试战斗服务框架
同 3.2 节,略
#### 4.3 开发战斗逻辑
##### 4.3.1 辅助函数
编辑 `~/Serverless-GameServer-Workshop/battle-manager/main.py`
添加一些辅助函数用于逻辑开发:
* 需要修改 endpoint_url 为创建的 APIGateway url
```python
...
import boto3
main_server_table = boto3.resource('dynamodb').Table('main_server')
common_resources_table = boto3.resource('dynamodb').Table('common_resources')
# 通过 user_id 获取 connection_id
# 这里做了遍历,生产环境中应该使用索引
def getConnIDFromUserID(user_id):
connection_ids = []
scan_response = main_server_table.scan(ProjectionExpression='connection_id')
connection_ids = [item['connection_id'] for item in scan_response['Items']]
for connection_id in connection_ids:
if getUserIDFromConnID(connection_id) == user_id:
return connection_id
logger.error("Cannot get connection_id, user_id=%s" % (user_id))
return -1
def server_response(connection_id, message):
apig_management_client = boto3.client('apigatewaymanagementapi',endpoint_url="https://aabbcc.execute-api.us-east-1.amazonaws.com/dev")
send_response = apig_management_client.post_to_connection(Data=message, ConnectionId=connection_id)
# 通过 connection_id 获取 user_id
def getUserIDFromConnID(connection_id):
item_response = main_server_table.get_item(Key={'connection_id': connection_id})
if 'Item' in item_response:
user_id = item_response['Item']['user_id']
else:
user_id = None
return user_id
# 通过 user_id 获取 room_name
def getRoomNameFromUserId(user_id):
player_room_key = "%s_in_room" % user_id
item_response = common_resources_table.get_item(Key={'resource_name': player_room_key})
if 'Item' in item_response:
room_name = item_response['Item']['room_name']
else:
room_name = None
return room_name
# 通过 user_id, room_name 获取对手的 user_id
def getPeerPlayerIDFromRoom(user_id, room_name):
item_response = common_resources_table.get_item(Key={'resource_name': room_name})
players_in_room = item_response['Item']['players_in_room']
for player_id in players_in_room:
if player_id != user_id:
return player_id
# 获取对局信息
def battleMgrPrecheck(connection_id):
user_id = getUserIDFromConnID(connection_id)
room_name = getRoomNameFromUserId(user_id)
peer_player_id = getPeerPlayerIDFromRoom(user_id, room_name)
return (user_id, room_name, peer_player_id)
# 对局结算
def battle_settlement(battle_players, room_name):
user_id_1 = battle_players[0]
user_id_2 = battle_players[1]
in_battle_score_1 = int(common_resources_table.get_item(Key={'resource_name': "%s_in_battle_score" % user_id_1})['Item']['score'])
in_battle_score_2 = int(common_resources_table.get_item(Key={'resource_name': "%s_in_battle_score" % user_id_2})['Item']['score'])
winner_id = None
if in_battle_score_1 > in_battle_score_2:
winner_id = user_id_1
elif in_battle_score_1 < in_battle_score_2:
winner_id = user_id_2
message = '{"action":"battle_settlement", "data":"UNKNOW"}'
for user_id in battle_players:
in_battle_score = int(common_resources_table.get_item(Key={'resource_name': "%s_in_battle_score" % user_id})['Item']['score'])
connection_id = getConnIDFromUserID(user_id)
if winner_id == None:
message = '{"action":"battle_settlement", "data":"DRAW"}'
print("Battle DRAW, user_id=%s, score=%d" % (user_id, in_battle_score))
elif user_id == winner_id:
message = '{"action":"battle_settlement", "data":"WIN"}'
print("Battle WIN, user_id=%s, score=%d" % (user_id, in_battle_score))
else:
message = '{"action":"battle_settlement", "data":"LOSE"}'
print("Battle LOSE, user_id=%s, score=%d" % (user_id, in_battle_score))
server_response(connection_id, message)
clear_battle_data(battle_players, room_name)
# 清除对局数据
def clear_battle_data(battle_players, room_name):
for user_id in battle_players:
common_resources_table.delete_item(Key={'resource_name': "%s_in_battle_score" % user_id})
common_resources_table.delete_item(Key={'resource_name': "%s_in_battle_die" % user_id})
with common_resources_table.batch_writer() as batch:
item_response = common_resources_table.get_item(Key={'resource_name': room_name})
players_in_room = item_response['Item']['players_in_room']
for user_id in players_in_room:
batch.delete_item(Key={"resource_name":"%s_in_room" % user_id})
batch.delete_item(Key={"resource_name":room_name})
print("All battle data cleared. room_name=%s, user_id=%s" % (room_name, battle_players))
```
##### 4.3.2 syncscore
编辑 `~/Serverless-GameServer-Workshop/battle-manager/main.py`,扩展 syncscore 功能
```python
......
def main_handler(event, context):
try:
......
if route_key == 'attack':
......
if route_key == 'die':
......
if route_key == 'syncscore':
score = event_body["score"]
user_id, room_name, peer_player_id = battleMgrPrecheck(connection_id)
in_battle_score = "%s_in_battle_score" % user_id
common_resources_table.put_item(Item={'resource_name': in_battle_score, 'score': score})
peer_connection_id = getConnIDFromUserID(peer_player_id)
message = '{"action":"player_syncscore", "data":%d}' % score
server_response(peer_connection_id, message)
print("[handle_syncscore]. user_id=%s, room_name=%s, current_score=%d." % (user_id, room_name, score))
return {'statusCode': 200}
except Exception as err:
print(err)
return {'statusCode': 500}
```
##### 4.3.3 attack
编辑 `~/Serverless-GameServer-Workshop/battle-manager/main.py`,扩展 attack 功能
```python
......
def main_handler(event, context):
try:
......
if route_key == 'attack':
# 根据 connection_id 获取 对局信息
user_id, room_name, peer_player_id = battleMgrPrecheck(connection_id)
# 获取对手的 connection_id
connection_id = getConnIDFromUserID(peer_player_id)
# 向对手发送攻击消息
message = '{"action":"attacked", "data":"FREEZE"}'
server_response(connection_id, message)
print("[handle_attack] Player be attacked. attacker_id=%s, victim_id=%s, room_name=%s." % (user_id, peer_player_id, room_name))
return {'statusCode': 200}
if route_key == 'die':
......
if route_key == 'syncscore':
......
except Exception as err:
print(err)
return {'statusCode': 500}
```
##### 4.3.4 die
编辑 `~/Serverless-GameServer-Workshop/battle-manager/main.py`,扩展 die 功能
```python
......
def main_handler(event, context):
try:
......
if route_key == 'attack':
......
if route_key == 'die':
user_id, room_name, peer_player_id = battleMgrPrecheck(connection_id)
in_battle_die = "%s_in_battle_die" % user_id
common_resources_table.put_item(Item={'resource_name': in_battle_die, 'die': 1})
peer_connection_id = getConnIDFromUserID(peer_player_id)
item_response = common_resources_table.get_item(Key={'resource_name': "%s_in_battle_die" % peer_player_id})
if 'Item' not in item_response:
peer_connection_id = getConnIDFromUserID(peer_player_id)
message = '{"action":"player_died", "data":"%s"}' % user_id
server_response(peer_connection_id, message)
print("[handle_die] Player died. died_user_id=%s, room_name=%s." % (user_id, room_name))
return {'statusCode': 200}
else:
message = '{"action":"player_died", "data":"all"}'
server_response(peer_connection_id, message)
print("[handle_die] Player all died, start battle settlement.")
battle_settlement([user_id, peer_player_id], room_name)
return {'statusCode': 200}
if route_key == 'syncscore':
......
except Exception as err:
print(err)
return {'statusCode': 500}
```
执行 sam sync 同步资源到云上
```shell
sam sync --stack-name Serverless-GameServer-Workshop
```
#### 4.4 测试战斗逻辑
 完整的战斗日志

### 5. 配置客户端进行匹配对战
**Workshop 没有在客户端做丢包重试,有可能展示有异常**
#### 5.1 启动两个客户端

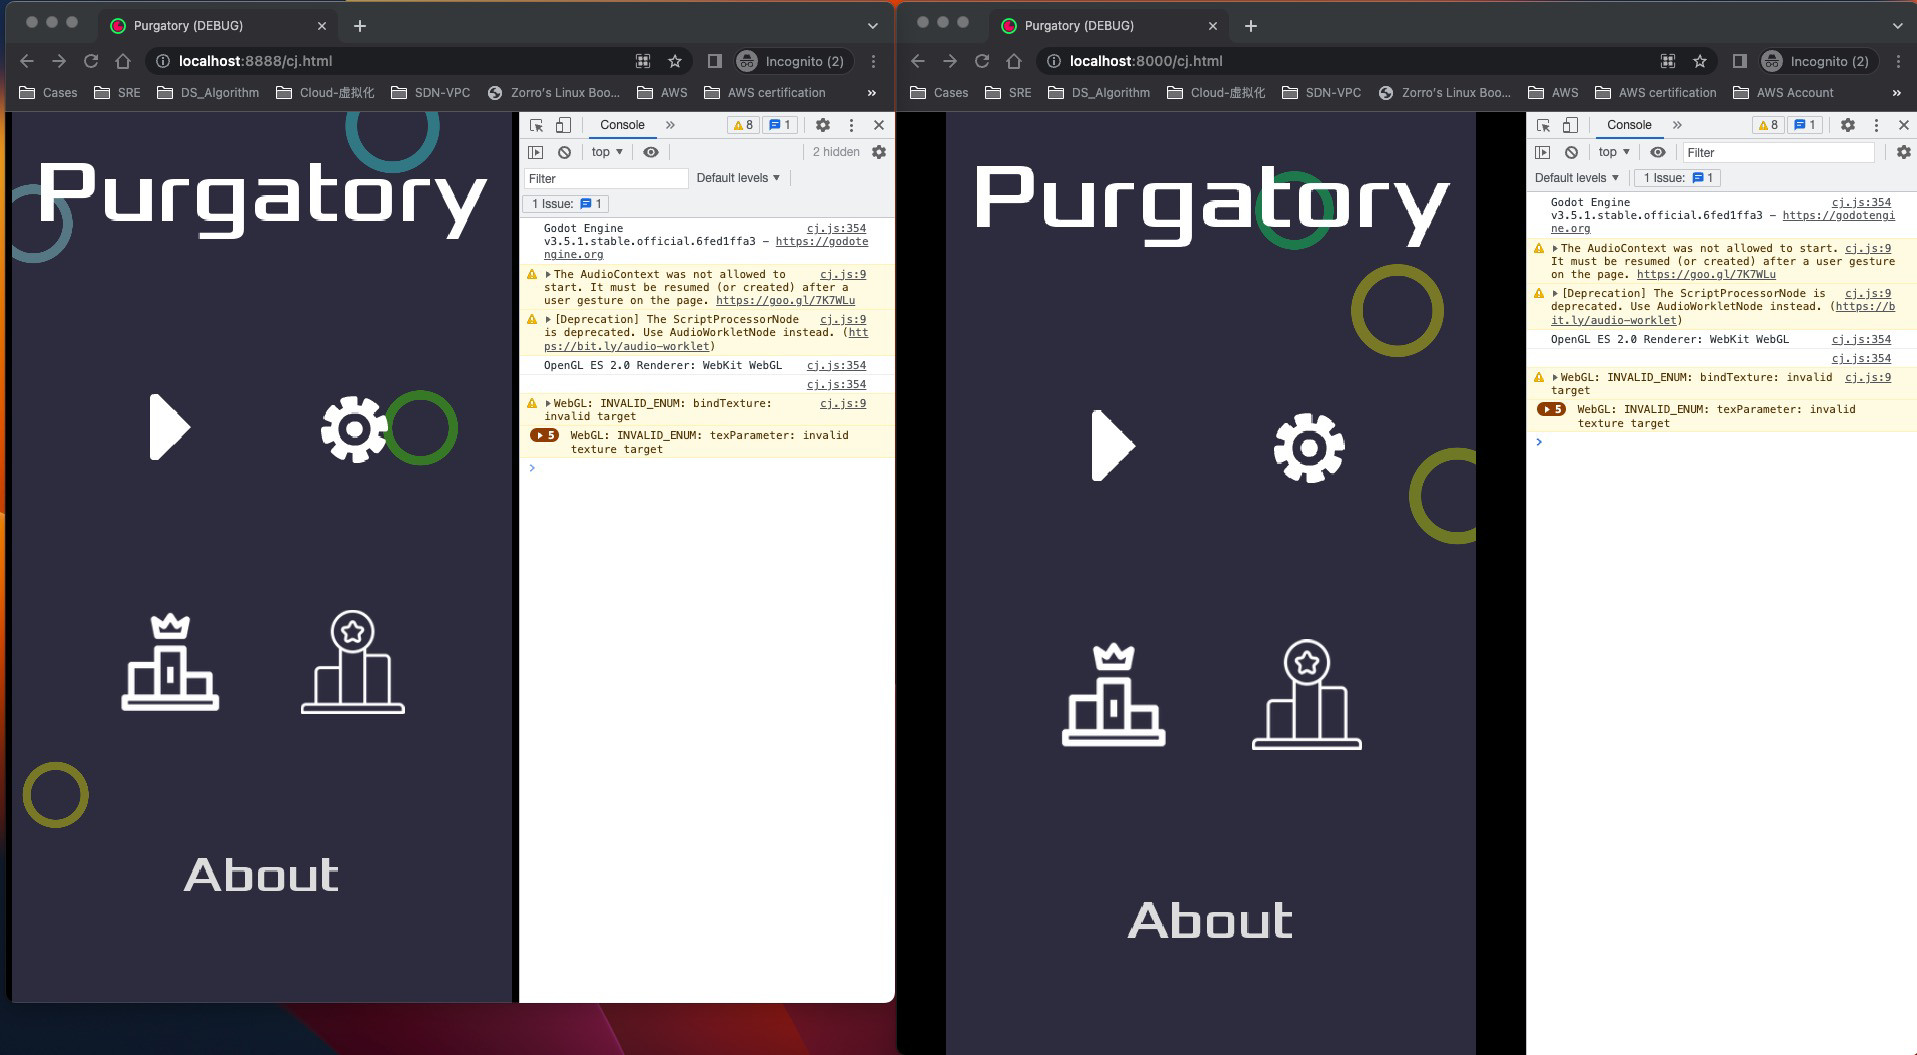
#### 5.2 分别给两个客户端配置服务端地址并创建用户
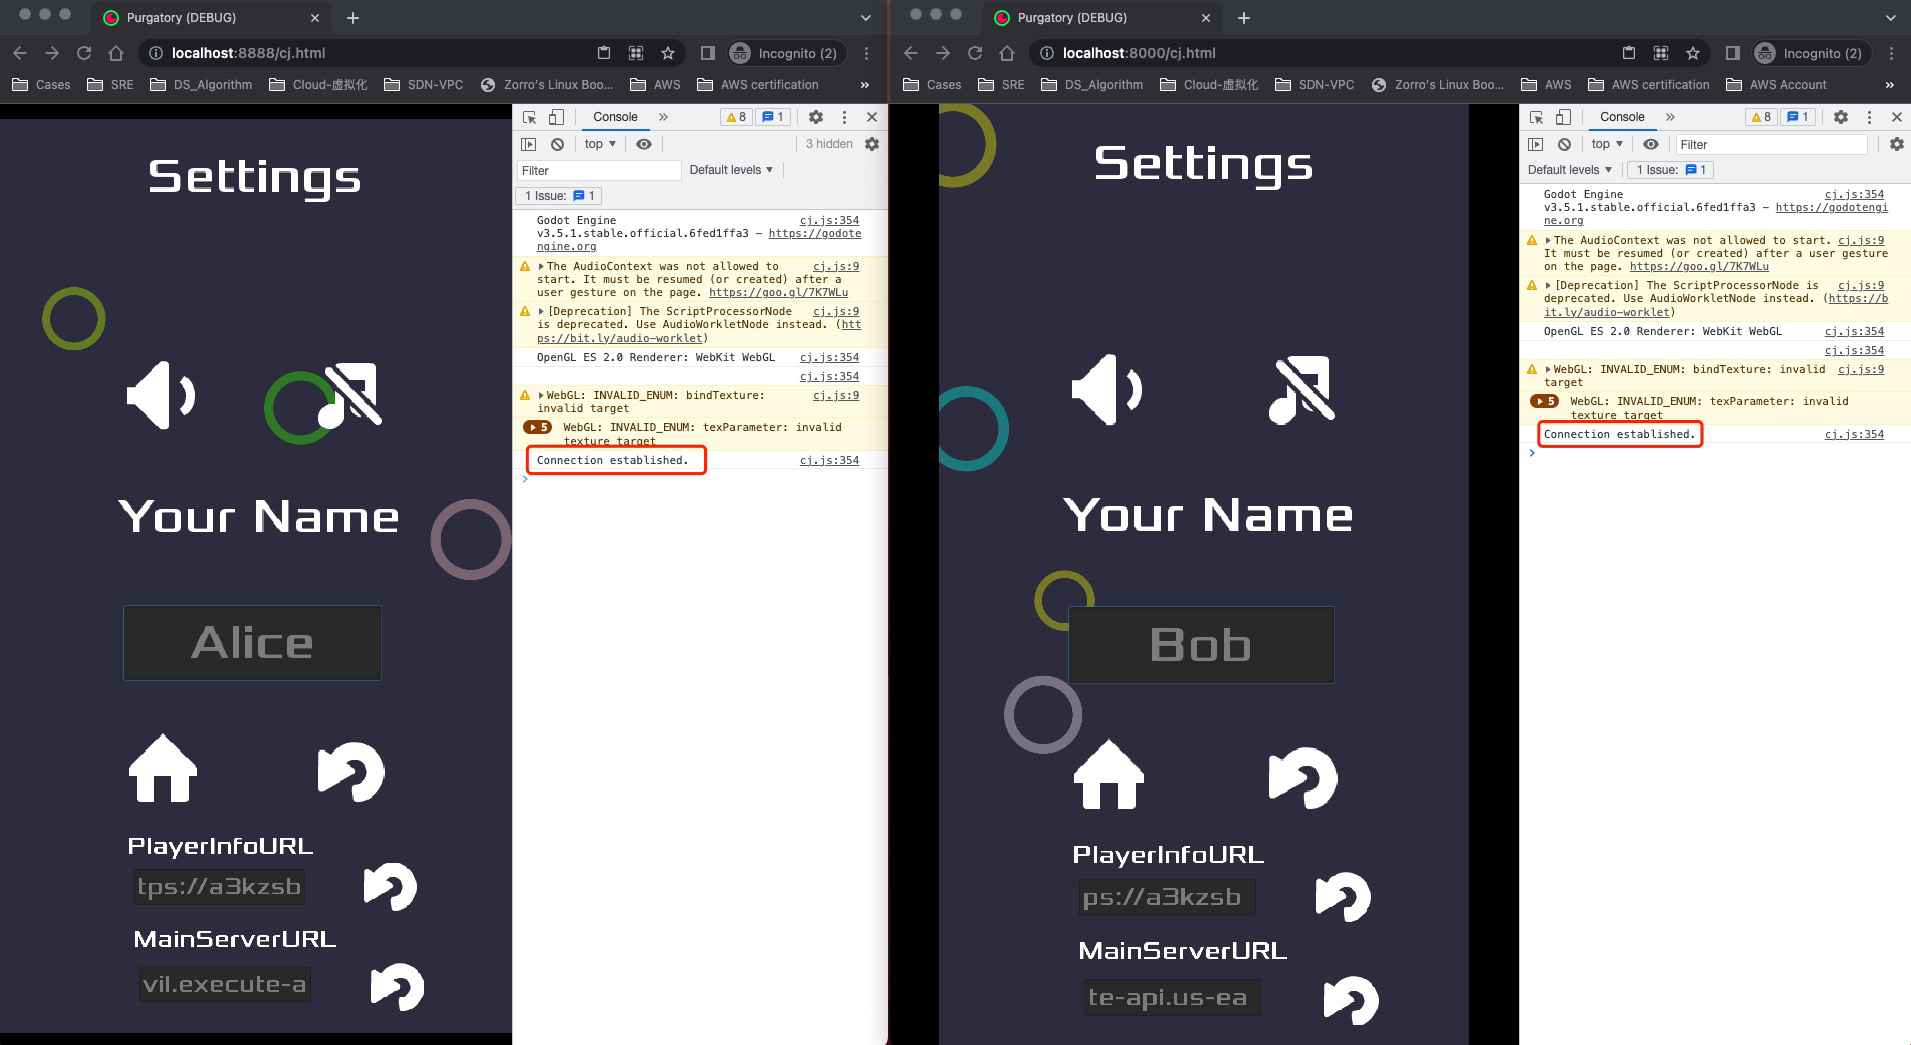
* 用户创建后,会自动将 user_id 作为 query_string 去和 Websocket APIGateway 建立连接
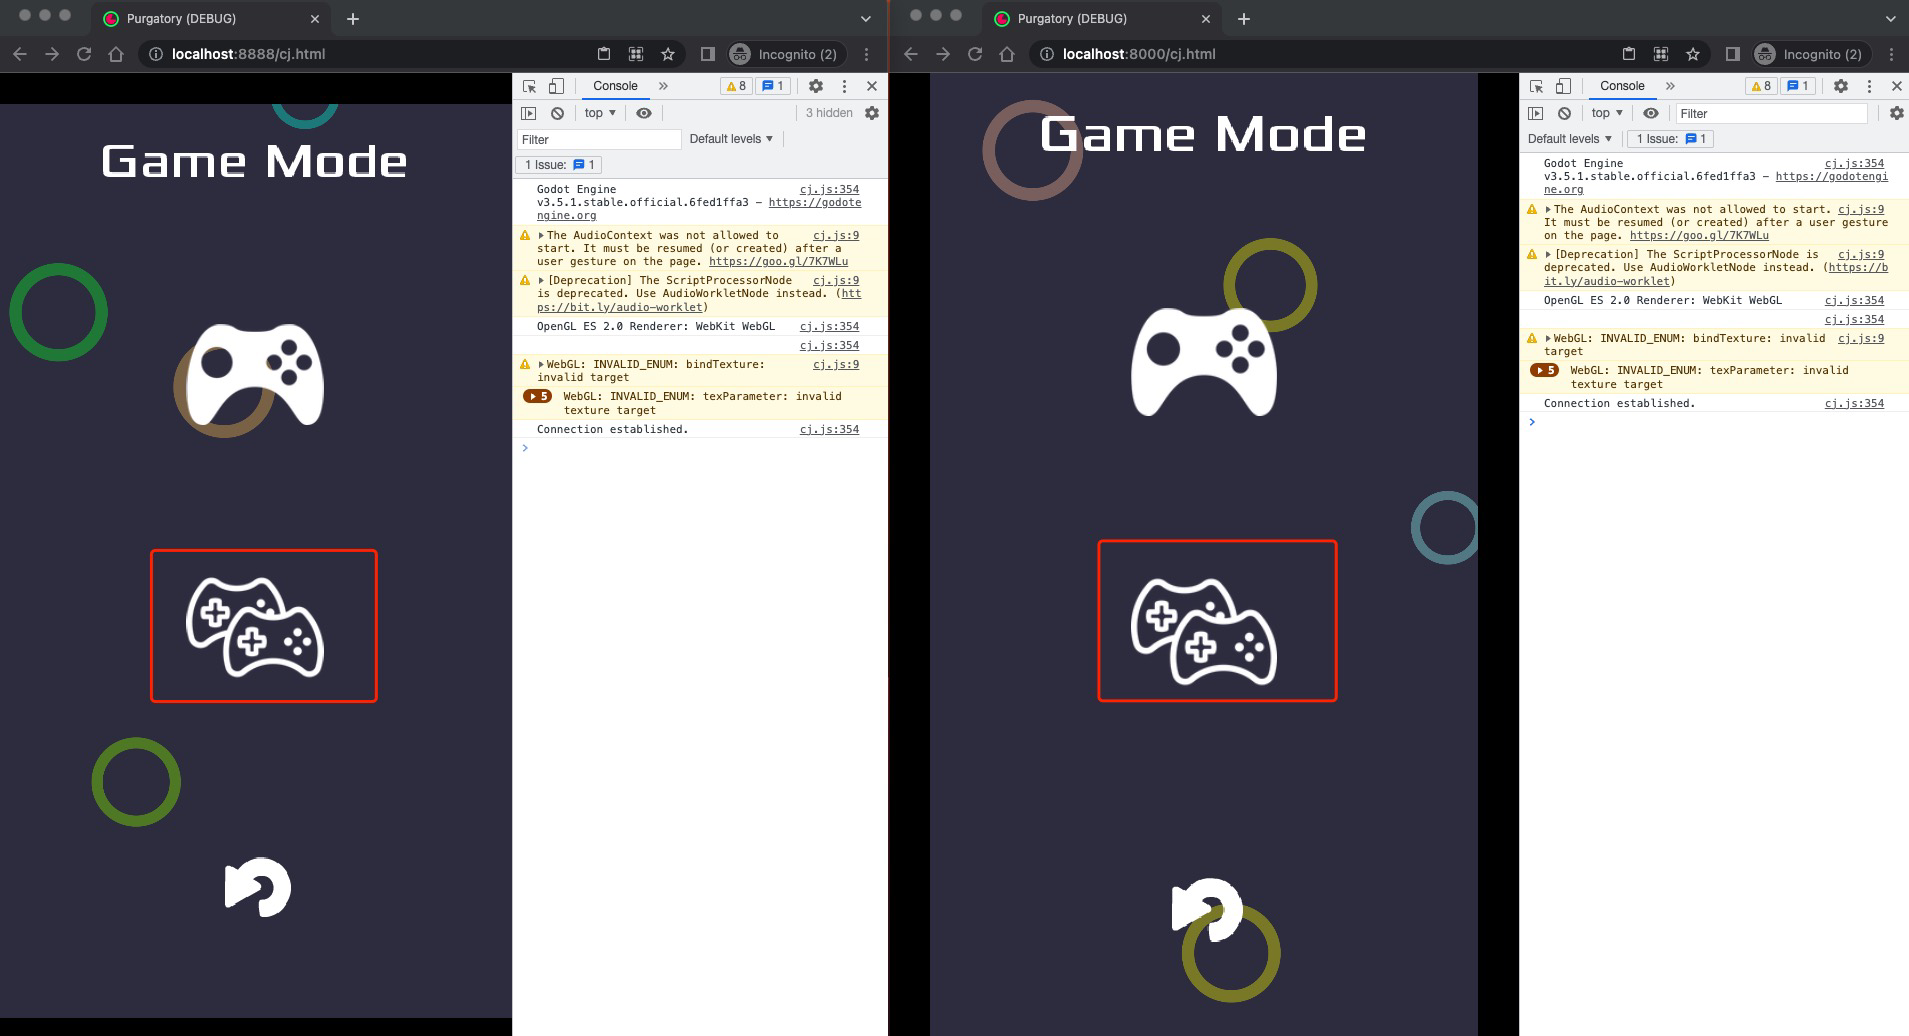
#### 5.3 进行匹配
选择双人模式进行匹配
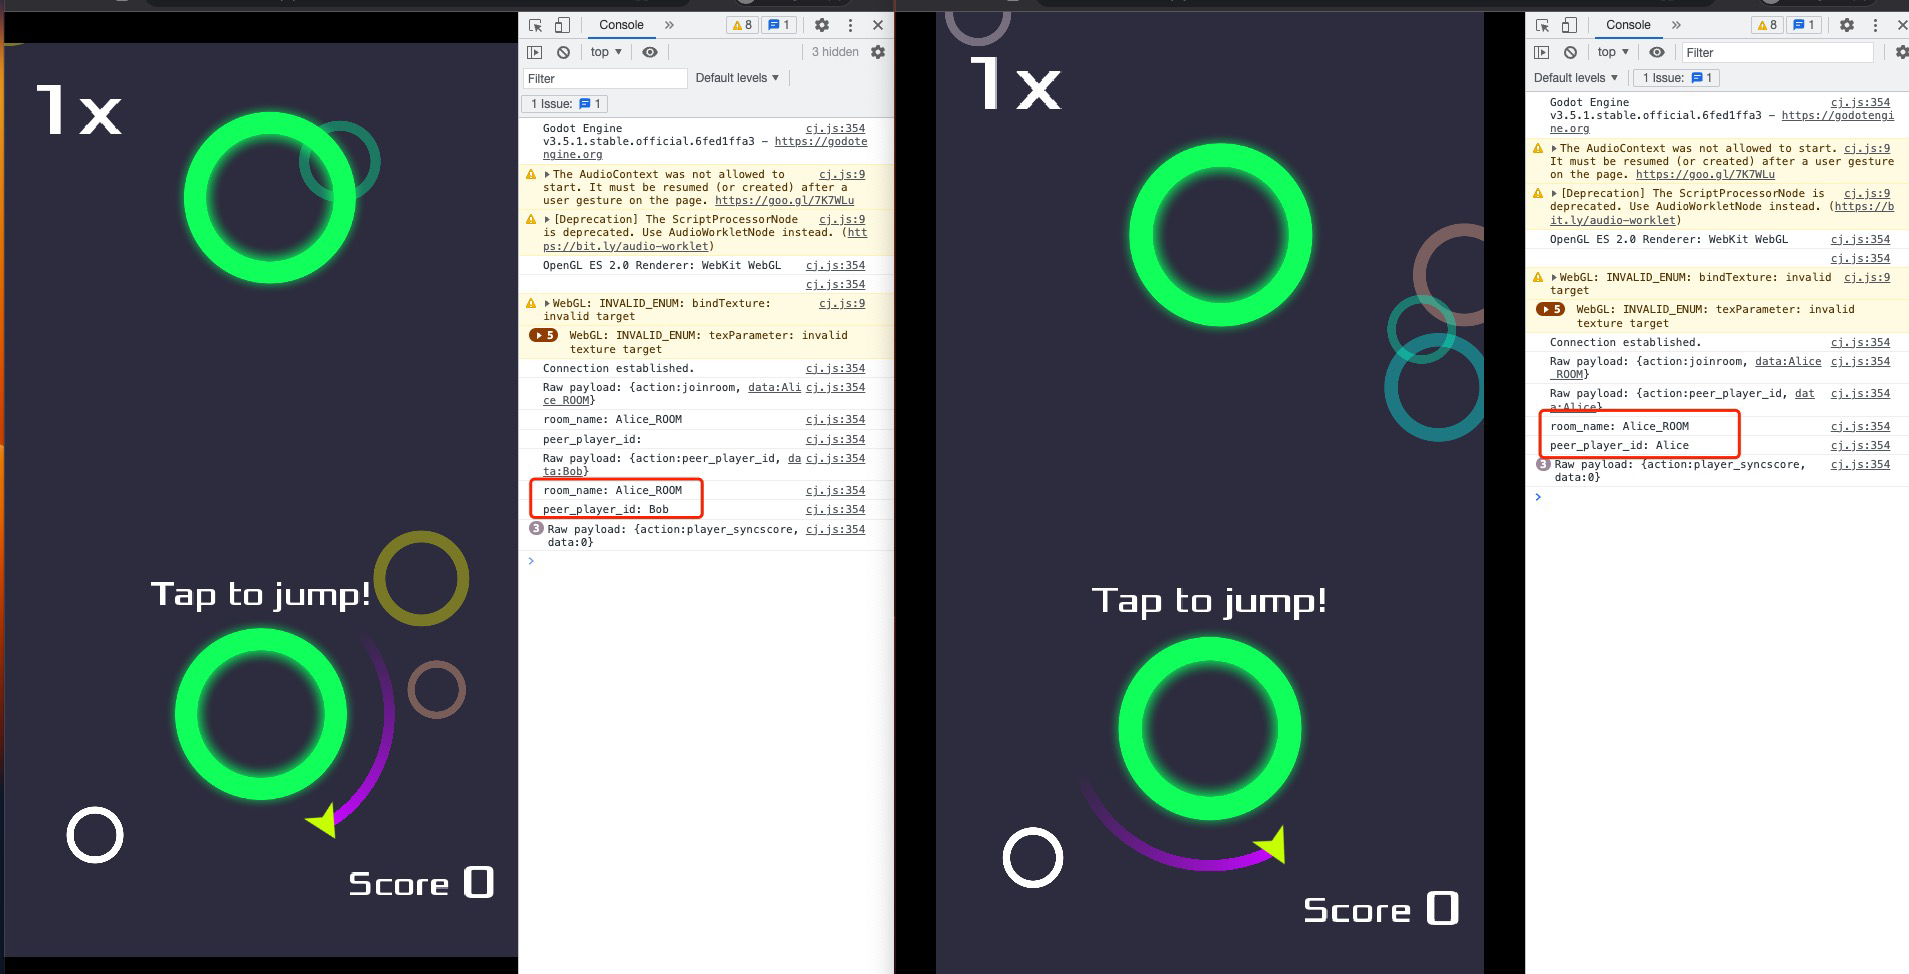
匹配完成
#### 5.4 战斗和结算
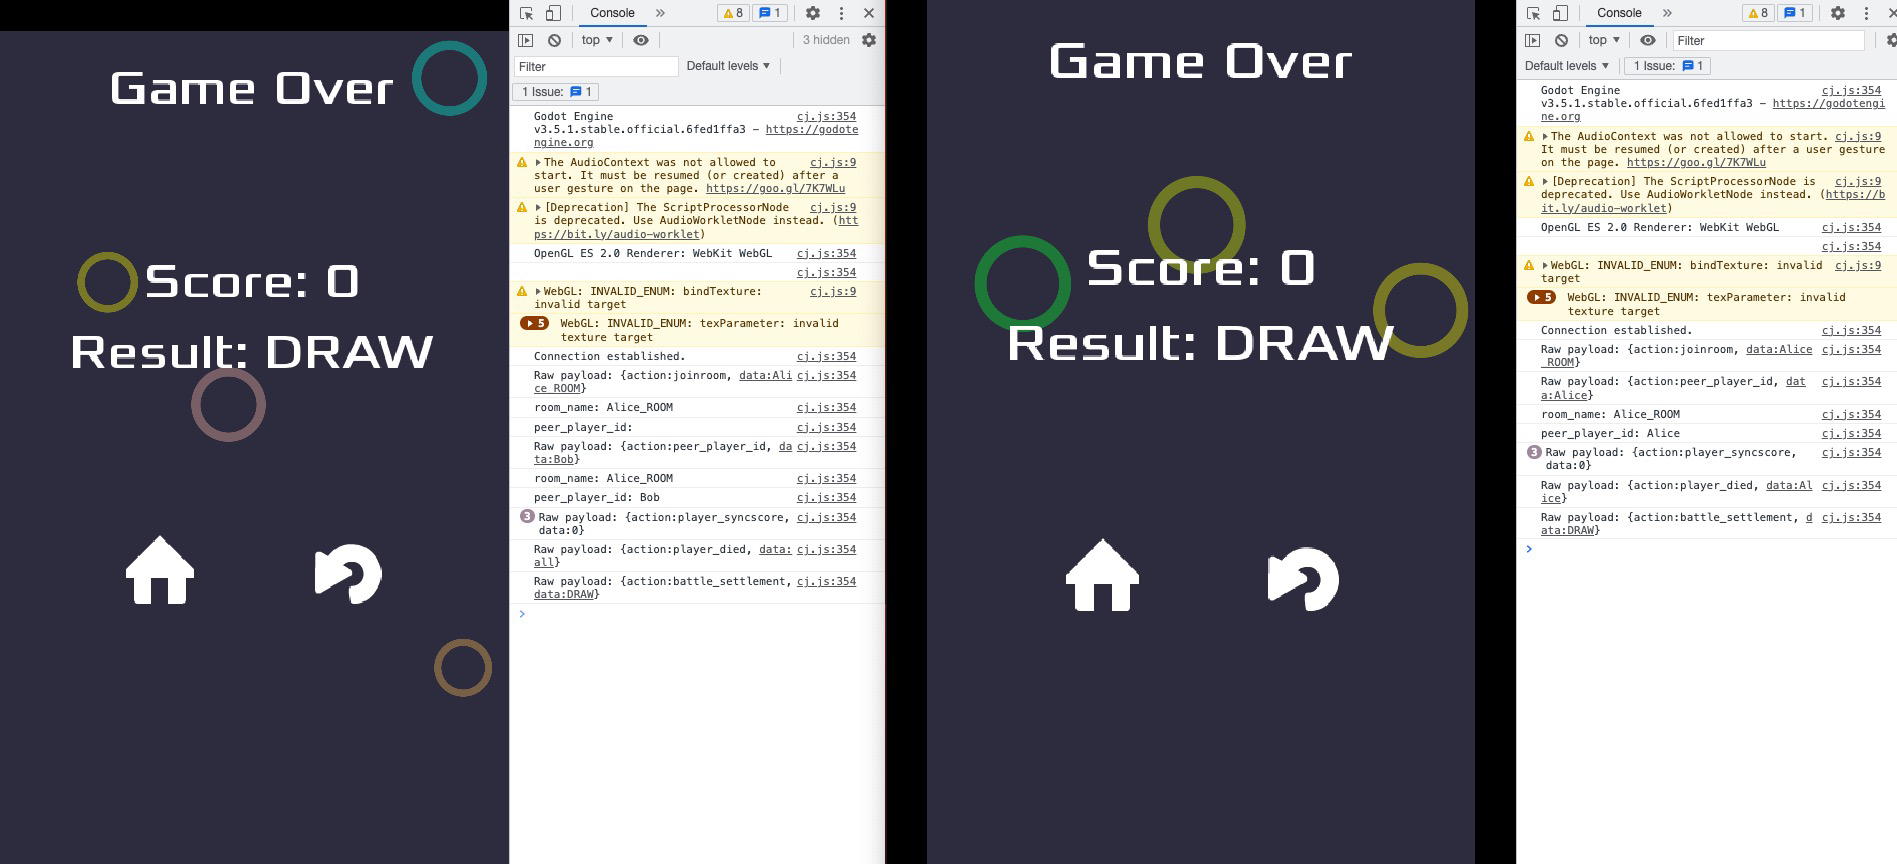
##### 5.4.1 平局
##### 5.4.2 攻击效果
左边的玩家积累超过 10 分,点击左下角按钮进行攻击,右边玩家被 FREEZE 无法跳跃

##### 5.4.3 战斗结算
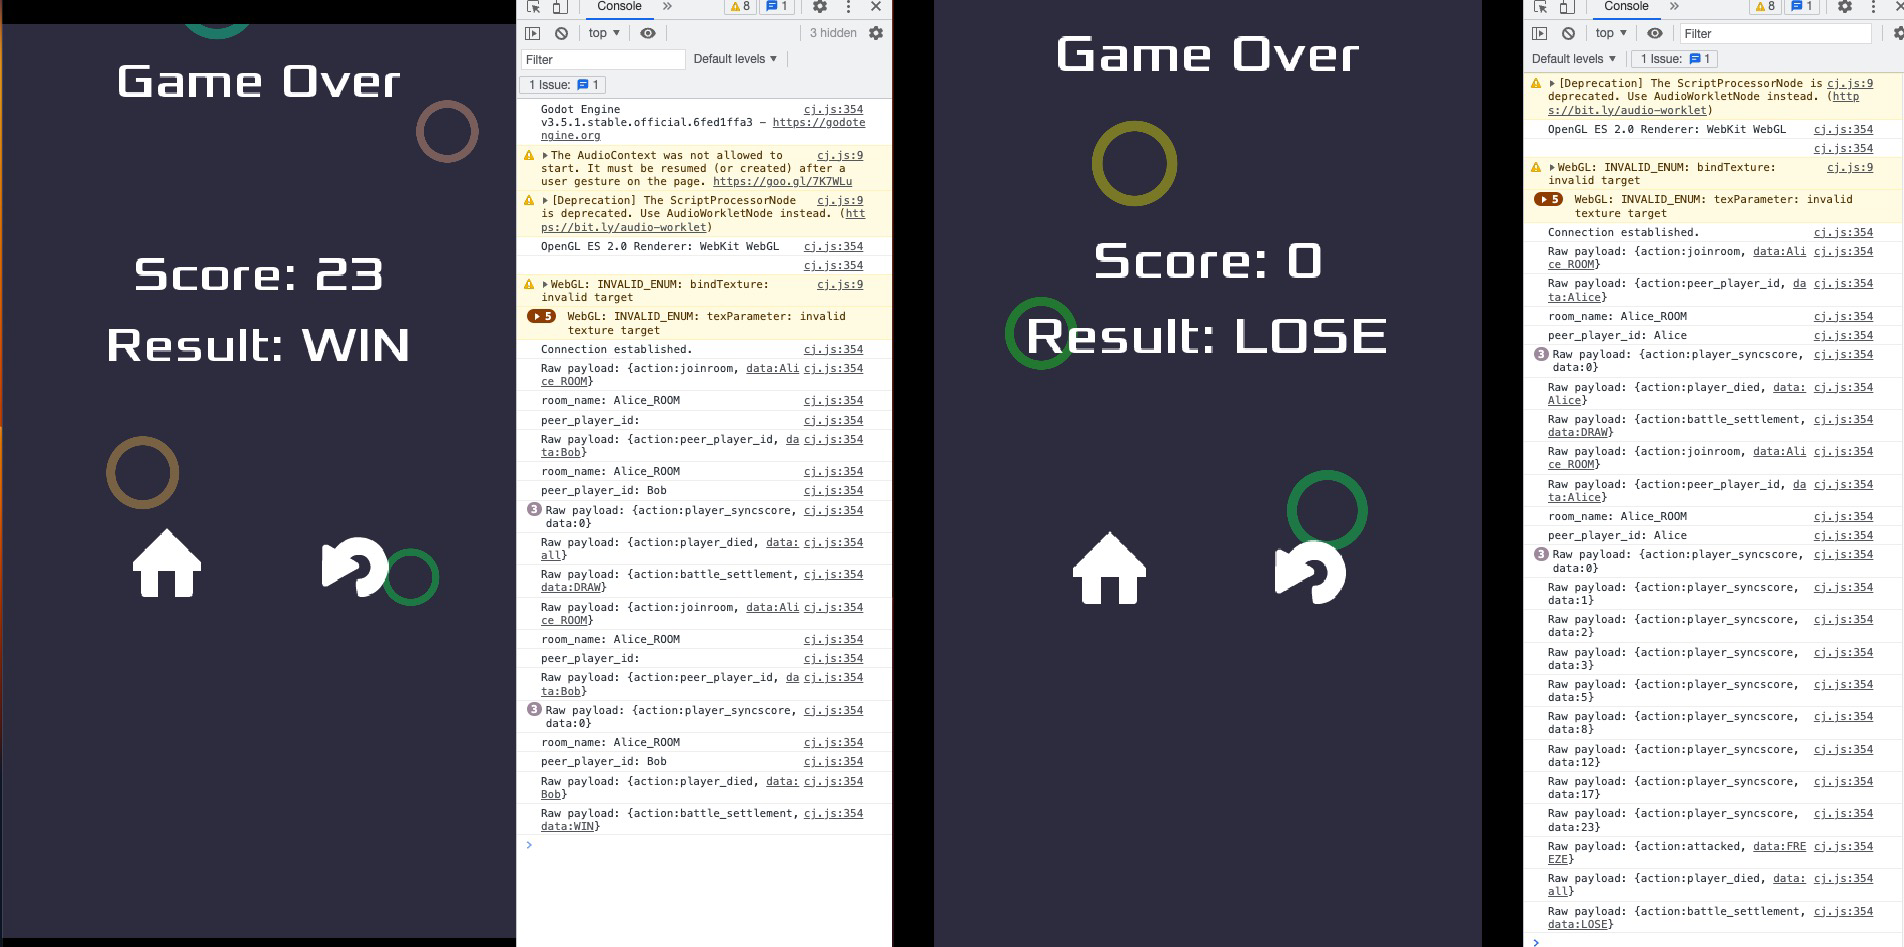
完整的战斗日志

### 5. 配置客户端进行匹配对战
**Workshop 没有在客户端做丢包重试,有可能展示有异常**
#### 5.1 启动两个客户端


#### 5.2 分别给两个客户端配置服务端地址并创建用户

* 用户创建后,会自动将 user_id 作为 query_string 去和 Websocket APIGateway 建立连接
#### 5.3 进行匹配
选择双人模式进行匹配

匹配完成

#### 5.4 战斗和结算
##### 5.4.1 平局

##### 5.4.2 攻击效果
左边的玩家积累超过 10 分,点击左下角按钮进行攻击,右边玩家被 FREEZE 无法跳跃

##### 5.4.3 战斗结算
