Figure 1: Solution architecture
# Walkthrough To implement this solution, we need to complete the following steps: 1. Create the IAM service role and policy that allow AWS Systems Manager to call other AWS services on your behalf. 2. Create the Automation documents. 3. Create a State Manager association, which invokes the Automation document. 4. Test the solution. If you prefer to use a CloudFormation template to create these resources, launch the following stack. []((https://console.aws.amazon.com/cloudformation/home?region=ap-southeast-2#/stacks/new?stackName=MSSQL-LT-Solution&templateURL=https://sql-lts-cfn-templates.s3-ap-southeast-2.amazonaws.com/single-account/SQLServerLicenseTrackingSolution-template.yaml)) ## Create an IAM service role and policy Create an IAM policy that allows Systems Manager to call other AWS services, such as Amazon Elastic Compute Cloud (Amazon EC2) and AWS License Manager, to perform the steps in the Automation document. 1. In the AWS Identity and Access Management console, choose Policies, and then choose Create policy. 2. On the JSON tab, enter the following code. Supply values for **REGION**, **AWS-ACCOUNT-ID**, and **ARN OF YOUR LICENSE CONFIGURATION**. ``` { "Version": "2012-10-17", "Statement": [ { "Sid": "sid0", "Effect": "Allow", "Action": [ "license-manager:UpdateLicenseSpecificationsForResource" ], "Resource": [ "(ARN OF YOUR LICENSE CONFIGURATIONS)" ] }, { "Sid": "sid1", "Effect": "Allow", "Action": [ "ssm:SendCommand" ], "Resource": [ "arn:aws:ec2:*:(AWS-ACCOUNT-ID):instance/*", "arn:aws:ssm:(REGION):(AWS-ACCOUNT-ID):automation-definition/Primary-SQLServerLicenseTrackingSolution-Document:VersionId}", "arn:aws:ssm:(REGION):(AWS-ACCOUNT-ID):document/Primary-SQLServerLicenseTrackingSolution-Document", "arn:aws:ssm:(REGION):(AWS-ACCOUNT-ID):automation-definition/Secondary-SQLServerLicenseTrackingSolution-Document:VersionId}", "arn:aws:ssm:(REGION):(AWS-ACCOUNT-ID):document/Secondary-SQLServerLicenseTrackingSolution-Document", "arn:aws:ssm:(REGION):*:document/AWS-RunPowerShellScript" ] }, { "Sid": "sid2", "Effect": "Allow", "Action": "iam:PassRole", "Resource": "arn:aws:iam::(AWS-ACCOUNT-ID):role/SQLServerLicenseTrackingSolution-Role" }, { "Sid": "sid3", "Effect": "Allow", "Action": [ "ssm:DeleteInventory", "ssm:PutInventory", "ssm:StartAutomationExecution", "ssm:ListCommands", "ssm:DescribeInstanceInformation", "ssm:ListCommandInvocations", "ssm:UpdateInstanceAssociationStatus", "ec2:DescribeInstances", "ec2:DescribeTags", "license-manager:ListLicenseSpecificationsForResource", "ec2messages:GetEndpoint", "ec2messages:FailMessage", "ec2messages:AcknowledgeMessage", "ec2messages:SendReply", "ec2messages:GetMessages", "tag:GetResources" ], "Resource": "*" } ] } ``` 4. Choose **Review policy** 5. For **Name**, enter `SQLServerLicenseTrackingSolution-Policy` 6. For **Description**, enter `Policy used by SSM and License Manager to track your SQL Server licenses using License Manager` 7. Choose **Create policy** 8. Next, you need to create an IAM role. In the IAM console, choose **Roles**, and then choose **Create role** 9. On the **Select role type** page, choose **AWS service**, and then choose **Systems Manager** 10. Under **Select your use case**, choose **Systems Manager** 11. Choose **Next: Permissions** 12. For **Filter policies**, enter `SQLServerLicenseTrackingSolution-Policy` 13. Choose **Next: Tags** 14. Choose **Next: Review** 15. For **Role name**, enter `SQLServerLicenseTrackingSolution-Role` 16. For **Description**, enter `Role used by SSM and License Manager to track your SQL Server licenses using License Manager` 17. Choose **Create role** ## Create the Automation Documents 1. In the AWS Systems Manager console, under **Actions & Change**, choose **Automation**. 2. Choose **Execute automation**, choose **Create document**, and then choose **Editor**. 3. For **Name**, enter `Primary-SQLServerLicenseTrackingSolution-Document`. 4. In the editor, choose **Edit**, and then choose **OK** to confirm. 5. Delete the existing content and paste the contents of [Primary-SQLServerLicenseTrackingSolution-Document.yaml](SystemsManagerAutomation/Primary-SQLServerLicenseTrackingSolution-Document.yaml). 6. Choose **Create automation**, and then verify that the newly created document is displayed under Owned by me. 7. Follow the same steps described above to create the secondary Automation document - `Secondary-SQLServerLicenseTrackingSolution-Document` using the contents of [Secondary-SQLServerLicenseTrackingSolution-Document.yaml](SystemsManagerAutomation/Secondary-SQLServerLicenseTrackingSolution-Document.yaml). 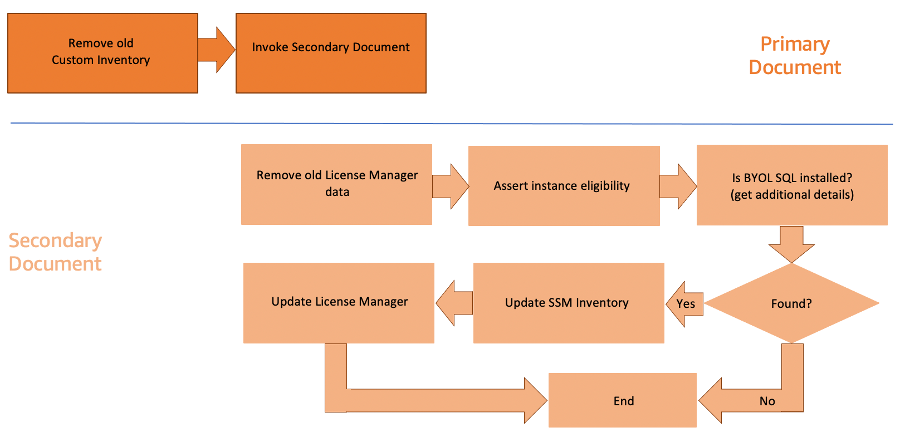Figure 2: Execution sequence of Automation document
The steps in the primary document are executed in the following order. 1. **Remove old Custom Inventory (deleteCustomInventory)**: This clean up task deletes all the metadata associated with the [custom inventory type](https://docs.aws.amazon.com/systems-manager/latest/userguide/sysman-inventory-custom.html) created for MSSQL `Custom:SQLServer` on all the EC2 instances. 2. **Invoke Secondary Document (invokeSecondarySQLServerLicenseTrackingSolutionDocument)**: This step invokes the SecondarySQLServerLicenseTrackingSolutionDocument automation The steps in the secondary document are executed in the following order. 1. **Remove old License Manager data (removeLicenseConfigDataForInstance)**: This step performs a clean-up task, removing any association to the license configuration if they exist. This gives us an opportunity to rehydrate the latest data to License Manager in case changes have been made. 2. **Assert instance eligibility (assertInstanceEligibility)**: Checks if the EC2 instance is eligible for this document. The two criteria are: • The instance is managed by Systems Manager and currently online. • The instance is running on a Windows operating system. 3. **Is BYOL SQL installed (isBYOLSQLServerInstalled)**: Checks if Microsoft SQL Server is installed, is not a SQL Server License Included instance and if it exists then retrieve the SQL Server(s) details running on the EC2 instance using Windows Registry. The output captures the Name, Edition and Version of the SQL Servers 4. **Conditional logic (foundSQLServerInstalledBranch)**: Performs a [branch](https://docs.aws.amazon.com/systems-manager/latest/userguide/automation-action-branch.html) action based on the evaluation of the previous step. Defaults to the next step if MSSQL exists on the EC2 instance. Exits if unavailable. 5. **Update SSM Inventory (updateInventory)**: Uses the output of step 3 (metadata) to update Inventory with a custom inventory of type Custom:SQLServer for the EC2 instance. 6. **Update AWS License Manager (updateLicenseManager)**: Determines the most recent edition of SQL Server installed and updates the AWS License Manager configuration associated with the EC2 instance accordingly. 7. **End (exitIfNoSqlServerFound)**: Is triggered if no SQL Server instances are found. ## Create State Manager association 1. In the AWS Systems Manager console, under Instances & Nodes, choose State Manager, and then choose Create association. 2. For Name, enter SQLServerLicenseTrackingSolution-Association. 3. In the search field, enter Primary-SQLServerLicenseTrackingSolution-Document, and then choose it in the results. 4. For Document version, choose Default at runtime. 5. Choose Simple execution. 6. Under Input parameters, enter the following: * InstanceId: `