# Contributing
Refer to the [readme guide](./README.md#getting-started) to get started.
## Resources
- [Carbon DevTools Chrome Extension](https://chrome.google.com/webstore/detail/carbon-devtools/oejjaglcafcolafkjecfkoojgnpfpgca)
- [Carbon Components Svelte](https://carbon-components-svelte.onrender.com/)
- [Carbon Icons Svelte](https://carbon-icons-svelte.onrender.com/)
- [discord.js](https://discord.js.org/#/docs/discord.js/main/general/welcome)
- [`@discordjs/builders` Slash Command Builder](https://github.com/discordjs/discord.js/blob/main/packages/builders/docs/examples/Slash%20Command%20Builders.md)
## Repository Reference
- [`cdk/`](./cdk) - AWS CDK application to deploy apps
- [`docs/`](./docs) - Documentation related to project including architecture diagrams
- [`tests/`](./tests) - End-to-end test suite powered by [Vitest](https://vitest.dev/), supports in-source unit testing
- [`packages/`](./packages) - collection of library packages, including Discord, support helpers, and a shared TypeScript configuration
- [`scripts/`](./scripts) - small CLI helper for automating tasks
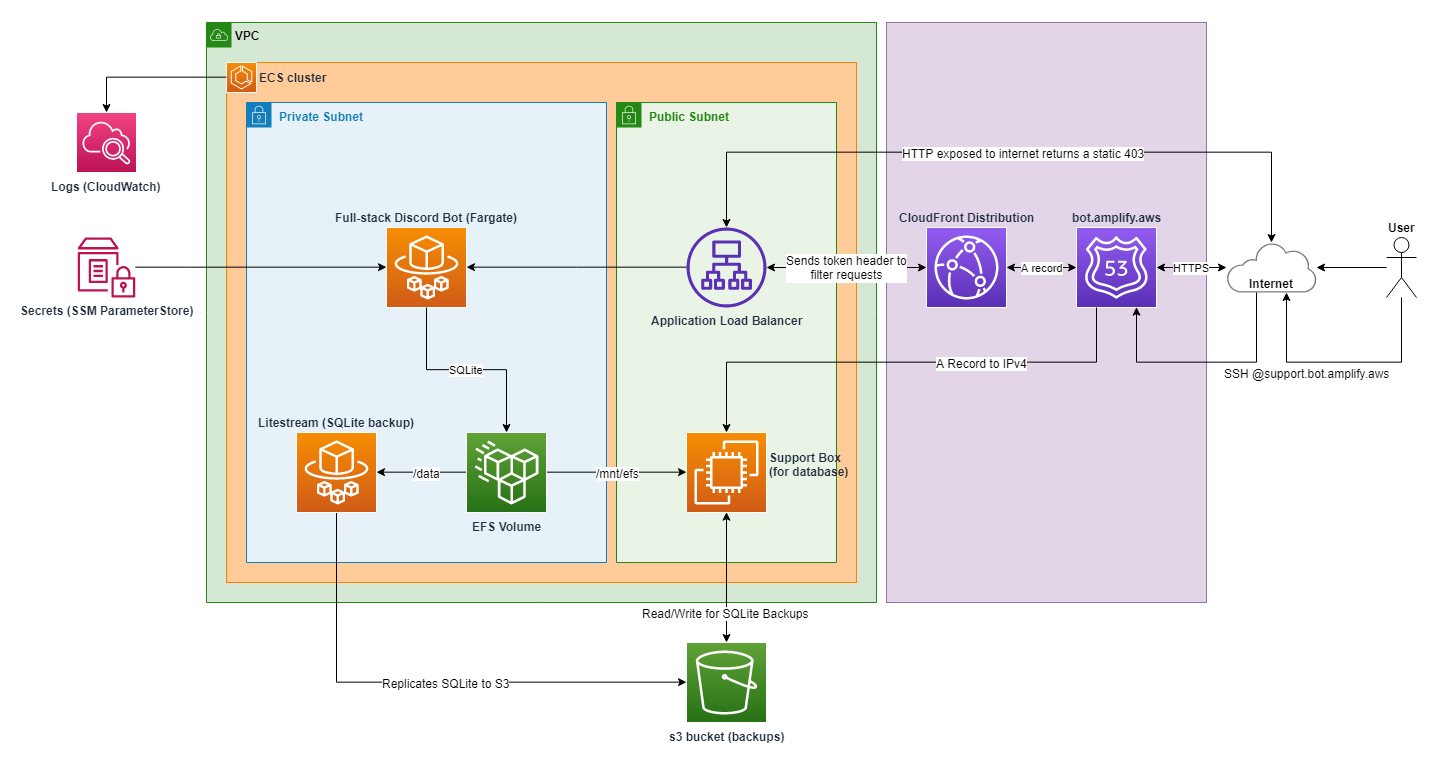
## Architecture Reference
## Git Hooks
It is recommended to use the provided git hooks to save time by verifying your changes before filing a pull request.
```bash
git config core.hookspath .git-hooks
```
## Authoring Discord Commands
To get started, let's create a new command file in `src/lib/discord/commands`: `hello.ts`
```ts
import { SlashCommandBuilder } from '@discordjs/builders'
import type { ChatInputCommandInteraction } from 'discord.js'
export const config = new SlashCommandBuilder()
.setName('hello')
.setDescription('Says hello to the world (or everyone)')
.addStringOption((option) =>
option
.setName('name')
.setDescription('Say hello to this name')
.setRequired(true)
.addChoices(
{ name: 'world', value: 'world' }
{ name: 'everyone', value: 'everyone' }
)
)
export function handler(interaction: ChatInputCommandInteraction): string {
const name = interaction.options.getString('name') as string
return `Hello, ${name}!`
}
if (import.meta.vitest) {
const { test } = import.meta.vitest
test.todo('/hello')
}
```
## Creating new endpoints
- refer to the [SvelteKit documentation](https://kit.svelte.dev/docs/routing#server)
- New endpoints _must_ be created in `/api` if they are to be called externally (i.e. not a page load endpoint, which runs at build time)
- all routes under `/api` are rate-limited
## Creating Secrets in SSM
**[scripts](./scripts)**
Create secrets in SSM Parameter Store with the `scripts` helper! Rename `.env.sample` to `.env.next` and create secrets with the following command:
```bash
pnpm scripts create-secrets -e next
```
> **Note**
> dotenv files are loaded using Vite's `loadEnv` and `local` dotenv files are not supported when creating secrets. Additionally, we must be sure to pass a valid environment name such as `main` or `next`
## Setup GitHub
Some of the bot features require a few manual configuration steps.
> **Note**
> You do not need to set up a GitHub organization to test with locally if you do not plan to work on GitHub-related features
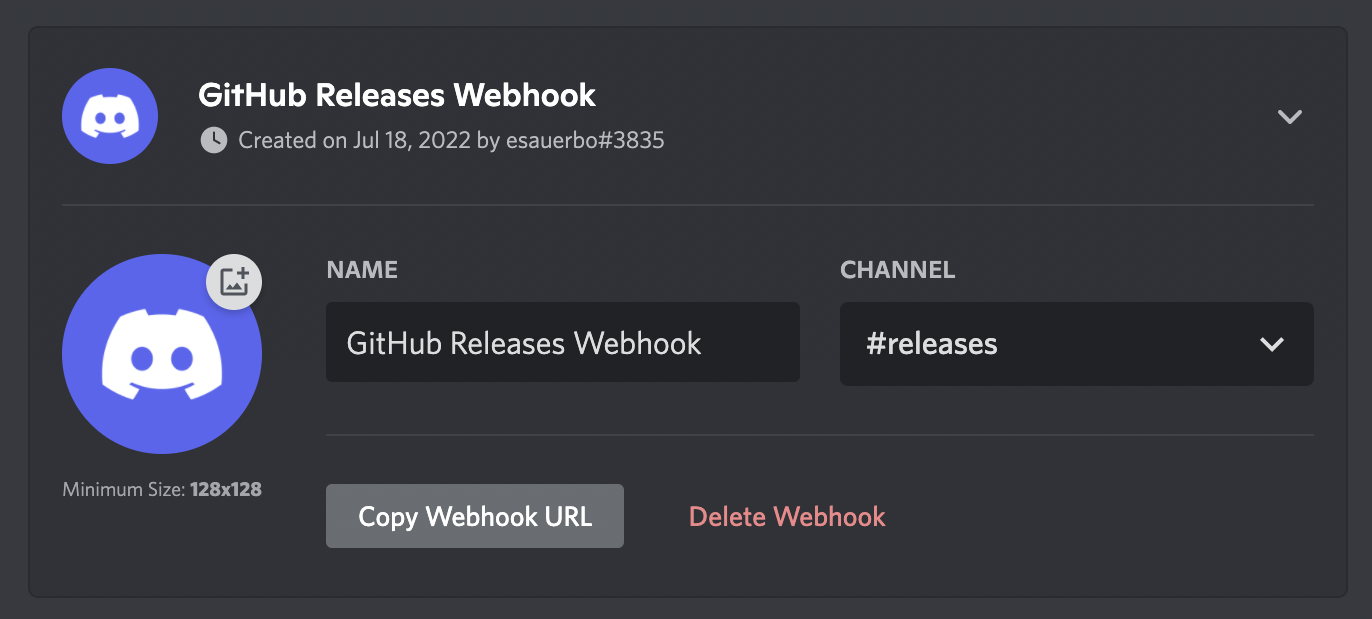
### Configuring a Github -> Discord Webhook
This is used for release notifications. Begin in your Discord server:
1. Go to server settings (click on the server name -> **Server Settings**)
2. Go to **Integrations** -> **Create Webhook**
3. Add a descriptive name
4. Select **#releases** as the channel the webhook posts to
5. Select **Copy Webhook URL**
6. Add the url to your `.env` file as `DISCORD_WEBHOOK_URL_RELEASES`
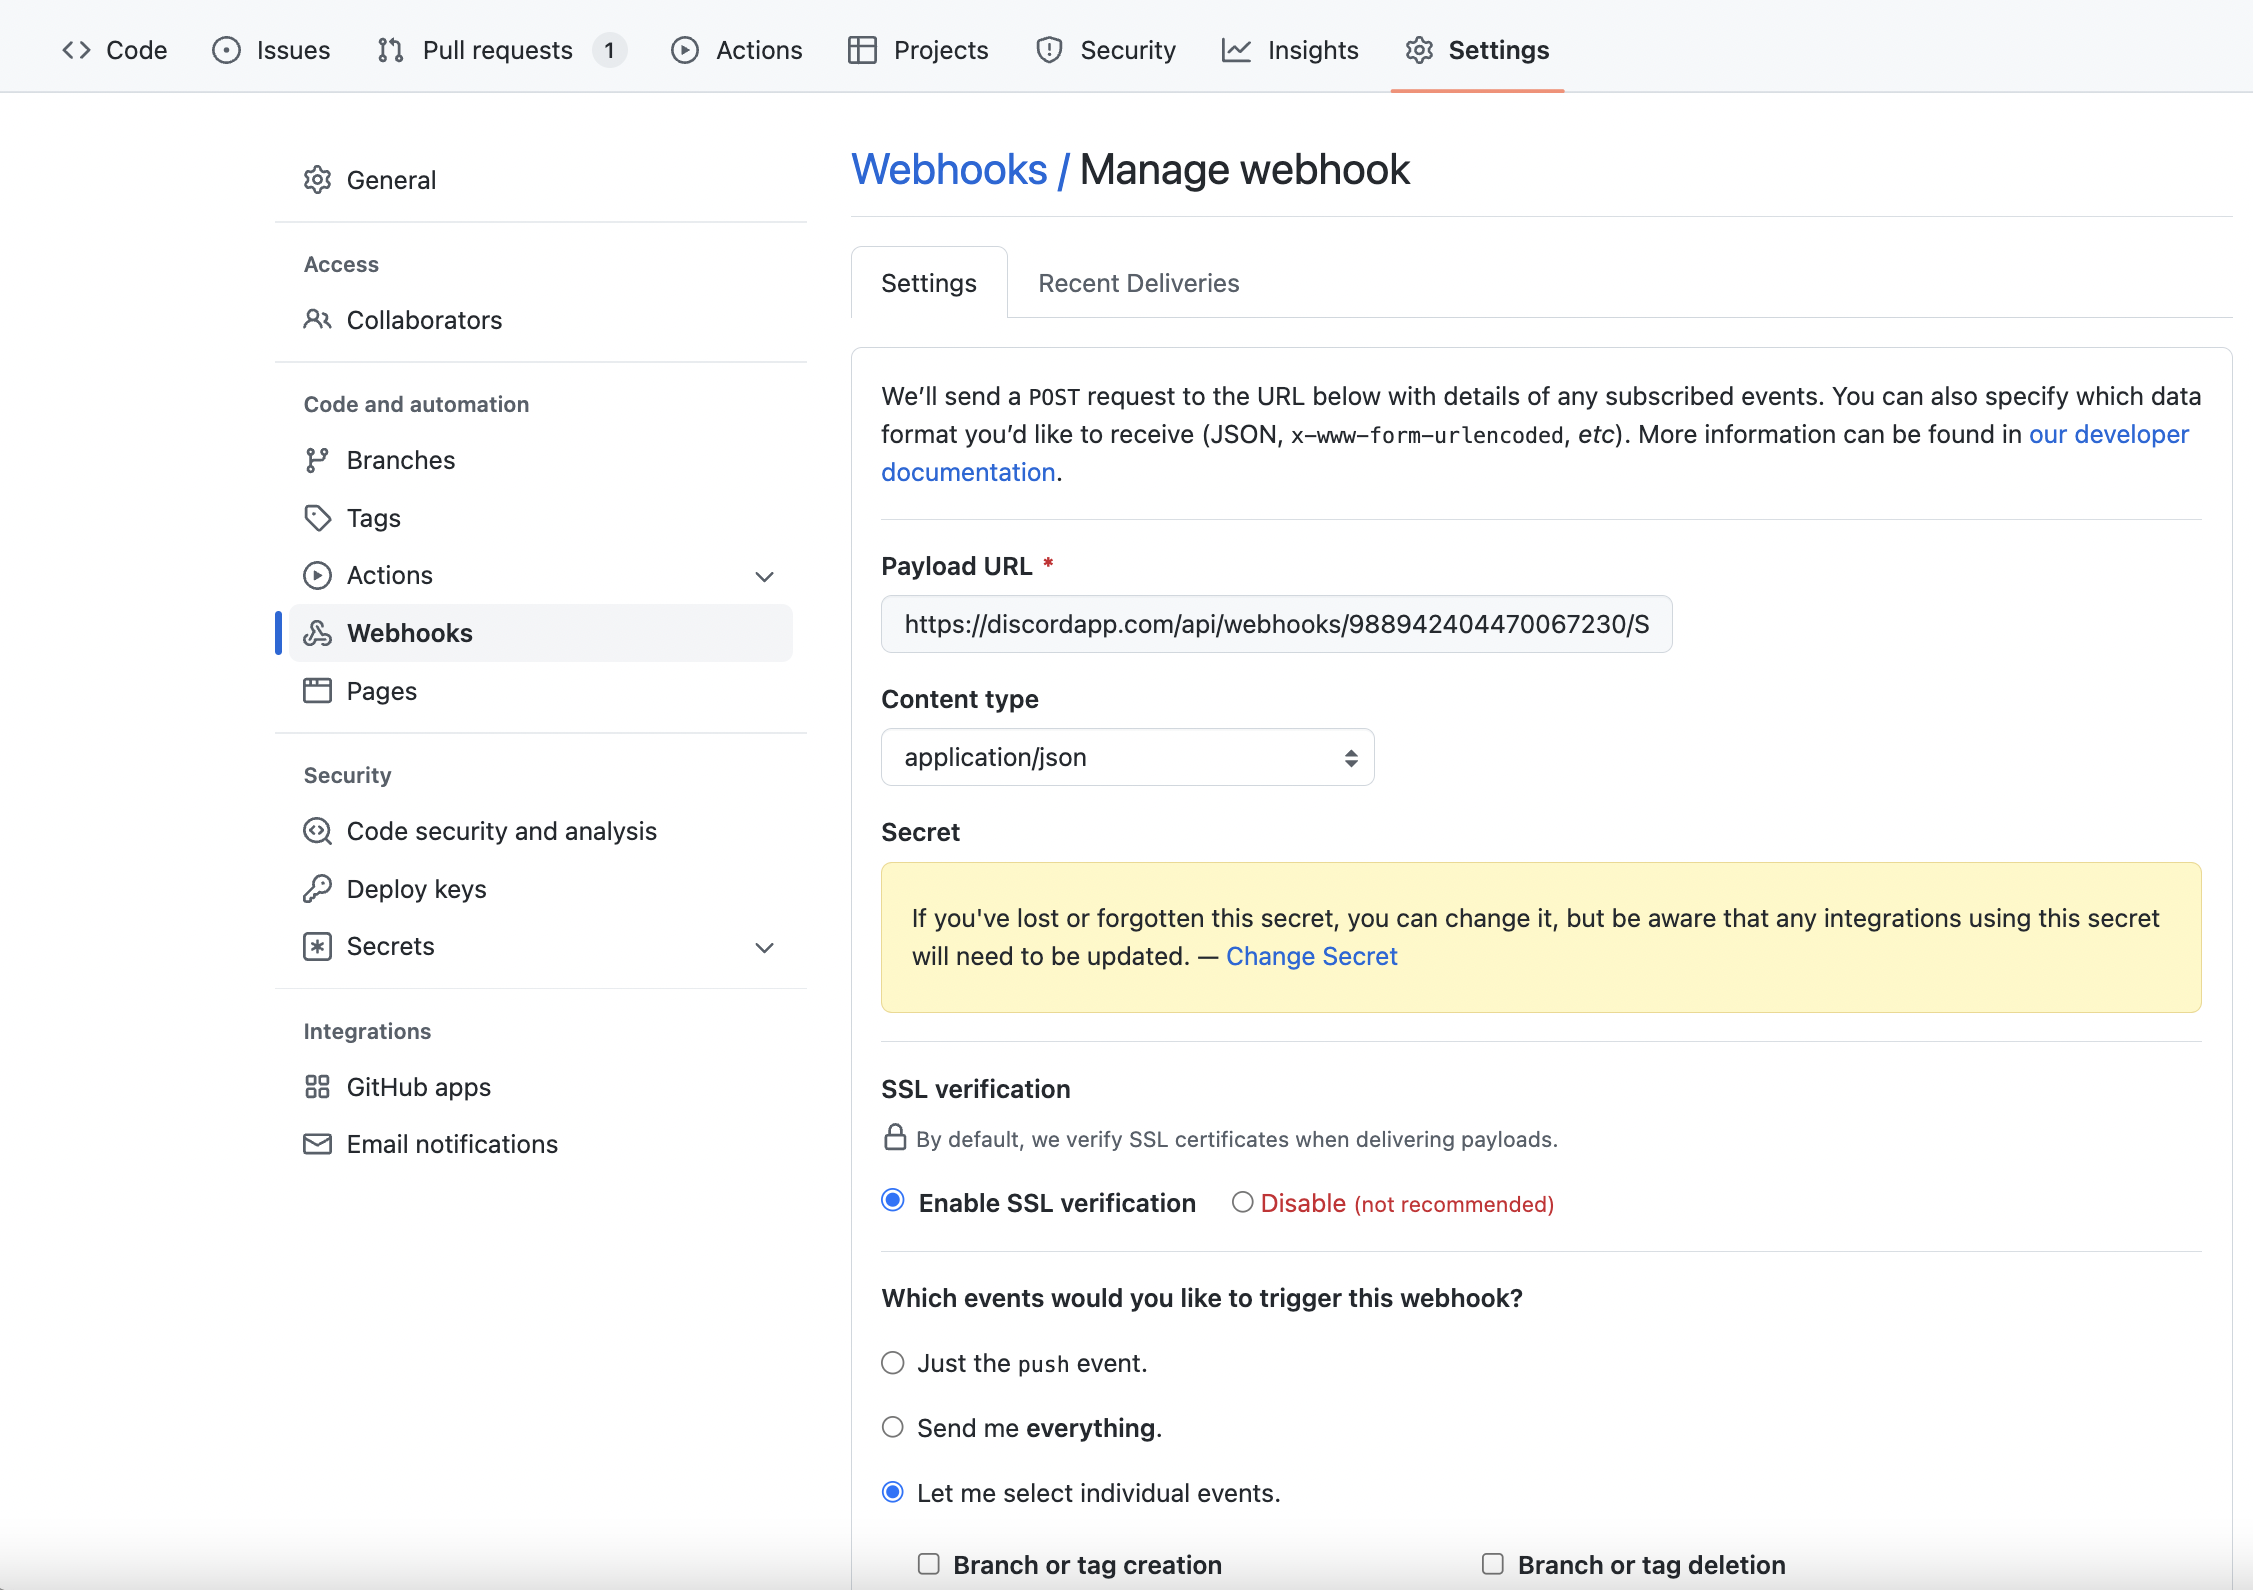
 ### Creating the GitHub Webhook
Go to either the GitHub organization or repository that you wish to recieve release notifications for. You must be the owner of the organization or repository to perform the following steps.
1. Go to the desired GitHub organization/repository, and click **Settings**
2. Click **Webhooks** -> **Add Webhook**
3. Under **Payload URL** , paste in the Discord Webhook URL from before with `/github` appended to the end
4. Under **Content type**, select `application/json`
5. Create a **Secret** and store it in `.env` as `GITHUB_RELEASES_WEBHOOK_SECRET`
6. Select **Let me select individual events** then choose `releases`
7. Click **Add Webhook**
### Creating the GitHub Webhook
Go to either the GitHub organization or repository that you wish to recieve release notifications for. You must be the owner of the organization or repository to perform the following steps.
1. Go to the desired GitHub organization/repository, and click **Settings**
2. Click **Webhooks** -> **Add Webhook**
3. Under **Payload URL** , paste in the Discord Webhook URL from before with `/github` appended to the end
4. Under **Content type**, select `application/json`
5. Create a **Secret** and store it in `.env` as `GITHUB_RELEASES_WEBHOOK_SECRET`
6. Select **Let me select individual events** then choose `releases`
7. Click **Add Webhook**
 ### Configuring an organization membership webhook
Configuring this webhook will remove the Discord `staff` role when members leave your organization.
#### Create the GitHub webhook
You must be the owner of the GitHub organization to perform the following steps.
1. Go to your GitHub organization, and click **Settings** -> **Webhooks** -> **Add Webhook**
2. Under **Payload URL** choose `http:///api/webhooks/github-org-membership`
3. Under **Content type**, select `application/json`
4. Create a **Secret** and store in in `.env` as `GITHUB_ORG_WEBHOOK_SECRET`
5. Select **Let me select individual events** then choose `Organizations`
6. **Add Webhook**
### Configuring a GitHub App
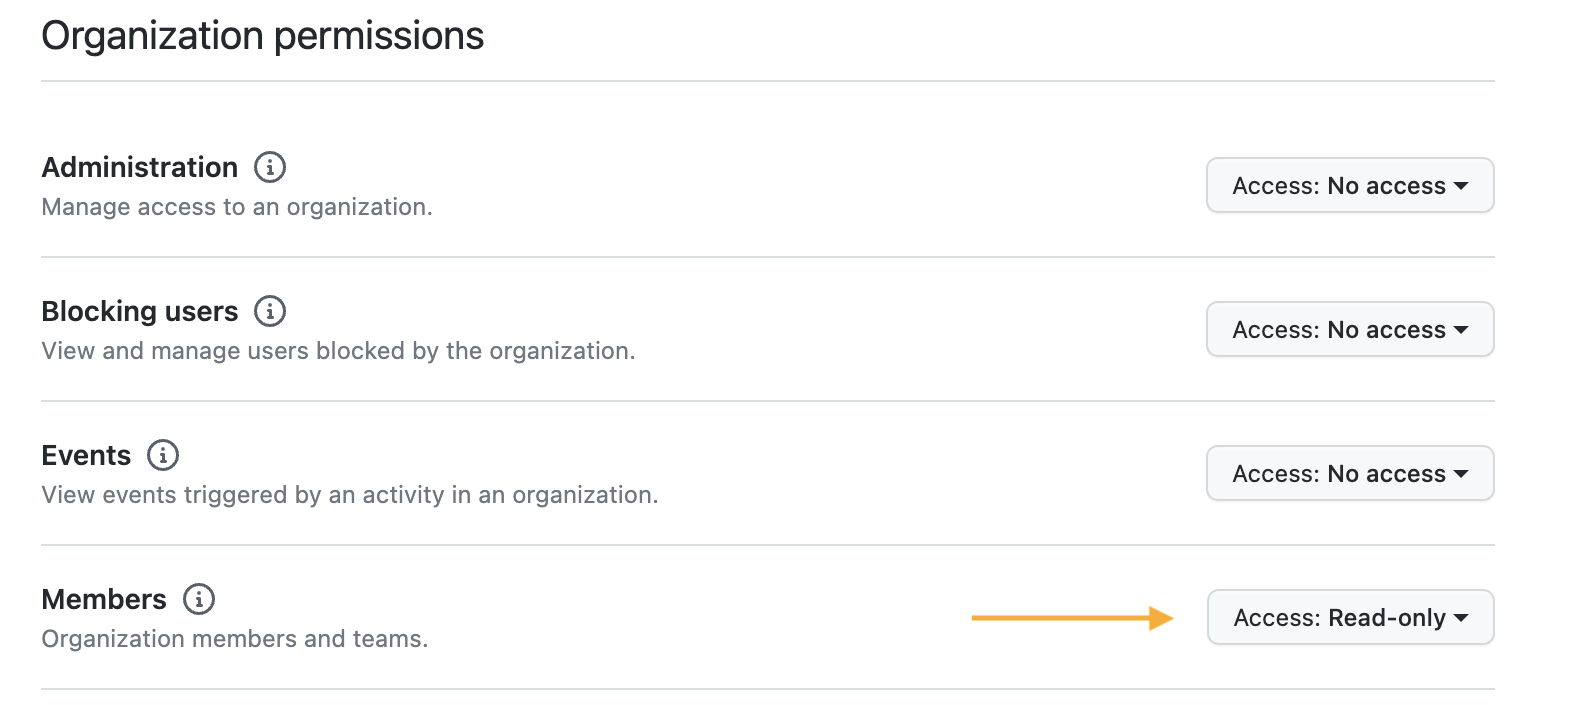
A GitHub App is required to obtain the permissions necessary for many API calls. You must be the owner of the GitHub organization to perform the following steps.
#### Creating the App
1. Go to your GitHub organization, and click **Settings** -> **Developer Settings** -> **GitHub Apps**
2. Select **New GitHub App**
3. For the homepage URL, put in the homepage of your website
4. Under **Callback URL** put `http:///api/auth/callback/github`
5. Select **Expire user authorization tokens** AND **Request user authorization (OAuth) during installation**
6. Under **Webhook** deselect **Active**
7. Scroll down to **Organization Permissions** and under **Members** select `Read-only`
8. **Create GitHub App**
### Configuring an organization membership webhook
Configuring this webhook will remove the Discord `staff` role when members leave your organization.
#### Create the GitHub webhook
You must be the owner of the GitHub organization to perform the following steps.
1. Go to your GitHub organization, and click **Settings** -> **Webhooks** -> **Add Webhook**
2. Under **Payload URL** choose `http:///api/webhooks/github-org-membership`
3. Under **Content type**, select `application/json`
4. Create a **Secret** and store in in `.env` as `GITHUB_ORG_WEBHOOK_SECRET`
5. Select **Let me select individual events** then choose `Organizations`
6. **Add Webhook**
### Configuring a GitHub App
A GitHub App is required to obtain the permissions necessary for many API calls. You must be the owner of the GitHub organization to perform the following steps.
#### Creating the App
1. Go to your GitHub organization, and click **Settings** -> **Developer Settings** -> **GitHub Apps**
2. Select **New GitHub App**
3. For the homepage URL, put in the homepage of your website
4. Under **Callback URL** put `http:///api/auth/callback/github`
5. Select **Expire user authorization tokens** AND **Request user authorization (OAuth) during installation**
6. Under **Webhook** deselect **Active**
7. Scroll down to **Organization Permissions** and under **Members** select `Read-only`
8. **Create GitHub App**
 #### Storing App IDs
Now you should be looking at the settings page for your app.
#### Storing App IDs
Now you should be looking at the settings page for your app.
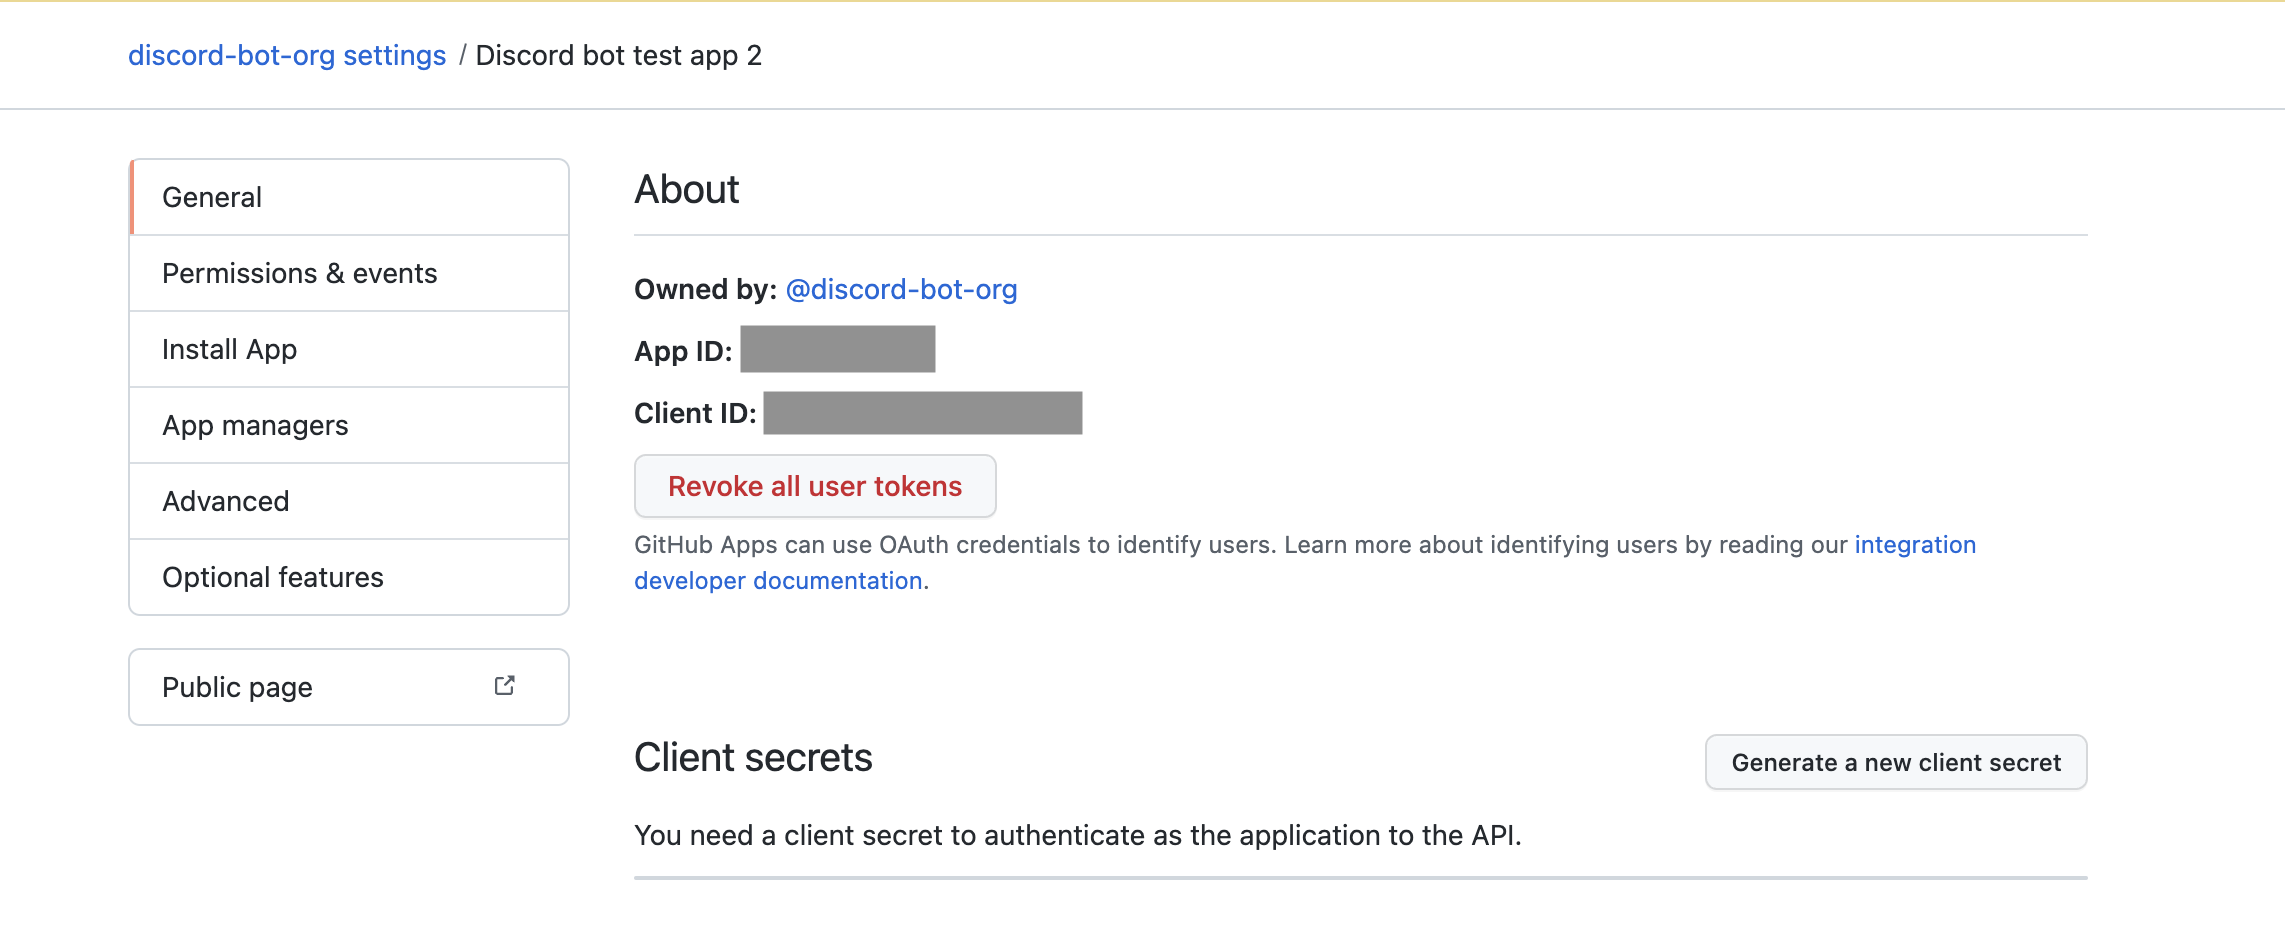 1. Copy the App ID and store in `.env` as `GITHUB_APP_ID`
2. Copy the Client ID and store in `.env` as `GITHUB_CLIENT_ID`
3. Select **Generate a new client secret**, then copy and store in `.env` as `GITHUB_CLIENT_SECRET`
#### Generating a Private Key
1. Scroll to the bottom of the page and select **Generate a private key**
2. Open the terminal on your computer and navigate to the directory that the key was saved to (look for `..private-key.pem`, likely in `~/Downloads`)
3. Run
```text
openssl pkcs8 -topk8 -inform PEM -outform PEM -nocrypt -in .pem -out private-key-pkcs8.key
```
4. Create a variable in `.env` called `GITHUB_PRIVATE_KEY`
5. Delete the original `.pem` file and copy the contents of `private-key-pkcs8.key` into `.env`
6. Wrap the key in double quotes, add a `\n` newline character at each line break, then format the private key to be on one line
7. Store the key like this:
```text
GITHUB_PRIVATE_KEY={"privateKey": "-----BEGIN PRIVATE KEY-----\nMIIEvQIBAadsgG9w0dsagQE...\n-----END PRIVATE KEY-----"}
```
8. Now delete `private-key-pkcs8.key` as well
#### Installing App
1. On the toolbar on the top left side of the screen, navigate to **Install App** (If you cannot see this, you likely do not have the correct organizational permissions)
2. Select the organization that you wish to install the app on and select **Install**
3. GitHub should prompt you to authorize **Read access to members**; select **Install & Authorize**
4. Upon success, you should be redirected to your App's callback url
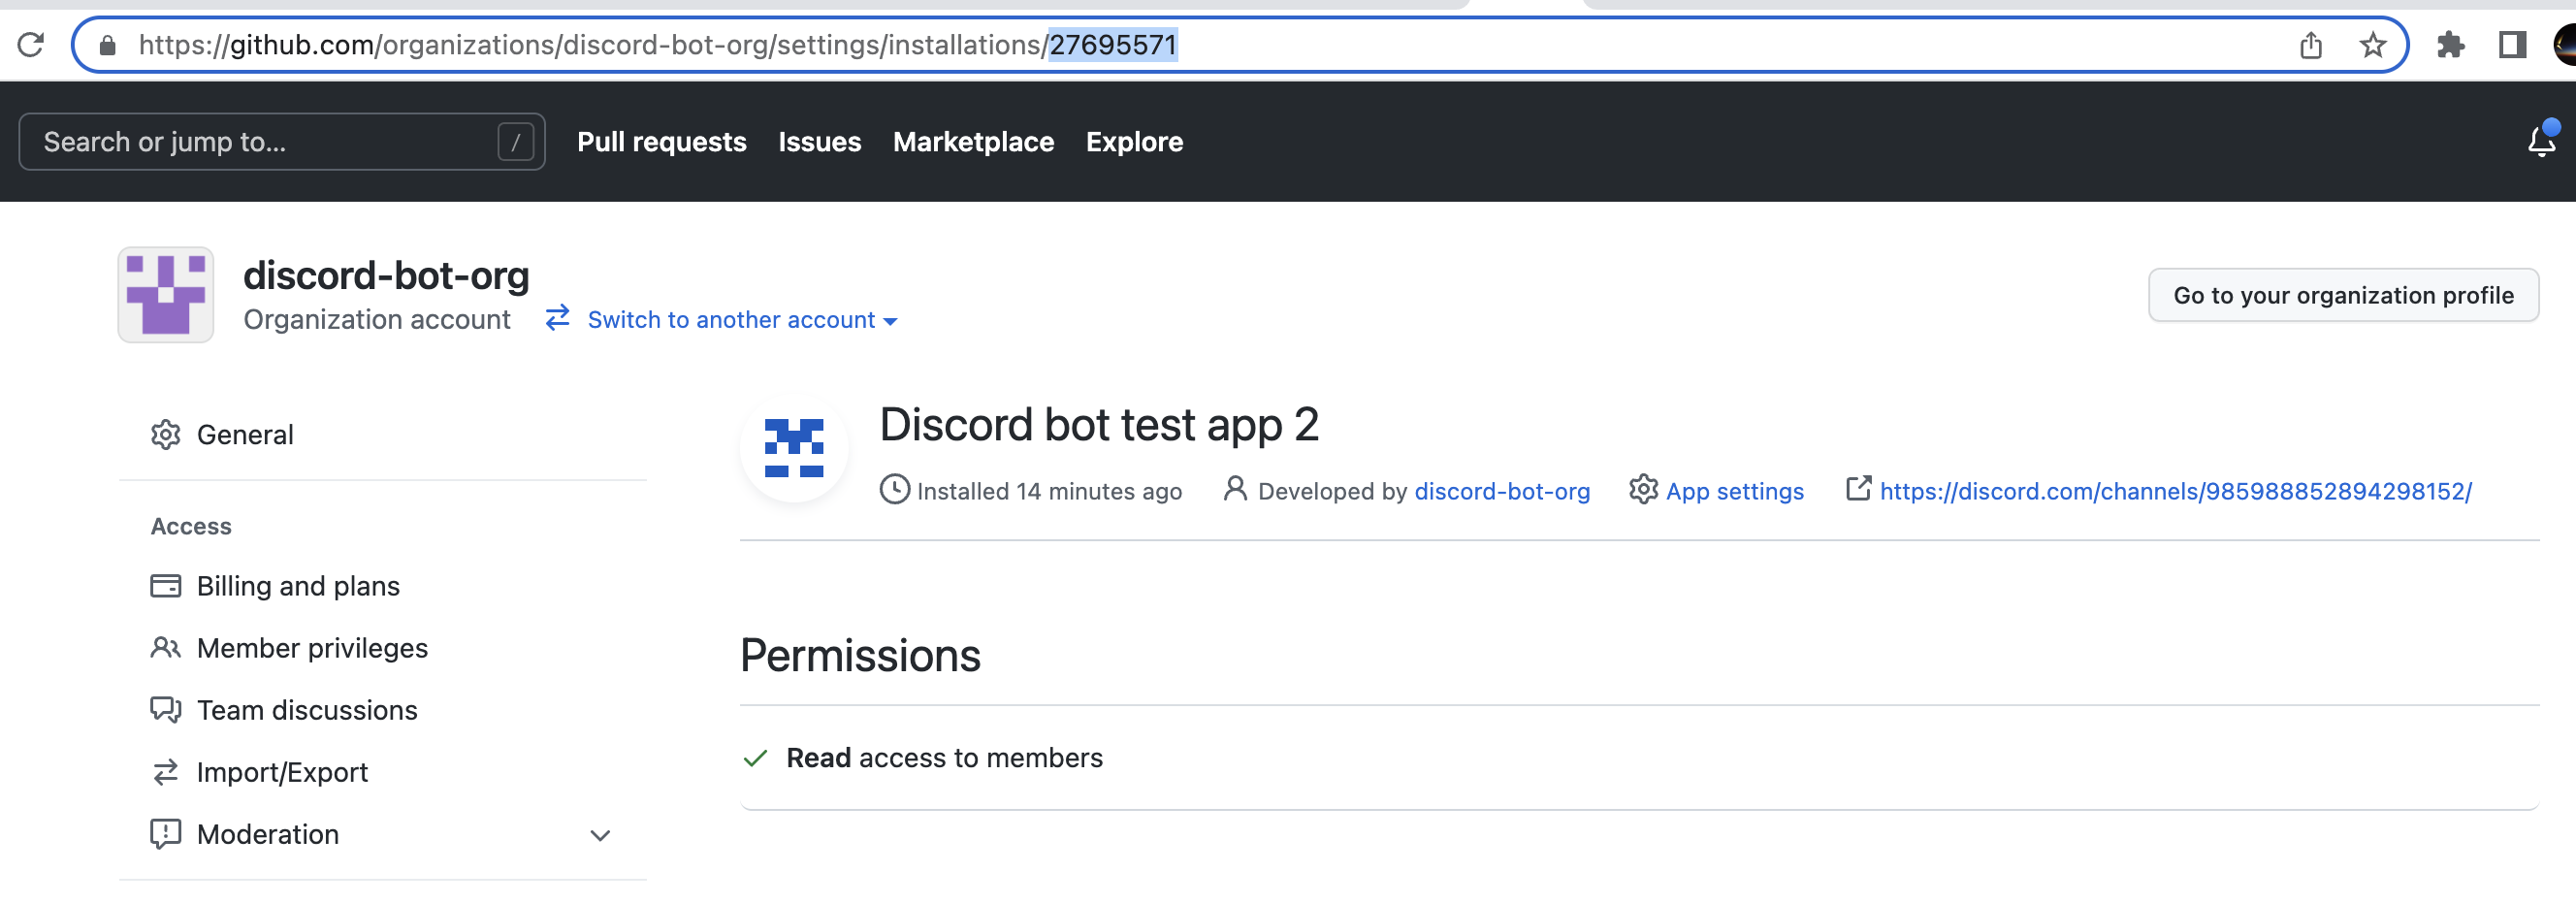
#### Getting Installation ID
1. Finally, go back to your organization's page, and select **Settings** -> **GitHub Apps** (under Integrations)
2. Select the **Configure** button next to the app you just installed
3. The url in your browser should now display the installation ID of your app
```text
github.com/organizations//settings/installations/
```
4. Copy this ID and store in `.env` as `GITHUB_INSTALLATION_ID`
1. Copy the App ID and store in `.env` as `GITHUB_APP_ID`
2. Copy the Client ID and store in `.env` as `GITHUB_CLIENT_ID`
3. Select **Generate a new client secret**, then copy and store in `.env` as `GITHUB_CLIENT_SECRET`
#### Generating a Private Key
1. Scroll to the bottom of the page and select **Generate a private key**
2. Open the terminal on your computer and navigate to the directory that the key was saved to (look for `..private-key.pem`, likely in `~/Downloads`)
3. Run
```text
openssl pkcs8 -topk8 -inform PEM -outform PEM -nocrypt -in .pem -out private-key-pkcs8.key
```
4. Create a variable in `.env` called `GITHUB_PRIVATE_KEY`
5. Delete the original `.pem` file and copy the contents of `private-key-pkcs8.key` into `.env`
6. Wrap the key in double quotes, add a `\n` newline character at each line break, then format the private key to be on one line
7. Store the key like this:
```text
GITHUB_PRIVATE_KEY={"privateKey": "-----BEGIN PRIVATE KEY-----\nMIIEvQIBAadsgG9w0dsagQE...\n-----END PRIVATE KEY-----"}
```
8. Now delete `private-key-pkcs8.key` as well
#### Installing App
1. On the toolbar on the top left side of the screen, navigate to **Install App** (If you cannot see this, you likely do not have the correct organizational permissions)
2. Select the organization that you wish to install the app on and select **Install**
3. GitHub should prompt you to authorize **Read access to members**; select **Install & Authorize**
4. Upon success, you should be redirected to your App's callback url
#### Getting Installation ID
1. Finally, go back to your organization's page, and select **Settings** -> **GitHub Apps** (under Integrations)
2. Select the **Configure** button next to the app you just installed
3. The url in your browser should now display the installation ID of your app
```text
github.com/organizations//settings/installations/
```
4. Copy this ID and store in `.env` as `GITHUB_INSTALLATION_ID`
 ## Deployment
For the deployment we will work primarily in the [`cdk`](./cdk) directory, where the [AWS CDK CLI](https://www.npmjs.com/package/aws-cdk) is installed locally to the package.
1. if not already done, bootstrap the environment with `pnpm cdk bootstrap`
2. ensure we are able to synthesize the stack: `pnpm cdk synth`
1. alternatively we can synthesize an environment-specific stack: `pnpm cdk synth -c env=next`
3. deploy the stack with `pnpm cdk deploy`
### Typical Workflow
Deploy for environment `next`
1. `pnpm cdk synth -c env=next`
2. `pnpm cdk deploy -c env=next`
Destroy resources associated with environment `next`
1. `pnpm cdk destroy -c env=next`
## Testing
Run the tests with `pnpm test`. This will launch Vite in `test` mode, which will load secrets from `.env.test` if it exists. In a CI setting it is recommended to use a separate set of secrets unique to the test flow.
You can also launch a UI for the tests with [`pnpm vitest --ui`](https://vitest.dev/guide/ui.html#vitest-ui)
### Unit Tests
This project supports [in-source testing powered by Vitest](https://vitest.dev/guide/in-source.html). To get started, at the **end of the file** add the following:
```ts
// ... implementation
if (import.meta.vitest) {
const { test } = import.meta.vitest
test.todo('my unit test')
}
```
> **Note**
> in-source testing with Vitest does not tree-shake dependencies, which could lead to ambiguous errors caused by circular references
When `pnpm test` is run from the project root, the newly added test is executed alongside the e2e tests.
## Releasing
1. developer creates a PR from their fork
2. maintainers review and add the `run-ci` label to [run the CI pipeline](./.github/workflows/ci.yml) and get the apporpriate status check
3. after PR requirements are met, maintainers merge to `main`
4. maintainers manually run the [`create-release`](./.github/workflows/create-release.yml) action with the desired version release (major, minor, patch, prerelease)
5. maintainers review and merge the automatically-created PR
6. GitHub Actions run [`release`](./.github/workflows/release.yml) action using the version specified in the PR title
This process uses one branch, `main`, and relies on the created releases and git tags to showcase the latest source code available in each environment (release -> `main` vs prerelease -> `next`).
```mermaid
flowchart TD
dev[staff runs `create-release` action]
createPrerelease[prerelease]
createPatch[patch]
createMinor[minor]
createMajor[major]
dev-->createPrerelease
dev-->createPatch
dev-->createMinor
dev-->createMajor
createPrerelease-->create-release
createPatch-->create-release
createMinor-->create-release
createMajor-->create-release
subgraph create-release["create-release action"]
pnpm[pnpm sets new version based on release type]
releaseBranch[creates release branch]
commitsChanges[commits changes from pnpm]
pushesChanges[pushes changes to branch]
createsPR[creates PR]
releaseCi[CI runs automatically]
pnpm-->releaseBranch
releaseBranch-->commitsChanges
commitsChanges-->pushesChanges
pushesChanges-->createsPR
createsPR-->releaseCi
end
staffReviewReleasePR[staff reviews and merges release PR]
releaseCi-->staffReviewReleasePR
staffReviewReleasePR-->|automatically triggers|releaseAction
subgraph releaseAction[release action]
raVerifyRun["verifies run (see workflow for details)"]
raExtract[extracts version from PR title]
raPrerelease[runs prerelease workflow for `next` env]
raRelease[runs release workflow for `main` env]
raVerifyRun-->|if verified|raExtract
raVerifyRun-->|if not verified|exit
raExtract-->|if prerelease|raPrerelease
raExtract-->|if not prerelease|raRelease
raPrerelease-->|uses|reusableReleaseEnv
raRelease-->|uses|reusableReleaseEnv
subgraph reusableReleaseEnv[reusable release-env workflow]
rrConfigureAws[configure AWS credentials]
rrSetup[setup pnpm, node, install dependencies]
rrCdkSynth[cdk synth with env, version]
rrCdkDeploy[cdk deploy with env, version]
rrGhRelease[GitHub CLI creates release with notes]
rrConfigureAws-->rrSetup
rrSetup-->rrCdkSynth
rrCdkSynth-->rrCdkDeploy
rrCdkDeploy-->rrGhRelease
end
reusableReleaseEnv-->exit
exit
end
releaseAction-->released
released[released]
```
### Creating Secrets in SSM
**[scripts](./packages/scripts)**
Create secrets in SSM Parameter Store with the `scripts` helper! Rename `.env.sample` to `.env.next` and create secrets with the following command:
```bash
pnpm scripts create-secrets -e next
```
**NOTE:** dotenv files are loaded using Vite's `loadEnv` and `local` dotenv files are not supported when creating secrets. Additionally, we must be sure to pass a valid environment name such as `main` or `next`
### Deployment
For the deployment we will work primarily in the [`cdk`](./cdk) directory, where the [AWS CDK CLI](https://www.npmjs.com/package/aws-cdk) is installed locally to the package.
1. if not already done, bootstrap the environment with `pnpm cdk bootstrap`
2. ensure we are able to synthesize the stack: `pnpm cdk synth`
1. alternatively we can synthesize an environment-specific stack: `pnpm cdk synth -c env=next`
3. deploy the stack with `pnpm cdk deploy`
### Docker
Build individual apps using [`docker compose`](https://docs.docker.com/compose/):
- `docker compose up bot --build`
Build manually with:
```shell
docker build -t bot .
```
Run manually with:
```shell
docker run --rm \
--name bot-local
-p 3000:3000 \
bot
```
## Deployment
For the deployment we will work primarily in the [`cdk`](./cdk) directory, where the [AWS CDK CLI](https://www.npmjs.com/package/aws-cdk) is installed locally to the package.
1. if not already done, bootstrap the environment with `pnpm cdk bootstrap`
2. ensure we are able to synthesize the stack: `pnpm cdk synth`
1. alternatively we can synthesize an environment-specific stack: `pnpm cdk synth -c env=next`
3. deploy the stack with `pnpm cdk deploy`
### Typical Workflow
Deploy for environment `next`
1. `pnpm cdk synth -c env=next`
2. `pnpm cdk deploy -c env=next`
Destroy resources associated with environment `next`
1. `pnpm cdk destroy -c env=next`
## Testing
Run the tests with `pnpm test`. This will launch Vite in `test` mode, which will load secrets from `.env.test` if it exists. In a CI setting it is recommended to use a separate set of secrets unique to the test flow.
You can also launch a UI for the tests with [`pnpm vitest --ui`](https://vitest.dev/guide/ui.html#vitest-ui)
### Unit Tests
This project supports [in-source testing powered by Vitest](https://vitest.dev/guide/in-source.html). To get started, at the **end of the file** add the following:
```ts
// ... implementation
if (import.meta.vitest) {
const { test } = import.meta.vitest
test.todo('my unit test')
}
```
> **Note**
> in-source testing with Vitest does not tree-shake dependencies, which could lead to ambiguous errors caused by circular references
When `pnpm test` is run from the project root, the newly added test is executed alongside the e2e tests.
## Releasing
1. developer creates a PR from their fork
2. maintainers review and add the `run-ci` label to [run the CI pipeline](./.github/workflows/ci.yml) and get the apporpriate status check
3. after PR requirements are met, maintainers merge to `main`
4. maintainers manually run the [`create-release`](./.github/workflows/create-release.yml) action with the desired version release (major, minor, patch, prerelease)
5. maintainers review and merge the automatically-created PR
6. GitHub Actions run [`release`](./.github/workflows/release.yml) action using the version specified in the PR title
This process uses one branch, `main`, and relies on the created releases and git tags to showcase the latest source code available in each environment (release -> `main` vs prerelease -> `next`).
```mermaid
flowchart TD
dev[staff runs `create-release` action]
createPrerelease[prerelease]
createPatch[patch]
createMinor[minor]
createMajor[major]
dev-->createPrerelease
dev-->createPatch
dev-->createMinor
dev-->createMajor
createPrerelease-->create-release
createPatch-->create-release
createMinor-->create-release
createMajor-->create-release
subgraph create-release["create-release action"]
pnpm[pnpm sets new version based on release type]
releaseBranch[creates release branch]
commitsChanges[commits changes from pnpm]
pushesChanges[pushes changes to branch]
createsPR[creates PR]
releaseCi[CI runs automatically]
pnpm-->releaseBranch
releaseBranch-->commitsChanges
commitsChanges-->pushesChanges
pushesChanges-->createsPR
createsPR-->releaseCi
end
staffReviewReleasePR[staff reviews and merges release PR]
releaseCi-->staffReviewReleasePR
staffReviewReleasePR-->|automatically triggers|releaseAction
subgraph releaseAction[release action]
raVerifyRun["verifies run (see workflow for details)"]
raExtract[extracts version from PR title]
raPrerelease[runs prerelease workflow for `next` env]
raRelease[runs release workflow for `main` env]
raVerifyRun-->|if verified|raExtract
raVerifyRun-->|if not verified|exit
raExtract-->|if prerelease|raPrerelease
raExtract-->|if not prerelease|raRelease
raPrerelease-->|uses|reusableReleaseEnv
raRelease-->|uses|reusableReleaseEnv
subgraph reusableReleaseEnv[reusable release-env workflow]
rrConfigureAws[configure AWS credentials]
rrSetup[setup pnpm, node, install dependencies]
rrCdkSynth[cdk synth with env, version]
rrCdkDeploy[cdk deploy with env, version]
rrGhRelease[GitHub CLI creates release with notes]
rrConfigureAws-->rrSetup
rrSetup-->rrCdkSynth
rrCdkSynth-->rrCdkDeploy
rrCdkDeploy-->rrGhRelease
end
reusableReleaseEnv-->exit
exit
end
releaseAction-->released
released[released]
```
### Creating Secrets in SSM
**[scripts](./packages/scripts)**
Create secrets in SSM Parameter Store with the `scripts` helper! Rename `.env.sample` to `.env.next` and create secrets with the following command:
```bash
pnpm scripts create-secrets -e next
```
**NOTE:** dotenv files are loaded using Vite's `loadEnv` and `local` dotenv files are not supported when creating secrets. Additionally, we must be sure to pass a valid environment name such as `main` or `next`
### Deployment
For the deployment we will work primarily in the [`cdk`](./cdk) directory, where the [AWS CDK CLI](https://www.npmjs.com/package/aws-cdk) is installed locally to the package.
1. if not already done, bootstrap the environment with `pnpm cdk bootstrap`
2. ensure we are able to synthesize the stack: `pnpm cdk synth`
1. alternatively we can synthesize an environment-specific stack: `pnpm cdk synth -c env=next`
3. deploy the stack with `pnpm cdk deploy`
### Docker
Build individual apps using [`docker compose`](https://docs.docker.com/compose/):
- `docker compose up bot --build`
Build manually with:
```shell
docker build -t bot .
```
Run manually with:
```shell
docker run --rm \
--name bot-local
-p 3000:3000 \
bot
```