1. Navigate to the CloudFormation console by clicking on the **Services** drop-down, typing **CloudFormation** in the search bar, and pressing Enter. 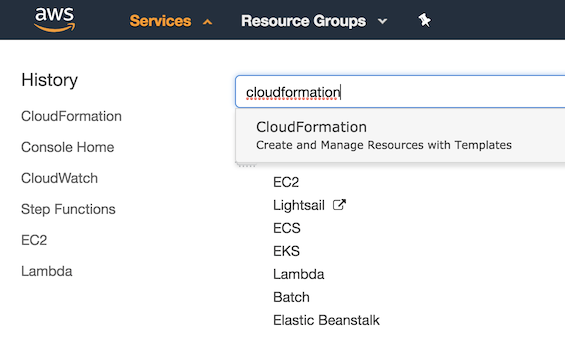 2. Click on **Create stack**. 3. Under **Specify template**, choose **Upload a template file** 5. Upload the file named *step\_1\_es\_ec2proxy\_reinvent\_workshop.yml*. 6. Click **Next**. 7. Enter a **Stack name**. Example: `ebs-es-reinvent` 8. Enter a public CIDR that Kibana will be accessible from. This is the public IP range that you will be accessing the dashboard from. (If you aren't sure, you can find your public IP at https://www.myip.com/ and then append a /32 suffix to it. For example, if your public IP was `1.2.3.4`, you would use: `1.2.3.4/32`. For demo purposes, you can enter the CICR as `0.0.0.0/0`). 9. Click **Next**. 10. If desired, tag the resources by entering `Name` as the Key and `kibana_es_reinvent` as the Value. 11. Click **Next**. 12. Click the check box next to **I acknowledge that AWS CloudFormation might create IAM resources.** 13. Click **Create**. 14. Once you see CREATE_COMPLETE, select the Outputs tab and click on the link for **KibanaURL** to ensure Kibana is accessible and functioning. **Diagram Note:** For demo purposes, an EC2 instance running as Reverse Proxy will be deployed to this cluster to simplify access to the Kibana Console. This is certainly not the recommended method of access especially when you are accessing over the internet. In a production environment, we recommend that you deploy the Amazon Elasticsearch cluster within a private VPC and access only via VPN tunnel, Direct Connect, and/or implement token-based authentication using Cognito. 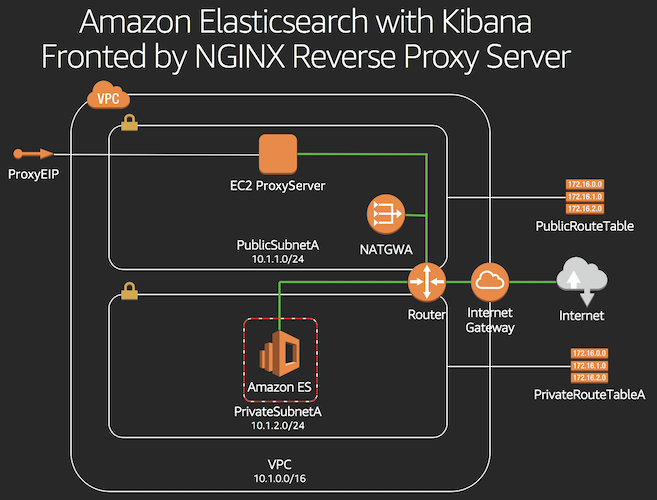
1. Navigate to the CloudFormation console by clicking on the **Services** drop-down, typing **CloudFormation** in the search bar, and pressing Enter. 2. Click on **Create stack**. 3. Under **Specify template**, choose **Upload a template file** 5. Upload the file named *step\_2\_app\_reinvent\_workshop.yml*. 6. Click **Next**. 7. Enter a Stack name, for example: `ebs-app-reinvent` 9. Select one of the two public subnets created in step 1 for the SubnetId parameter. If you aren't sure, navigate to the VPC Management Console, choose Subnets in the left menu and select one of the newly created subnets with the tag "PublicSubnetA" or "PublicSubnetB". 10. Select the VPC created in Step 1 for the VpcId parameter. 11. Click **Next**. 10. If desired, tag the resources by entering `Name` as the Key and `ebs_app_reinvent` as the Value. 11. Click **Next**. 12. Click the check box next to **I acknowledge that AWS CloudFormation might create IAM resources.** 13. Click **Create**.
1. Navigate to the CloudFormation console by clicking on the **Services** drop-down, typing **CloudFormation** in the search bar, and pressing Enter. 2. Click on **Create stack**. 3. Under **Specify template**, choose **Upload a template file** 5. Upload the file named *step\_3\_stepfunctions\_reinvent\_workshop.yml*. 6. Click **Next**. 7. Enter a **Stack name**. Example: `stepfunction-reinvent` 8. Enter the Elasticsearch stack name chosen in Step 1 (sub-step 6) for ESStackName, an SNS topic name (e.g. `sns_es_reinvent`) and an email address for SNS notifications. 9. Click **Next**. 10. If desired, tag the resources by entering `Name` as the Key and `stepfunction_reinvent` as the Value. 11. Click **Next**. 12. Click the check box next to **I acknowledge that AWS CloudFormation might create IAM resources.** 13. Click **Create**. 14. Once the stack is created, you should receive an e-mail confirming the subscription to the SNS topic. Click **Confirm subscription**. 
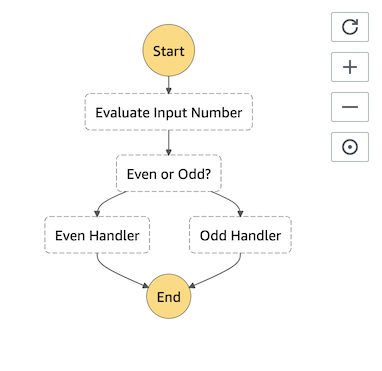
Let us build a sample Step Function to evaluate whether the input number is even or odd. Based on the result, a Choice state will add branching logic.
1. Navigate to the Lambda console by clicking on the **Services** drop-down, typing **Lambda** in the search bar, and pressing Enter.
2. Click on **Create function**.
3. Choose **Author from scratch**.
4. Enter **Name**. Example: `even_odd_evaluator`
5. In the **Runtime** drop-down, select **Node.js 8.10**.
6. In the **Role** drop-down, select **Choose an existing role**.
7. In the **Existing role** drop-down, select **lambda\_basic\_execution**.
8. Click on **Create function**.
9. Paste below code.
```
exports.handler = async (event) => {
if (event.InputNumber % 2 === 0) {
return "even";
} else {
return "odd";
}
};
```
1. Click on **Save**.
2. Repeat above steps to create a second function.
3. Name the function `even_function`, and paste below code.
```
exports.handler = async (event) => {
const response = {
statusCode: 200,
body: JSON.stringify('The input number is even!'),
};
console.log(response);
return response;
};
```
1. Click on **Save**.
2. Repeat above steps to create a third function.
3. Name the function `odd_function`, and paste below code.
```
exports.handler = async (event) => {
const response = {
statusCode: 200,
body: JSON.stringify('The input number is odd!'),
};
console.log(response);
return response;
};
```
1. Let's create the Step Function. Navigate to the Step Functions console by clicking on the **Services** drop-down, typing **Step Functions** in the search bar, and pressing Enter.
1. Click on **Create state machine**.
2. In the **Details** section, Enter **Name** of the state machine. Example: `even_odd_number_step_function`
3. In the **State machine definition** section, paste below code. Be sure to replace \<\
1. Navigate to the CloudWatch Events console by clicking on the **Services** drop-down, typing **CloudWatch** in the search bar, and pressing Enter. 2. In the **Navigation** pane, select **Rules**. 3. Click on **Create rule**. 4. Paste below event rule pattern. ``` { "source": [ "aws.health" ], "detail-type": [ "AWS Health Event" ], "detail": { "service": [ "EBS" ], "eventTypeCategory": [ "issue" ], "eventTypeCode": [ "AWS_EBS_VOLUME_LOST" ] } } ``` 1. Click on **Add target***. 2. Choose **Step Functions state machine**. 3. Select the state machine that you created in Step 2. 4. Choose **Create a new role for this specific resource**. 5. Click on **Configure details**. 6. Enter **Name**. Example: `ebs_events_rule_reinvent` 7. Click on **Create rule**.
1. Navigate to the EC2 console by clicking on the **Services** drop-down, typing **EC2** in the search bar, and pressing Enter.
2. Select the instance created in Step 4, and click on **/dev/xvda** next to Root Device and copy the EBS Volume ID.
**Consider below options to test:**
**Prerequisite:** You need to have the **AWS CLI** installed. Installation instructions can be found [here](https://docs.aws.amazon.com/cli/latest/userguide/installing.html).
1. Navigate to the CloudWatch Events console by clicking on the **Services** drop-down, typing **CloudWatch** in the search bar, and pressing Enter.
2. In the **Navigation** pane, select **Rules**.
3. Click on **Create rule**.
4. Paste below event rule pattern.
```
{
"source": [
"awshealth.mock"
],
"detail-type": [
"AWS Health Event"
],
"detail": {
"service": [
"EBS"
],
"eventTypeCategory": [
"issue"
],
"eventTypeCode": [
"AWS_EBS_VOLUME_LOST"
]
}
}
```
5. Click on **Add target***.
6. Choose **Step Functions state machine**.
7. Select the state machine that you created in Step 2.
8. Choose **Create a new role for this specific resource**.
9. Click on **Configure details**.
10. Enter **Name**. Example: `ebs_mock_events_rule_reinvent `
11. Click on **Create rule**.
12. Create a file named mockpayload.json with below contents. Be sure to replace \<\
1. Navigate to the Step Functions console by clicking on the **Services** drop-down, typing **Step Functions** in the search bar, and pressing Enter.
3. Click on the state machine named **StepFunctionVolumeLost-*** created as part of Step 2.
4. Click on **Start execution**.
4. Paste below payload that CloudWatch Events would pass if EBS volume lost event were to occur. Be sure to replace \<\Option 1: Test by triggering mock CloudWatch event through AWS CLI
Option 2: Test using Step Functions Start execution feature
7. Navigate to the Kibana dashboard from Step 1. 8. Click **Management**. 9. Click **Index Patterns**. 10. Enter * as the index pattern. 11. Click **Next step**. 12. Select **PhdEventTime** from the Time filter drop down. 13. Click **Create Index pattern**. 14. Click **Saved Objects**. 15. Click **Import**. 16. Select the **kibana.json** file provided. 17. Click **Confirm all changes** 18. Click Dashboard 19. Click **PHD Events** 20. At the top right, choose a time frame that will include sub-set 6 above (for example, Last 4 hours)
1. From the AWS Management Console, navigate to the **N. Virginia** (us-east-1) region.
1. Navigate to the Lambda console by clicking on the **Services** drop-down, typing **Lambda** in the search bar, and pressing Enter.
2. Click **Create Function**
3. Enter **Name**. Example: `alexa_ebs_reinvent`
4. Select **Python 3.6** for the Runtime.
1. In the **Role** drop-down, select **Create a custom role**.
1. In the **IAM role** drop-down, select **Create a new IAM role**.
1. In the **Role name** text box, type *alexa\_lambda\_admin\_role\_reinvent*.
2. Click on **View Policy Document**.
3. Click on **Edit**.
1. Paste below policy.
```
{
"Version": "2012-10-17",
"Statement": [
{
"Effect": "Allow",
"Action": "*",
"Resource": "*"
}
]
}
```
1. Click on **Allow**.
2. Click on **Create function**.
8. Paste below code into the function.
```
import json
import datetime
import urllib.request
import dateutil.parser
import math
import os
WELCOME_MESSAGE = ("Welcome to Production Environment! You can ask me about your production environment status!")
EXIT_SKILL_MESSAGE = "Thank you! Enjoy the rest of your summit!"
HELP_MESSAGE = ("I know stuff about your production environment! Ask away!")
STATE_START = "Start"
STATE = STATE_START
date_handler = lambda obj: obj.strftime('%Y-%m-%d %H:%M:%S')
def getLatestPhdEvent():
es = "http://"+os.environ['ES']
index = 'phd-full-events'
query = {
"size": 1,
"sort": [
{
"PhdEventTime": {
"order": "desc"
}
}
]
}
# Elasticsearch Request/Response
payload = json.dumps(query).encode('utf-8') # Encode query for HTTP request
request = urllib.request.Request(es + '/' + index + '/_search', payload, {'Content-Type': 'application/json'}, method='GET') # Build HTTP request
response = urllib.request.urlopen(request).read() # Send Request
response = json.loads(response.decode('utf-8')) # Decode response and convert to JSON
return response['hits']['hits'][0]['_source'] # Return query payload
# --------------- entry point -----------------
def lambda_handler(event, context):
print(event)
""" App entry point """
if event['request']['type'] == "LaunchRequest":
return on_launch()
elif event['request']['type'] == "IntentRequest":
return on_intent(event['request'], event['session'])
elif event['request']['type'] == "SessionEndedRequest":
return on_session_ended(event['request'])
# --------------- response handlers -----------------
def on_intent(request, session):
""" Called on receipt of an Intent """
intent = request['intent']
intent_name = request['intent']['name']
#print("on_intent " +intent_name)
get_state(session)
if 'dialogState' in request:
#delegate to Alexa until dialog sequence is complete
if request['dialogState'] == "STARTED" or request['dialogState'] == "IN_PROGRESS":
print (request['dialogState'])
return dialog_response("", False)
if intent_name == "GetNewEventIntent":
return get_event()
elif intent_name == "AMAZON.HelpIntent":
return do_help()
elif intent_name == "AMAZON.StopIntent":
return do_stop()
elif intent_name == "AMAZON.CancelIntent":
return do_stop()
else:
print("invalid intent reply with help")
return do_help()
def do_stop():
attributes = {"state":globals()['STATE']}
return response(attributes, response_plain_text(EXIT_SKILL_MESSAGE, True))
def do_help():
global STATE
STATE = STATE_START
attributes = {"state":globals()['STATE']}
return response(attributes, response_plain_text(HELP_MESSAGE, True))
def on_launch():
return get_welcome_message()
def on_session_ended(request):
if request['reason']:
end_reason = request['reason']
print("on_session_ended reason: " + end_reason)
def get_state(session):
""" get and set the current state """
global STATE
if 'attributes' in session:
if 'state' in session['attributes']:
STATE = session['attributes']['state']
else:
STATE = STATE_START
else:
STATE = HELP_MESSAGE
# --------------- response string formatters -----------------
def get_welcome_message():
attributes = {"state":globals()['STATE']}
return response(attributes, response_plain_text(WELCOME_MESSAGE, False))
def getDateTimeFromISO8601String(s):
d = dateutil.parser.parse(s)
return d
def get_event():
attributes = {"state":globals()['STATE']}
payload = getLatestPhdEvent()
print(payload)
## Get Time ##
x = payload['PhdEventTime']
timeiso = getDateTimeFromISO8601String(x)
## Convert to AU/Melbourne ##
y = dateutil.parser.parse(x)
meltimeiso = y + datetime.timedelta(hours=int(os.environ['timezonedelta']))
eventtimestr = json.dumps(meltimeiso, default = date_handler)
eventtime = datetime.datetime.strptime(eventtimestr.replace("\"", ""), "%Y-%m-%d %H:%M:%S")
systemname = payload['ResourceStack']['StackName']
eventid = payload['PhdEventId']
recoverytime = payload['RestoredResources']['RestoredVolumes'][0]['CreateTime']
#recoverystatus = payload['NOTIFMESSAGE']['Message']
# Compose Event time
eventdate = str(eventtime.year) + "-" + str(eventtime.month) + "-" + str(eventtime.day)
eventtimestr = str(eventtime.hour) + ":" + str(eventtime.minute)
dtime = datetime.datetime.strptime(eventtimestr, "%H:%M")
eventtime = dtime.strftime("%I:%M %p")
# Find Recovery Time
reventlist = payload['ResourceStack']['StackEvents']
for revent in reventlist:
if revent['ResourceType'] == "AWS::CloudFormation::Stack":
if revent['ResourceStatus'] == "UPDATE_COMPLETE":
rendtime = revent['Timestamp']
endtime = getDateTimeFromISO8601String(rendtime)
diff = endtime - timeiso
diffseconds = diff.total_seconds()
diffhours = diffseconds // 3600
diffminutes = (diffseconds % 3600) // 60
diffseconds = diffseconds % 60
recoveryhours = str(math.ceil(diffhours))
recoveryminutes = str(math.ceil(diffminutes))
recoveryseconds = str(math.ceil(diffseconds))
LATEST_EVENT = ( "On "+ eventdate + " at " + eventtime + "! System " + systemname + " was down! " + "System is now recovered ! " + " Total Recovery time is " + recoveryhours + " hours " + recoveryminutes + " minutes and " + recoveryseconds + " seconds " + "! Please check kibana for recovery details!")
return response(attributes, response_plain_text(LATEST_EVENT, True))
def response(attributes, speech_response):
""" create a simple json response """
return {
'version': '1.0',
'sessionAttributes': attributes,
'response': speech_response
}
def response_plain_text(output, endsession):
""" create a simple json plain text response """
return {
'outputSpeech': {
'type': 'PlainText',
'text': output
},
'shouldEndSession': endsession
}
```
9. Under Environment variables, enter `timezonedelta` as the Key and `-8` as the value.
10. Under Environment variables, enter `ES` as the Key and the `<