## Graph Notebook: easily query and visualize graphs
The graph notebook provides an easy way to interact with graph databases using Jupyter notebooks. Using this open-source Python package, you can connect to any graph database that supports the [Apache TinkerPop](https://tinkerpop.apache.org/), [openCypher](https://github.com/opencypher/openCypher) or the [RDF SPARQL](https://www.w3.org/TR/rdf-sparql-query/) graph models. These databases could be running locally on your desktop or in the cloud. Graph databases can be used to explore a variety of use cases including [knowledge graphs](https://aws.amazon.com/neptune/knowledge-graphs-on-aws/) and [identity graphs](https://aws.amazon.com/neptune/identity-graphs-on-aws/).
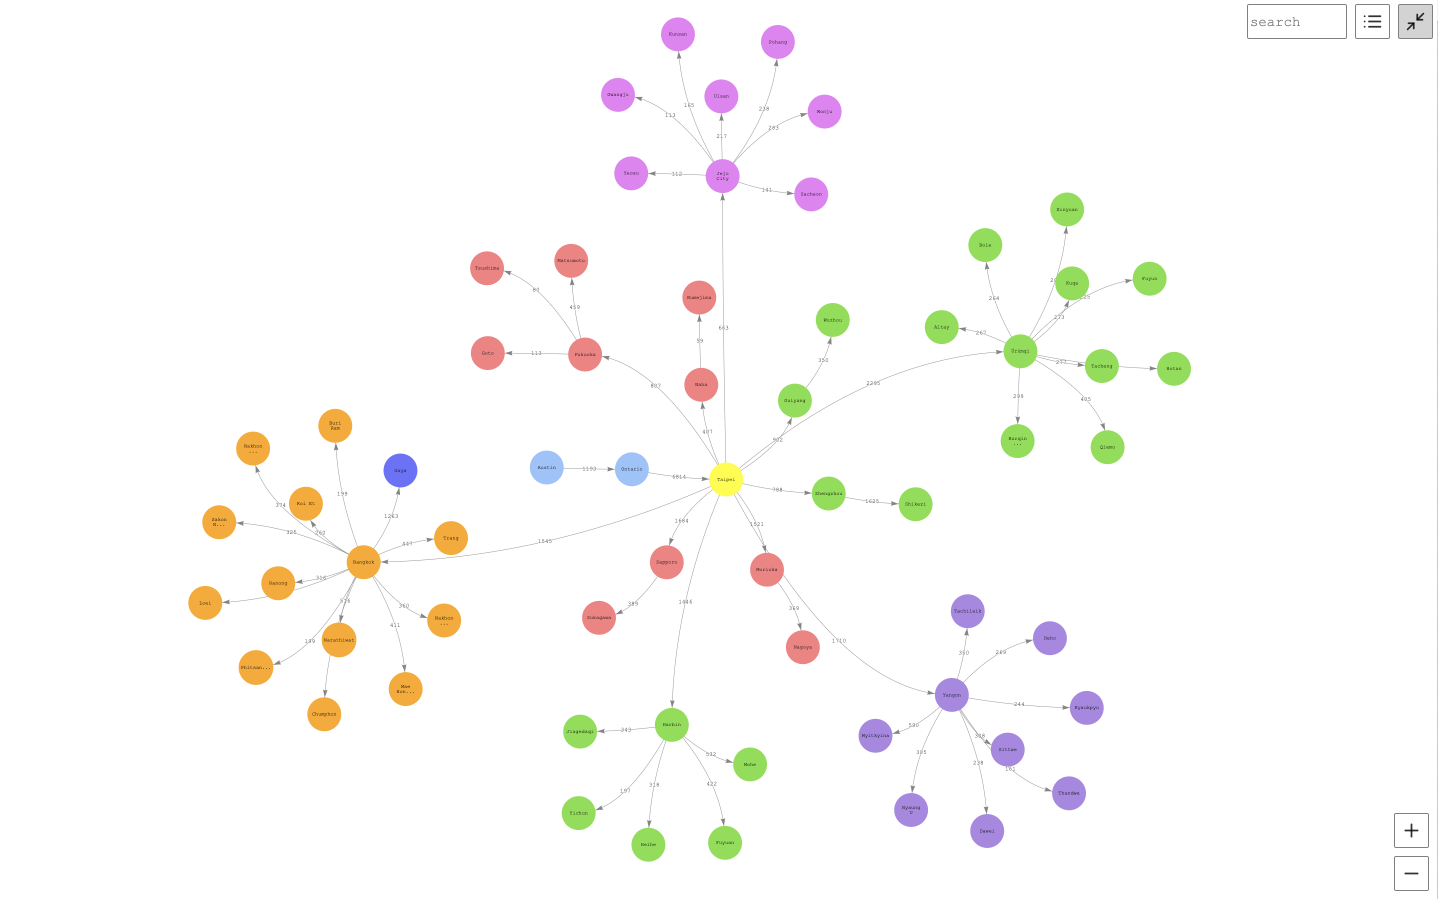
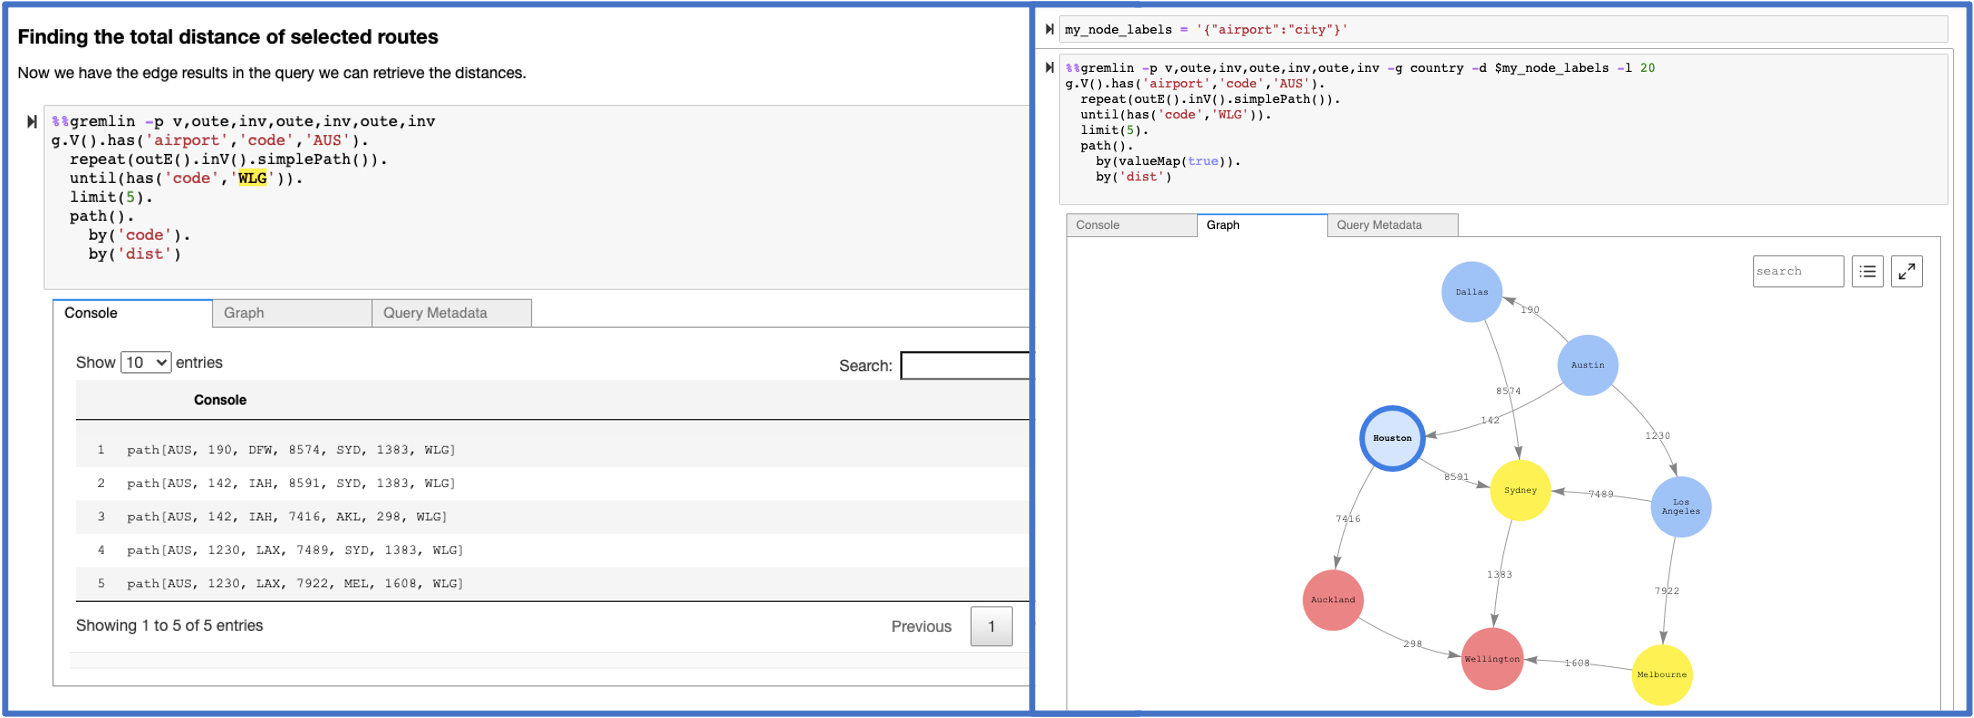
### Visualizing Gremlin queries:
### Visualizing openCypher queries

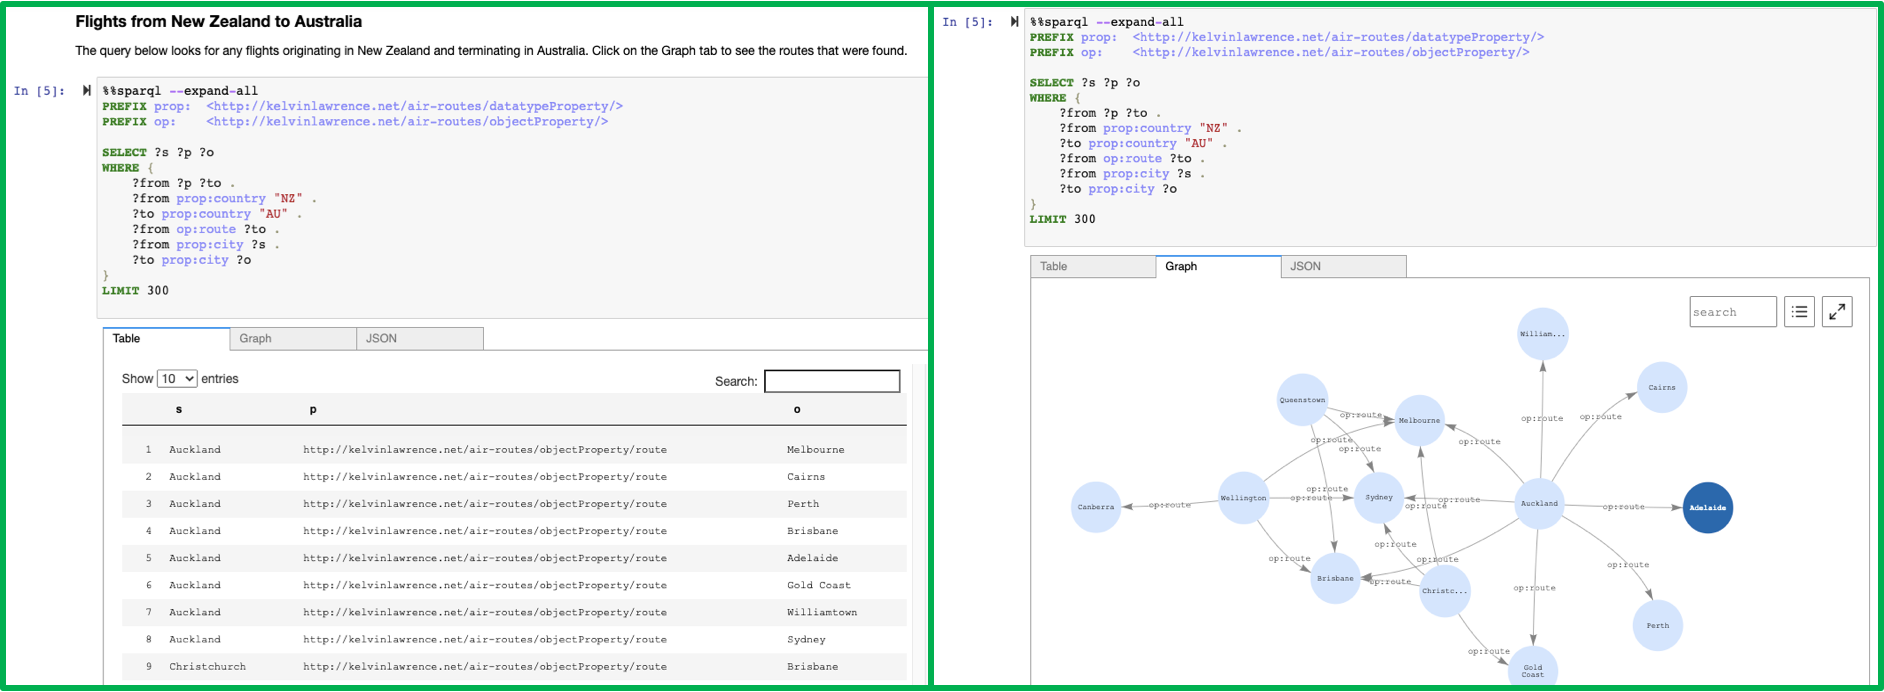
### Visualizing SPARQL queries:
Instructions for connecting to the following graph databases:
| Endpoint | Graph model | Query language |
| :-----------------------------: | :---------------------: | :-----------------: |
|[Gremlin Server](#gremlin-server)| property graph | Gremlin |
| [Blazegraph](#blazegraph) | RDF | SPARQL |
|[Amazon Neptune](#amazon-neptune)| property graph or RDF | Gremlin or SPARQL |
| [Neo4J](#neo4j) | property graph | Cypher |
We encourage others to contribute configurations they find useful. There is an [`additional-databases`](https://github.com/aws/graph-notebook/blob/main/additional-databases) folder where more information can be found.
## Features
#### Notebook cell 'magic' extensions in the IPython 3 kernel
`%%sparql` - Executes a SPARQL query against your configured database endpoint. [Documentation](https://docs.aws.amazon.com/neptune/latest/userguide/notebooks-magics.html#notebooks-cell-magics-sparql)
`%%gremlin` - Executes a Gremlin query against your database using web sockets. The results are similar to those a Gremlin console would return. [Documentation](https://docs.aws.amazon.com/neptune/latest/userguide/notebooks-magics.html#notebooks-cell-magics-gremlin)
`%%opencypher` or `%%oc` Executes an openCypher query against your database. [Documentation](https://docs.aws.amazon.com/neptune/latest/userguide/notebooks-magics.html#notebooks-cell-magics-opencypher)
`%%graph_notebook_config` - Sets the executing notebook's database configuration to the JSON payload provided in the cell body.
`%%graph_notebook_vis_options` - Sets the executing notebook's [vis.js options](https://visjs.github.io/vis-network/docs/network/physics.html) to the JSON payload provided in the cell body.
`%%neptune_ml` - Set of commands to integrate with NeptuneML functionality, as described [here](https://docs.aws.amazon.com/neptune/latest/userguide/notebooks-magics.html#notebooks-line-magics-neptune_ml). [Documentation](https://docs.aws.amazon.com/neptune/latest/userguide/machine-learning.html)
**TIP** :point_right: `%%sparql`, `%%gremlin`, and `%%oc` share a [suite of common arguments](https://docs.aws.amazon.com/neptune/latest/userguide/notebooks-magics.html#notebook-magics-query-args) that be used to customize the appearance of rendered graphs. Example usage of these arguments can also be found in the sample notebooks under [02-Visualization](https://github.com/aws/graph-notebook/tree/main/src/graph_notebook/notebooks/02-Visualization).
**TIP** :point_right: There is syntax highlighting for language query magic cells to help you structure your queries more easily.
#### Notebook line 'magic' extensions in the IPython 3 kernel
`%gremlin_status` - Obtain the status of Gremlin queries. [Documentation](https://docs.aws.amazon.com/neptune/latest/userguide/gremlin-api-status.html)
`%sparql_status` - Obtain the status of SPARQL queries. [Documentation](https://docs.aws.amazon.com/neptune/latest/userguide/sparql-api-status.html)
`%opencypher_status` or `%oc_status` - Obtain the status of openCypher queries. [Documentation](https://docs.aws.amazon.com/neptune/latest/userguide/access-graph-opencypher-status.html)
`%load` - Generate a form to submit a bulk loader job. [Documentation](https://docs.aws.amazon.com/neptune/latest/userguide/bulk-load.html)
`%load_ids` - Get ids of bulk load jobs. [Documentation](https://docs.aws.amazon.com/neptune/latest/userguide/load-api-reference-status-examples.html)
`%load_status` - Get the status of a provided `load_id`. [Documentation](https://docs.aws.amazon.com/neptune/latest/userguide/load-api-reference-status-examples.html)
`%cancel_load` - Cancels a bulk load job. You can either provide a single `load_id`, or specify `--all-in-queue` to cancel all queued (and not actively running) jobs. [Documentation](https://docs.aws.amazon.com/neptune/latest/userguide/load-api-reference-cancel.html)
`%neptune_ml` - Set of commands to integrate with NeptuneML functionality, as described [here](https://docs.aws.amazon.com/neptune/latest/userguide/notebooks-magics.html#notebooks-cell-magics-neptune_ml). You can find a set of tutorial notebooks [here](https://github.com/aws/graph-notebook/tree/main/src/graph_notebook/notebooks/04-Machine-Learning).
[Documentation](https://docs.aws.amazon.com/neptune/latest/userguide/machine-learning.html)
`%status` - Check the Health Status of the configured host endpoint. [Documentation](https://docs.aws.amazon.com/neptune/latest/userguide/access-graph-status.html)
`%seed` - Provides a form to add data to your graph, using sets of insert queries instead of a bulk loader. Sample RDF and Property Graph data models are provided with this command. Alternatively, you can select a language type and provide a file path(or a directory path containing one or more of these files) to load the queries from.
`%stream_viewer` - Interactively explore the Neptune CDC stream (if enabled)
`%graph_notebook_config` - Returns a JSON payload that contains connection information for your host.
`%graph_notebook_host` - Set the host endpoint to send queries to.
`%graph_notebook_version` - Print the version of the `graph-notebook` package
`%graph_notebook_vis_options` - Print the Vis.js options being used for rendered graphs
**TIP** :point_right: You can list all the magics installed in the Python 3 kernel using the `%lsmagic` command.
**TIP** :point_right: Many of the magic commands support a `--help` option in order to provide additional information.
## Example notebooks
This project includes many example Jupyter notebooks. It is recommended to explore them. All of the commands and features supported by `graph-notebook` are explained in detail with examples within the sample notebooks. You can find them [here](./src/graph_notebook/notebooks/). As this project has evolved, many new features have been added. If you are already familiar with graph-notebook but want a quick summary of new features added, a good place to start is the Air-Routes notebooks in the [02-Visualization](./src/graph_notebook/notebooks/02-Visualization) folder.
## Keeping track of new features
It is recommended to check the [ChangeLog.md](ChangeLog.md) file periodically to keep up to date as new features are added.
## Prerequisites
You will need:
* [Python](https://www.python.org/downloads/) 3.7.x-3.10.11
* A graph database that provides one or more of:
* A SPARQL 1.1 endpoint
* An Apache TinkerPop Gremlin Server compatible endpoint
* An endpoint compatible with openCypher
## Installation
Begin by installing `graph-notebook` and its prerequisites, then follow the remaining instructions for either Jupyter Classic Notebook or JupyterLab.
```
# install the package
pip install graph-notebook
```
### Jupyter Classic Notebook
```
# Enable the visualization widget
jupyter nbextension enable --py --sys-prefix graph_notebook.widgets
# copy static html resources
python -m graph_notebook.static_resources.install
python -m graph_notebook.nbextensions.install
# copy premade starter notebooks
python -m graph_notebook.notebooks.install --destination ~/notebook/destination/dir
# create nbconfig file and directory tree, if they do not already exist
mkdir ~/.jupyter/nbconfig
touch ~/.jupyter/nbconfig/notebook.json
# start jupyter notebook
python -m graph_notebook.start_notebook --notebooks-dir ~/notebook/destination/dir
```
### JupyterLab 3.x
```
# install jupyterlab
pip install "jupyterlab>=3,<4"
# copy premade starter notebooks
python -m graph_notebook.notebooks.install --destination ~/notebook/destination/dir
# start jupyterlab
python -m graph_notebook.start_jupyterlab --jupyter-dir ~/notebook/destination/dir
```
#### Loading magic extensions in JupyterLab
When attempting to run a line/cell magic on a new notebook in JupyterLab, you may encounter the error:
```
UsageError: Cell magic `%%graph_notebook_config` not found.
```
To fix this, run the following command, then restart JupyterLab.
```
python -m graph_notebook.ipython_profile.configure_ipython_profile
```
Alternatively, the magic extensions can be manually reloaded for a single notebook by running the following command in any empty cell.
```
%load_ext graph_notebook.magics
```
## Upgrading an existing installation
```
# upgrade graph-notebook
pip install graph-notebook --upgrade
```
After the above command completes, rerun the commands given at [Jupyter Classic Notebook](#jupyter-classic-notebook) or [JupyterLab 3.x](#jupyterlab-3x) based on which flavour is installed.
## Connecting to a graph database
### Gremlin Server
In a new cell in the Jupyter notebook, change the configuration using `%%graph_notebook_config` and modify the fields for `host`, `port`, and `ssl`. Optionally, modify `traversal_source` if your graph traversal source name differs from the default value, `username` and `password` if required by the graph store, or `message_serializer` for a specific data transfer format. For a local Gremlin server (HTTP or WebSockets), you can use the following command:
```
%%graph_notebook_config
{
"host": "localhost",
"port": 8182,
"ssl": false,
"gremlin": {
"traversal_source": "g",
"username": "",
"password": "",
"message_serializer": "graphsonv3"
}
}
```
To setup a new local Gremlin Server for use with the graph notebook, check out [`additional-databases/gremlin server`](additional-databases/gremlin-server)
### Blazegraph
Change the configuration using `%%graph_notebook_config` and modify the fields for `host`, `port`, and `ssl`. For a local Blazegraph database, you can use the following command:
```
%%graph_notebook_config
{
"host": "localhost",
"port": 9999,
"ssl": false,
"sparql": {
"path": "sparql"
}
}
```
You can also make use of namespaces for Blazegraph by specifying the path `graph-notebook` should use when querying your SPARQL like below:
```
%%graph_notebook_config
{
"host": "localhost",
"port": 9999,
"ssl": false,
"sparql": {
"path": "blazegraph/namespace/foo/sparql"
}
}
```
This will result in the url `localhost:9999/blazegraph/namespace/foo/sparql` being used when executing any `%%sparql` magic commands.
To setup a new local Blazegraph database for use with the graph notebook, check out the [Quick Start](https://github.com/blazegraph/database/wiki/Quick_Start) from Blazegraph.
### Amazon Neptune
Change the configuration using `%%graph_notebook_config` and modify the defaults as they apply to your Neptune cluster:
```
%%graph_notebook_config
{
"host": "your-neptune-endpoint",
"port": 8182,
"auth_mode": "DEFAULT",
"load_from_s3_arn": "",
"ssl": true,
"ssl_verify": true,
"aws_region": "your-neptune-region"
}
```
To setup a new Amazon Neptune cluster, check out the [Amazon Web Services documentation](https://docs.aws.amazon.com/neptune/latest/userguide/manage-console-launch.html).
When connecting the graph notebook to Neptune, make sure you have a network setup to communicate to the VPC that Neptune runs on. If not, you can follow [this guide](https://github.com/aws/graph-notebook/tree/main/additional-databases/neptune).
## Authentication (Amazon Neptune)
If you are running a SigV4 authenticated endpoint, ensure that your configuration has `auth_mode` set to `IAM`:
```
%%graph_notebook_config
{
"host": "your-neptune-endpoint",
"port": 8182,
"auth_mode": "IAM",
"load_from_s3_arn": "",
"ssl": true,
"ssl_verify": true,
"aws_region": "your-neptune-region"
}
```
Additionally, you should have the following Amazon Web Services credentials available in a location accessible to Boto3:
- Access Key ID
- Secret Access Key
- Default Region
- Session Token (OPTIONAL. Use if you are using temporary credentials)
These variables must follow a specific naming convention, as listed in the [Boto3 documentation](https://boto3.amazonaws.com/v1/documentation/api/latest/guide/configuration.html#using-environment-variables)
A list of all locations checked for Amazon Web Services credentials can also be found [here](https://boto3.amazonaws.com/v1/documentation/api/latest/guide/credentials.html#configuring-credentials).
### Neo4J
Change the configuration using `%%graph_notebook_config` and modify the fields for `host`, `port`, `ssl`, and `neo4j` authentication.
If your Neo4J instance supports [multiple databases](https://neo4j.com/developer/manage-multiple-databases/), you can specify a database name via the `database` field. Otherwise, leave the `database` field blank to query the default database.
For a local Neo4j Desktop database, you can use the following command:
```
%%graph_notebook_config
{
"host": "localhost",
"port": 7687,
"ssl": false,
"neo4j": {
"username": "neo4j",
"password": "password",
"auth": true,
"database": ""
}
}
```
Ensure that you also specify the `%%oc bolt` option when submitting queries to the Bolt endpoint.
To setup a new local Neo4J Desktop database for use with the graph notebook, check out the [Neo4J Desktop User Interface Guide](https://neo4j.com/developer/neo4j-desktop/).
## Building From Source
A pre-release distribution can be built from the graph-notebook repository via the following steps:
```
# 1) Clone the repository and navigate into the clone directory
git clone https://github.com/aws/graph-notebook.git
cd graph-notebook
# 2) Create a new virtual environment
# 2a) Option 1 - pyenv
pyenv install 3.10.11 # Only if not already installed; this can be any supported Python 3 version in Prerequisites
pyenv virtualenv 3.10.11 build-graph-notebook
pyenv local build-graph-notebook
# 2b) Option 2 - venv
rm -rf /tmp/venv
python3 -m venv /tmp/venv
source /tmp/venv/bin/activate
# 3) Install build dependencies
pip install --upgrade pip setuptools wheel twine
pip install "jupyterlab>=3,<4"
# 4) Build the distribution
python3 setup.py bdist_wheel
```
You should now be able to find the built distribution at
`./dist/graph_notebook-3.8.2-py3-none-any.whl`
And use it by following the [installation](https://github.com/aws/graph-notebook#installation) steps, replacing
```
pip install graph-notebook
```
with
```
pip install ./dist/graph_notebook-3.8.2-py3-none-any.whl
```
## Contributing Guidelines
See [CONTRIBUTING](https://github.com/aws/graph-notebook/blob/main/CONTRIBUTING.md) for more information.
## License
This project is licensed under the Apache-2.0 License.